Stuffing or Dressing?

This time of year, everyone seems to be planning for Thanksgiving. Most of that planning is around the dinner. There are people who make stuffing and those who make dressing. The difference between the two, is where you cook it.
When you stuff the bird, it is stuffing. Cooked outside of the turkey, it is dressing. Over the years I’ve had a lot of variations on both. My Mom always bought Pepperidge Farm stuffing mix as a base. The she added onions, celery, sausage and sometimes mushrooms. She also made a pretty darn good cornbread stuffing. I tend to use a good quality bread, often homemade, that I toast and combine with veggies and stock and then bake as dressing.
I love stuffing, too. The only problem is that by stuffing the bird you must increase the cooking time to be sure the stuffing has reached a safe internal temperature ( 165 degrees). I prefer to stuff smaller birds, like chicken, where the cooking time isn’t as long. We always had stuffing when I was little. Eventually Mom switched over to dressing to make it faster to cook the bird. Keep in mind, my family normally had turkeys that weighed over 25 pounds. The cooking time for a stuffed bird of that size is pretty long.
There are also people who add eggs to their stuffing/dressing. That wasn’t something I’ve done. It is something I need to try at some point. They swear by the moistness and texture of their recipe. I will admit to being intrigued. It reminds me of making bread pudding. I love the texture of bread pudding.
So how do you make your stuffing/dressing? Eggs, no eggs? In the bird or out? I love to hear what others are doing. I have my recipe, which I will share with you, but I am open to trying something new.
Dressing/Stuffing
Basic Bread Stuffing/ Dressing
1 c. sliced mushrooms
¾ c. diced celery
3 T. minced onions
2 T. chopped parsley
4 T. butter or margarine
4-5 c. bread cubes
salt and pepper to taste
¼ – ½ c. turkey or chicken broth if making dressing
Sauté vegetables in butter until tender. Add bread and seasonings and toss to coat. Stuff into turkey just before cooking or add broth and place in covered casserole, cooking for 45 minutes to an hour at 350 degrees. When making stuffing allow ¾ c. per pound of turkey. You may want to stuff the bird and still make extra dressing for the next day. When making dressing be sure to cover the pan well to keep the dressing from drying out.
Variations:
Oyster dressing: Add 12 ounces of oysters, cooked in their own liquid for 3 minutes and drained to the stuffing. For the dressing you may want to reserve some of the cooking liquid and add it in place of turkey broth.
Cornbread Stuffing: Omit bread cubes and add 4-5 cups of cornbread crumbs.
Fruit Stuffing: Omit parsley and add 1 ½ c. chopped tart apples and ½ c. chopped prunes.
Sausage: Add 1 cup cooked and crumbled sausage
Of course there is always the prepared stuffing mixes on shelves everywhere. I make no judgements. Time is a precious commodity. If you are going to use Pepperidge Farm or any of the other dry mixes watch what liquid you use as the mixes tend to be saltier and adding broth could make them too salty. Also when you use pre-seasoned mixes, add the same vegetables you would have added to homemade for a better taste. My mom always uses the Pepperidge Farm stuffing mix and by the time she adds all of her little touches it tastes great.
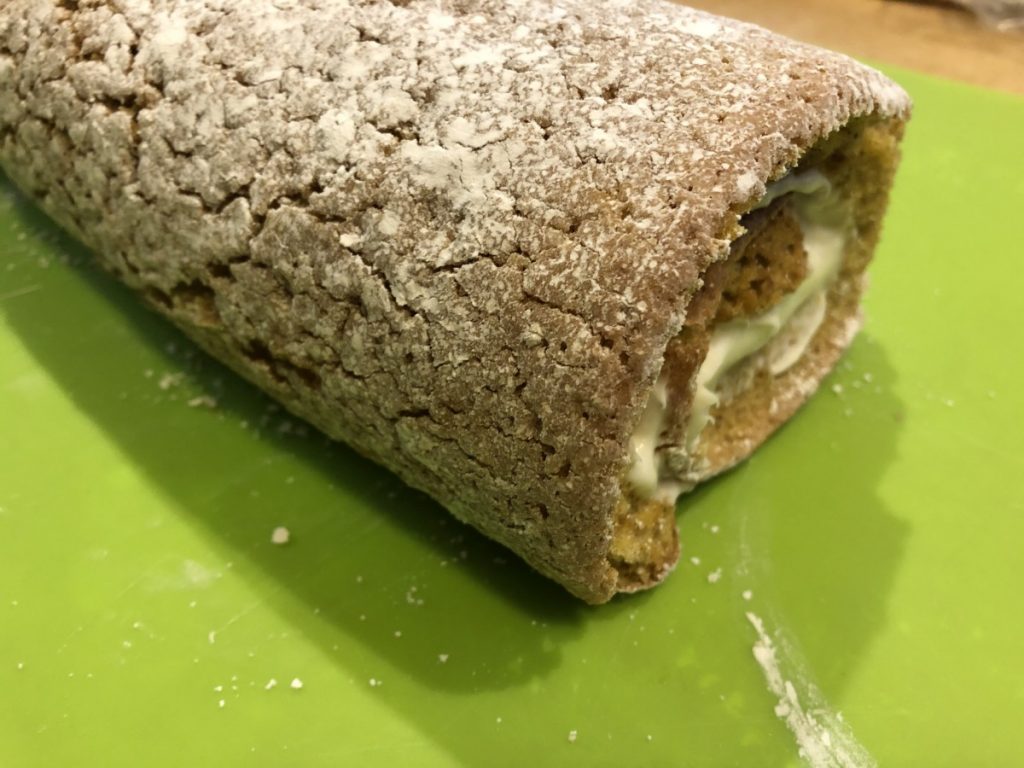
Pumpkin Cake Roll

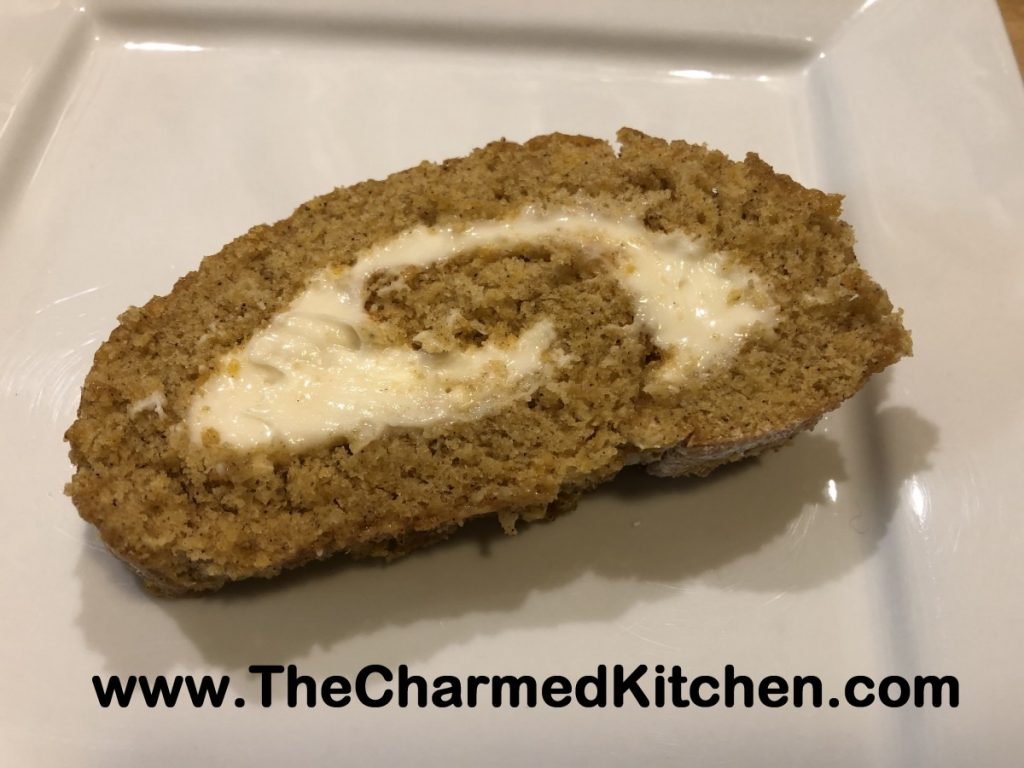
This is one of my favorite desserts. A soft pumpkin cake, lightly spiced, rolled around a cream cheese filling. Not just tasty, it’s pretty, too.
I have several variations of this recipe and decided to make the “simple” one last night. It mixes up in no time and rolls up easily. I like the combination of spices, too. It also freezes well. You can make a couple of them and pop them in the freezer, so you always have dessert when needed. This recipe makes one cake, but can easily be doubled. These make nice gifts, too.
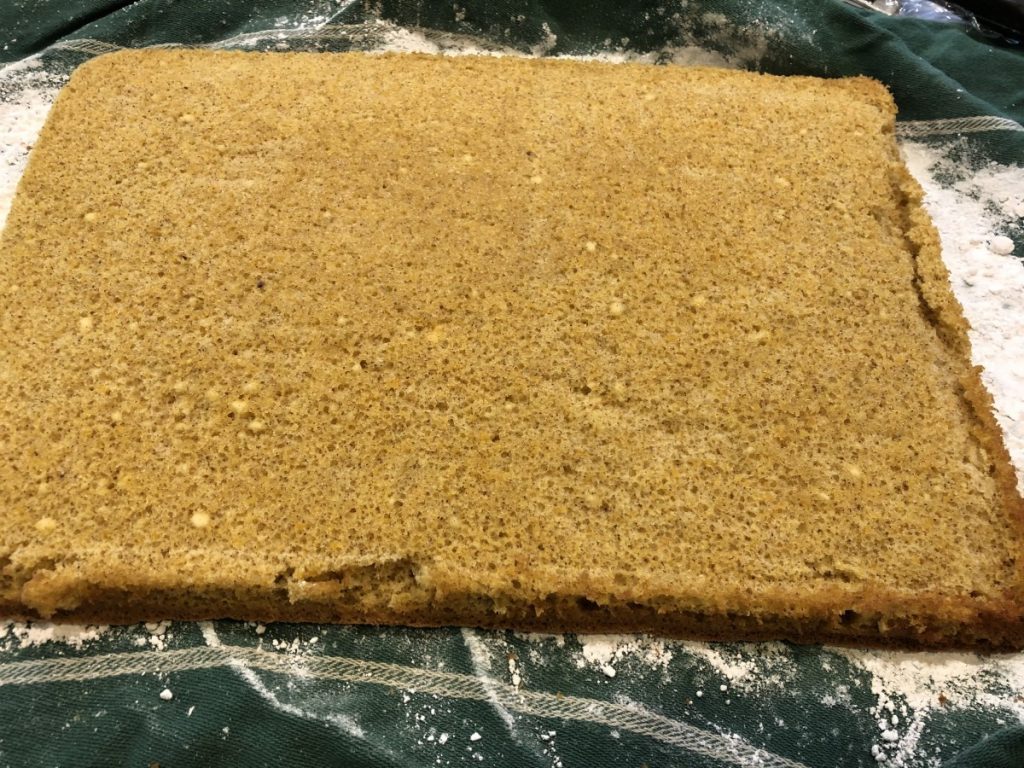
It is baked in a small jelly roll pan, the 10×15-inch size. Don’t freak out when you put the batter in the pan. It will fill it right up to the top. The cake doesn’t rise much, so it works.
Pumpkin Cake Roll
3 Eggs
1 cup Sugar
2/3 cup Pumpkin puree
1 teaspoon Lemon juice
3/4 cup All-purpose flour
1 teaspoon Baking powder
2 teaspoons Cinnamon
1 teaspoon Ginger
1/2 teaspoon Nutmeg
1/2 teaspoon Salt
Filling:
8 ounces Cream cheese — softened
4 tablespoons Butter
1 cup Powdered sugar
1/2 teaspoon Vanilla
In large bowl, combine eggs and sugar, beating with an electric mixer until thick and light yellow in color. Add pumpkin and lemon juice, mixing until blended. In separate bowl, combine flour, baking powder, spices and salt. Add to egg mixture, mixing well. Spread batter into greased and waxed-paper lined 10-by-15-inch jelly-roll pan.
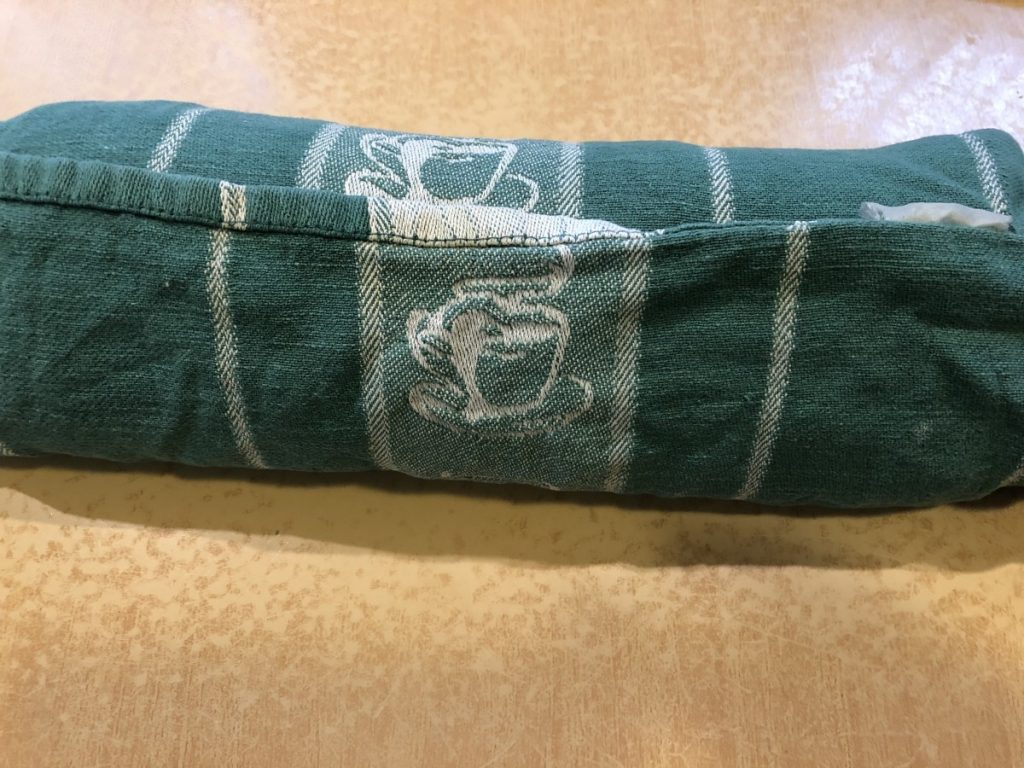
Bake at 350 ° for 15 minutes. Remove from oven. Cool for 15 minutes. Place cake on clean tea towel sprinkled liberally with powdered sugar. Peel off the wax paper. Cool 10 minutes longer. From 10- inch side, roll cake up in towel. Set aside. While cake is cooling in towel, prepare filling. Beat together cream cheese and butter; stir in powdered sugar and vanilla and blend until smooth. Unroll cake. Evenly spread filling over cake. Roll up cake (without the towel). Wrap in plastic wrap. Cover and chill at least 1 hour before serving. A serrated knife works best for slicing. Keep leftover cake refrigerated. This pumpkin roll freezes well. Serves 6-8.

Mom’s Pumpkin Squares

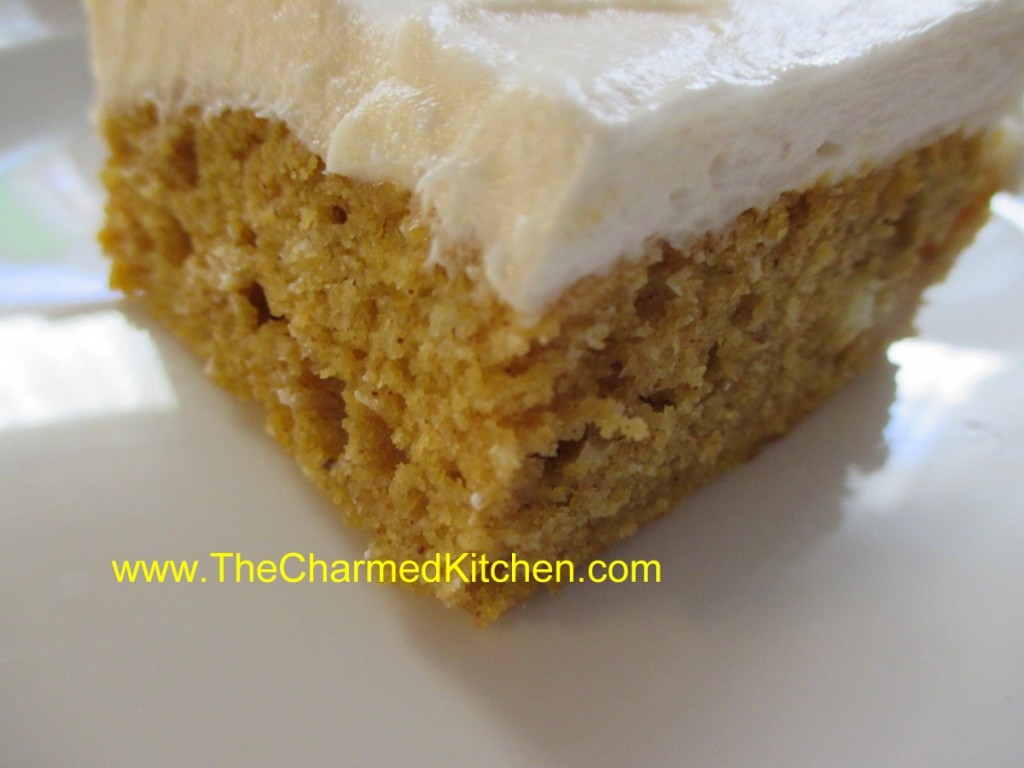
This recipe has been part of our family for years now. My mom made them for Thanksgiving every year- and I continue that tradition. Like my mom, I use fresh (or frozen) cooked pumpkin or winter squash. My mom didn’t care much for the taste of canned pumpkin. She would cut up the Halloween pumpkin, cook it, puree it and freeze it- so she could make pumpkin squares anytime she wanted.
The original recipe came from Bisquick, but it had 2 cups of sugar in it. My Mother’s sensibilities kicked in and she cut the sugar down to one cup. Great move on her part. The cake is still plenty sweet with less sugar.
It mixes and bakes up in no time. I normally top it with cream cheese frosting, but it would be good with a simple powdered sugar glaze, a buttercream frosting, or even just a dusting of powdered sugar mixed with a little cinnamon.
The texture is moist and tender and I think you’ll enjoy it as much as I do.
Pumpkin Squares
1 c. sugar
½ c. oil
16 oz. cooked pumpkin, canned, fresh (preferred) or frozen
4 eggs, beaten
2 c. biscuit mix (homemade or Bisquick or Jiffy Mix)
2 t. cinnamon
½ c. raisins, optional
Grease a jelly roll pan and set aside. Preheat oven to 350 degrees. Beat first 4 ingredients for 1 minute. Stir in mix, cinnamon and raisins. Pour in prepared pan and bake 25-30 minutes. Test for doneness with a toothpick. Cool and frost. Frosted cake must be kept refrigerated between servings.
Frosting:
8 oz. cream cheese
2/3 c. butter
2 T. milk
2 t. vanilla
3 c. powdered sugar, or more
Beat together until smooth.
Honey and Orange Glazed Sweet Potatoes

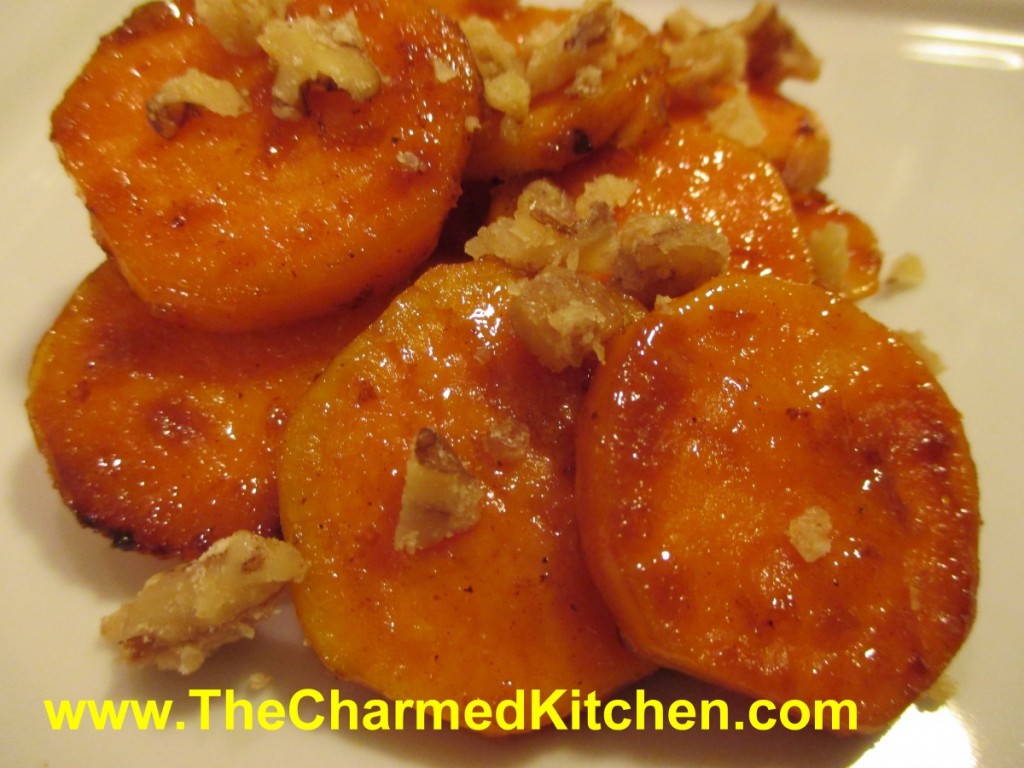
I will admit it – I am not a fan of really sweet, sweet potato dishes. Not unless it is a dessert. My Mom never served sweet potatoes with marshmallows, but they were still served “candied”. Sweet potatoes, sometimes canned, cooked in a glaze of brown sugar and butter. It was just what we did.
Then, one year, I grew my own sweet potatoes. Everything changed after that. I can still remember the joy of digging that first plant up. There they were, a cluster of beautiful sweet potatoes. I grew a lot of them that first year. I steamed them, baked them, made soup with them. Even had them for breakfast a few times.
My Mom was so pleased when I told her I was supplying them for her Thanksgiving dinner that year. I suggested we just cook them with a little butter, salt and pepper. They were so naturally sweet, that they surely, did not need to be candied.
Not everyone was so pleased with that choice. Clearly, how to prepare sweet potatoes evokes some of the same passion as how to cook the turkey. So for awhile, there were two competing dishes of sweet potatoes on the Thanksgiving table. As if there weren’t enough dishes to worry about- we now had to have 2 types of sweet potatoes.
I hope this dish might just bridge the gap between the two camps. A little sweet, but not overly sweet. The orange juice and honey enhance the sweet potatoes nicely. The sugared nuts are a fun addition, too.
Honey Orange Glazed Sweet Potatoes
4 T. butter
4-5 c. peeled and sliced sweet potatoes
1 c. fresh orange juice
Zest of 2 oranges
¼ c. honey
2 t. hot sauce, or to taste
Salt and pepper to taste
Fresh grated nutmeg
Sugared nuts- optional* recipe follows
Melt butter in large skillet. Add sweet potatoes and cook over medium heat, for 5- 8 minutes. Potatoes should start to turn a little golden. Add orange juice, honey and seasonings and turn heat down to low. Cook, uncovered, until potatoes are tender and liquid is evaporated, about 10 minutes. If you want more color on the sweet potatoes, turn the heat up a little once they are tender, and liquid is mostly gone. Serve with sugared nuts sprinkled on top, if you like. These can be made a day ahead and reheated.
*Sugared Nuts
4-5 c. nuts, I like walnuts or pecans
2 c. sugar
1 c. water
1 t. cinnamon
1 t. orange peel
1 t. salt, optional
Place all ingredients in heavy skillet and cook over medium heat, stirring often, until all the water disappears. Whatever liquid in the pan will be clinging to the nuts and syrupy. Dump nuts onto a large cookie sheet and break apart with a wooden spoon to prevent clumping. As nuts cool, stir once or twice to remove any remaining clumps, and to cool faster. Nuts will lose their glossy appearance and attain a sugary crust. If it looks like nut soup, you didn’t cook them long enough, and you must return all to the skillet and cook longer. As the nuts start to get drier during cooking, you can turn down the heat a little to prevent burning. Once you’ve made a few batches, though, you will get good at judging when to stop cooking. You can also make a spicy version by adding a teaspoon of cayenne pepper along with the other ingredients. Store in cool, dry place to keep nuts fresh longer.
Classic Pecan Pie

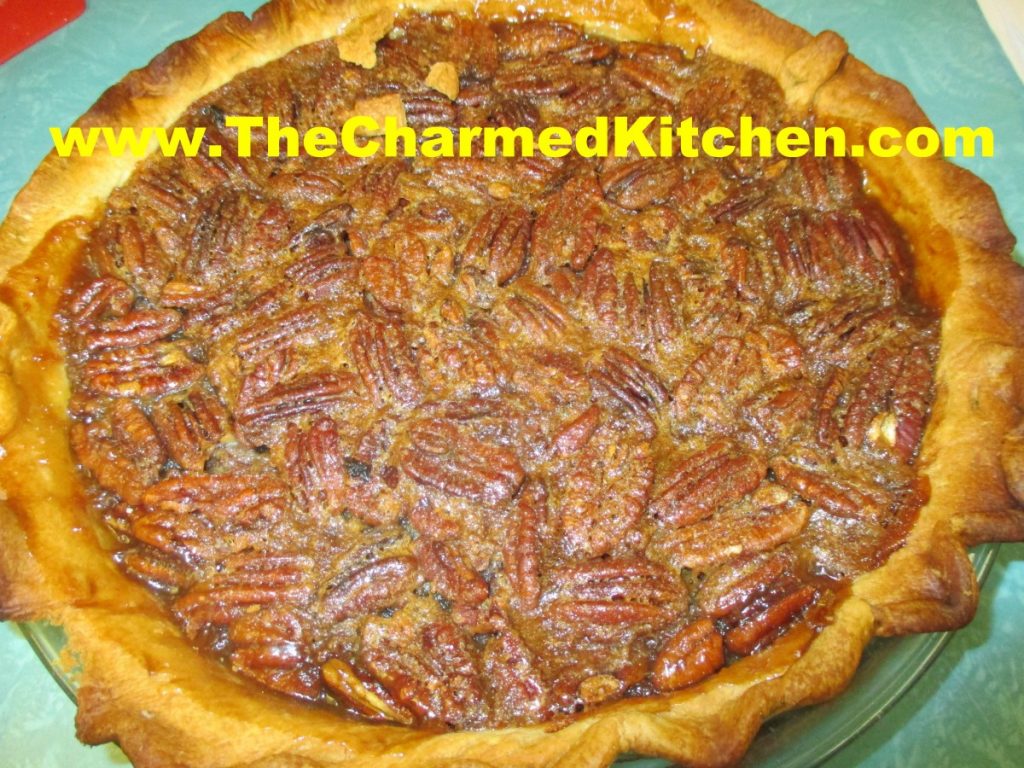
I love all sorts of pies. I would never want to pick just one favorite. If I had to pick, pecan would probably be it. The nuts, the sweet filling and the crispy crust all work so well together.
Served plain, or with a dollop of whipped cream, pecan pie just works for me. It is not a pie I make very often, so I think pecan pie always makes me thinks of the holidays. It was also a favorite of my Mom’s.
Here is the recipe. The crust recipe follows.
Classic Pecan Pie
3 eggs, slightly beaten
1 c. light or dark corn syrup
1 c. sugar
2 T. Butter, melted
1 t. vanilla
1½ c. pecans
1 unbaked 9-inch pastry crust
In medium mixing bowl beat together all ingredients, except the pecans until well mixed. Stir in nuts and pour into crust. Bake in a preheated 350 degree oven for 50-55 minutes or until knife inserted off center comes out clean. Makes 1.
Chocolate Pecan Pie Variation: The same recipe as above, but reduce sugar to 1/3 cup and add 4 oz. of German sweet chocolate or semi sweet chocolate, melted and cooled along with the eggs. This pie sometimes needs a little more time to bake-5 minutes or so.
Variations: You can experiment with other nuts. Try toasted, skinned hazelnuts, chopped coarsely or walnuts, slivered almonds or a combo.
You can use a store bought crust, but I prefer homemade. This is the crust recipe I normally use when I make pecan pie. It makes two crusts, so you can cut the recipe in half, freeze half of the dough, or just make 2 pies!!!
Half and Half Dough
This is a great crust for liquid fillings like custard type pies, pecan and pumpkin. For a sweet pie like pecan you can reduce the sugar in the crust by half.
¼ c. butter, room temp
½ c. lard or shortening, room temp
¼ c. sugar
½ t. salt
2½ c. pastry or all purpose flour
1/8 t. baking powder
¼ c. milk
1 t. lemon juice
Cream together the first 4 ingredients until smooth. Mix together the flour and baking powder. Set aside. Combine milk with the juice and set aside. Stir ½ c. of the flour into butter mixture. Stir until smooth. Add a little of the milk, stirring until smooth. Add remaining ingredients alternately until finished. Dough will firm up once chilled. Chill at least 4 hours before using. Makes 2 crusts.
Sweet Potato and Herb Biscuits


These biscuits are a favorite of mine. They go great with a bowl of chili. They also would make a nice addition to your Thanksgiving table.
I like sweet potatoes any number of ways. Steamed, roasted, mashed. In this biscuit recipe, raw sweet potatoes are grated and added to the dough, along with some herbs. The biscuits come out tender, with great flavor and texture. They are also quite pretty.
I enjoy them with a bit of butter, warm from the oven.
When you mix the dough, don’t be worried if it seems too dry. It takes a little bit of kneading to get the moisture out of the potatoes. The extra effort is worth it.
I cut them into triangles, but you can just form the dough into a log shape. Then, slice the dough for round biscuits. They taste wonderful, no matter the shape.
Sweet Potato and Herb Biscuits
2 1/4 c. flour
1 T. baking powder
1/2 t. grated lemon peel
1/4 t. each baking soda, dried basil and dried thyme
1 egg, beaten
1 1/2 c. shredded sweet potato, about 1 large
1/2 c. fine chopped green onions
1/2 c. sour cream
2T. butter, melted or olive oil
Stir together dry ingredients in large bowl and set aside. Combine remaining ingredients and add to flour mixture mixing until just blended. Turn onto lightly floured surface and knead a few times until dough just stays together. Dough will look too dry- but it will come together after you knead it. Press into an 8-inch square and cut into four squares.* Cross cut each square into four triangles. Place on greased baking sheet and bake in a preheated 425 degree oven for 20 minutes. Makes 16.
* I press the dough into a lightly floured 8×8-inch baking pan and then flip it out onto the work surface, before cutting. That way you’ll get nice, even edges.
A Trio of Mashed Potatoes

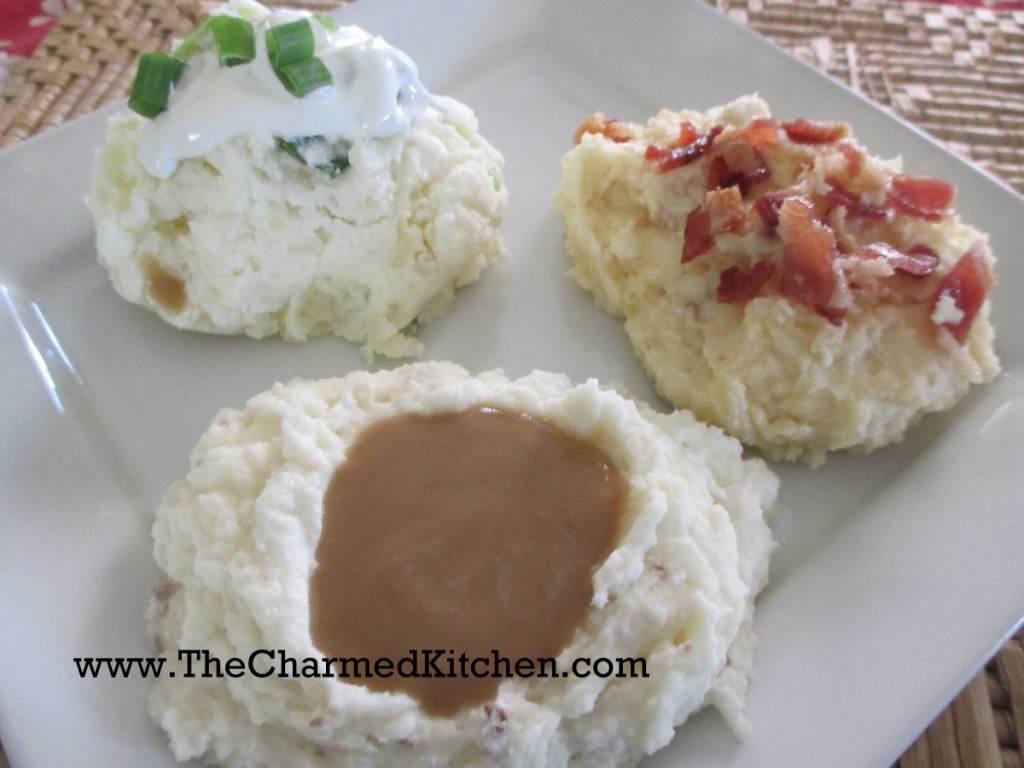
I am perfectly happy just mashing up potatoes and adding warm milk or cream and butter to them along with salt and pepper. Still, sometimes it is nice to switch things up a little. There are certainly countless variations for what you could add to mashed potatoes. If you are making mashed potatoes for Thanksgiving, and want to try something new, you might consider one of these recipes.
They are three of my favorites.
I can remember the first time my Mother added roasted garlic to mashed potatoes. They were so good. I think she added roasted garlic to them all the time after that.
Roasted Garlic Smashed Potatoes
6 cloves garlic, peeled
1/4 cup olive oil
3 lbs. potatoes, peeled and cubed
½ c. milk, warmed
¼ c. grated Parmesan cheese
2 tablespoons butter
½ t. salt
¼ t. ground black pepper
Preheat oven to 350 degrees. Place garlic cloves in a small baking dish. Drizzle with olive oil, cover, and bake 45 minutes, or until golden brown. Bring a large pot of lightly salted water to boil. Add potatoes, and cook until tender but firm. Drain, and transfer to a large mixing bowl. Place roasted garlic, milk, Parmesan cheese, and butter into the bowl with the potatoes. Season with salt and pepper. Mash to desired consistency.
Cheesy Bacon Smashed Potatoes
3 lbs. potatoes, peeled and cubed
½ c. milk or half and half, warmed
2 c. shredded cheese- I like cheddar
3 T. butter
12 oz. bacon, cooked, drained and crumbled
Salt and pepper to taste
Bring a large pot of lightly salted water to boil. Add potatoes, and cook until tender but firm. Drain, and transfer to a large mixing bowl. Place milk, cheese, and butter into the bowl with the potatoes. Season with salt and pepper. Mash to desired consistency. Stir in bacon, reserving some for the top.
Sour Cream and Green Onion Smashed Potatoes
3 lbs. potatoes, peeled and cubed
1 c. sour cream
3 T. butter
½ c. chopped green onions or chives
Salt and pepper to taste
Bring a large pot of lightly salted water to boil. Add potatoes, and cook until tender but firm. Drain, and transfer to a large mixing bowl. Place sour cream and butter into the bowl with the potatoes. Season with salt and pepper. Mash to desired consistency. Stir in green onions, reserving some for the top.
One more thing: A note about peeling. I still mostly peel potatoes that I am going to mash. My sister, Cindy, does not. She likes the flavor and texture the peel adds. Either is fine by me.
Sweet Potato Pound Cake

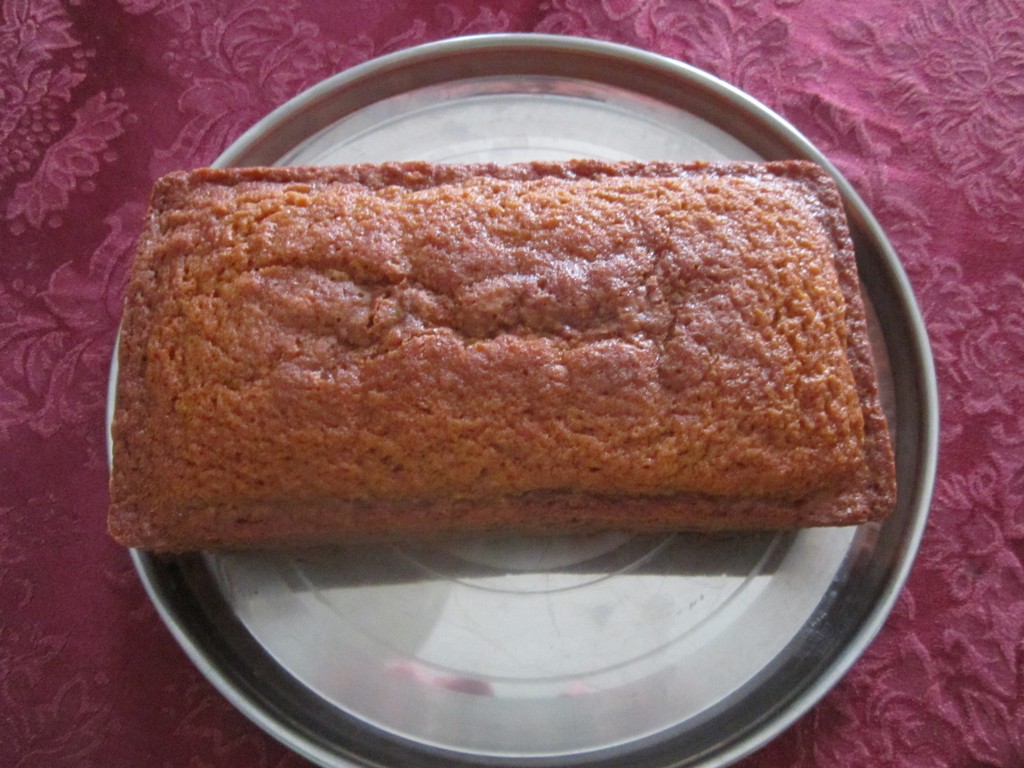
If the only way you enjoy sweet potatoes is as a side at the holidays, or in pie, it is time to expand your thinking about them. In this recipe, the mashed sweet potatoes add both sweetness and moistness to the finished cake. Great plain, or with a dollop of whipped cream and some fresh berries.
This cake makes a lovely dessert or a nice addition to a brunch menu. Also, a way to use up leftover mashed sweet potatoes, if you find yourself with leftovers.
I mentioned this recipe to a friend and she was very interested. I will be seeing her over the weekend and think I will make this for our dinner together.
Sweet Potato Pound Cake
1 1/2 c. cake flour*
1/2 t. each baking soda, salt, cinnamon and nutmeg
1/2 c. unsalted butter, room temperature
1/2 c. sour cream, room temperature
1 1/3 c. sugar
3 eggs, room temperature
1/2 c. mashed sweet potato
1 t. vanilla
Preheat oven to 300 degrees. Lightly oil an 8×4-inch loaf pan. Mix flour with next 4 ingredients and set aside. In large mixing bowl beat together butter and sour cream. Beat in sugar and then beat in eggs 1 at a time, beating well after each addition. Stir in mashed sweet potato and vanilla. Stir in dry ingredients and pour batter into prepared pan. Bake until tester comes out clean, about 1 hour and 15 minutes. Cool in pan 30 minutes before loosening cake sides from pan and removing. After cake has cooled wrap in foil and store at room temperature. Serves 8.
* If you don’t have cake flour you can make your own. Simply measure out a cup of all purpose flour and remove 2 tablespoons of the flour. That is now the same as a cup of cake flour OR remove the 2 tablespoons of flour and replace them with 2 tablespoons of cornstarch and sift together to combine. I do the flour/cornstarch mix and keep a batch on hand for when I need it in baking.
Sweet Potatoes or Yams?


I just wanted to clear something up. With all the sweet potato and “yam” recipes circulating, it seemed like a good time for this post. Are you eating sweet potatoes or yams?
Well, if you live in North America, you are having sweet potatoes. No matter what the produce department labels them, everything in the store is, botanically speaking, a sweet potato. Red, orange and yellow, big and small – all are sweet potatoes.
So where did the yam thing start? Well, many years ago the state of Louisiana had an abundant crop of sweet potatoes. They wanted to sell them in a competitive marketplace, so they decided to call them yams. Just a name change in an effort to give their product an edge over the competition. You’ll often still see them sold as Louisiana Yams. They aren’t yams, though. Louisiana Yams are, in fact, just sweet potatoes with a name change.
There are real yams- they are larger than sweet potatoes and quite starchy. They might be found at South American restaurants, or in specialty markets in the States, but they are NOT in your local grocery store.
A sweet potato by other name will taste as sweet.
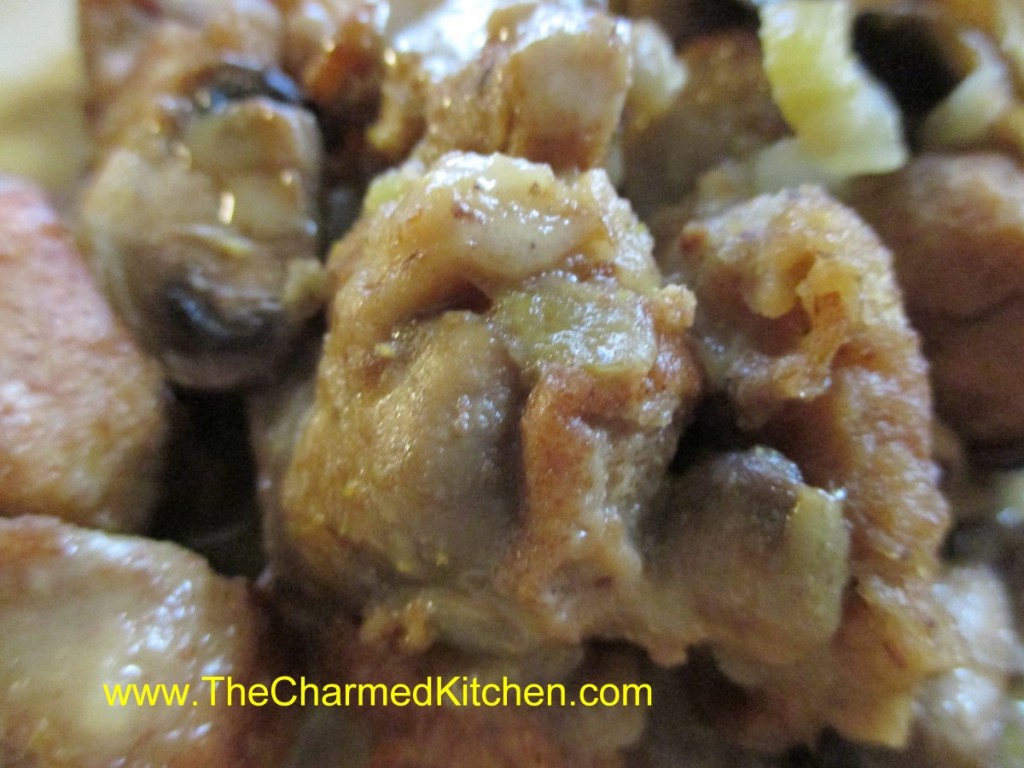
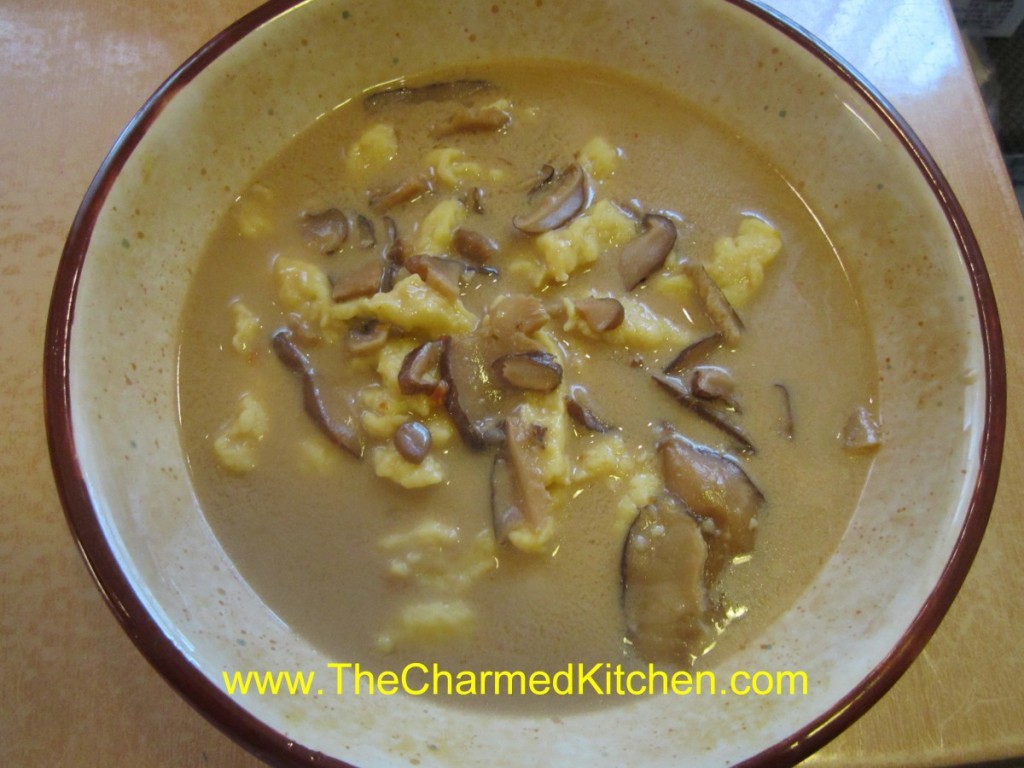
Mom’s Polish Mushroom Soup

Since I decided to share some of my Mother’s favorite recipes this week, I had to include this soup. Sharing this family recipe with other people makes me happy. My Busha (Polish Grandmother) and my Mother both made this soup. They would be pleased to know that someone is still making it.
There are many variations of mushroom soup in Eastern European culture. Some have barley, others add sauerkraut. This is my family’s version. Plenty of mushrooms in rich stock, slightly thickened, and made creamy with the addition of sour cream. Ours is served with kluski noodles.
This soup is a tradition in my family. When I was a kid, my Busha would make it every Easter. My Mom made it for Christmas Eve. Now my niece makes it, and we have it the day before Thanksgiving.
It is one of those dishes that brings back so many wonderful childhood memories. I love the rich, earthy flavor of the mushrooms, and the slightly sweet/sour flavor of the broth. It is made with dried mushrooms, usually. I can remember watching my mom get out a big bowl and soaking the mushrooms to get them clean, and to soften them, before starting the soup.
I use dried shiitake mushrooms, but often add fresh mushrooms as well. Sometimes I use other dried mushrooms, too. I like to have a variety of mushrooms in the soup. I use chicken stock. If made with vegetable stock, it could make a great meatless meal.
Polish Mushroom Soup
4 qt. Chicken, beef or vegetable stock
5 c. dried mushrooms, about 4 0z. I use Shiitake.*
Water for soaking
½ c. flour
1 pint sour cream
¼ c. balsamic vinegar
2 T. sugar
1 Lb. Kluski-style noodles, cooked and drained
Soak mushrooms in water for 1-2 hours. Lift mushrooms carefully out to leave any sand in the bowl of water. Rinse and drain. Set aside. Bring stock to a boil and add the mushrooms. Simmer, covered for about 1½ hours, or until mushrooms reach desired tenderness. Mushrooms will retain some “chewiness”. In medium bowl whisk sour cream into flour gradually until smooth. Stir in vinegar and sugar until smooth. Add a small amount of the hot soup to the sour cream mixture, whisking until smooth. Continue adding hot soup to the sour cream mixture until sour cream mixture is warm. Add the warm mixture to the pot of soup and stir to combine. Return to simmer and simmer 1 minute, stirring continuously. Place desired amount of kluski into bowls and ladle over the hot soup. Serves12.
Note: You can add a variety of fresh mushrooms to the soup to make it even more special. You might use portabellas; crimini, button or whatever mushrooms are at the store that day. Add in addition to the dry mushrooms; don’t reduce the amount of shiitakes.
You can use other cooked pasta. You could try spaetzle or even gnocchi. You might also need more than one pound of kluski, depending on how much pasta your family likes in their soup.
*The dried shiitake mushrooms can be found at specialty grocery stores, some larger grocery stores and at Asian markets.


