Saving Specialty Ingredients


We all have certain ingredients that fall into this category. You might use it once in a great while, or only in one recipe. Then you have extra, but aren’t sure what else to do with it, or how to keep it from going bad. These ingredients are often expensive, and can be at waste of money to just toss.
There are a couple of ways to handle the situation. You can find more uses for the product or find ways to make it keep longer. So let discuss a few products and how you can get more from them.
Capers: The buds from the caper bush, capers come pickled and are salty and similar in flavor to gherkins. Probably most often used in tartar sauce they can be used lots of other places. Since they taste like intense little pickles use them where you might use pickles. Capers are great in potato salad, chicken, tuna or ham salads and in eggs dishes and omelets. They also go great with seafood. I love to add a few capers when I enjoy lox on a bagel. Once open, they are kept in the fridge and will keep for a very long time.
Tomato Paste: Think of tomato paste as super concentrated tomato sauce. Strong in flavor a little goes a long way. How many of us have opened a jar for the one tablespoon of tomato paste a recipe calls for, and then end up throwing the rest away when we find it in the back of the fridge weeks later looking like a science experiment gone bad? You can get tomato paste in squeeze tubes that keep longer in the fridge or you can freeze it. That seems to be the easiest solution. Put dollops of tomato paste in ice cube trays and freeze. Once frozen you can pop out the cubes, place them in little freezer bags, label, and toss back in the freezer. Now when you need that tablespoon of tomato paste- you’ll have it.
Chutney: This fruit- based relish is used in Indian dishes. Most often made with mangoes. It can be used in tuna and chicken salad. You can use chutney as you might use cranberry sauce as a side dish or to glaze meats. A mix of fruit, garlic, vinegar, sugar and spices it has a complex flavor. I use it in bobotie- a North African casserole. It is one of those items that you might use a couple of times and then forget about. Because of its sugar and vinegar base it will keep for a pretty long time in the fridge. Like tomato paste you can freeze the chutney in smaller amounts and defrost for later use. What’s better though is to start to use it more. Try adding it to sauces or even make a salad dressing with some chutney in it. Chutney can be a great base for a sweet and sour sauce for meats or veggies.
Ginger: This versatile root can be grated in everything from savory to sweet dishes. Although often associated with Asian cooking, ginger is used in all sorts of foods. I get this question all the time. How do I keep my fresh ginger root longer? Some people like to peel it and place it in a jar of sherry and keep it in the fridge. You can also save peeled garlic cloves this way. But I prefer to just freeze it. Take the whole ginger root and place in a freezer bag. I like to keep mine on the freezer door so I can find it easily. When ready to use, just scrape off the peel, like you might on a carrot. Use a grater on the ginger while it is still frozen and return the unused portion to the freezer. It will keep for a very long time this way- as long as the ginger is in a freezer bag. You can even slice and chop the frozen ginger- although I must admit that is a little trickier. Next time you are making gingersnaps try using the fresh/frozen ginger over the dried version. Another option is to candy the ginger. Here is the recipe.
Candied Ginger
6-8 oz. fresh ginger
¾ c. water
¾ c. sugar, plus extra for rolling
3 T. light corn syrup
Remove peel from the ginger. Slice into disks, about ¼ -inch thick. Place ginger in a pot with cold water and bring to a boil. Boil 1 minute, drain and rinse under cold water. Repeat process 2 more times. Return to pan with fresh water and boil 15 minutes. Drain and pat dry. Bring ¾ c. water and ¾ c. sugar to boil in sauce pan with the corn syrup. Boil 2-3 minutes and then add the ginger. Simmer, stirring occasionally until all but a spoonful of the syrup is left. This should take about 10 minutes. On a wax-paper lined baking sheet sprinkle 1 cup of sugar and arrange the ginger slices on top of the sugar. Toss around until cooled, adding more sugar if needed. Place on a drying rack for 24 hours before storing. Makes a little over ½ pound.
Buttermilk: I buy fresh buttermilk always planning on baking more with it. I do not like to just drink it. That leaves me with unused buttermilk. I hate just pouring that money down the drain. I freeze it! Keep in mind it will separate when thawed- but you can still cook and bake with it. Another easy solution is to buy powdered buttermilk and just mix up what you need. Yet another answer is to make your own- well, sort of. Just use regular milk in the recipe but add some acid to it to make it curdle. I use lemon juice- but vinegar works well, too. If the recipe calls for a cup of buttermilk- measure out the cup of milk just a little short-leaving room for the extra liquid. 1-2 tablespoons of lemon juice or vinegar per cup of milk will work fine.
Tahini: I first started using tahini when I made my own hummus. Tahini is like peanut butter, but made with sesame seeds. I only needed a small amount and then found myself with this open jar of tahini. I never seemed to use it in anything else. While tahini keeps for a long time, I never felt comfortable using tahini that had been opened for more than a few months. I found freezing tahini was a decent solution. I just put it in a small plastic container and popped in in the freezer. When I needed it, I would just spoon out what I needed. You can also make your own tahini when you need some. Just combine sesame seeds in a blender with a small amount of oil. I normally add 1/4 cup of sesame seeds and a couple tablespoons of olive oil. Avocado oil works well, too. You can add more oil, if needed. I finally started using tahini in other ways. Its a great base for salad dressing. Here is the salad dressing recipe.
Tahini Dressing
1/3 c. tahini
1/3 c. water
¼ c. oil, optional
1/4 c. lemon juice
2 garlic cloves, chopped
3/4 t. salt
Combine all ingredients in a blender until smooth. Use on green salads or on fish dishes and falafel.
Note: You can add a little more lemon juice to this recipe when using on seafood dishes.
Whipping Cream: While not an exotic ingredient, I find I rarely need the whole pint that I bought. So many recipes call for smaller amounts. Unless I am making dessert for a crowd, I know some of the whipping cream will go to waste. Once the carton is open, you have to use it fairly soon. You can use it in coffee, or in your cooked oatmeal or cereal to replace some of the liquid. You can use to make French toast or custard. Another solution is to freeze what you can’t use right away. Once it is frozen, the thawed whipping cream won’t whip like before. But you can still cook with it. You can make ice cream with it, too. Below is a recipe for making chocolate ice cream, but you can add other flavors to your whipped cream, like jams or preserves. If you have an open container, you will likely have less than a full pint. Just whip up what you have, and flavor to taste.
Super Easy Homemade Chocolate Ice Cream
1 pint whipping cream
1/2 c. chocolate syrup or to taste
Place whipping cream in a bowl and whip until stiff peaks form. With mixer running, add the syrup. Add until mixture is the color of chocolate ice cream. You can also give it a taste, to be sure. Place mixture in a container with a tight fitting lid and place in freezer. Freeze several hours before trying it. Makes 1 quart.
Kahlua Blondies

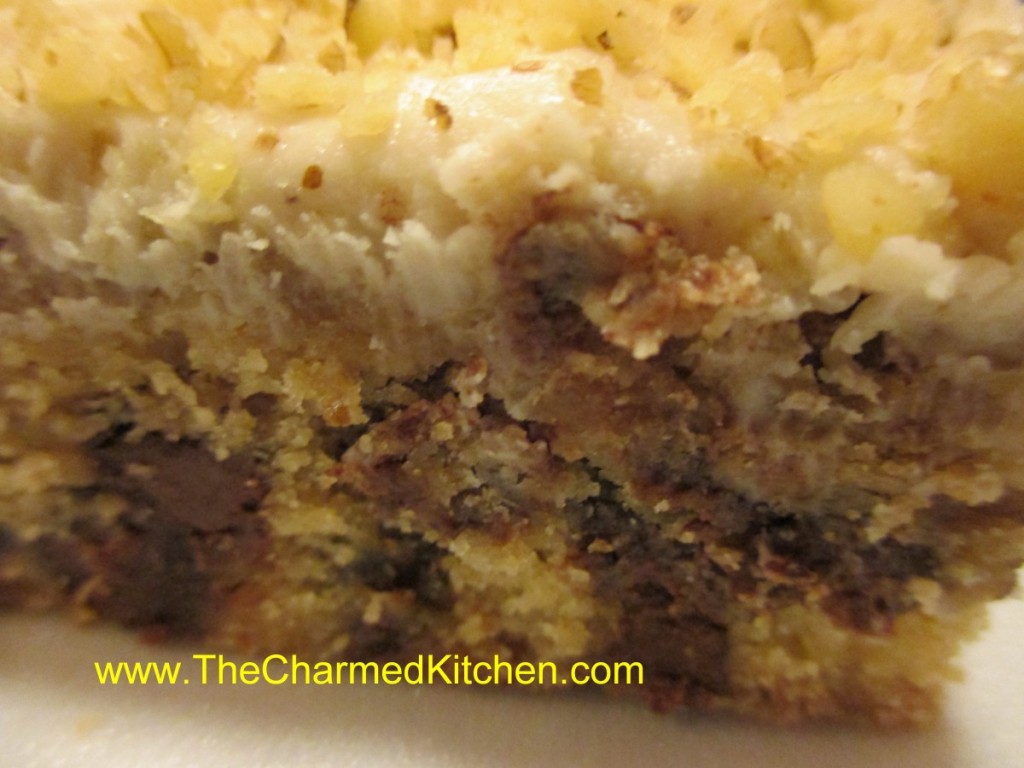
These yummy treats are brownie-like in texture, studded with nuts and chocolate chips and full of Kahlua flavor. There is Kahlua in the batter, Kahlua brushed over the squares after baking, and Kahlua in the brown butter frosting. So easy and so tasty.
I wanted to call them brownies, but they really aren’t a brownie, so much as a blondie. Whatever you call them, I know you will enjoy them.
Kahlua Blondies
1 ¼ c. all purpose flour
¾ t. baking powder
½ t. salt
½ c. butter, softened
¾ c. packed brown sugar
1 egg
¼ c. coffee liqueur
1-c. chocolate chips
1/3 c. walnuts
1 T. coffee liqueur (for tops of bars)
Brown butter icing
2 T. butter
1 T. coffee liqueur
2 t. milk
1 1/3 c. powdered sugar
Walnut halves or chopped walnuts
Combine dry ingredients and set aside. In large bowl cream butter and sugar until light and fluffy. Beat in egg then stir in liqueur, then flour mixture. Fold in chips and nuts. Turn into greased 7×11 inch pan and even out. Bake in a 350-degree oven for about 30 minutes. Top should spring back when touched lightly. Cool in pan 15 minutes then brush with remaining liqueur. When cool spread with brown butter icing and top with nuts. Makes 24 bars.
To make icing:
Brown butter in small saucepan. Do not burn. Remove from heat and beat in remaining icing ingredients. Spread on bars. Allow frosting to set up before cutting.
Toasted Sugar

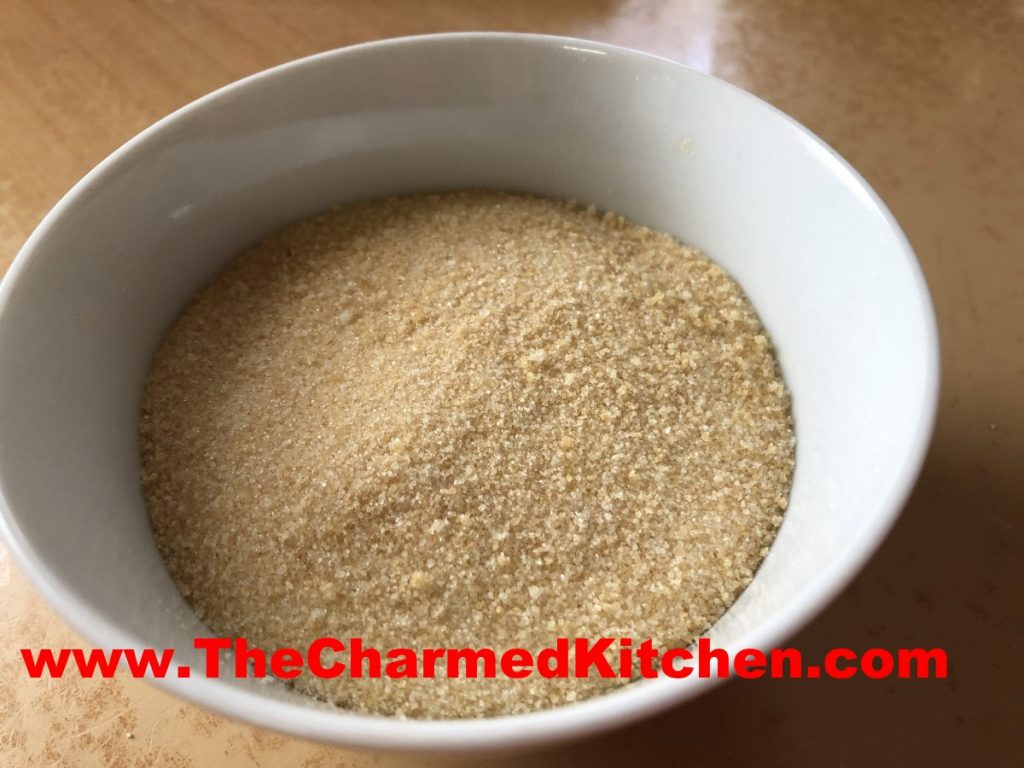
If you never toasted sugar, you might want to start. Toasted sugar is just sugar that is baked, at low heat, until it turns a caramel color. The sugar also picks up a lovely caramel flavor. That flavor change is what really makes it worth it.
I first heard about toasting sugar a few years ago. I was intrigued and decided to try it myself. The flavor was wonderful. I always keep a supply of toasted sugar around.
So how do you use toasted sugar? Simple- just like regular sugar. Measures the same, bakes the same. The only difference is that extra caramel flavor it adds to everything. From your morning coffee, to baked goods, the toasted caramel flavor comes through.
How to Toast Sugar
Preheat oven to 300 degrees- no higher. If your oven runs hot, you might want to bake at 275. Place sugar in a baking dish. I used a glass baking dish. You’re going to stir the sugar a few times during baking, so a dish with high enough sides is a must. I always toast at least 3 or 4 pounds of sugar at a time. It keeps, so why not? Also, I worry that smaller amounts might toast too fast.
Toast until the sugar turns an ivory color, about 1 hour. Stir thoroughly and continue baking, checking and stirring about every half hour, until the sugar gets to the color you want. The darker the color, the more intense the caramel flavor. You can bake the sugar until it looks like brown sugar, if you like. I usually stop when it looks like light brown sugar.
The sugar will produce steam as it heats up, so it should be stirred to allow that moisture to escape. Stirring will help move hot sugar from the edges toward the center, and cool sugar from the center toward the edges, for even toasting. Continue toasting and stirring every 30 minutes until the sugar has darkened to the desired color. The process can take 2-5 hours in total. It’s not a lot of work, mostly just waiting. You can see why I do a large batch at a time. I would rather bake 4 pounds of sugar- and have plenty for months and months.
When the sugar has finished toasting, remove from the oven and set aside and cool to room temperature, stirring from time to time to speed the process and allow for continued evaporation of steam. I like to transfer the toasted sugar to a large foil pan, where it cools down quicker. Once fully cool, transfer to an airtight container and store as you would plain white sugar. It can be used interchangeably in any recipe that calls for white sugar.
Sometimes, the sugar clumps as it cools. You want to break those clumps up when you see them- or press the cooled sugar through a sieve to get out the lumps.
In the end, I think the effort is worth it. In cookies and other baked goods, toasted sugar adds the nicest flavor.
City Chicken


If you never had City Chicken, you don’t know what you are missing. Meat on a stick- always a good thing. But not just meat on a stick- breaded meat on a stick! If you like breaded pork chops, you should love City Chicken.
This is a dish I grew up with. When my Mom made City Chicken, I knew dinner was going to be special.
There is no chicken in the dish at all. Odd, but well, I didn’t name the dish, I just like eating it.
City Chicken is normally made with chunks of pork- or chunks of pork and veal- skewered on wooden sticks. I used pork. After skewering, the meat is dipped in seasoned flour, egg wash and then bread crumbs- or cracker crumbs.
You can just bake them, or brown in a little oil first, before baking- for a crispier coating.
I didn’t have my Mom’s recipe, so I recreated it as I remembered it. So here is my recipe. A tasty dish, and also a trip down memory lane.
City Chicken
2 lbs. boneless pork – I used Western style ribs
½ c. sherry – not cooking sherry
2 T. soy sauce
¾ c. flour
Salt and pepper
3 eggs
½ c. milk or half and half
2 T. chopped parsley
Hot sauce
½ t. garlic powder
1-2 c. bread crumbs
2 t. dried basil
2 t. dried oregano
½ t. dried thyme
Oil
6 –inch Wooden sticks or skewers
Cube pork into 1-inch cubes. Place in a bowl and add the sherry and soy sauce. Stir to combine, cover bowl and place in fridge. You can do this a couple of hours ahead or even a day ahead. You might not really need to do this step, but I like the flavor of the sherry, so I chose to marinade my pork in it before breading. Your choice, completely.
Take pork and skewer it onto wooden sticks. I used skewers that were a little thicker than what I normally use. Since they were long, I cut them in half before using. I ended up with 9.
Place flour in a bag with salt and pepper to taste. Add one pork skewer at a time to the flour, shaking to coat evenly. Place floured pork skewers on a tray. Once finished, combine eggs with the milk, parsley, hot sauce, garlic powder and a little more salt and pepper. Place bread crumbs in a bag with the basil, oregano and thyme. Shake to combine. Dip each floured skewer into the egg mixture, remove from egg mix and allow excess to drip off a little. Then place in the bag of bread crumbs, shaking to coat evenly. Repeat until all the city chicken is breaded.
Now I know I already asked you to wait to marinade the pork in the beginning. I am going to ask you to wait again. If you fry up the city chicken right away, the breading is likely to fall off. If you bread the city chicken early in the day- then leave it in the fridge at least a couple of hours before cooking it, the breading will stay on much better. I actually marinade a day ahead, in the morning. Then I bread them in the evening the night before. But even breading them a couple of hours before makes a big difference. Just keep in the fridge until you are ready to cook.
When ready to cook them- I know you were giving up hope we would ever get to this step- heat oil in a large skillet. You don’t need much oil- a few tablespoons, at most. Brown the city chicken on all sides in the hot oil. Transfer them to a baking dish, as you finish browning them. Place in a preheated 350-degree oven for about 30 minutes. Don’t bake them too long- you don’t want them to dry out. Pork has to reach a minimum internal temp of 145 F. Serves 6.
100% Whole Wheat Bread

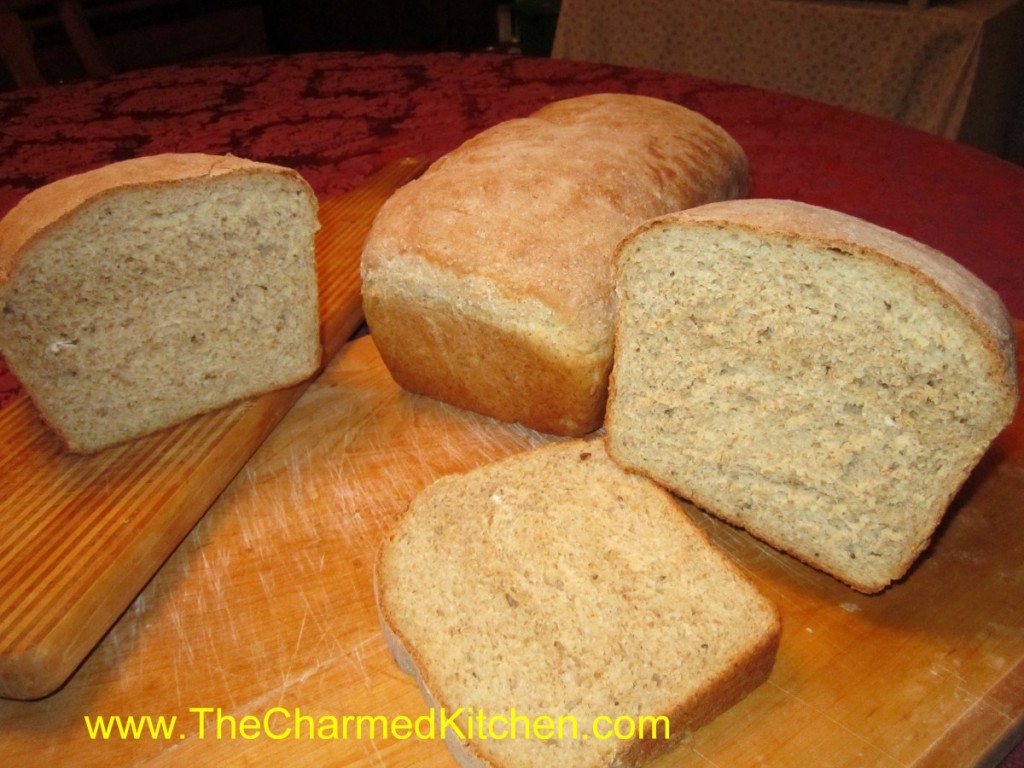
A lot of us want to eat more whole grains, but are unhappy when we try to make 100% whole wheat bread at home. There is a secret to baking whole wheat bread that is both tender, and slices easily.
Whole wheat flour, high in gluten, also is high in fibers, which make it harder to get the gluten to that stretchy state. If you knead whole wheat bread dough for 5- 10 minutes, like white bread dough, you’ll have a dough that is far from elastic.
The secret? Knead it longer. I knead my whole wheat bread dough about 20 minutes. That is easy if you have it in a stand mixer. Just set it on low and let the dough hook do the work. Not so easy if you are kneading by hand. When kneading for 20 minutes by hand, more and more flour gets added to the dough, to keep it from sticking. The extra flour results in a heavy dough, and a loaf of bread that is best used as a door stop. If you have to knead by hand- knead on a wet surface. The dough won’t stick to your hands or the board and you can knead it long enough to get a properly worked dough. How do you know your dough has been worked long enough? Hold the dough up to light and pull it. It should stretch thin enough so that you can see the light through it, without tearing. Here is one of several recipes I have for 100% whole wheat bread. I love it and I think you will, too.
100% Whole Wheat Bread
2 packets active dry yeast
2 2/3 c. warm water
½ c. oil
½ c. honey, molasses or maple syrup
6 ½ -7 c. whole wheat flour
½ c. non fat dry milk
2½ t. salt
Combine first 4 ingredients in a mixing bowl and stir in 3 cups of the flour the dry milk and the salt. Beat with electric mixer for 3 minutes. Stir in enough flour for mixture to form a thick batter and continue mixing on low in mixer for 15-20 minutes. Dough takes time to become elastic. Add extra flour slowly until dough comes away from the sides of the work bowl, but not too soon. Note: if you must do this by hand add flour until dough starts to come away from the sides of the bowl and knead with wet hands on wet work surface for 15-20 minutes. Transfer dough to lightly greased bowl and cover, allowing to rise until puffy, about 1 hour. Punch dough down and transfer to a lightly floured surface. Divide in half and shape each half into a loaf. Place in a lightly greased 9×5 – inch pan. Brush top with oil and place a piece of plastic wrap over the top. Allow to rise until doubled. Bake in a preheated 350 degree oven for 40 minutes. Tent with foil after 20 minutes to prevent over browning of the top. Test for doneness by removing bread from pan and thumping on the bottom. Bread should sound hollow. Makes 2.
Candied Bacon

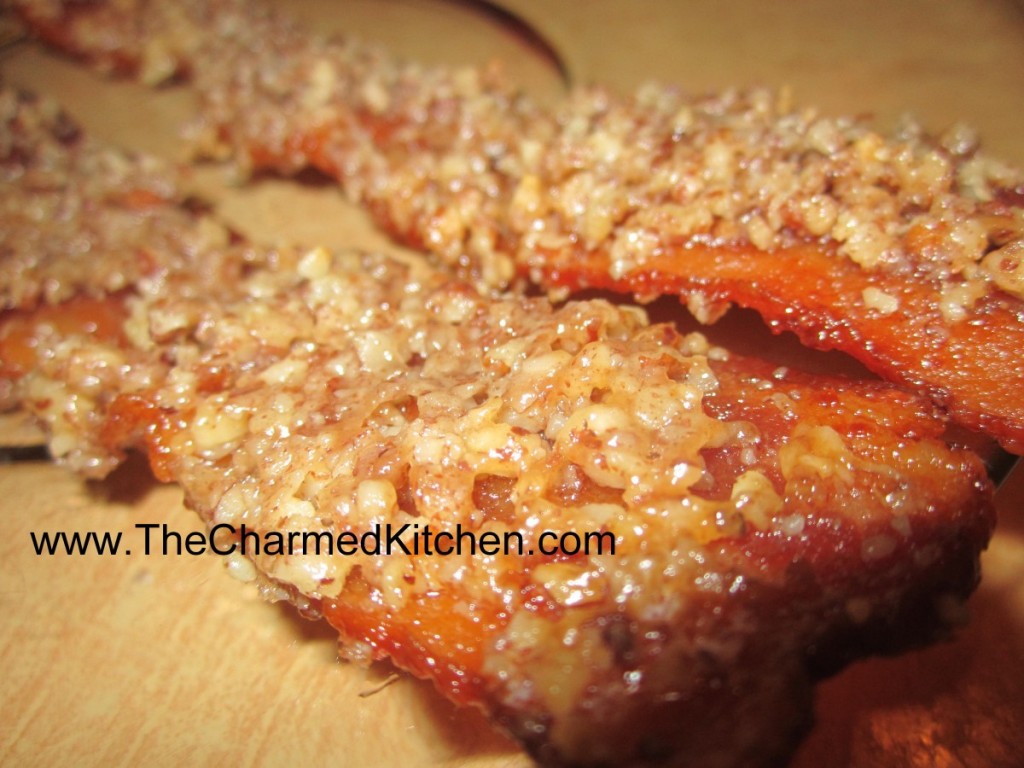
This candied bacon only has three ingredients- bacon, maple syrup and chopped nuts. The combination in sublime. Salty, sweet, smoky all in one crunchy bite. Friends and family love it!!
The bacon is baked, and then coated with maple syrup and chopped nuts. It is returned to the oven, where it bakes until the bacon is crisp and the coating it toasted, almost caramelized. It gets crisper once it cools down.
You can make a spicier version by sprinkling with a little cayenne pepper or adding hot sauce to the maple syrup.
Candied Bacon
1 lb bacon
3/4 c – 1 c maple syrup
3/4 c – 1 c crushed pecans (or any nuts you like! I like to leave some
larger pieces and then mix in some more finely ground)
Preheat oven to 350. Put bacon in baking pan and bake about halfway through (about 5-7 minutes or so). Drain most of the grease and allow to cool slightly. Coat each piece in syrup, roll in nuts and put back on pan. You may need more nuts as you go along, though it’s up to you how much to cover them. Bake another 7-9 minutes, until desired crispness. If you do like crisper bacon, just be sure to move the cooked bacon quickly off the baking sheet onto parchment paper, since the syrup will harden. Allow longer cooking times with thicker bacon.
100 Dandelion Flower Muffins


The curious name for this recipe comes from my own curiosity. I wondered just how many blossoms I would need to get about a cup and a half of petals. I decided to make muffins with some of the dandelions blooming in my yard. I have a lot of dandelions, and I wanted to use a really decent amount in my muffins. I started counting as I trimmed them and stopped when I had a cup and a half. It turned out to be 100 flowers. So now, if you want to make this recipe, you will know when you can stop picking!!!
If you can’t beat them, eat them. I actually am a big fan of dandelions. I have organized dandelion cook-offs and edited a dandelion cookbook. I eat the leaves, and a tea made from the roasted roots. The flowers are a wonderful ingredient in cooking, too. They are used to make dandelion wine and I enjoy adding them to fritters, pancakes and other baked goods. So here is my recipe for dandelion muffins. They are pretty tasty, tender, light and not too sweet.
100 Dandelion Flower Muffins
2 c. flour
1 T. baking powder
½ t. salt
1 egg, beaten
1½ c. half and half
1/3 c. honey
¼ c. melted butter
1 t. vanilla
1 t. orange zest
1 ½ c. dandelion petals*
Preheat oven to 375 degrees. Line 12 muffin cups with paper liners or grease them, set aside. In medium bowl, combine flour with baking powder and salt and set aside. In another bowl, combine egg with half and half, honey, butter, vanilla and orange zest. Beat by hand until well mixed. Stir in dandelion blossoms, then stir in flour mixture. Do not over mix. Stir just until flour is mixed in. Spoon batter into prepared pans, filling them about ¾ full. Bake for 20 minutes or until lightly browned on top. Great served warm with butter and honey. Makes 12.
* To prepare the dandelion blossoms you want to trim of the tough base and just use the petals in the recipe. Some of the green sepals will get mixed in, and that is OK. Measure the petals after trimming. I picked 100 flowers and ended up with about 1½ cups of petals.
The Art of Biscuits

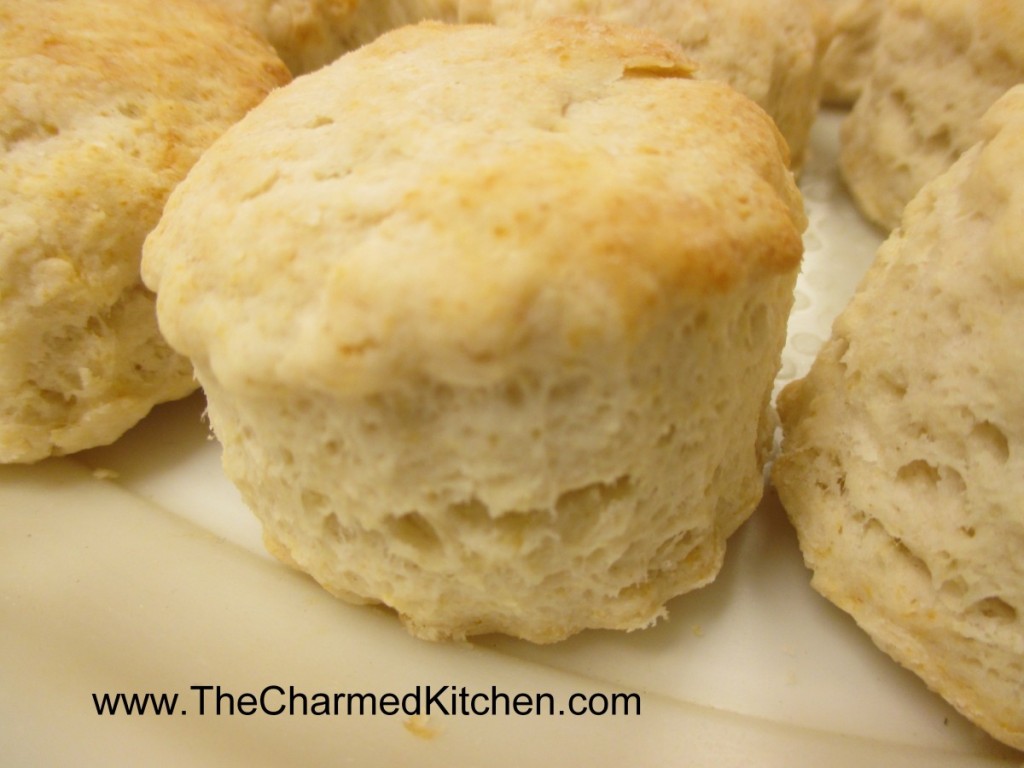
Biscuits are easy to make. They really are. Fast, too. You can mix up a batch of biscuits in the time it takes the oven to preheat. Yet, I know people who seem to struggle with them. The other night, a friend and I were talking about the secret to a light and flaky biscuit.
So what goes wrong? How do you make light, flaky biscuits every time?
For the moment I’ll assume you have a decent recipe. There are a lot of great biscuit recipes out there. I know people that have treasured family recipes. Biscuits that have been made the same way for generations.
Assuming also, that the baking powder is fresh*, there has to be some other reason that some folks just seem to struggle with biscuits.
The problem is, more than likely, over-mixing the dough. When I talk to someone who tells me that their biscuits are always heavy or tough, I first ask about how they are put together.
Once the dry ingredients have been mixed and the fat cut in, there is just liquid to be added. I prefer to chill whatever fat I am using.
At this point the dough should be handled just enough to hold together. A light hand means a light biscuit. The same is true for making scones. The more you knead the dough, handle the dough and roll the dough, the less flaky biscuits become.
Don’t treat biscuit dough the way you would a yeast-based dinner roll. The two are very different in how they are handled. Yeast-based doughs benefit from kneading and “working” the dough. Biscuits are the opposite.
Even when cutting out the biscuits, it will help if you cut them out as close together as you can. That way you have fewer scraps to re-roll. Every time you roll the dough out- it becomes a little tougher.
Here is a recipe for one of my favorite biscuits. They are light and very flaky. Is there anything better than a fresh, warm biscuit with some butter?
Biscuits Supreme
2 c. flour
4 t. baking powder
2 t. sugar
½ t. cream of tartar
½ t. salt
½ c. cold butter, shortening or coconut oil – you can even use lard
2/3 c. milk
Stir together dry ingredients and cut in butter to resemble coarse crumbs. Make a well in the center and add milk all at once. Stir until dough sticks together and knead on lightly floured surface 10-12 strokes. Roll or pat to ½ inch thickness. Cut with 2-21/2 inch biscuit cutter and place on ungreased baking sheet. Bake in 450-degree oven for 10-12 minutes. Serve warm. Makes 10-12.
*If your baking powder might be old, you can test it. Place a couple of tablespoons of boiling water in a cup. Add a teaspoon, or two, of baking powder. The mixture should bubble vigorously. If there are no bubbles, or very few bubbles, you might want to get a new container of baking powder.
Making Macarons


Macarons are French cookies, made from almond flour, egg whites and sugar. Simple ingredients, with an elegant end result. They are similar to meringues, which I have made often in the past.
I remember the first time I tried to make macarons. They can be tricky, so I decided to do some research before trying to bake them myself. I watched videos, searched recipes, and then decided it was time to go for it. My first batch did not go according to plan. They got over- baked and the dough was too stiff. I went back and tried again.
Sometimes failure can teach us more than success.
I had clearly not mixed the dough long enough. Not the stage where you beat the egg whites. They were mixed to perfection in very stiff peaks. Where I messed up the first time, was not mixing the egg whites with the almond flour mixture long enough. I was so focused on the folding in directions, I was afraid to over mix it. Big mistake.
When you get to the “folding in” part, don’t be afraid to mix the batter. The more you mix, the softer the batter gets. The second time around, I folded and stirred long enough for the batter to get a little runny. Think of a bowl of oatmeal.
After that, the rest was pretty easy. I piped the dough into circles on the baking sheet. They weren’t perfect, but so much better than the first batch. I expect them to look even better with more practice.
When they baked, they got their “feet”. When done the right way, macarons rise a bit, forming a ring below the original circle of batter.
Once baked, I let them cool before filling with a strawberry buttercream frosting. For the buttercream, I just mixed a few tablespoons of softened butter with half a cup of powdered sugar and a tablespoon of strawberry jam. I had added a little pink food coloring to the batter, so I thought the pink frosting would look pretty.
You can tint them any color you like and use all sorts of jams and frostings to fill them.
So here is the recipe I used.
Macarons
¾ c. almond flour
1 c. powdered sugar
2 egg whites
3 T. granulated sugar
Food coloring, optional
½ -¾ c. jam or frosting for filling the cookies
Sift almond flour and powdered sugar together. Mix well and set aside. In mixing bowl, beat egg whites for 3 minutes on medium. Egg whites should be foamy. With mixer running, sprinkle in the sugar. Beat another 3 or 4 minutes, or until soft peaks form. Add food coloring at this point, if using, and increase speed on mixer to high. Continue to beat egg whites until stiff peaks form, another 3 minutes, or so. Take about a third of the egg whites and mix into the almond flour mixture. Mixture will be sort of dry- don’t worry. Fold in the rest of the egg whites and stir/fold until mixture has the consistency of a thick batter. Think of cooked oatmeal. You don’t want to over or under mix at this point. Just stir until it gets to the “oatmeal” stage. Probably 50 strokes or so. Line a baking sheet with parchment- or use a silicone liner. Place batter in a piping bag with a round tip. Squeeze the batter into circles on the baking sheet, trying to keep them even in size. I did circles just under 2 inches across. They don’t spread during baking. Batter should settle, but if there are any little peaks, use a wet finger to press them down. Tap baking sheet on the counter 4 or 5 times to remove any air bubbles. Set aside for about 15 minutes. You need to let the dough form a kind of dry skin on the top. The way to test is to lightly touch the dough. If it sticks your finger, wait a few more minutes. Once the dough had dried enough- bake them in a preheated 350 degree oven for 12-15 minutes, depending on the size of your macarons. Remove from oven and allow to cool on baking sheet before removing. Use frosting or jam to sandwich cookies together.
Black and White Cookies

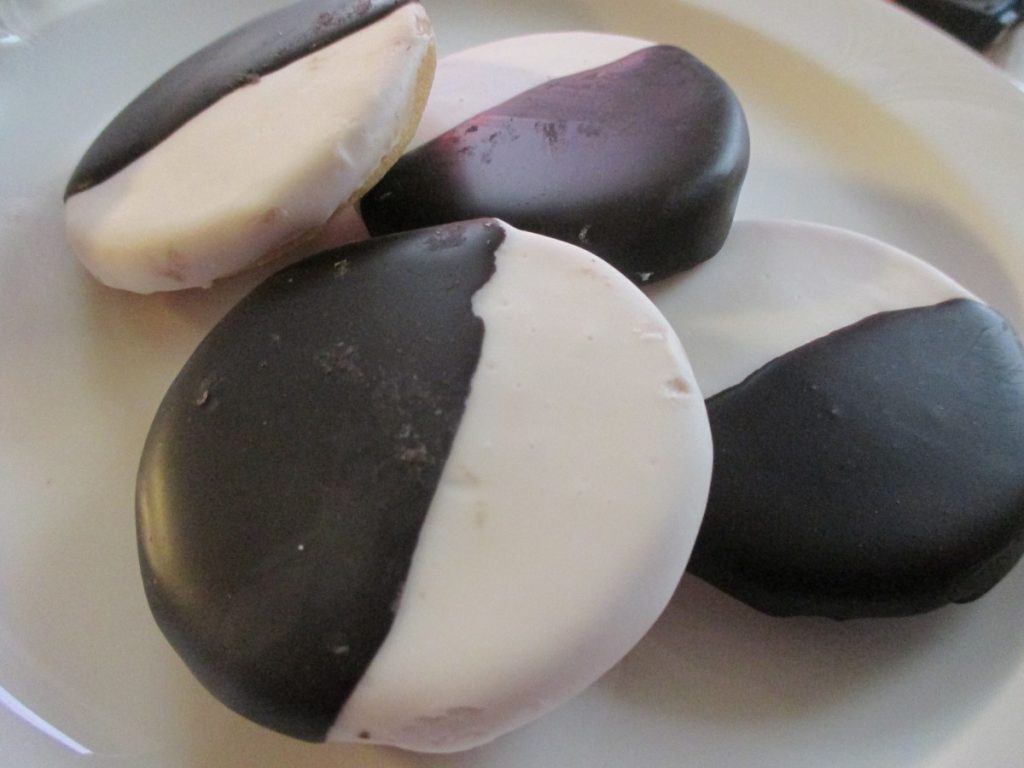
These lovely cookies are always a lot of fun to make and to serve. The name comes from the mix of both white and dark frostings used to decorate them. Black and White Cookies are a classic. They are tender, cake like cookies and one of my favorites. After the cookies are baked, you brush them with both white and dark chocolate frostings. The effect is dramatic and tasty. If you have never tried one, you really should.
Black and White Cookies
1 3/4 cups sugar
1 cup unsalted butter – room temp.
4 large eggs
1 cup milk
1/2 tsp. vanilla extract
1/4 tsp. lemon extract or
2 1/2 cups cake flour
2 1/2 cups all purpose flour
1 tsp. baking powder
1/2 tsp. salt
Frosting:
4 cup confectioner’s sugar
1/3 to 1/2 cup boiling water
1 ounce bitter or semi sweet chocolate
Preheat the oven to 350. Line two baking sheets with parchment paper. In a large mixing bowl, combine sugar and butter until fluffy. Stir in eggs, milk, vanilla, extracts, until smooth. Fold in flours, baking powder, salt and stir until mixed. Using a soup spoon (or a small ice cream scoop) drop spoonfuls of dough onto baking sheet, leaving 2 inches of room between them. Bake until edges are browned – 20-30 minutes.
Frosting: Place confectioner’s sugar in a bowl. Gradually stir in boiling water until you have a thick spreadable mixture. Remove half of frosting to a bowl and stir in melted chocolate. With a brush, decorate each cookie half with white frosting, half with chocolate. Let set until thoroughly dry.
About 4 dozen cookies.


