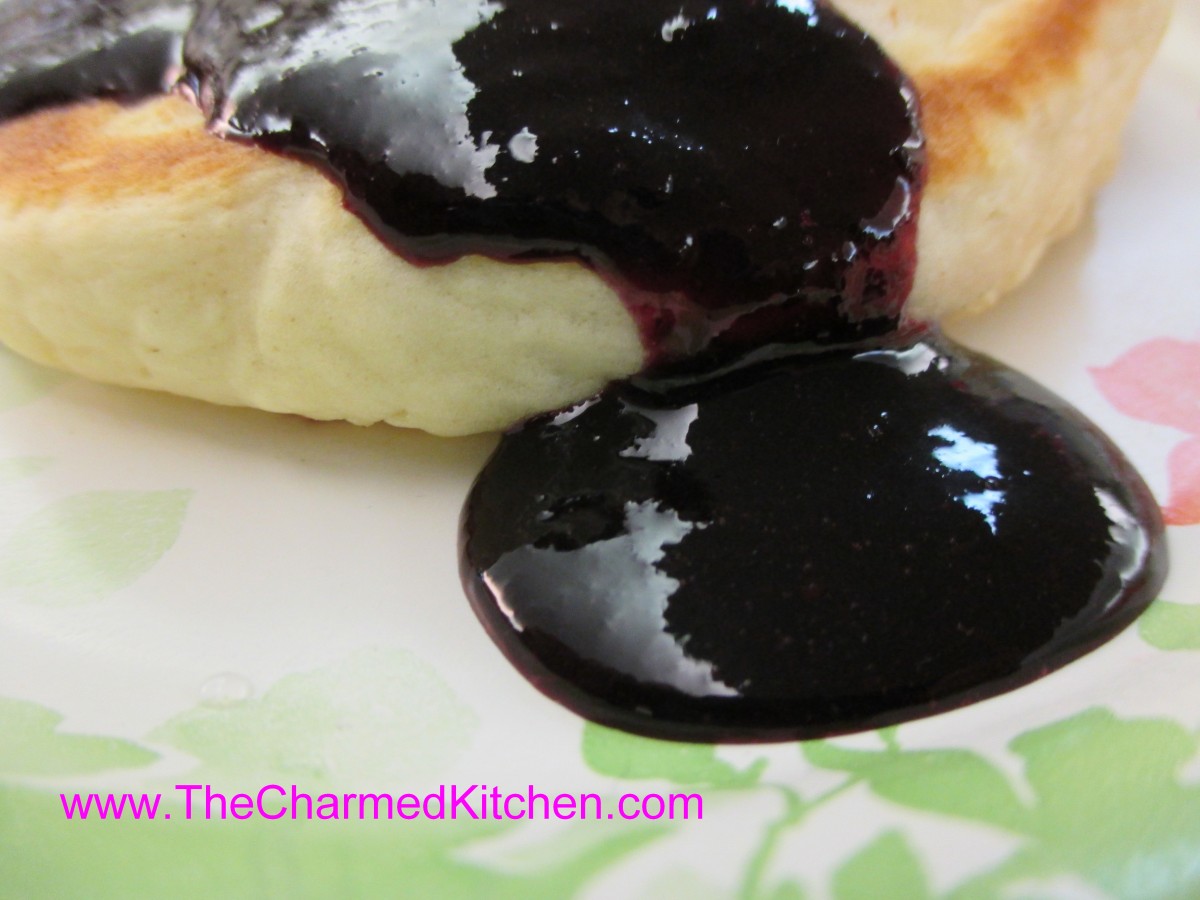
Cinnamon Coffee Scones

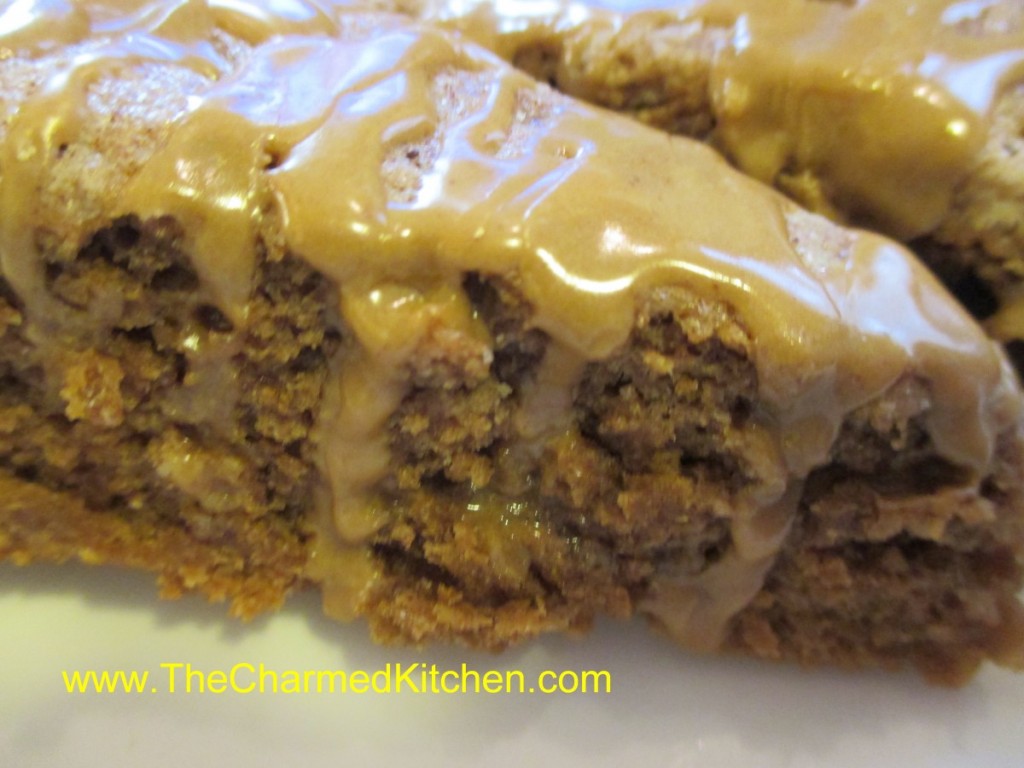
Scones should be tender, a little crumbly, and still moist in the middle. These scones are delicate, full of coffee flavor, and not too sweet. You might think of only serving scones with tea, but these are wonderful with a cup of coffee.
As with any scone, the secret is not to over work the dough. You can eat these plain or with a bit of butter or jam. I’m having mine with a cup of coffee. They really make a tasty start to the day.
When someone tells me they don’t like scones, I am sure it is because they haven’t had good scones. In a cooking class, one of the students said she only had scones once, and they were heavy and dry. I encouraged her to seek out better scones. I think these would win her over.
Cinnamon Coffee Scones
2/3 c. half and half
2 T. instant coffee powder or espresso powder
1 t. vanilla
1 egg
2 1/4 c. flour
1/2 c. sugar
1 T. baking powder
1 t. cinnamon
1 t. salt
1/2 c. cold butter
1 T. half and half, for brushing the scones
2 T. cinnamon sugar, for sprinkling on the scones
Coffee Cinnamon Glaze- recipe follows
In microwave safe container combine half and half with the coffee powder and heat 30 seconds or so. Stir to dissolve coffee and cool down before using. Heat oven to 400 degrees. Add vanilla and egg to cooled coffee mixture and beat until smooth. Set aside. Combine dry ingredients in a mixing bowl and cut in butter until mixture resembles coarse crumbs. Some small pieces of butter can still be visible. Stir in coffee mixture and mix gently until a soft dough forms. At this point you are supposed to press the dough into an 8-inch circle on a baking sheet. To get a really neat circle use an 8-inch cake pan. Sprinkle the pan with a little flour and put the dough in the pan. Press the dough into the pan. Turn the cake pan over onto an ungreased baking sheet. Do this part fast. Slam it down and then remove the cake pan. You will have a perfect 8-inch circle of dough. Use a sharp knife to cut the dough in half. If the dough is too sticky sprinkle the top with a little more flour. Cut in half again and then 2 more times. You will have eight wedges of dough forming 8 scones. Pull dough apart slightly using a spatula. They grow a lot when baking and this will give them more room to expand. Brush with the extra half and half and sprinkle with the cinnamon sugar. Bake for 20 minutes or until they spring back when touched lightly. Make glaze and drizzle over the warm scones. Makes 8.
Coffee Cinnamon Glaze
2 T. half and half
2 t. instant coffee powder or espresso powder
1 t. cinnamon
1 c. powdered sugar
Heat half and half and coffee powder together in microwave safe container for 10 seconds. Stir until smooth. Stir in cinnamon and powdered sugar until smooth and drizzle over the scones.
Polish Duck Soup/ Czarnina

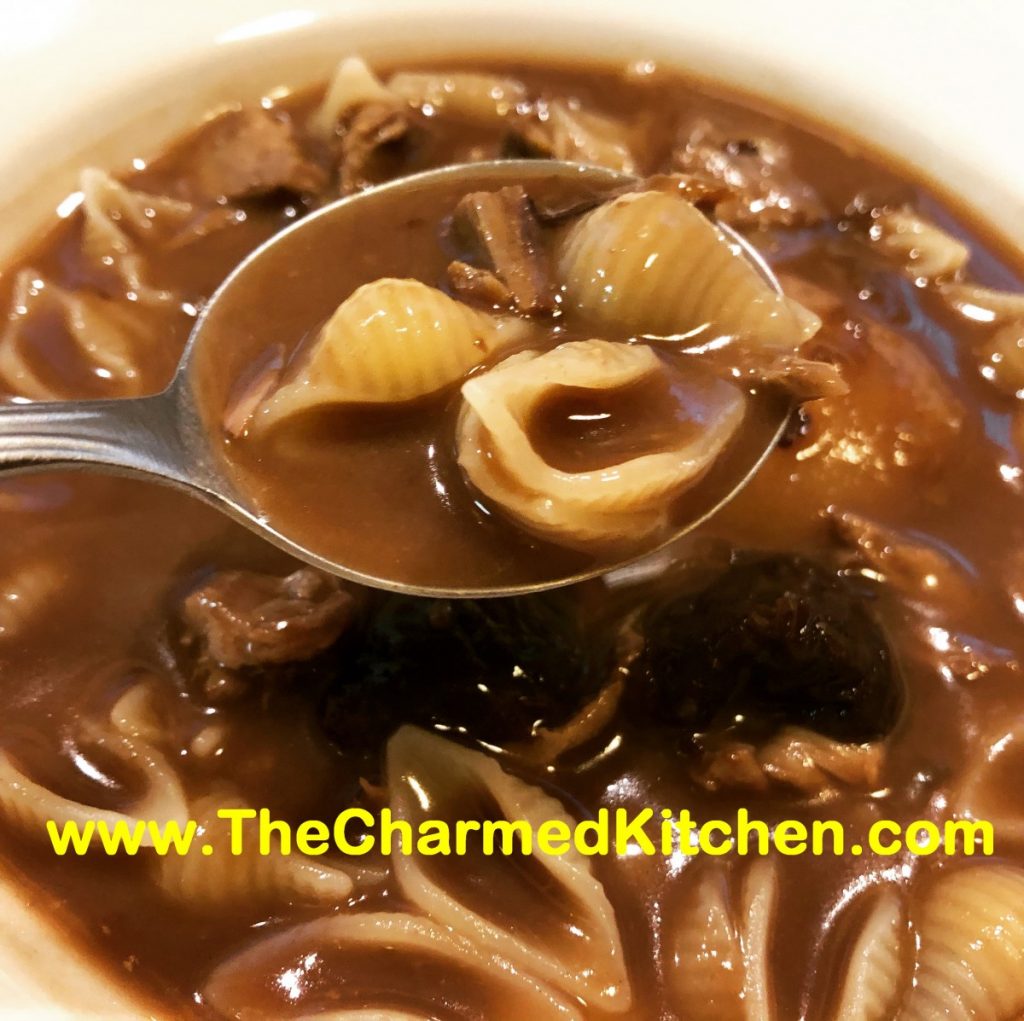
This soup is part of my Polish heritage. My Busha (Polish grandmother) made it and my mother made it and I make it. It is a rich, sweet and sour duck soup which actually has prunes and pear halves in it. That isn’t even the strange part. There is a special ingredient in Czarnina that tends to freak people out. That ingredient is duck blood. Yes, duck blood.
For those of you who are still reading, let me explain. Using the blood from animals is not that uncommon. People used every part of an animal in the past. Lots of cultures make some sort of blood sausage or blood pudding (which is really a sausage) and even beverages with blood. One time, Food Network even included Czarnina in the mystery basket on Chopped. It was a Halloween themed show, but still.
Good news is, there are two versions of my Mom’s Czarnina recipe. One using duck blood and the other one, not using blood in the soup at all. Both recipes are included in this post.
This is going to be a longer post than normal. Feel free to just scroll on down to the recipes. I think the background information is kind of important, but again, not critical to making the soup.
I decided to post this recipe on my blog for the first time ever in honor of my Mom on Mother’s Day. I know it will freak some people out. I get that. As a kid, it was always strange to tell a friend what was in that soup. The looks I would get. Truth is, I loved Czarnina, even though I went through a phase when I wouldn’t eat it. I think you would love it, too. You don’t even need duck blood to make it!!
The non-blood version happened when my Mom’s source for duck blood dried up. There was some poultry place near the West Side Market, where my Dad got her duck blood. Once they closed, they didn’t know of another place to get duck blood. She was very upset. She thought my Dad should ask if any of his hunting buddies could save the blood next time they went hunting ducks. It never happened- not really a big surprise there.
Mom had been watching a cooking show where someone was making what I assume was a mole sauce. At least it was a sauce with unsweetened chocolate in it, or perhaps cocoa. Either way, that day, an idea was born out of necessity. Mom was convinced that the blood didn’t really add that much flavor to the soup, but rather it’s distinctive brownish color. She made her soup as usual, but used cocoa and balsamic vinegar to mimic what she lacked from the loss of blood. She was pretty pleased with how it turned out. We all had to taste it. She sent samples to other family members to try. She got thumbs up. I honestly don’t know if she told them about the ingredient switch. Pretty sure she did blind tastings, so she would get an unbiased report.
Eventually Mom found a couple of sources for duck blood. One was some place on Broadway Avenue. My brother always drove her there, so I don’t honestly have a clue about that one.
I took her to the other place. There is a large Polish-American community around Fleet Avenue in Cleveland. We went to a Polish market/deli place on Fleet and asked for duck blood. The guy went to the freezer and got a carton of frozen duck blood. It always comes frozen. Apparently only in one size. We also bought a Muscovy duck to use in the soup. Mom was very pleased to have a duck blood source again. If I could remember the name of the place, or let you know if they still sell duck blood, I would. Where ever you live, seek out local producers of duck. They would be your best source for duck blood, I would think.
I still make Czarnina, but I use the cocoa version, most of the time. No one seems to noticed the difference. I was making it at a cooking class in Independence one time. After class, one of the guys from the cleaning crew popped his head in the kitchen and asked if that was Czarnina he had been smelling. I was sure to give him some to taste and he loved it.
Once you get over the blood part, the soup is really tasty and pretty unique in other ways. I already mentioned pears and prunes, in a soup. It has a fair amount of sugar and vinegar, too. Sweet and sour is a pretty common flavor profile in Polish cooking.
Mom served hers with cooked, shell pasta, so that is normally what I use. Spaetzle or kluski are more traditional, I suppose. You add the pasta to each bowl as you serve it. Never dump the pasta in the pot of soup.
The recipe makes a lot of soup. It freezes well, but you can easily cut the recipe in half. Still use a whole duck. Mom always cut the duck into pieces, once it was cooked. When you served the soup, people would get pieces of duck to eat with it. I found it easier to serve if you take the duck out of the soup once it is cooked. Cool it down, then take all the meat off the bones, cut it up and return the meat to the soup.
Another change Mom made to her Czarnina, was to skin the duck before adding it to the soup. She would render all the duck skin and fat to have duck fat for cooking with and duck cracklings for snacking. She said otherwise, you just end up skimming all that fat off of the soup anyway. Mom never liked to waste food. Now you know where I got that.
Thanks for letting me share a little part of my culinary heritage with you. Happy Mother’s Day to all the Moms out there.
Here are the recipes for Czarnina. One with the blood, one without. I left them the way Mom wrote them. Not all the ingredients are exact measurements- like celery or onions in the stock. Other things are pretty specific. Hers came out the same every time.
Enjoy!!
Irene’s Duck Soup/ Czarnina– Original Version
7 qts. Duck stock
1 duck, skinned if you prefer
Celery, onion and parsley
Cook together, covered, until duck is very tender. Remove duck, cut into serving pieces, skin if desired, and set aside.
Combine the following in a medium bowl, stirring until smooth.
1 ½ c. flour
1 c. duck blood, thawed, if frozen
1 c. water
2/3 c. each vinegar and sugar
¼ c. salt
Add mixture to stock and simmer until thickened and flavors have blended, about 30-45 minutes, stirring often. Strain and return duck pieces to soup.
Also add: ¾ lb. pitted prunes
2 large cans pears in heavy syrup , undrained
Heat through and serve with cooked shells or other pasta or kluski.
Serves 20.
Irene’s Duck Soup/ Czarnina- The new version
7 qts. Duck or chicken stock
1 duck, skinned
Celery, onion and parsley
Cook together, covered, until duck is very tender. Remove duck, cut into serving pieces, and set aside.
Combine the following in a medium bowl, whisking until smooth.
2 c. flour
3/4 c. unsweetened cocoa
1 c. water
2/3 c. each balsamic vinegar and sugar
¼ c. salt
Add mixture to stock and simmer until thickened and flavors have blended, about 30-45 minutes, stirring often. Strain and return duck pieces to soup or remove duck meat from the bones. Cut up the duck meat and return meat only to the soup.
Also add: ¾ lb. Prunes
2 large cans pears, undrained
Heat through and serve with cooked shells or other pasta or kluski.
Serves 20.
Note: While this soup freezes well you can cut the recipe in half, still using a whole duck.
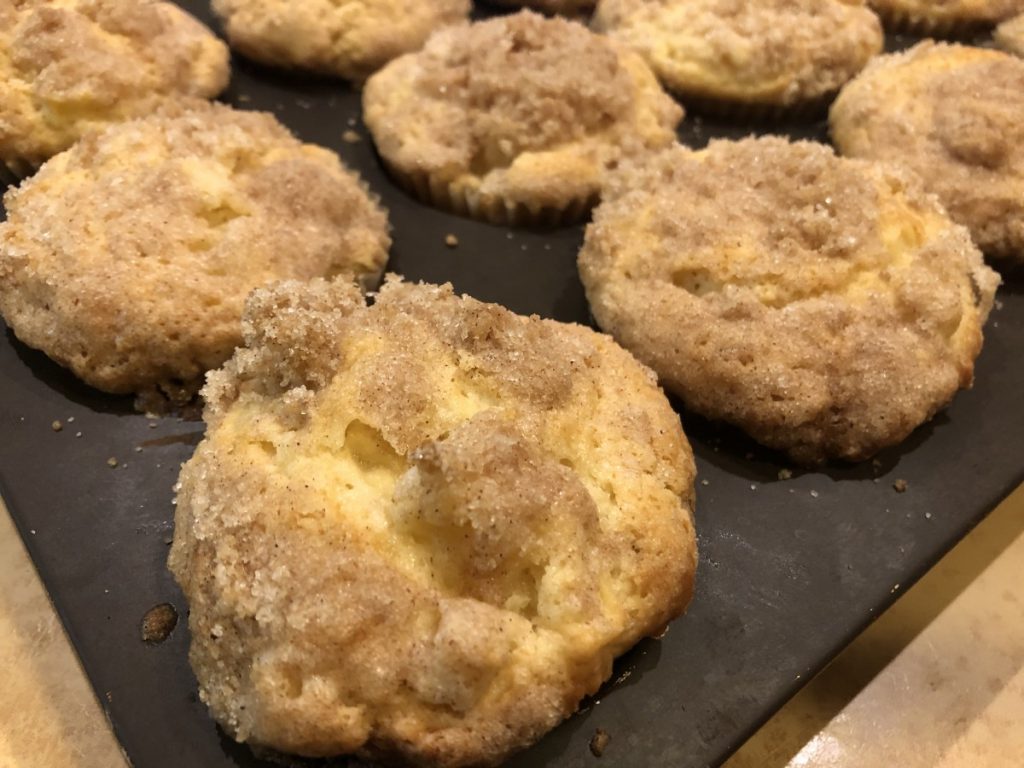
Apple Crumb Cupcakes


I wanted to bake something sweet for two dear friends. Since I had a couple of apples, I knew I wanted to use them. I decided to use my apple crumb cake recipe, but turn it into cupcakes instead. That way it would be simpler to give each friend a treat, without having to cut a cake in half. I also really love the recipe. That crumb topping is so good.
The cupcakes worked out very nicely and my friends were both happy to get them. The only problem was that I ended up making 12 cupcakes. I should have made a few more. They were very full and rose more than I had anticipated. Don’t get me wrong. They still tasted great, but smaller cupcakes would have looked better. I would make 15-18 cupcakes the next time.
So here is the recipe. Enjoy!!
Apple Crumb Cupcakes
For cupcake batter:
2 c. flour
2 t. baking powder
½ t. salt
½ stick (¼ cup) butter, softened
¾ c. sugar
1 egg
½ c. milk
2 c. chopped peeled, cored apples
For topping:
½ c. sugar
¼ c. flour
1 t. cinnamon
½ stick (¼ c. butter, chilled and cut into bits)
Combine dry ingredients and set aside. In mixing bowl with electric mixer, beat butter and sugar until light and fluffy. Beat in egg and milk. Add flour mixture gradually until just mixed in. Fold in apples. Grease or line muffin tins with paper liners. You should get 15-18 cupcakes, depending on how full you fill them. I made 12 in my test batch, and they were too full. Divide batter among the prepared pans, filling about 2/3 full. The batter is pretty thick. That is normal. Combine topping ingredients until they resemble coarse crumbs. Sprinkle over batter in pans. Bake in a preheated 350-degree oven and bake for 20-22 minutes. Use toothpick to test. Makes 15-18.
Blueberry Pancakes with Blueberry Syrup

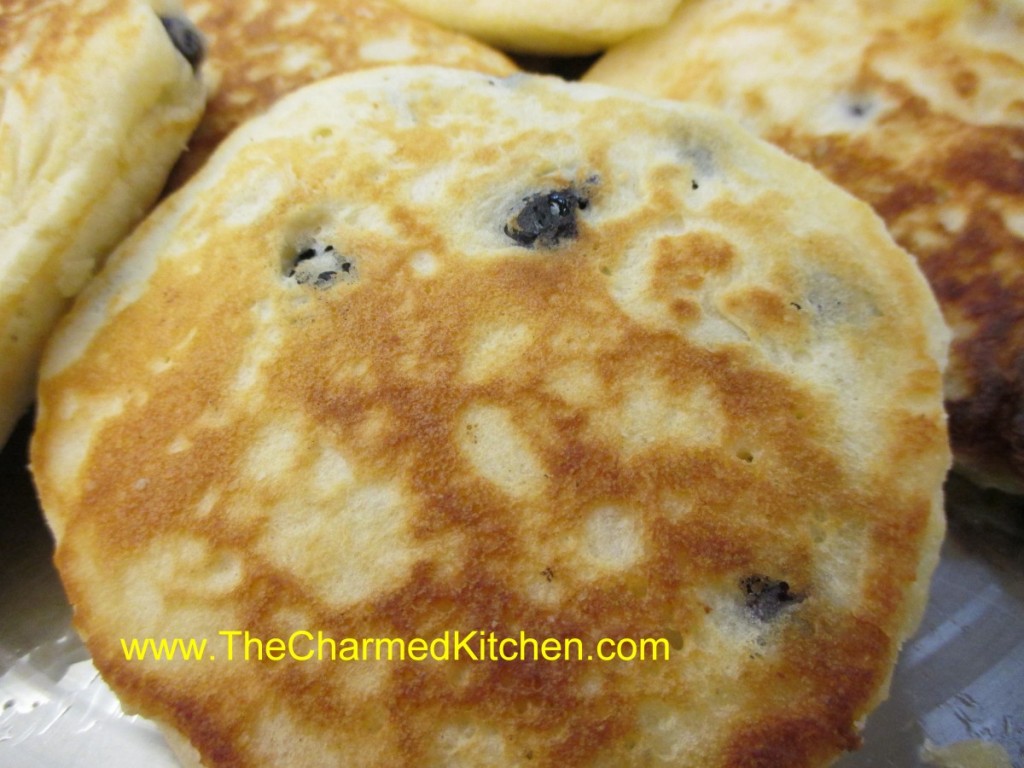
For breakfast I can’t think of a better dish than blueberry pancakes with fresh made blueberry syrup. These would make a great breakfast for Mom on Mother’s Day.
I was talking to a friend yesterday about some of our favorite breakfast foods. Blueberry pancakes were at the top of both our lists.
This is why I freeze blueberries. So I can have these wonderful pancakes whenever the mood strikes.
The secret is to fluffy pancakes is not to over mix the batter. The ingredients are stirred until just combined. I used a homemade biscuit mix as the base. The recipe follows.
The baking mix is normally made with shortening, but I use coconut oil. You can use the mix in any recipe that calls for baking mixes, like Bisquick or Jiffy mix. When using coconut oil, you might want to store the mix in the fridge in hot weather. Normally I store it at room temperature, but pop it in the fridge during the summer. You could also make the baking mix with butter- store in the fridge.
The syrup is pretty simple. Just three ingredients; blueberries, sugar and a little water. Sometimes I add some vanilla or a little lemon zest. I served it warm over the pancakes.
Blueberry Pancakes
2 c. biscuit mix*
1 c. milk – I used half and half
2 eggs
1 c. fresh or frozen blueberries
Combine mix, milk and eggs until just blended. Fold in berries. Pour batter by scant 1/4 cups in lightly greased griddle or skillet over moderate heat. Turn when pancakes are dry around the edges. Cook until golden brown. Makes about 13.
* Like Bisquick or Jiffy Mix or home made- recipe follows
Biscuit Mix
8 c. flour
1 c. powdered milk
1 c. powdered buttermilk (or 1 more cup powdered milk)
1/4 c. baking powder
1 T. salt
1 1/2 c. shortening* I use coconut oil
Combine dry ingredients and cut in shortening until well mixed. Store in tightly covered container. Makes 10 cups.
* You can substitute coconut oil or butter for the shortening- but mix will have to be kept cool. Refrigerate if using butter and use withing 3 months.
Blueberry Pancakes with Blueberry Syrup
Blueberry Syrup
4 c. blueberries
1 c. water
1½ c. sugar
In saucepan heat berries and water to a boil and boil 2 minutes. Crush berries with a potato masher as they cook. Add sugar and cook for 10- 15 minutes on medium heat until mixture thickens. Process syrup with an immersion blender or in a blender until smooth. Cool, then refrigerate. Keeps a couple of weeks. Makes about 3½ cups.
Homemade Tortillas

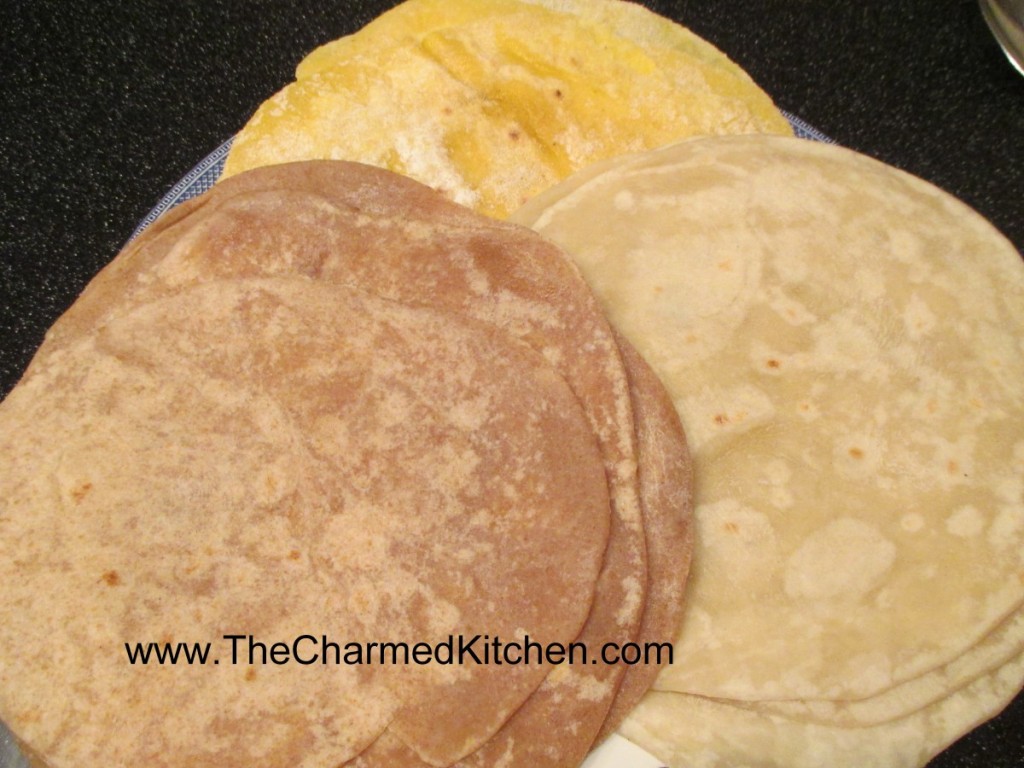
If you never made tortillas because you thought they were too hard to make, I hope I can change your mind. Tortillas are pretty easy to make. They only have a few ingredients- although you can get creative and add more stuff. The dough is simple enough. Once made, you just need to roll it out into circles. Heck, you only need to roll them into something resembling a circle. They will taste the same, even if they aren’t perfectly round.
Cooking involves a hot skillet and 30 seconds per side. The flavor and texture are so much fresher than most of what you can buy. Certainly fresher than what is at the local grocery store.
While it is easier if you have a tortilla press, I roll mine out by hand all the time. You could also use a pasta machine for rolling- although that will limit their width.
There is a little fat in most recipes- traditionally lard- but you have wiggle room here, too. I used coconut oil and was very happy with the taste and texture. So here are three recipes for tortillas- corn, wheat and whole wheat.
Corn Tortillas
1 3/4 cups masa harina ( corn flour) it is finer than cornmeal and will give you a nicer end product
1 1/8 cups hot water
In a medium bowl, mix together masa harina and hot water until thoroughly combined. Turn dough onto a clean surface and knead until pliable and smooth. If dough is too sticky, add more masa harina; if it begins to dry out, sprinkle with water. Cover dough tightly with plastic wrap and allow to stand for 30 minutes.
Preheat a cast iron skillet or griddle to medium-high. Divide dough into 15 equal-size balls. Using a tortilla press, a rolling pin, or your hands, press each ball of dough flat between two sheets of plastic wrap. Immediately place tortilla in preheated pan and allow to cook for approximately 30 seconds, or until browned
and slightly puffy. Turn tortilla over to brown on second side for approximately 30 seconds more, then transfer to a plate. Repeat process with each ball of dough. Keep tortillas covered with a towel to stay warm and moist until ready to serve.
Whole Wheat Flour Tortillas
1 cup all-purpose flour
4 cups whole wheat bread flour
1/2 cup fat, you could use lard, shortening or coconut oil – something solid at room temp- not oil
2 tablespoons salt
1 1/2 cups boiling water
flour for rolling
In a large bowl, stir together 1- cup all-purpose flour, whole wheat flour and salt. Rub in the fat by hand until the mixture is the texture of oatmeal. Make a well in the center, and pour in the boiling water. Mix with a fork until all of the water is evenly incorporated. Sprinkle with a bit of additional flour, and knead until the dough does not stick to your fingers. The dough should be smooth. Make balls the size of golf balls, about 2 oz. each. Place them on a tray, and cover with a cloth. Let stand for at least 1 hour, or up to 8 hours. Heat a griddle or large frying pan over high heat. On a lightly floured surface, roll out a tortilla to preferred thinness. Fry one at a time. Place on the griddle for 10 seconds, as soon as you see a bubble on the top, flip the tortilla over. Let it cook for about 30 seconds, then flip and cook the other side for another 30 seconds. Roll out the next tortilla while you wait for that one to cook. Tortillas can be refrigerated or frozen. Makes 18.
Flour Tortillas
2 c. flour
1/4 c. fat, you could use lard, shortening or coconut oil – something solid at room temp- not oil
1 t. salt
2/3 c. warm water
Combine flour and fat by cutting in to resemble coarse crumbs. Dissolve salt in water and stir into flour mixture. Form into a ball and knead on a lightly floured surface 2-3 minutes or until it is smooth. Divide dough into 12 equal pieces and wrap each in plastic wrap. Allow dough to rest 30 – 60 minutes. On lightly floured surface roll out a piece of dough into a 7-inch circle. Cook dough on griddle or in a skillet over medium high heat until puffy and golden on both sides, 1-2 minutes. Wrap in a kitchen towel and repeat process with remaining dough, stacking and wrapping as you go. Makes 12.
Mom’s Duck Fat Bread


There is a reason my mother’s sweet bread recipe has such an odd name. My Mom used to make this wonderful sweet bread. Made it for every family occasion. The recipe uses butter.
She was a very frugal person. One day, she decided to render the skin from a duck she was using in soup. She would never just toss it. Too wasteful. Once it was cooled, the duck fat looked like butter.
She was making her sweet bread and substituted the duck fat for the butter in the recipe. When my brother-in-law, Bob, tasted it he declared it was the best batch yet. My Mom told him what the secret ingredient was, and from that day on, we always called it duck fat bread, even when it was made with butter.
Recently, my niece Sarah has made the bread. My nephew Bobby also made the bread with his daughter, Elia. It makes me happy to see the family traditions continued onto the next generation. Elia loved it so much, Bobby suggested we rename it Elia Bread!!! I am Ok with that.
The bread really is exceptional, with a texture that is soft and a little chewy at the same time. With Mother’s Day approaching, I thought I would share my family story with all of you. Happy Mother’s Day!!
Here is the recipe- wonderful even when made with plain old butter.
Mom’s Butter Coffeecake Braids aka Duck Fat Bread
4 1/2 c. flour
2 T. sugar
1 t. salt
½ c. butter or 1/2 c. cooled rendered duck fat
1 packet yeast
¼ c. warm water
2 t. sugar
1 c. evaporated milk
2 eggs, beaten
Combine flour with sugar and salt. Cut in butter or duck fat and set aside. Dissolve 2 teaspoons sugar in warm water. Dissolve yeast in warm water mixture and set aside. Allow to become bubbly, about 5 minutes. Combine milk with eggs. Stir in yeast mixture and add to flour mixture stirring well. Knead dough in bowl until smooth, about 10 minutes. Place on lightly floured surface and knead until smooth. Cover and let rise until doubled, about 1½ hours. Divide dough in half and then each half into thirds. Roll dough into ropes and braid three ropes together. Repeat with remaining 3 ropes. Place braids in 9×5 inch greased bread pans and cover with a towel. Place in a warm, draft-free place and allow to rise until doubled, about 1½ hours. Bake in a preheated 350 degree oven for 25 minutes. If you like glaze loaves while warm with a mix of powdered sugar, a little milk, butter, and vanilla. Toasted almonds or walnuts can be added, if desired. Makes 2 loaves.
Note: You can also refrigerate the dough after kneading it if you would prefer. Just place dough in an oiled bowl, cover with plastic wrap and chill overnight. Roll and shape dough into braids when cold from the fridge. Rise, covered, until doubled in bulk, about 2-3 hours. Bake as directed.
Note: You can also place loaves on a greased baking sheet for a longer, flatter bread rather than in loaf pan.
Note: This is the same dough my parents used to make jelly doughnuts.
Lemon and Sour Cream Cupcakes

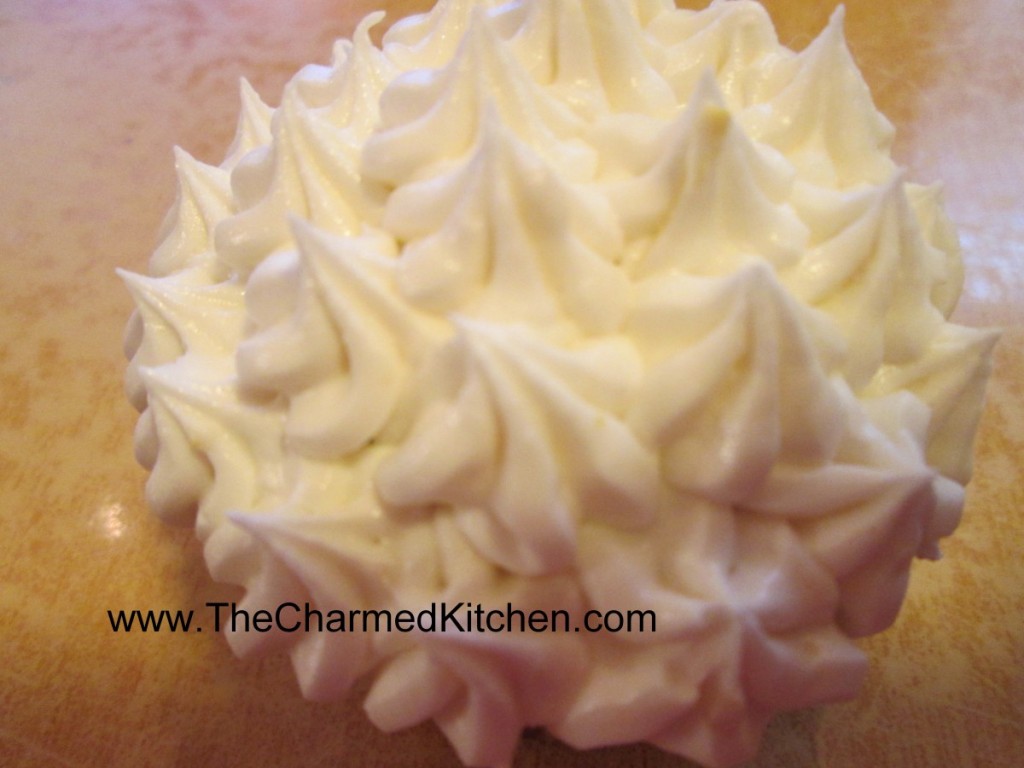
I love the lemon flavor in these cupcakes. They are rich, without being too heavy. They taste like Spring. These would make a lovely dessert for Mother’s Day.
Lemon zest in both the batter and the frosting, really makes them special. Cupcakes are such a nice, easy dessert. If you try these, I am sure you will be pleased, as will your family and friends.
It makes a big batch, so you can freeze some for later.
Even though I normally frost these, you can also just combine powdered sugar with a little lemon zest and dust them with it, instead of the frosting.
Lemon and Sour Cream Cupcakes
1 cup butter, softened
2 cups sugar
3 eggs
2 teaspoons grated lemon peel
1 teaspoon vanilla extract
3½ cups all-purpose flour
1 teaspoon baking soda
½ teaspoon each baking powder and salt
2 cups sour cream
Frosting:
9 tablespoons butter, softened
6 ¾ cups confectioners’ sugar
6 tablespoons lemon juice
1 T. vanilla extract
¾ teaspoon grated lemon peel
3 tablespoon milk
In a mixing bowl, cream butter and sugar. Beat in eggs, one at a time. Add lemon peel and vanilla; mix well. Combine dry ingredients; add to creamed mixture alternately with sour cream (batter will be thick). Fill 30 greased or paper-lined muffin cups with 1/4 cup of batter. Bake at 350 degrees for 25-30 minutes or until a toothpick inserted near the center comes out clean. Cool for 10 minutes; remove to wire racks to cool completely. For frosting, cream butter and sugar in a small mixing bowl. Add lemon juice, vanilla, lemon peel and milk; beat until smooth. Frost cupcakes. Makes 30.
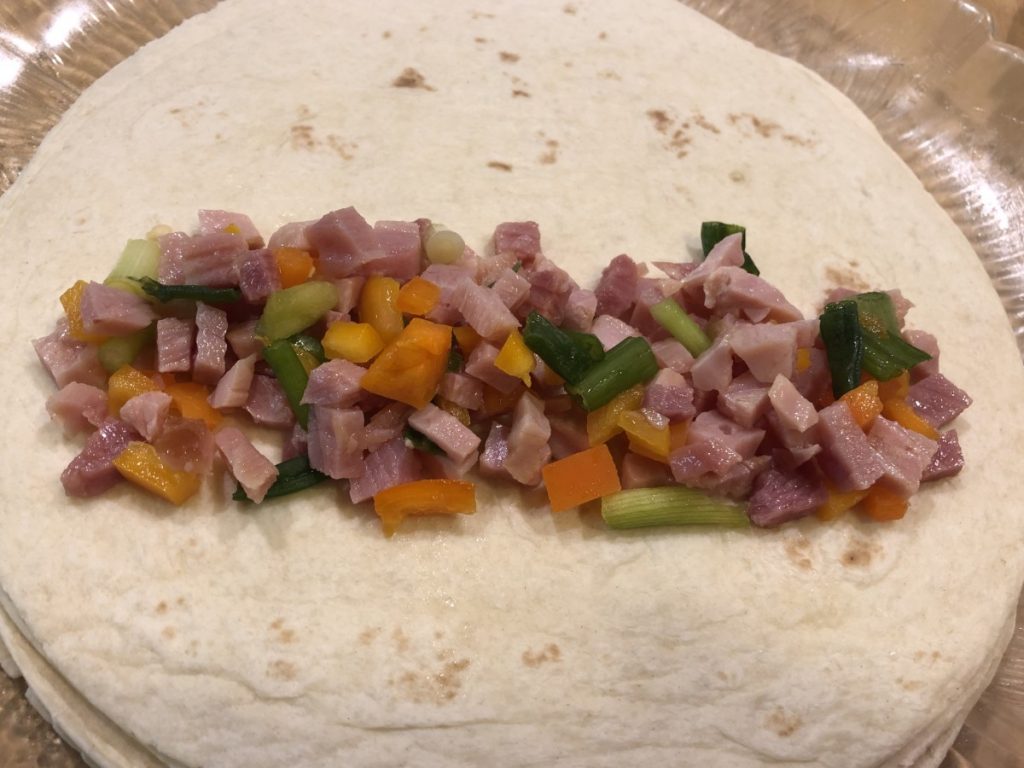
Tara’s Brunch Enchiladas


These are not traditional enchiladas, and I am OK with that. Made with a ham and cheese filling, then topped with an egg based custard, they are a wonderful addition to any brunch menu. They would be fine served for breakfast or lunch, too. The prep in all done the day before, so you just have to pop them in the oven when ready to bake and serve.
The recipe can be easily tweaked, to work with other ingredients. Maybe a corned beef and Swiss cheese version or chicken with broccoli. You could also go vegetarian with a combination of beans and veggies. You can cut the recipe in half, or freeze leftovers. I love a versatile recipe.
I have to thank my friend, Tara, for reminding me about this dish. She was looking for something to make for her Mom for a Mother’s Day brunch. I remembered how much I liked these enchiladas, so I shared the recipe with her.
It inspired me to make a batch for home. I shared them with a neighbor, as a thank you for cutting my grass for me.
So here is the recipe. Hope you give it a try.
Brunch Enchiladas
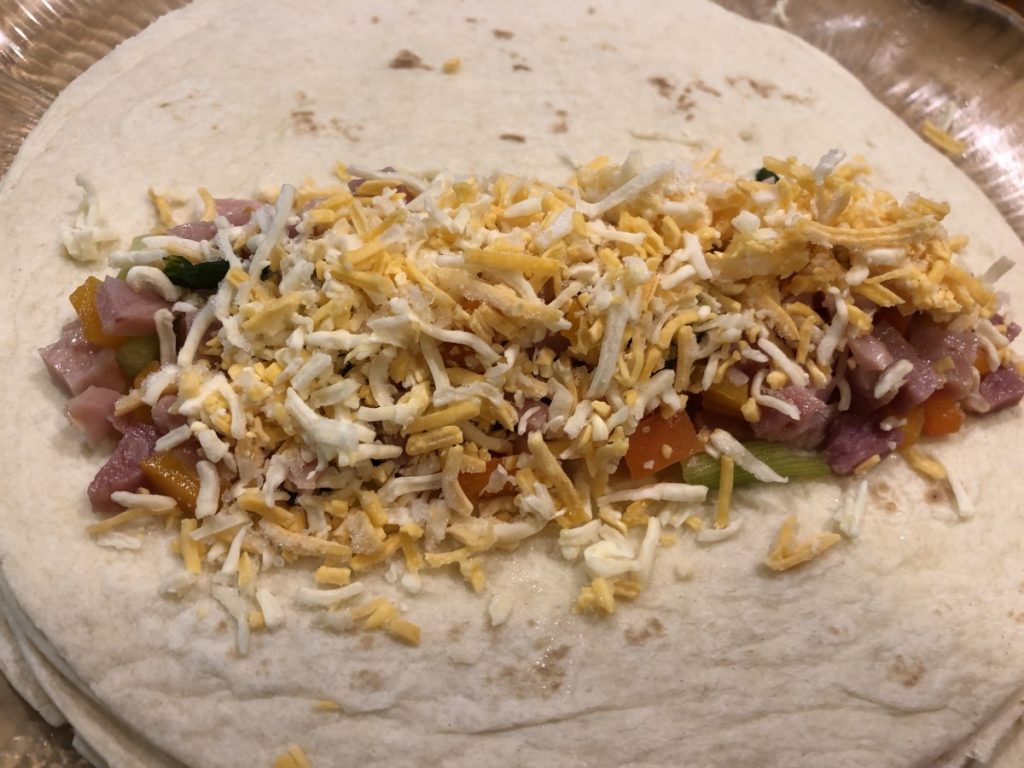
12 oz. fully cooked ham, chopped fine or ground
½ c. sliced green onions
½ c. chopped sweet pepper
2½ c. shredded cheddar cheese
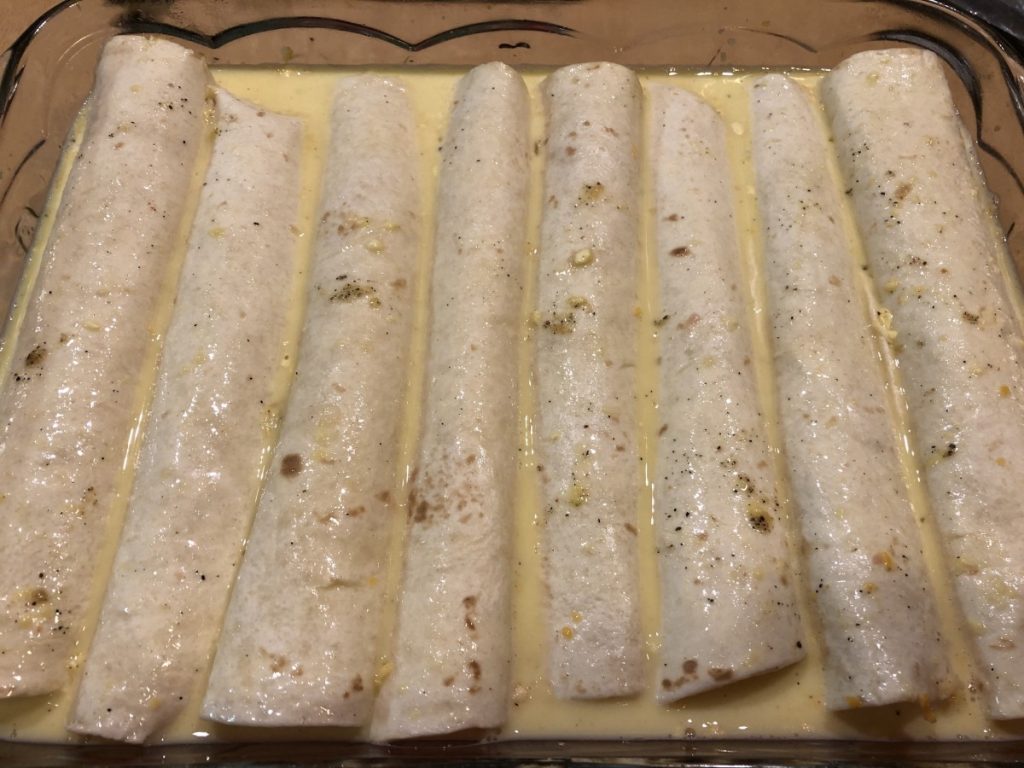
8 (8-inch) flour tortillas
4 beaten eggs
2 c. half and half or milk
1 T. flour
salt, pepper, and garlic powder to taste- ham is salty- so go light on salt
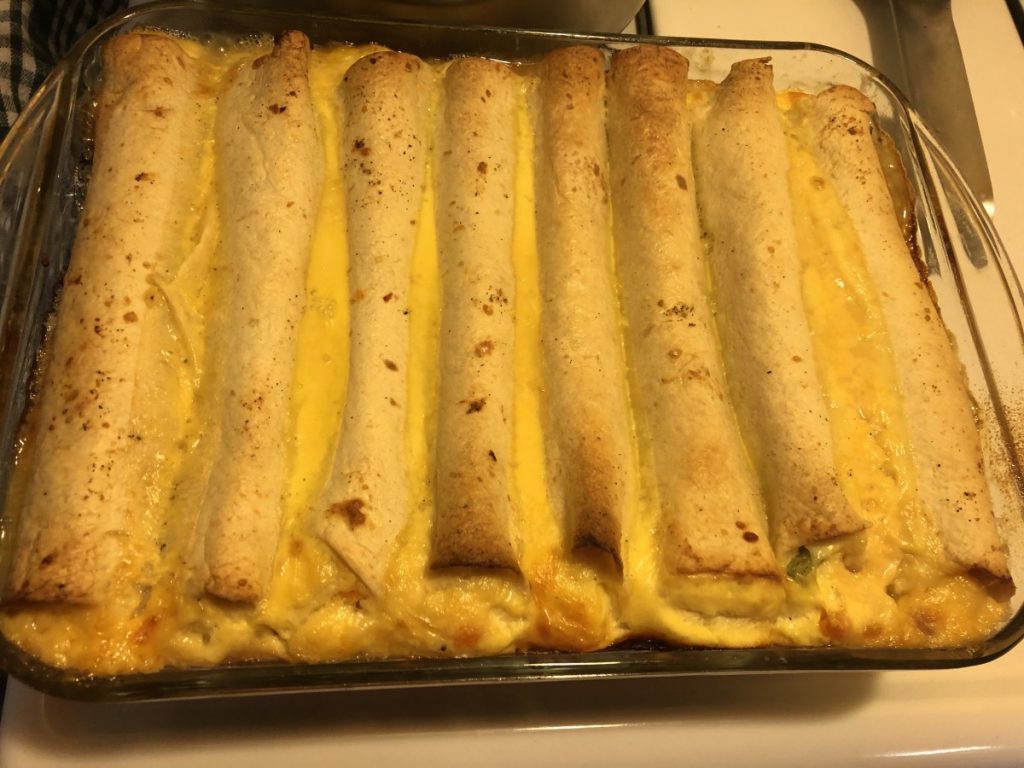
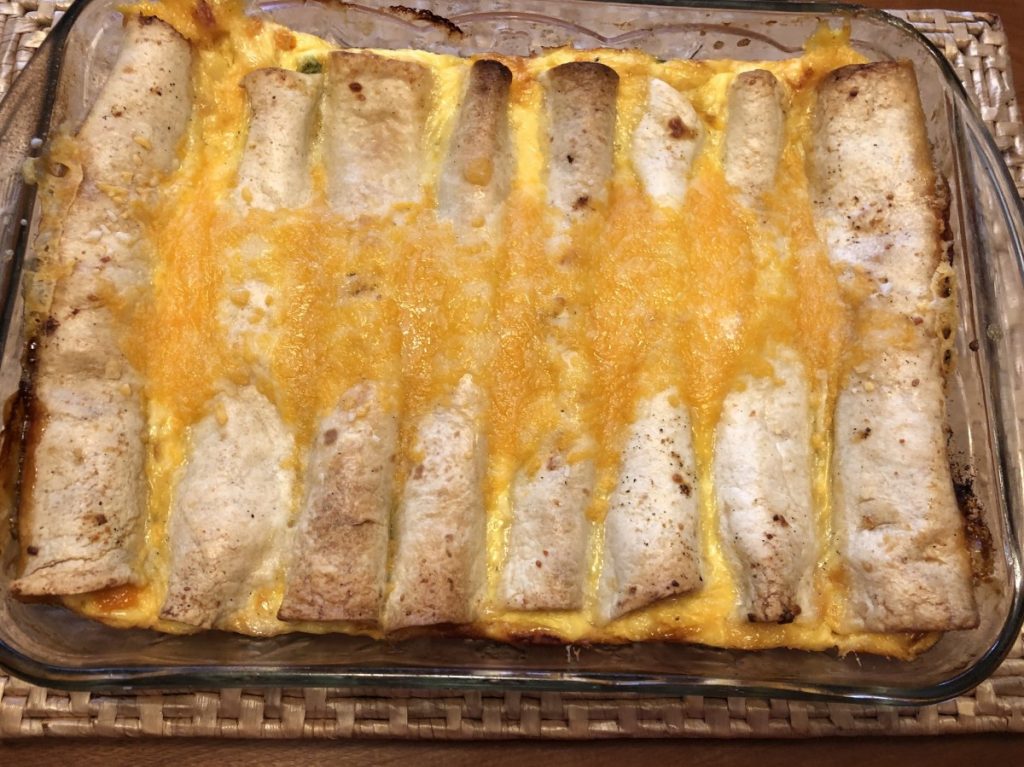
In bowl, combine ham with vegetables. Place 1/3 c. of ham mixture and 3 tablespoons of cheese in each tortilla and roll up. Place tortillas, seam side down, in greased 9×13-inch pan. Combine remaining ingredients and mix well. Pour over tortillas. Refrigerate several hours or overnight. Uncover and bake in a 350-degree oven for 45-50 minutes or until set. To check for doneness, insert a knife off center. Knife should come out clean. Sprinkle with remaining cheese and return to oven for 3-5 minutes to melt cheese. Serves 8.
Note: Let enchiladas sit a few minutes before serving to make cutting easier. I cut them down the middle, then into squares to serve.
Chocolate Pecan Pie

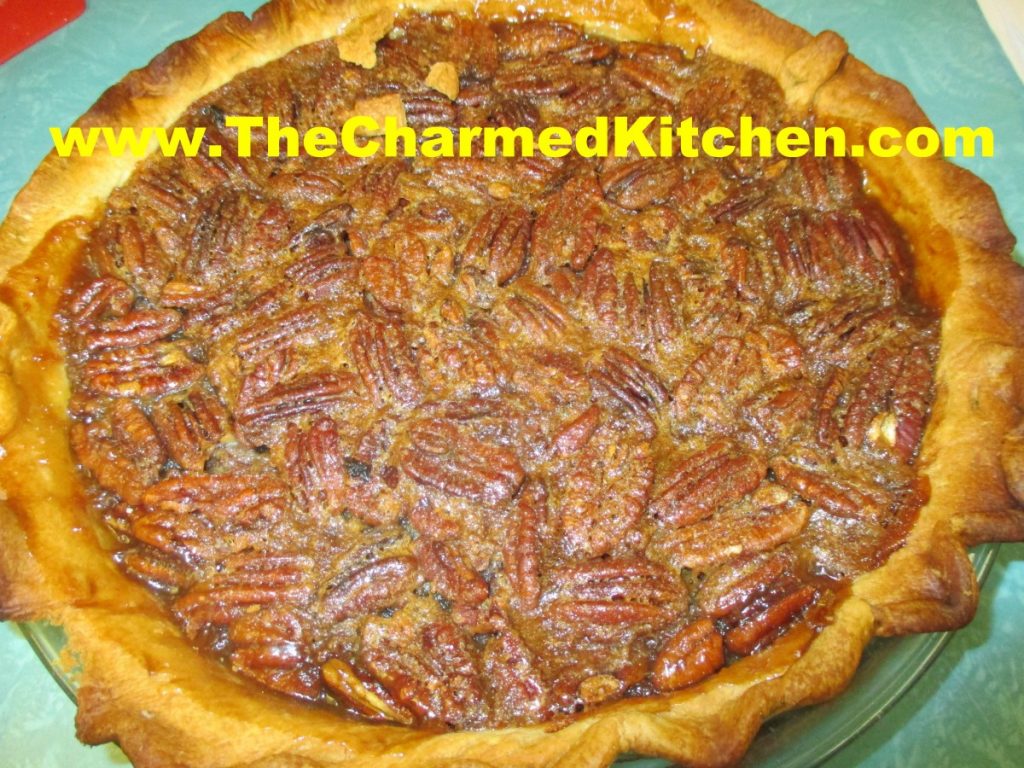
If you want to make a special dessert for Mom, you might want to make a pie. Who doesn’t love pie, right?
I like all sorts of pies. I would never want to pick just one favorite. If I had to choose, pecan would probably be it. The nuts, the sweet filling and the crispy crust all work so well together. Sometimes, I add chocolate to the pie. It is always a big hit.
This variation on classic pecan pie includes melted chocolate in the filling. I use less sugar than in my original recipe for pecan pie. The end result is wonderful.
You can use a store bought crust, but I prefer homemade. The crust recipe I normally use when I make pecan pie makes two crusts, but you only need enough dough for one. You can cut the recipe in half, freeze half of the dough, or just make 2 pies!!!
Chocolate Pecan Pie
3 eggs, slightly beaten
1 c. light or dark corn syrup
4 oz. German sweet chocolate or semi-sweet chocolate, melted and cooled
1/3 c. sugar
2 T. Butter, melted
1 t. vanilla
1½ c. pecans
1 unbaked 9-inch pastry crust
In medium mixing bowl beat together all ingredients, except the pecans until well mixed. Stir in nuts and pour into crust. Bake in a preheated 350 degree oven for 55-60 minutes or until knife inserted off center comes out clean. Makes 1.
Half and Half Dough
This is a great crust for liquid fillings like custard type pies, pecan and pumpkin. For a sweet pie like pecan you can reduce the sugar in the crust by half.
¼ c. butter, room temp
½ c. shortening, room temp or lard or coconut oil (chilled)
¼ c. sugar
½ t. salt
2½ c. pastry or all purpose flour
1/8 t. baking powder
¼ c. milk
1 t. lemon juice
Cream together the first 4 ingredients until smooth. Mix together the flour and baking powder. Set aside. Combine milk with the juice and set aside. Stir ½ c. of the flour into butter mixture. Stir until smooth. Add a little of the milk, stirring until smooth. Add remaining ingredients alternately until finished. Dough will firm up once chilled. Chill at least 4 hours before using. Makes 2 crusts.
Spinach and Artichoke Quiche


If you are still looking for something to make for Mother’s Day- why not make a quiche? I love quiche. It is a perfect dish for any time of the day. It is also so versatile. You can really get creative with the ingredients you put in your quiche. As an added bonus- quiche freezes well. I can make a couple, and freeze one for a day when I am too busy to cook. Leftover quiche is a favorite breakfast of mine. too.
I had planned to make a quiche with artichoke hearts. Seemed like a nice, Spring kind of dish. When I was starting to put the quiche together, it occurred to me that I also had a bag of spinach.
Made sense to put the two together. Sort of like spinach and artichoke dip. Why didn’t I think about this sooner? The combo made for a wonderful quiche.
I used about a pound of fresh spinach, cooked, drained and chopped, but a box of frozen spinach would work, too.
Here is the recipe.
Spinach and Artichoke Quiche
1 unbaked pie crust – enough for a deep dish pie
4 oz. diced cheddar cheese – I like a sharp cheddar
2 T. flour
1 lb. fresh spinach or 1 (10 oz.) package frozen spinach, cooked, chopped and squeezed dry
3-4 artichoke hearts, drained and chopped coarsely (about 1/2 of a 14 oz. can)
1 c. milk or half and half
3 eggs, beaten
2 T. fresh chopped parsley
Hot pepper sauce to taste
salt and pepper to taste
In 9-inch (deep dish) pie pan place the crust. Toss cheese with the flour and place in crust. Add the spinach and artichoke hearts. Combine milk with the eggs and add seasonings to taste. Pour over the spinach mixture. Place pan on a baking sheet to collect any drips and place in a preheated 400 degree oven. Bake for 30 minutes then turn down oven to 325 and continue baking until quiche is firm near the middle, about 25-30 minutes more. To test for “doneness” insert a butter knife about an inch from the center of the quiche. If it comes out clean, the quiche is done. Serves 4-6.


