Lemon-Sour Cream Cupcakes


Lemon and Sour Cream Cupcake
I love the lemon flavor in these cupcakes. They are rich, without being too heavy, and full of zest. I had picked up a bunch of lemons recently. Since I need dessert for dinner, I thought I would bake up a batch.
Lemon zest in both the batter and the frosting, really makes them special. Cupcakes are also such a nice, easy dessert. If you try these, I am sure you will be pleased, as will your family and friends.
It makes a big batch, so you can freeze some for later.
Even though I normally frost these, you can also just combine powdered sugar with a little lemon zest and dust them with it, instead of the frosting.
Lemon and Sour Cream Cupcakes
1 cup butter, softened
2 cups sugar
3 eggs
2 teaspoons grated lemon peel
1 teaspoon vanilla extract
3½ cups all-purpose flour
1 teaspoon baking soda
½ teaspoon each baking powder and salt
2 cups sour cream
Frosting:
9 tablespoons butter, softened
6 ¾ cups confectioners’ sugar
6 tablespoons lemon juice
1 T. vanilla extract
¾ teaspoon grated lemon peel
3 tablespoon milk
In a mixing bowl, cream butter and sugar. Beat in eggs, one at a time. Add lemon peel and vanilla; mix well. Combine dry ingredients; add to creamed mixture alternately with sour cream (batter will be thick). Fill 30 greased or paper-lined muffin cups with 1/4 cup of batter. Bake at 350 degrees for 25-30 minutes or until a toothpick inserted near the center comes out clean. Cool for 10 minutes; remove to wire racks to cool completely. For frosting, cream butter and sugar in a small mixing bowl. Add lemon juice, vanilla, lemon peel and milk; beat until smooth. Frost cupcakes. Makes 30.
Marinated Mushrooms and Peppers

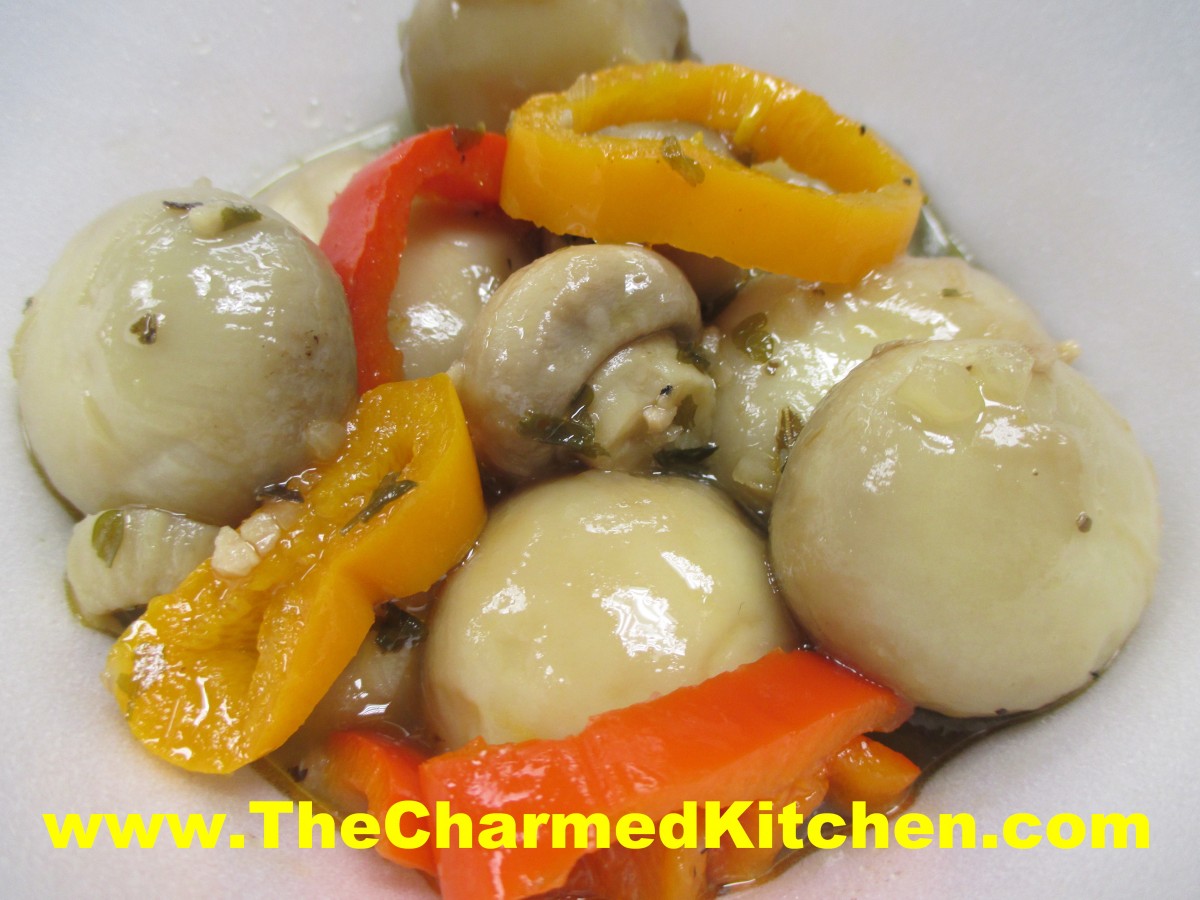
Marinated Mushrooms and Peppers
This dish combines two of my favorites- mushrooms and peppers. They are cooked together in an herb-rich brine, then allowed to chill in the brine, absorbing even more flavor. Think of it like a fresh pickle.
Once finished, the marinated veggies will keep for several weeks in the fridge.
This is a great dish to have on hand. You can serve it as an appetizer, with cheese and crackers, or as part of an antipasto tray. I have been known to eat them right out of the container as a snack.
You can also serve it on a bed of lettuce, as a salad, using some of the brine as the dressing. I sometimes double the brine ingredients, just so I have extra “liquid” to use as a dressing.
I kept it fairly mild, but you can add hot sauce for a spicier version, if you prefer.
I know 2 pounds of mushrooms sounds like an awful lot. It really isn’t. The mushrooms cook down a lot.
Marinated Mushrooms with Peppers
1/2 cup red wine vinegar
1/3 cup water
2 tablespoons oil
1 teaspoon sugar
1 tablespoon chopped onion
1 tablespoon chopped fresh parsley
1/2 teaspoon dried basil
2 cloves garlic, minced
1/4 teaspoon salt
1/4 teaspoon fresh ground black pepper
2 lbs. fresh mushrooms, stems removed
2 sweet peppers, seeded and diced
Combine the vinegar, water, oil, sugar, onion, parsley, basil, garlic, salt, and pepper; bring to a boil. Stir in the mushrooms and red bell pepper; return mixture to a boil; reduce heat and simmer until the mushrooms are tender, 5 to 10 minutes. Remove from heat and allow to cool to room temperature. Transfer to a covered container and store in refrigerator at least 4 hours before serving.
Violet Jelly

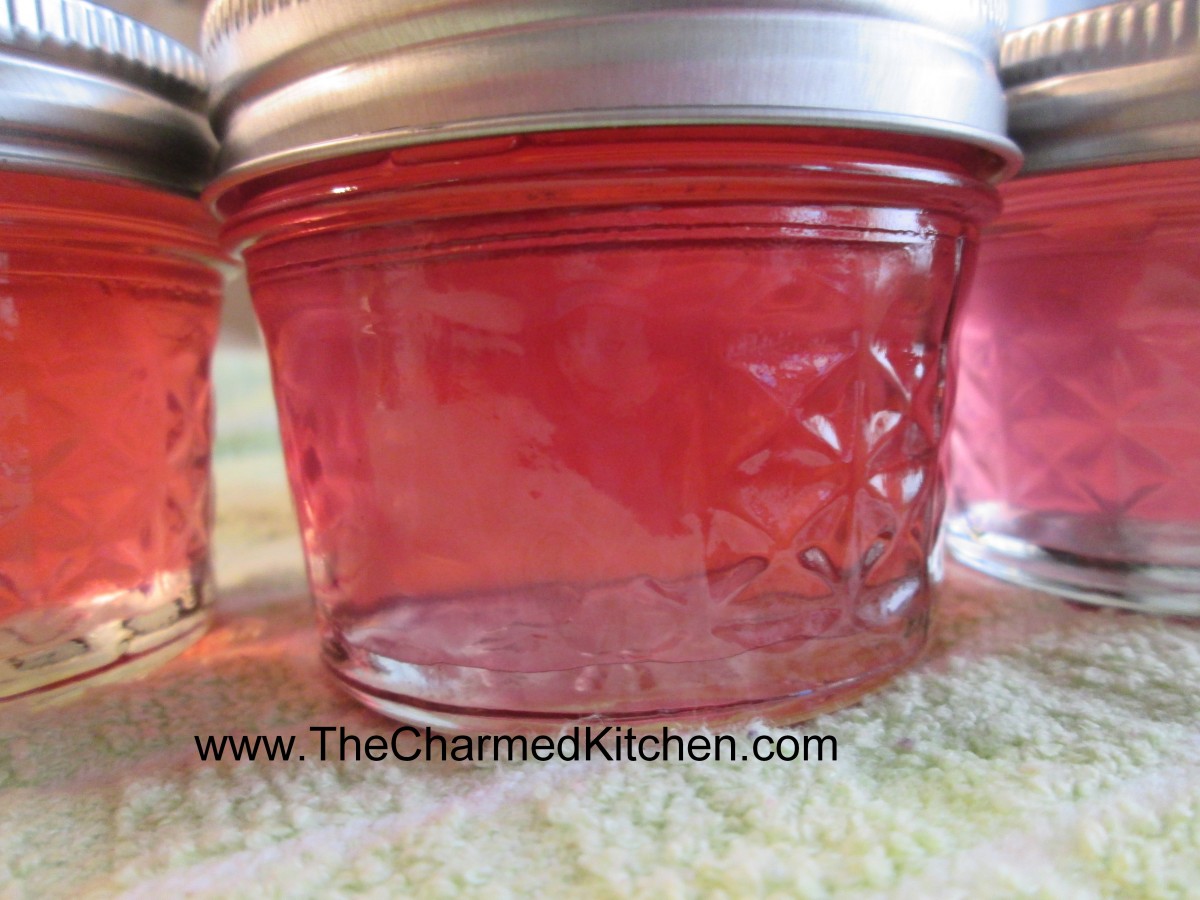
Violet Jelly
I am always interested in new and different ways to use my edible flowers. A few years ago, I started making jelly with my violets. I started by making infused vinegar from some of my violets. I like the vinegar for dressing salads.
Later, I decided to use some of the violet vinegar as a base for the jelly. It worked out great. The end product had a sweet taste of violets, but the vinegar added a tartness I really liked. It also came out a stunning pink color.
Since the violets are steeped in vinegar- you can harvest over several weeks- just keep adding blossoms to the vinegar. If you don’t have a lot of blossoms at once, you can harvest a few at a time over a longer period of time. The violets in vinegar will keep, so you don’t have to make the jelly right away.
I like to have equal parts flowers and vinegar for a nice strong floral flavor, but you can get by with fewer blossoms if you need.
Start with a clean jar, and put your violets in it. Pour vinegar over to cover. White vinegar or white wine vinegar can be used. Heck you could probably use red wine vinegar, too. Cider vinegar might affect the color. You can continue to add flowers to the jar as you pick them. I picked 4 cups of violets and put them in a quart mason jar. I added vinegar to fill the jar, closed it up and let the flavors blend for a week. I could have let it sit longer if I was too busy to get to it. If you are in a hurry and want to make the jelly right away just heat up the vinegar and steep the flowers.
After a week, I strained it out then poured the mixture through a coffee filter to get it really clear. I ended up with 3 1/2 cups of violet “vinegar” to use for my violet jelly. I had a basic idea of how much sugar I would need so I went from there. It worked out great and jelled perfectly.
Violet Jelly
3 1/2 cups violet vinegar*
1/2 c. lemon juice
1 box powdered pectin
5 c. sugar
Wash and prep jars and get water bath heating up. Place violet vinegar in pan and add lemon juice and pectin. Bring mixture to a rolling boil over high heat. Add sugar and return to the boil. Stir often. Once mixture gets to a full rolling boil, boil 1 minute. Remove jelly from heat and skim off any foam. Ladle hot liquid into jars leaving 1/4 inch headspace. Wipe rims and adjust lids. Process in a boiling water bath for 10 minutes for 4 oz. and 8 oz. jars. Remove jars to cooling rack and check seals once they have cooled down. Yield: about 7 half pint jars or 13-14 (4 oz.) jars.
*For 3 1/2 cups of violet vinegar you will need 3-4 cups of blossoms and 3 1/2 cups of vinegar.
Lilac Jelly

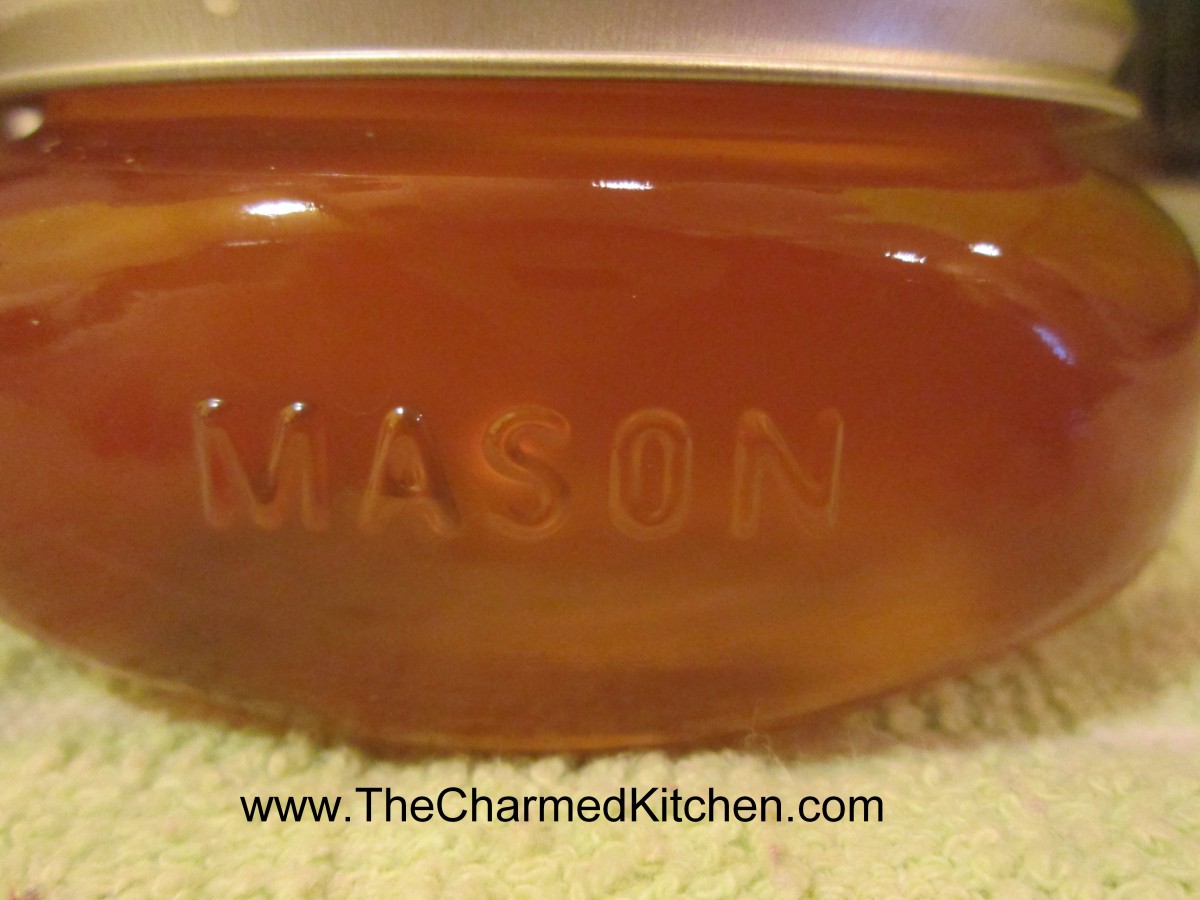
Lilac Jelly
This time of year, I always gather lilacs and make lilac vinegar with them. It’s easy to do. You just put lilac blossoms in a jar and cover them with vinegar. I use a cup of vinegar for every cup of flowers. I let the mixture steep for a week or longer and then strain out the blossoms. Any 5% strength vinegar works fine. I kind of like apple cider vinegar.
I decided to use some of this mixture to make jelly this year. The color of the vinegar is a light pink color. The cooking process changed it somewhat and it came out a light honey color. Very pretty. By using vinegar as the base, the jelly has a nice combination of tartness with the sweet. I could see using it on toast or as a glaze for meats.
You can use the same recipe for violets and roses.
Lilac Jelly
3 1/2 cups lilac vinegar
1/2 c. lemon juice
1 package powdered pectin
5 c. sugar
Wash and prep jars and get water bath heating up. Place violet vinegar in pan and add lemon juice and pectin. Bring mixture to a rolling boil over high heat. Add sugar and return to the boil. Stir often. Once mixture gets to a full rolling boil, boil 1 minute. Remove jelly from heat and skim off any foam. Ladle hot liquid into jars leaving 1/4 inch headspace. Wipe rims and adjust lids. Process in a boiling water bath for 10 minutes for 4 oz. and 8 oz. jars. Remove jars to cooling rack and check seals once they have cooled down. Yield: about 7 half pint jars or 13-14 (4 oz.) jars.
Sweet and Sour Pork


Sweet and Sour Pork
For dinner with a friend the other night, I decided to make sweet and sour pork. It takes a bit of work- but it is worth the effort. I used a fresh pineapple, which I prefer, but canned could be used, too.
I have to admit to loving all things sweet and sour. You can buy sweet and sour sauce in most grocery stores, but I like my own better.
Make the sauce first, so you can just toss it over the pork and veggies when ready to serve.
The pork is cubed and marinated overnight in a mixture of soy sauce, cornstarch and an egg. The pork comes out very tender, when prepared this way. You could substitute cubed chicken, for the pork, if you prefer.
Sweet and Sour Pork
1-2 lbs. boneless pork
1 egg
1 t. cornstarch
2 t. soy sauce
Additional cornstarch for dredging
oil for frying
1 medium onion, chopped
1 sweet red or yellow pepper, seeded and chopped
2 cups peeled and cubed fresh pineapple, or 1 can pineapple in juice, drained, reserving juice for sauce
Sweet and Sour Sauce, recipe follows
Chopped green onions
Cut meat into cubes and place in bowl. Combine egg, 1-t. cornstarch and soy sauce and pour over the meat, stirring to coat. Allow marinating at least 1 hour in fridge, but best if done the day before, or early in the day.
When ready to cook, heat 1-2 inches of oil in a medium sauce pan to 350 degrees. Dredge the pork in corn starch to coat. Set aside. Heat 1T. oil in large skillet or wok. In wok, sauté onions on high until tender. While you are cooking the onions and other vegetables, start cooking the cubed pork in the sauce pan in the 1-2 inches of hot oil. It will take several batches to cook the pork. As the pork cooks- it will take about three minutes per batch- remove the pork from the pan and drain on paper towels. Continue to cook the pork in batches while finishing the veggies and pineapple in the wok. Add pepper to onion and sauté 3 minutes more. Add pineapple and cook until pineapple starts to brown a little. Add the cooked pork to the onion mixture. Then and some of the sweet and sour sauce and toss until coated. There is usually extra sauce for a later use. Serve over rice, and top with some green onions. Makes 4-6 servings.
Sweet and Sour Sauce- see note
1/2 c. apple cider vinegar
1/2 c. sugar
1/2 c. pineapple juice
3 T. ketchup
2 T. soy sauce
2 T. cornstarch
1 t. dried minced garlic
1-t. fresh grated ginger
Hot pepper flakes to taste
In saucepan combine all ingredients. Cook over medium heat, stirring as mixture gets hot, until sauce begins to bubble. It will also get much clearer. Boil gently 1 minute, stirring constantly before removing You may also want to use only some of the sauce and save the rest for another use.from heat. Makes 1 1/2 c. Keeps in the fridge for a couple of weeks.
Note: If you make the sweet and sour sauce ahead of time it will get runny when reheated if made with regular cornstarch. Either use modified cornstarch (Clear Gel ) or make sauce just before using.
Rich and Chewy Brownies

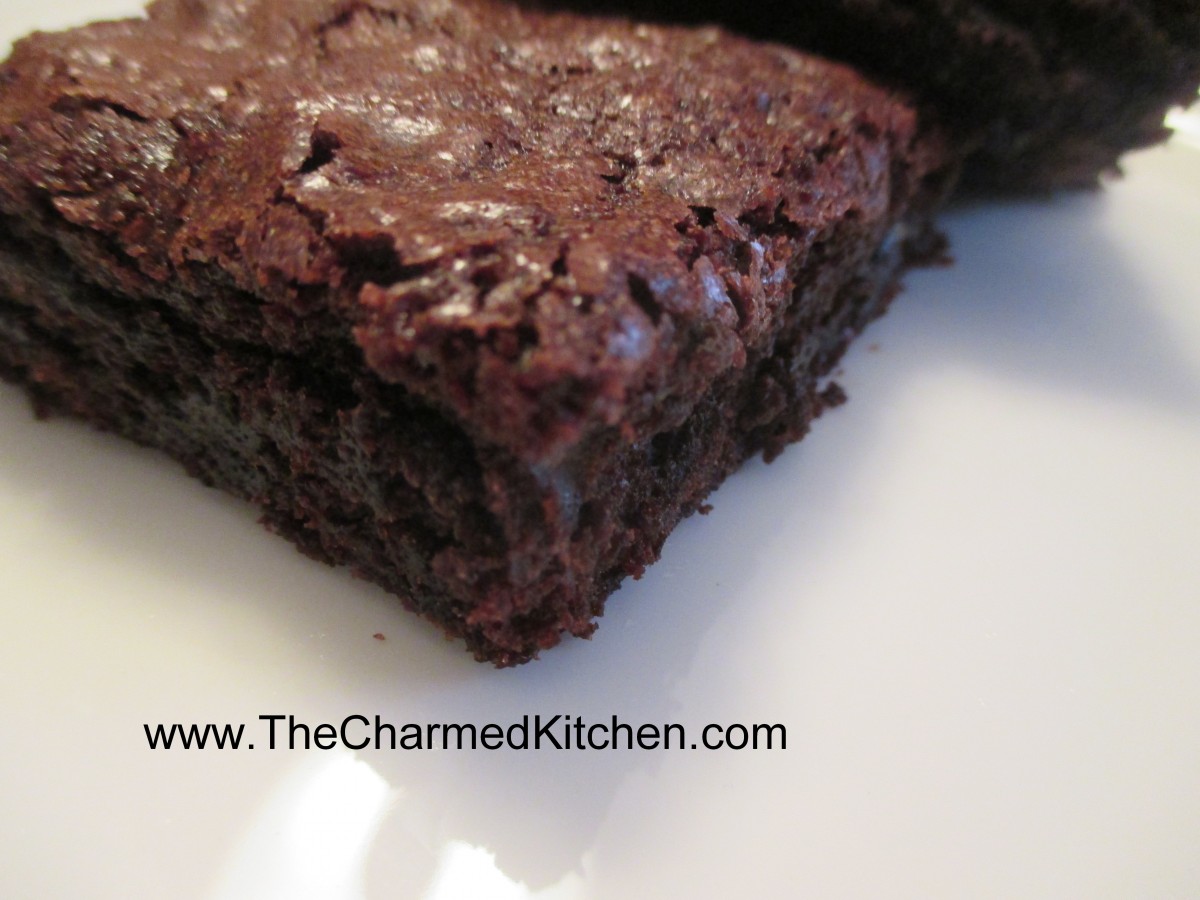
Rich and Chewy Brownies
Brownies have been around for almost 100 years. The story about the creation of brownies, is that they were an accident. A woman was making a chocolate cake. She couldn’t find her recipe, so she made the cake as best she could from memory. The cake didn’t rise- and brownies were invented.
What a happy accident that was for the rest of us.
There are a lot of versions of brownies around. Some are more like a chocolate cake, just a little denser. Others are moist, and so dense they are almost fudge like.
I have a lot of brownie recipes. This is one of my favorites. If you make them, you will understand why. They are soft, rich and a little chewy. They can be serves plain, dusted with powdered sugar, or frosted.
Rich and Chewy Brownies
3 sticks butter, melted and cooled
3 c. sugar
1 T. vanilla
6 large eggs
1½ c. flour
1 c. cocoa
1 t. baking powder
1 t. cinnamon
1 c. chocolate chips
Heat oven to 350 degrees and grease a 13×9 inch pan. Beat together butter, sugar and vanilla. Whisk in eggs one at a time. Combine dry ingredients and stir into batter. Stir in chocolate chips and spread batter in prepared pan. Bake 40-45 minutes, or until brownies pull away from sides of pan. Cool brownies completely in pan, on a rack and cover with foil. Let stand 6 hours before serving. Makes 24.
To serve, you can leave them plain, dust with powdered sugar, or frost. Here is a great frosting recipe for these brownies.
Easy Chocolate Butter Cream
6 T. butter, softened
1/3 – 3/4 c. cocoa, depending on how dark you want your frosting.
2 2/3 c. powdered sugar
1/3 c. milk
1 t. vanilla
Cream butter. Combine cocoa and sugar. Beat cocoa mixture in alternately with the milk until frosting is spreading consistency. Beat in vanilla. You may need an additional tablespoon of milk. Makes about 2 cups.
Spring Sunshine Salad

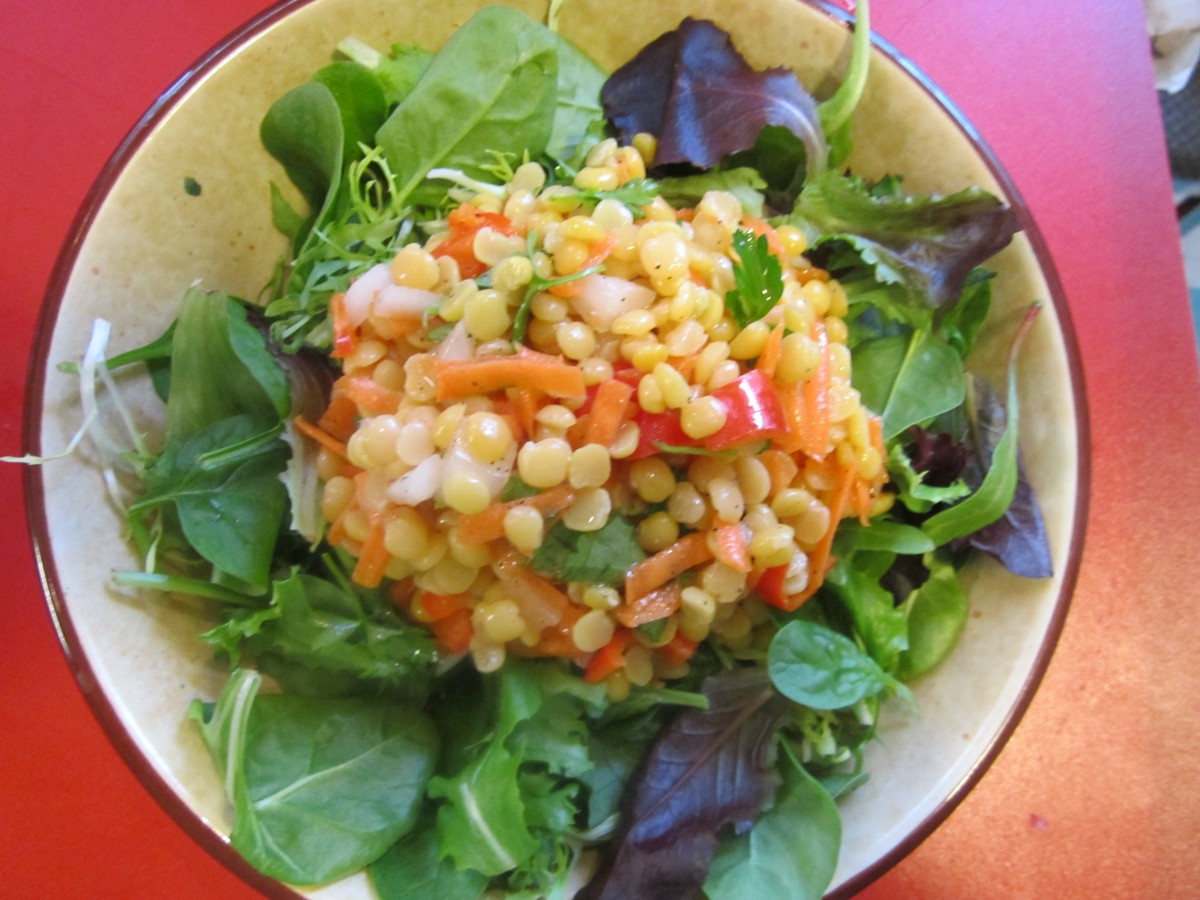
Spring Sunshine Salad
When I say split peas what comes to mind? Split pea soup? GREEN split pea soup? Years ago my dear friend, Dale Gallis, turned me on to yellow split peas. I started making soup from them but also used them in salads.
Today’s recipe is a tasty vegetarian salad that is as satisfying as it is pretty. The color is bright, just perfect after several days of rainy weather. The yellow split peas are combined with carrots, sweet onion, sweet peppers and fresh herbs, then tossed with a simple combination of apple cider vinegar and olive oil. You can serve it right away, or let the flavors blend in the fridge for a bit. I served my salad over a mix of Spring greens.
Yellow (or green) split peas cook to al dente in about 20 minutes so they are a quick option, too. Much shorter cooking times than other legumes.
Spring Sunshine Salad
1- 1 1/2 c. raw yellow split peas
salt
1 carrot, peeled and shredded
1/2 c. chopped sweet onion
1/2 c. chopped sweet pepper
1/2 c. chopped parsley
1/2 c. snipped chives
1/4 c. olive oil
1/4 c. cider vinegar
salt and pepper to taste
6 c. mixed Spring greens
Rinse peas and place in a saucepan. Cover with water and add a little salt. Bring to a boil and simmer until peas are tender, about 20 minutes. Drain and rinse under cold water. Combine peas with carrots, peppers and onion and toss well. Add parsley, chives, oil, vinegar and salt and pepper to taste. Chill until ready to use. Serve on greens. Serves 3-4.
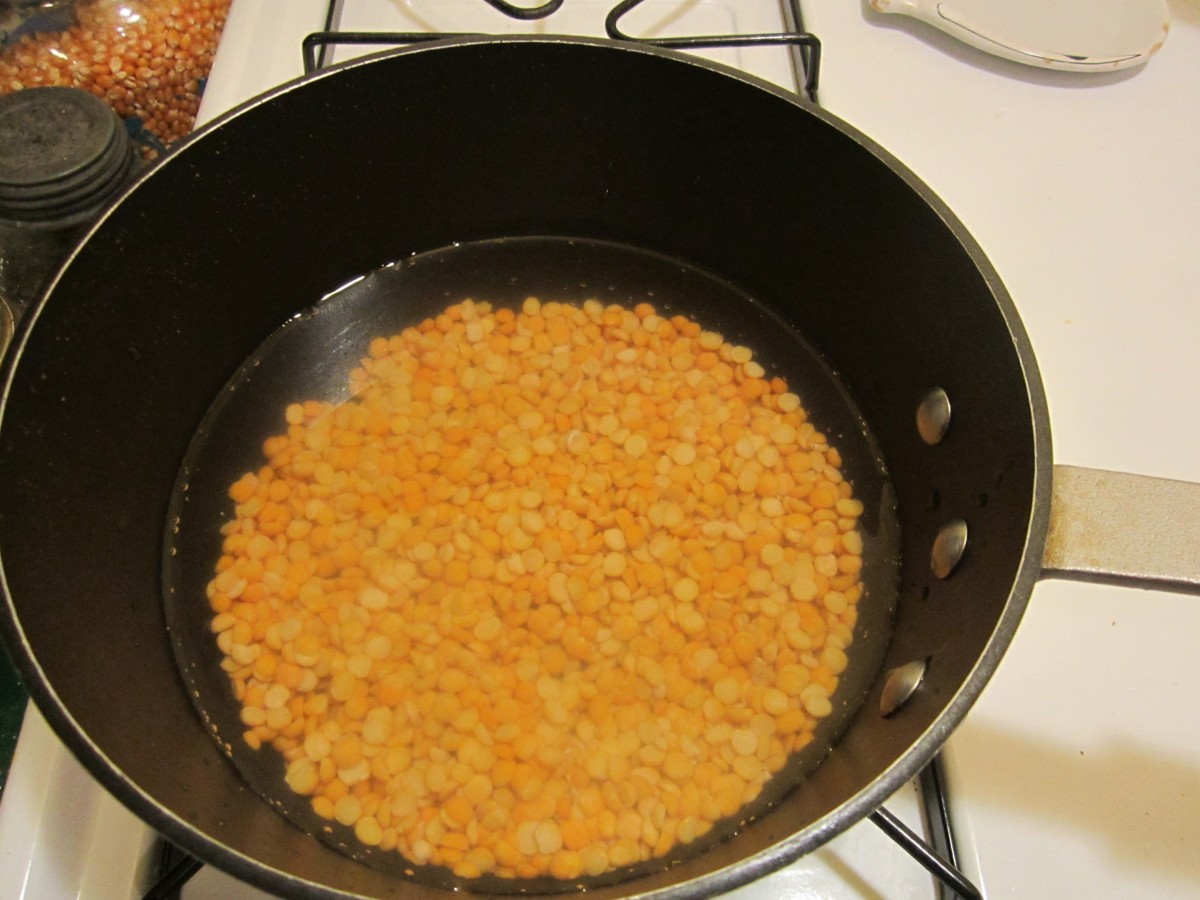
Cook in simmering water until tender

Rinse in cold water after cooking
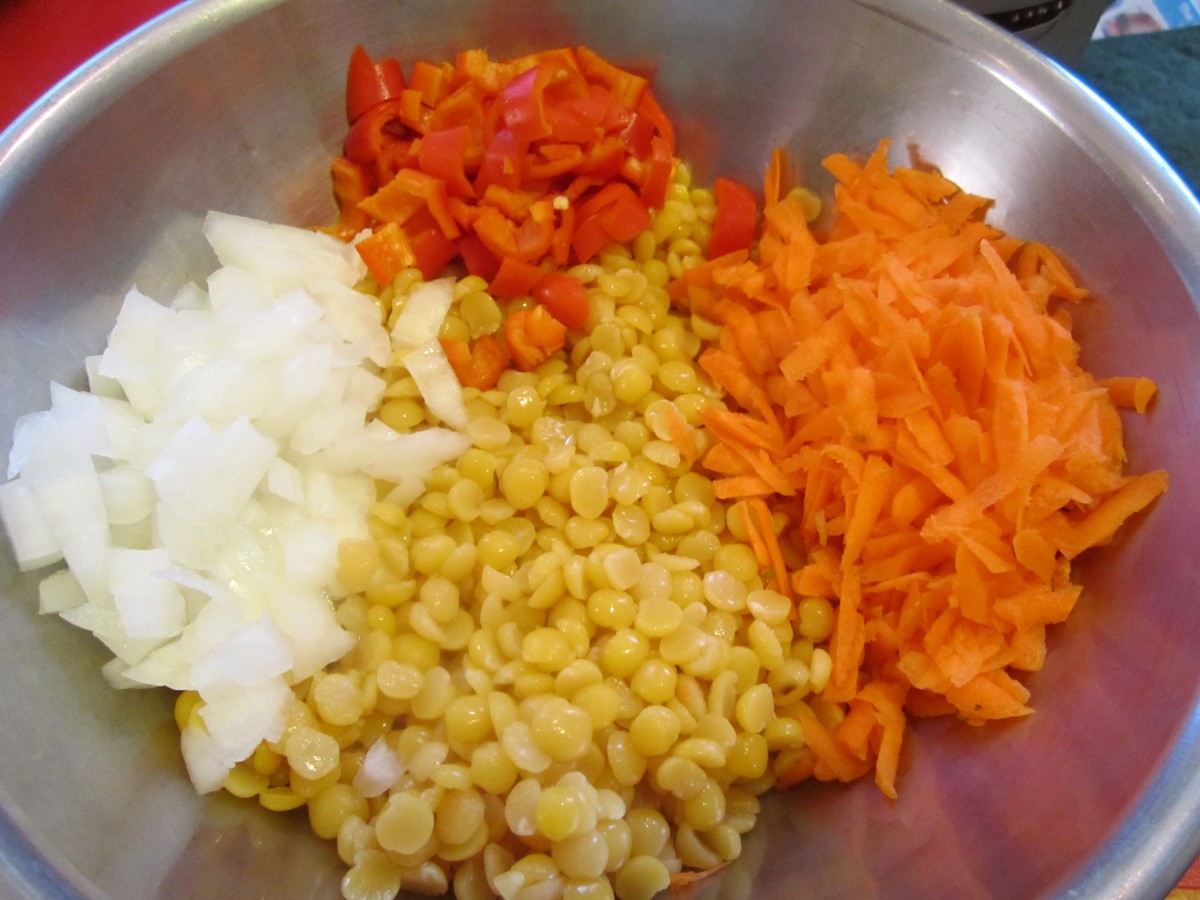
Combine peas with other veggies
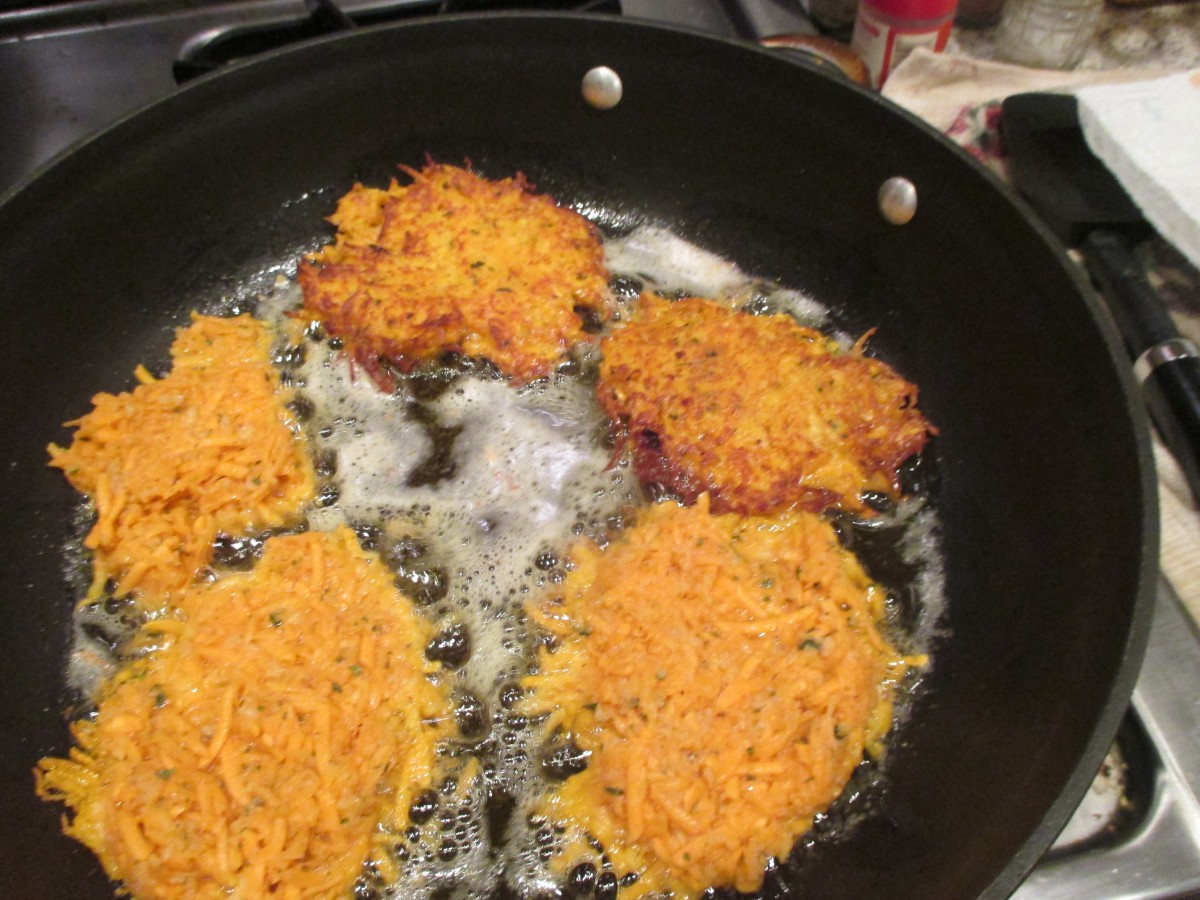
Sweet Potato Pancakes


Sweet Potato Pancake
I am a big fan of sweet potatoes. They are so versatile to cook with. For me, just roasting or steaming a sweet potato, and enjoying with salt, butter and a sprinkle of nutmeg is fine.
For dinner with a friend the other night I was looking for something different to do with sweet potatoes. I didn’t want to just roast or steam them. I ended up shredded them and making sweet potato pancakes. I had duck fat so that is what we used to fry them in.
They were amazing. Crispy on the outside and tender in the middle. I am definitely going to make them again. I could see making smaller pancakes and serving as an appetizer. Here is the recipe.
Sweet Potato Pancakes
2 small sweet potatoes, peeled and shredded- you want to end up with 3-4 cups of shredded sweet potatoes- 1 medium /large one would also work
2 eggs
½ c. panko bread crumbs
1 T. parsley flakes
1 t. hot pepper sauce, or to taste
½ t. garlic powder
½ t. onion powder
Salt and pepper to taste
Oil for frying- we used duck fat and it was wonderful
Combine all ingredients in a mixing bowl and stir until well mixed. Heat oil or fat in large skillet to 350 degrees.* Spoon batter into skillet in 4-5 pancakes, depending on the size you prefer. Cook until golden on one side- and starting to firm up- about 5 minutes. You might have to cook them in two batches – depending on the size of your pan. Don’t over crowd. They are tricky to turn over. Turn over carefully and cook at least another 5 minutes or until both sides are golden brown and crispy. Makes 4-5
* A little trick to know when your oil is hot enough. Place an un-popped kernel of popcorn in your pan with the oil when you are heating it up. Popcorn pops at 350 degrees. When the popcorn pops – it is time to add the batter.
Sweet potato pancakes cooking
100 Dandelion Blossom Muffins


100 Dandelion Blossom Muffins
I was teaching a class on cooking with honey. I made these muffins. Since dandelions are blooming now, it seemed like a good choice for last night. The class really enjoyed them.
The curious name for this recipe comes from my own curiosity. I wondered just how many blossoms I would need to get about a cup and a half of petals. I decided to make muffins with some of the dandelions blooming in my yard. I have a lot of dandelions, and I wanted to use a really decent amount in my muffins. I started counting as I trimmed them and stopped when I had a cup and a half. It turned out to be 100 flowers. So now, if you want to make this recipe, you will know when you can stop picking!!!
If you can’t beat them, eat them. I actually am a big fan of dandelions. I have organized dandelion cook-offs and edited a dandelion cookbook. I eat the leaves, and a tea made from the roasted roots. The flowers are a wonderful ingredient in cooking, too. They are used to make dandelion wine and I enjoy adding them to fritters, pancakes and other baked goods. So here is my recipe for dandelion muffins. They are pretty tasty, tender, light and not too sweet.
100 Dandelion Blossom Muffins
2 c. flour
1 T. baking powder
½ t. salt
1 egg, beaten
1½ c. half and half
1/3 c. honey
¼ c. melted butter
1 t. vanilla
1 t. orange zest
1 ½ c. dandelion petals*
Preheat oven to 375 degrees. Line 12 muffin cups with paper liners or grease them, set aside. In medium bowl, combine flour with baking powder and salt and set aside. In another bowl, combine egg with half and half, honey, butter, vanilla and orange zest. Beat by hand until well mixed. Stir in dandelion blossoms, then stir in flour mixture. Do not over mix. Stir just until flour is mixed in. Spoon batter into prepared pans, filling them about ¾ full. Bake for 20 minutes or until lightly browned on top. Great served warm with butter and honey. Makes 12.
* To prepare the dandelion blossoms you want to trim of the tough base and just use the petals in the recipe. Some of the green sepals will get mixed in, and that is OK. Measure the petals after trimming. I picked 100 flowers and ended up with about 1½ cups of petals.
Homemade Mini Chocolate Eclairs


Homemade Mini Chocolate Eclairs
If you want to surprise someone with a very special sweet treat, you could make eclairs. These are a bit or work, but the end result is so wonderful. I think they are worth the effort, especially for special occasions.
I decided to make a mini version this time. Not everyone wants to eat a full size eclair, especially after a big meal. They were a big hit.
You start by make a pate a chou, or cream puff pastry. This is the same dough used to make cream puffs. It is a combination of water, butter, milk and flour- cooked on top of the stove, then enriched with the addition of eggs. The dough is piped onto baking sheets and baked until puffed, golden and crisp. Once cooled, they are filled with sweetened whipped cream or, more traditionally, a custard filling, then topped with chocolate ganache.
Homemade Mini Eclairs
1 recipe Cream Puff Pastry (Pate a Chou)- recipe follows
Egg custard- for filling, or sweetened whipped cream- recipe follows
Chocolate Ganache- for topping- recipe follows
Start by making the dough. This recipe will make 12-18 medium eclairs or 3 dozen of the mini ones.
Cream Puff Pastry
¾ c. water
¼ c. milk
¼ t. salt
½ c. (1 stick) unsalted butter
1¼ c. flour – unbleached or bread flour preferred
4 large eggs
Extra milk for brushing
In saucepan, heat together water, milk butter and salt into a full boil. Butter has to be melted. While stirring, dump flour into saucepan, stirring constantly. Mixture will form into a ball. Reduce heat to medium and continue cooking dough, while stirring, for another minute or two. Place dough in an electric mixer and allow it to cool down a little before adding the eggs. Mixture has to be at 140 degrees F, or below, before you start adding the eggs. I use the paddle attachment and beat the dough before adding the eggs. This cools the dough down faster. Beat in eggs, one at a time, until each is fully incorporated. Beat until dough is shiny. A spoon, lifted out of the batter, should leave a peak that does not fall down.
Preheat oven to 425. Line a baking sheet with foil or parchment. I used a silicone liner and was happy with the result. Don’t grease the pan. Using a piping bag, squeeze the dough into 2-3-inch strips on the baking sheet- leaving a little room in between. Strips should be about ¾ -inch in diameter. Using a little milk on your finger, smooth down any peaks on the puffs. They should resemble miniature hot dog buns. Bake at 425 for 10 minutes, then turn oven down to 375. Bake eclairs 10 more minutes, or until golden brown. Tap the shells. They should sound hollow. Turn off the heat and leave oven door open a crack, allowing them to dry completely. Cool before filling. Makes about 36.
Custard Filling
2 cups milk
2 tablespoons cornstarch
1⁄3 cup sugar
2 eggs, lightly beaten
1 teaspoon vanilla
Using a whisk, combine milk, sugar and cornstarch in a medium saucepan over medium heat on stove top. Allow milk to scald (heat to the point when tiny bubbles form around edges of pan). Whisk occasionally to prevent cornstarch from clumping on bottom edges of pan. Remove milk mixture from heat, preferably to a burner that’s turned off.
Mix about 2 tablespoons of scalded milk mixture into eggs using whisk, then introduce eggs into milk mixture in a slow stream, whisking milk mixture constantly. Immediately return pan to heat and whisk gently until custard thickens, another two or three minutes. Do not allow to boil. (If you find that you have egg white strands in custard, feel free to pass it through a fine-mesh sieve into a different bowl now.) Remove pan from heat and stir in vanilla. Cool before using. Makes 3 cups.
To fill the eclairs, using a small piping tip with a pastry bag, filled with the custard. Squeeze filling in on one end, on through the bottom, squeezing until it seems full.
Once eclairs are filled, top with a chocolate ganache. I just dip the tops of the eclairs in the warm ganache and chill until chocolate sets. Filled eclairs should be stored i8n fridge until ready to serve. They can be frozen.
Chocolate Ganache
4- 6 oz. dark chocolate, chopped- or 1 cup chocolate chips
2 oz. heavy whipping cream
In saucepan, heat chocolate and cream together until just heated through. Remove from heat and stir until smooth. You can also do this in a microwave safe bowl, in the microwave for about a minute. Remove and stir until smooth. Makes 1 cup.


