Search Results for: shrimp
Ginger Lime Shrimp
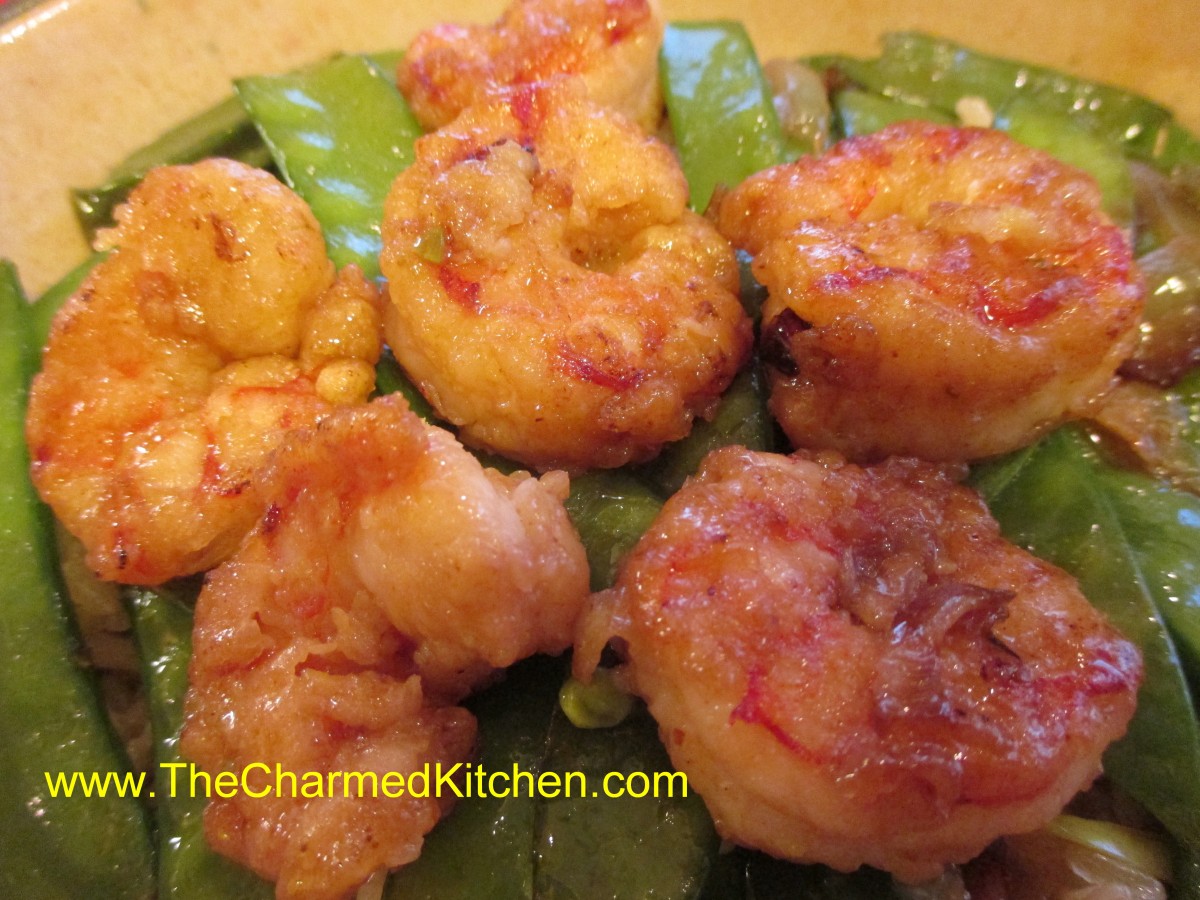
Ginger Lime Shrimp
A friend was stopping by last evening and I wanted to make dinner, but didn’t have a lot of time. I always keep some shrimp in the freezer. It can be defrosted in no time and makes any dinner special. I put the shrimp in a bowl of cold water. I changed the water a couple of times. They were mostly defrosted in less than 30 minutes. I peeled them and added the marinade ingredients. While they were marinading I started cooking the rice. It was brown rice and would take 40 minutes or so. I also prepped the veggies. When the rice was nearly cooked I started cooking the rest of the dish. It was so easy but it felt very special, like it was more work than it really was. It tasted pretty special, too.
Ginger Lime Shrimp
12 oz. raw shrimp, shelled and deveined
1 lime
1 t. fresh grated ginger
2 t. soy sauce
1 egg
oil
1 small onion, sliced
8 oz. pea pods, washed and trimmed
1-2 T. oyster sauce
2-3 T. cornstarch
Hot cooked rice
In small bowl place shrimp. Zest the lime and add the lime zest to the shrimp along with the juice of half of the lime, ginger, soy sauce and egg. Allow mixture to marinade together for 30 minutes or so. In skillet or wok heat a little oil and saute the onion until golden. Add pea pods and cook 3-4 more minutes. Remove veggies from pan and set aside. Drain shrimp and dredge in the cornstarch. Heat a little more oil in the pan and cook shrimp until just done. Return veggies to pan and toss with the shrimp. Add the oyster sauce and heat through. Serve over the rice. Serves 2-3.
Shrimp Fried Rice

Shrimp Fried Rice
I got together with friends to celebrate Chinese New Year and we made several Asian- inspired dishes. I did my version of fried rice, using brown Jasmine rice as the base. I cooked the rice a day ahead so it would be cold when I fried it the next day. I left the shrimp whole- I prefer that. I really liked the way it came out. Of course, you can switch out ingredients in countless ways. It isn’t like the take out fried rice you are used to. It’s moister and actually has a lot less oil in it. I loved it and so did the other guests at the dinner.
Shrimp Fried Rice
2 c. uncooked rice- I used brown rice and prefer it in this dish
4 c. stock or water
Soy sauce to taste
4 T. oil, or a bit more
1 onion, diced
1 sweet pepper, seeded and diced
1½ c. shelled edamame (fresh soybeans), you could use green peas
2-3 cloves garlic, minced
12 oz. raw medium shrimp, shelled and deveined
2 t. grated ginger
1 t. hot sauce
Toasted sesame oil
Chopped green onions
Cook rice in water or stock (stock preferred). Add some soy sauce to the cooking liquid, if you like. Once rice is cooked, cool down and keep in the fridge until ready to use. Better if you make the rice a day ahead. Heat half of the oil in large skillet or wok and cook the onion until lightly browned. Add the pepper, edamame and garlic and cook about 3 minutes longer. Add shrimp and cook, stirring often, until shrimp are just cooked through. Remove from pan and set aside. Heat remaining oil in pan and stir fry the rice until just starting to turn a little golden around the edges. You might have to do this in batches. Once rice is done return the shrimp mixture to the wok, with the rice, and stir to mix well. Add seasonings and adjust to your taste, adding more soy sauce if needed. Drizzle with a little sesame oil and green onions and serve. Serves 6-8.
Smoky Shrimp and Corn Soup
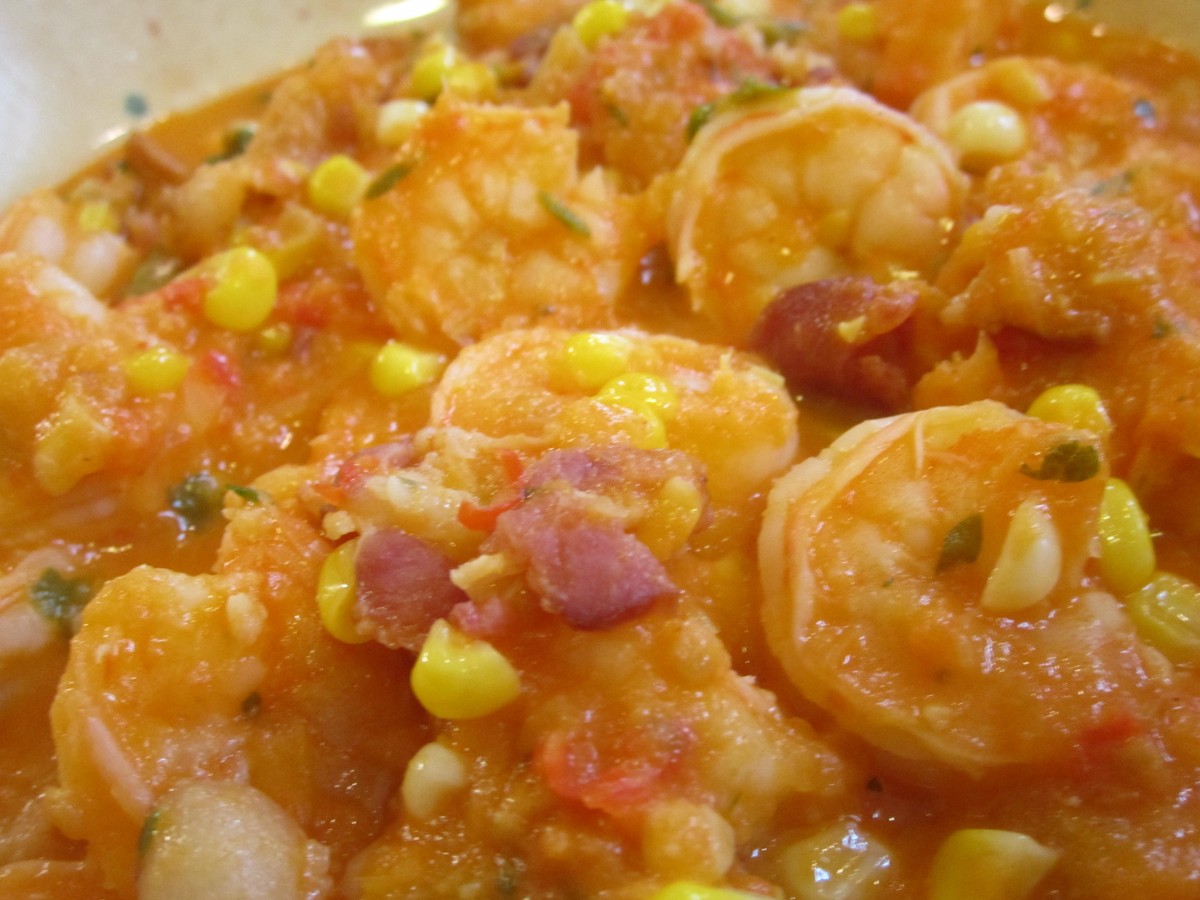
Smoky Shrimp and Corn Soup
One of those days that I was inspired by produce I wanted to use and what I had on hand. In the end I ended up with a really good soup that I will be making again soon. I had some fresh tomatoes and corn and some shrimp and bacon. Added a few more ingredients and the soup was finished. This soup was hearty enough that it could easily have been served over pasta or rice, too.
Smoky Shrimp and Corn Soup
4 c. peeled and chopped fresh tomatoes
2 ribs celery, chopped fine
1 sweet red pepper, seeded and chopped
1 small leek, white part only, washed and chopped fine- you could use a small onion instead
1 c. stock- chicken, vegetable or seafood*
1/4 c. sherry, not cooking sherry
4 slices of thick-sliced bacon, chopped
corn kernels from 1 large ear of corn
1 1/2 lbs. raw medium shrimp, cleaned, shelled and de-veined
hot pepper sauce
salt and pepper to taste
Fresh chopped parsley
Make the soup base by combining the tomatoes, celery, peppers, leek, stock and sherry in a pot and simmer until vegetables are tender, about 15 minutes. Meanwhile cook the bacon in a skillet until crisp. Drain off most of the fat in the pan and add the corn to the skillet with the bacon. Saute the corn for 3 or 4 minutes- to cook it and give it a little color. Puree the soup base. I used an immersion blender so I didn’t have to take the soup out of the pan. Add the bacon mixture and the raw shrimp to the soup base. Simmer until the shrimp are cooked, about 5 minutes. Add hot sauce, adjust seasoning and add the parsley. Serves 3-4.
* I had shrimp with shells on so I peeled the shells and placed the shells and tails in a little more than a cup of water and simmered them for 20 minutes to make a shrimp stock for my soup. Then I just strained out the shells and used it in the soup.
Shrimp Chips
OK, now this is the coolest thing. I love those shrimp chips and I buy them at the Asian market and fry them up. A friend showed me a new way to cook them without frying!!!! You just place them in the microwave on a paper towel. Space them in a circle- do not put them in the middle. Set the timer for a minute and watch out. The ones we did took 28 seconds. They puff up all nice and crispy. He tells me that if you don’t watch carefully they go from crispy to “on fire” fast so be warned!!!! I’ll try to take some pictures to post later but I just had to share this one. Thanks Jared! 🙂
Creole Jambalaya
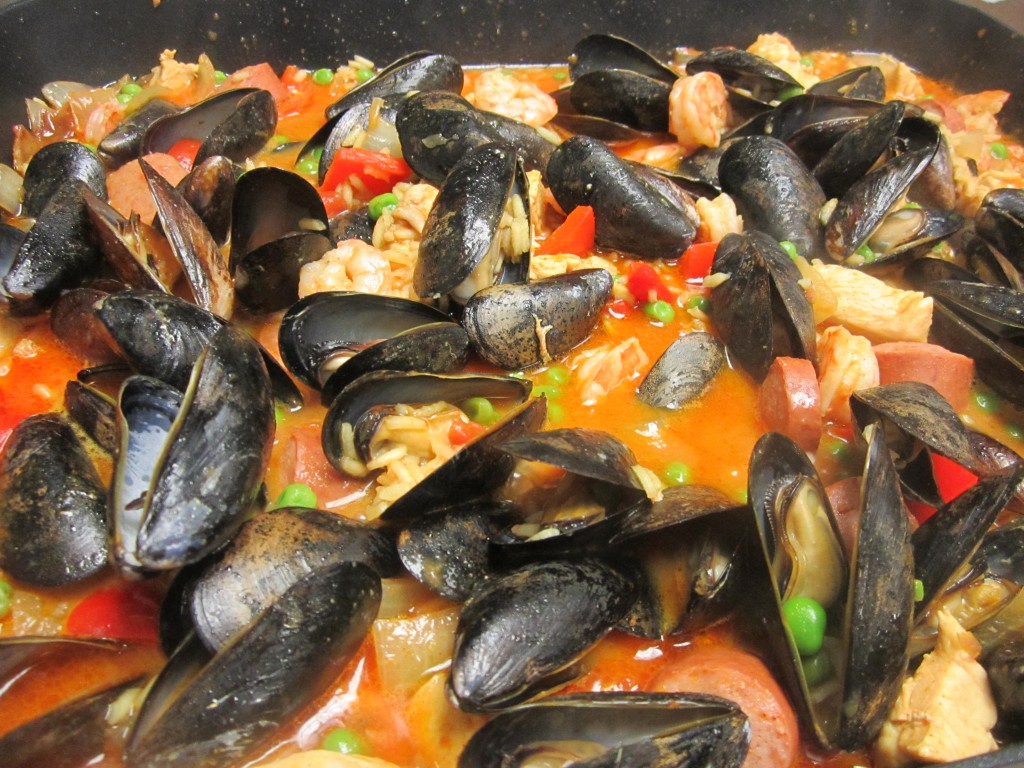
There are so many variations for Jambalaya. I don’t think I ever had a Jambalaya I didn’t like. This Creole dish varies a little with each person who makes it. The assortment of ingredients adds so many layers of flavor.
Traditionally, Jambalaya would include smoked sausage or ham, chicken, shellfish, rice, tomatoes and assorted veggies and seasonings.You can see why there are so many variations. For me, it just isn’t Jambalaya without mussels. Lots and lots of mussels.
It is definitely a great dish for a party. It is impossible to make a small batch of Jambalaya!!!
This recipe is a tweaked version I got from a boss of mine a long time ago. I must say, every time I make this for friends or family it gets rave reviews.
The heat level in this dish is really about personal preference and for the people who are going to be eating it. I like it a bit spicier, so I add more cayenne. If I am making it for friends who like their food less spicy, I use less. Of course, you can always serve it with hot sauce on the side, so people can spice it up a little more.
Creole Jambalaya
1 lb. smoked sausage, sliced into 1-inch pieces
1 c. chopped onions
1 c. chopped celery
2 garlic cloves, chopped
1/4 c. oil
2 c. cubed uncooked chicken
3 c. chicken stock
1 1/2 c. uncooked rice
1 (14.5 oz.) can tomatoes
2-3 t. paprika
Cayenne pepper to taste
Black pepper to taste
1/4 t. ground turmeric
1 lb. medium shrimp, peeled and de-veined, uncooked
1 1/2 c. shelled peas, fresh or frozen
1/2 c. chopped red pepper
1-2 lb. mussels, scrubbed
In Dutch oven cook sausage, onion, celery and garlic in oil until onion is tender. Add remaining ingredients, except shrimp, peas, sweet red peppers and mussels. Bring to a boil, turn down to simmer and cook 20 minutes. Stir in shrimp, and peppers, cover and cook 10 minutes. Stir in peas and stick in mussels. Cover and cook 5 more minutes. Discard any mussels which have not opened in 5 minutes. Serves 8.
Wonton Soup
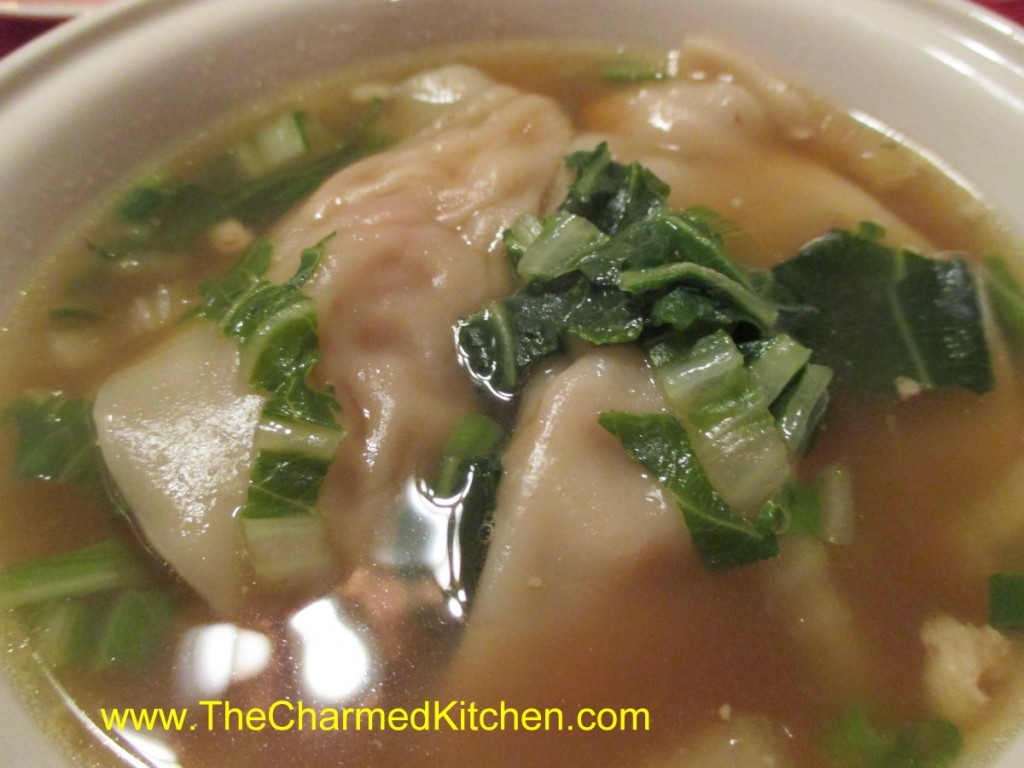
For me, Wonton soup always brings back memories of going out for Chinese food with my family, when I was a kid. The restaurant would serve it family style, and my mom or dad would ladle out everyone’s soup. It always looked and smelled wonderful. Tasted wonderful, too. Even more special, because we only had it when we out to dinner.
The one problem I find when trying to make this soup at home is finding wonton wrappers that are thick enough. The square ones I find at the neighborhood grocery store are OK, but thinner than the ones in Wonton Soup at a restaurant. At a local Asian grocery I have found round wrappers that are labelled for dumplings and are thicker. That is what I used. They worked out better. You can play around with fillings. I often add shrimp as both a filling, and to the soup itself.
Wonton Soup
1½ lb. chicken
1 head bok choy, or 4-5 baby bok choy
3 T. hoisen sauce
1 clove garlic, minced
24 won ton wrappers
2 qts. chicken stock
1 t. ginger
1 t. hot pepper sauce
Chopped green onions
Sesame oil
Bake the chicken until cooked. I used boneless chicken thighs, but even leftover roasted chicken would work. You can also used pork. Once cooled, I minced enough of the chicken to give me 1 cup of meat. The rest I cut into thin strips. I then took stems from the bok choy and minced enough of them to make 1 cup. Combine the minced chicken with minced bok choy, the hoisen and the garlic. This is the filling for your wontons. Slice more of the bok choy- using mainly the leaves, into thin shreds. This will go into the soup later, along with the strips of chicken. You should have at least a couple of cups of the shredded bok choy, but more is OK, too. To make the wontons place one on your work surface and spoon a rounded teaspoon of the filling into the middle of it. Moisten edge with water, fold in half and press to seal. I used round wrappers, but square wrappers are fine, too. Repeat with remaining wontons and fillings until done. Bring stock to a boil and add the ginger and hot sauce. Add the wontons to the simmering stock. Simmer gently for 3-4 minutes, stirring occasionally, then add the strips of chicken and the shredded bok choy greens. Cook about 5-6 minutes longer. Finish soup with chopped green onions and a drizzle of sesame oil. Serves 6-8
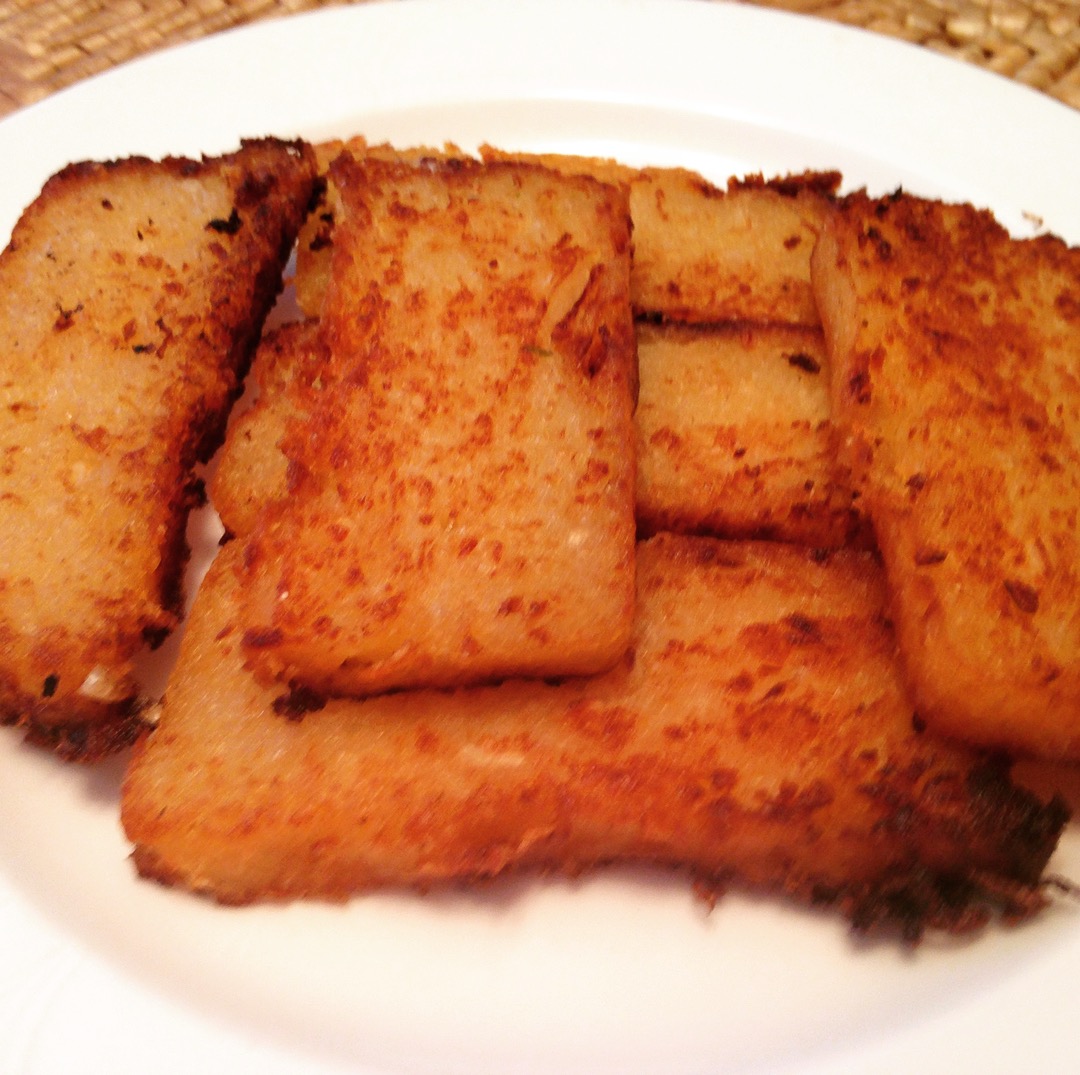
Asian Turnip Cakes

If you are planning a party for Chinese New Year, you might want to make turnip cakes.
I first had turnip cakes at a local Asian restaurant. I loved them, and was intrigued at how to make them. They were little squares, lightly crisped on the outside, smooth and creamy in the middle.
When I first heard turnip cake- I was thinking of the purple and white turnips I knew. That is not what these turnip cakes are made from.
It helped a lot when I realized the “turnip” cake was actually made from Daikon radish. Daikon radishes are also called Chinese turnips. They are really big, white radishes. They are available at Asian grocery stores and other grocery stores. Now that I knew the ingredient I needed, I had to find a recipe.
I searched the internet and found a lot of different variations for how to make them.
The first recipe I tried was more like a potato pancake. Shredded radish paired with eggs and bread crumbs. They were good, but not what I had at the restaurant. The turnip cake I had enjoyed was smooth and sort of starchy. Plus, it was a neat square shape.
I found several recipes that included the steaming step. This enabled the cakes to be set up with a starch, cooled and sliced before the final frying step. This was what I wanted!!
The most promising recipe included rice flour- but I was out of rice flour, so I improvised with cornstarch and a little wheat flour. It worked really well.
Many recipes included shrimp or Chinese sausage and sometimes green onions. I decided, this time, to make them vegetarian. That worked well, but you certainly could add meat or shrimp to yours.
I shredded the daikon pretty fine, but you could still discern the radish in the final dish. I liked that a lot. I did not grate them as some recipes suggested.
So here is my version of turnip cakes. They sound like a bit of work, but it really is worth the time. I also like that all the prep can be done a day or two ahead of time, then just slice and fry when you want them.
Turnip Cakes
1 large Daikon radish- about 1¼ lbs., give or take
1 c. water
½ c. minced onion
1 t. salt
½ t. white pepper
½ c. cornstarch
2 T. flour
Oil for frying
Oyster sauce for dipping, optional
Peel and shred radish. I used a fine shredding blade. Squeeze out some of the liquid from the radish. Place shredded radish in bowl with the water and onion and steam in microwave for 4-5 minutes- you can also place radish and onion in saucepan with water and simmer 4-5 minutes. Set aside to cool. Combine the radish mixture with the cornstarch, flour salt and pepper. Oil an 8×4-inch loaf pan. Place the radish mixture in the prepared pan and steam for 50 minutes.* I placed plastic wrap over the pan to prevent water from dripping into the pan. Remove pan from steamer and cool down for at least 30 minutes. . At this point you can finish preparing the turnip cakes- or place in fridge until ready to make them. When ready to fry the turnip cakes, remove from the pan and cut into slices- about ¾ -inch thick. Heat oil in a skillet over medium high heat. Cook cakes in oil on both sides until golden brown and crisp. Drain on paper towels. Serve with oyster sauce- or whatever dipping sauce you prefer. Makes about 10.
* To steam the mixture- I just used a large stock pot with a cooling rack in it. I brought about 2 inches of water to a boil, placed the pan on the rack and covered the pan. You could also steam in the oven with a roasting pan, with an inch of boiling water in it and covered with foil.

Slicing the turnip cakes before frying
Ready to serve
Coconut Chocolate Snowballs
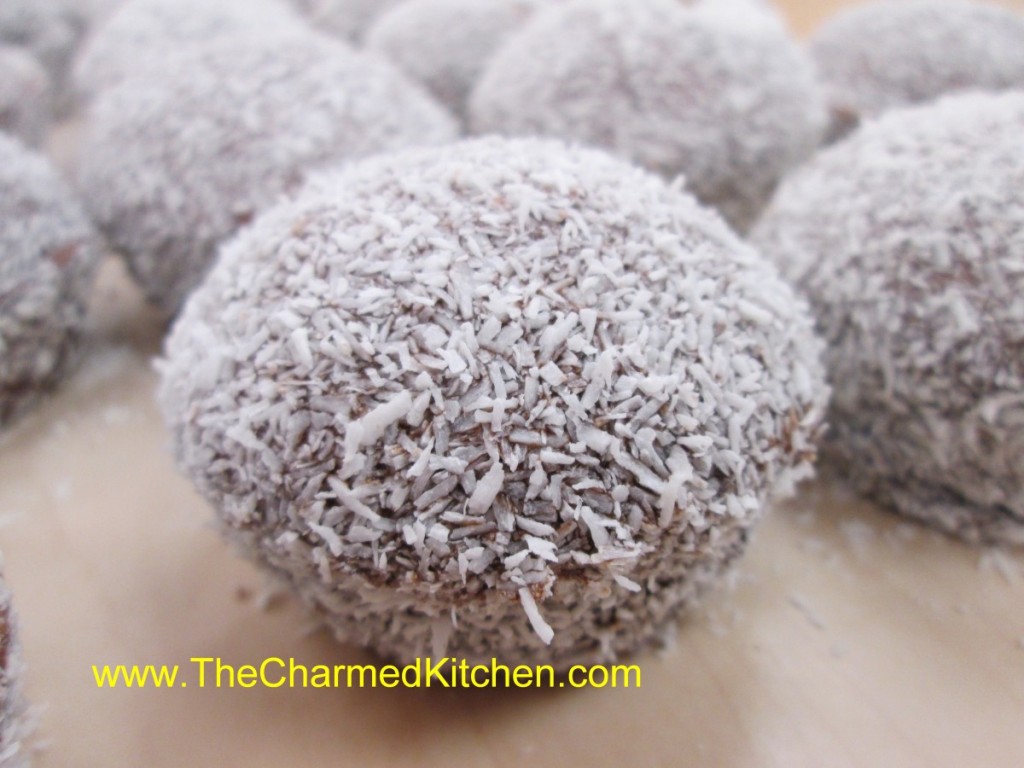
I have wonderful memories of my Aunt Josie making these for every family gathering. Aunt Josie cut the cake into squares. They were all perfectly even. I asked her how she did that. She told me that she used her cooling racks to get the lines even. She would set the cooling racks on her cake and use the wires as guides. So clever.
I never could seem to get them even, so I bake my cake in cupcake tins and call then snowballs. Whatever the shape, these little cakes are a favorite treat in my family.
In bakeries, you’ll find them in squares or rectangles. She shared her recipe with me a long time ago, and I am sharing it with you.
You can bake the batter in mini muffin pans or standard muffin pans. It just depends on what size you want your snowballs to be. After the cupcakes are baked, freeze them. The frozen cakes are dipped in a chocolate sauce and then rolled in desiccated coconut.
Desiccated coconut is dried and unsweetened. It looks like coarse, white bread crumbs. You can find it in stores that carry baking supplies and at Asian markets. It is the same kind of coconut used to make coconut shrimp.
Here is the recipe for making the “snowballs”. The recipe for the cupcakes is listed below, as well. I just doubled my classic white cupcake recipe, but you could use a box mix, if you prefer.
Aunt Josie’s Coconut Cake Squares aka “Snowballs”
1 white cake, prepared and frozen solid* or cupcakes
Chocolate Sauce
1 c. unsweetened cocoa
1 1/4 c. sugar
2 c. water
1 t. vanilla
1 c. desiccated coconut (available at cake supply stores and some health food stores)
Cut frozen cake into small squares, or cake can be baked in regular or mini cupcake tins. Keep cake frozen until ready to use. Meanwhile, make the chocolate dipping sauce. Combine remaining ingredients, except coconut, in a medium saucepan. Bring to a boil then simmer 5 minutes. Remove from heat and cool completely.
Using toothpicks or fondue forks, dip frozen cake in sauce let drain a few seconds, then roll in the coconut. Can be enjoyed right away or frozen again for later use.
*If you make the cake in muffin tins you’ll get 24 cupcakes or about 60 mini cupcakes.
Classic White Cupcakes
1 cup sugar
1/2 cup butter
2 eggs
2 teaspoons vanilla extract
1 1/2 cups all-purpose flour
1 3/4 teaspoons baking powder
1/2 cup milk
Preheat oven to 350 degrees. Line a muffin pan with 12paper liners. In a medium bowl, cream together the sugar and butter. Beat in the eggs, one at a time, then stir in the vanilla. Combine flour and baking powder, add to the creamed mixture and mix well. Finally stir in the milk until batter is smooth. Pour or spoon batter into the prepared pan. Bake 20 to 25 minutes. Cupcakes are done when they springs back to the touch. Makes 12.
Aunt Josie’s Coconut Cake Squares aka “Snowballs”
I have wonderful memories of my Aunt Josie making these for every family gathering. Aunt Josie cut the cake into squares. They were all perfectly even. I asked her how she did that. She told me that she used her cooling racks to get the lines even. She would set the cooling racks on her cake and use the wires as guides. So clever.
I never could seem to get them even, so I bake my cake in cupcake tins and call then snowballs. Whatever the shape, these little cakes are a favorite treat in my family. I made them for a recent family clambake and everyone enjoyed them. I even made a batch of gluten free ones for my cousin, Sue, who has celiac. For the gluten free ones, I just bought a gluten free cake mix.
In bakeries, you’ll find them in squares or rectangles. She shared her recipe with me a long time ago, and I am sharing it with you.
You can bake the batter in mini muffin pans or standard muffin pans. It just depends on what size you want your snowballs to be. After the cupcakes are baked, freeze them. The frozen cakes are dipped in a chocolate sauce and then rolled in desiccated coconut.
Desiccated coconut is dried and unsweetened. It looks like coarse, white bread crumbs. You can find it in stores that carry baking supplies and at Asian markets. It is the same kind of coconut used to make coconut shrimp.
Here is the recipe for making the “snowballs”. The recipe for the cupcakes is listed below, as well. I just doubled my classic white cupcake recipe, but you could use a box mix, if you prefer.
Aunt Josie’s Coconut Cake Squares aka “Snowballs”
1 white cake, prepared and frozen solid* or cupcakes
Chocolate Sauce
1 c. unsweetened cocoa
1 1/4 c. sugar
2 c. water
1 t. vanilla
1 c. desiccated coconut (available at cake supply stores and some health food stores)
Cut frozen cake into small squares, or cake can be baked in regular or mini cupcake tins. Keep cake frozen until ready to use. Meanwhile, make the chocolate dipping sauce. Combine remaining ingredients, except coconut, in a medium saucepan. Bring to a boil then simmer 5 minutes. Remove from heat and cool completely.
Using toothpicks or fondue forks, dip frozen cake in sauce let drain a few seconds, then roll in the coconut. Can be enjoyed right away or frozen again for later use.
*If you make the cake in muffin tins you’ll get 24 cupcakes or about 60 mini cupcakes.
Classic White Cupcakes
1 cup sugar
1/2 cup butter
2 eggs
2 teaspoons vanilla extract
1 1/2 cups all-purpose flour
1 3/4 teaspoons baking powder
1/2 cup milk
Preheat oven to 350 degrees. Line a muffin pan with 12paper liners. In a medium bowl, cream together the sugar and butter. Beat in the eggs, one at a time, then stir in the vanilla. Combine flour and baking powder, add to the creamed mixture and mix well. Finally stir in the milk until batter is smooth. Pour or spoon batter into the prepared pan. Bake 20 to 25 minutes. Cupcakes are done when they springs back to the touch. Makes 12.
Chives – How to Use, Grow and Preserve

What’s not to love about chives? This allium family herb is an easy to grow perennial. With little effort, you will be rewarded with onion-flavored leaves and blossoms year after year.
When the chives are first up in my garden I want to use them in everything. They will be around all season, but that first Spring harvest is always my favorite.
Their delicate onion flavor goes well with so many dishes. I enjoy cooking with the blossoms, too. Anyplace you might use green onions, you can use chives. I add them to dips, salad dressings, soups, veggie dishes. You get the idea. Same thing with the flowers. Toss them in any dish where you want a mellow, onion flavor. I have a friend who likes to dip the blossoms in batter and deep fry them. Yum!!
Chive Crepes with Crab Filling
Chives add a pretty color and wonderful flavor when used in crepes. I made a crab filling, but you could fill them with any number of savory ingredients. This is a great dish for brunch, lunch or breakfast.
3/4 c. flour
1/8 t. salt
3 eggs, beaten
2 T. melted butter
3/4 c. milk, approximately
1/3 c. fresh chives*
Butter or oil for pan
In blender mix together flour, salt and eggs until smooth. Add butter, milk and chives and blend until batter consistency is that of cream. Let stand for 30 minutes before using, or can be refrigerated, covered, overnight. Mix well, just before using.
Heat 6 or 7 inch skillet. Brush with butter or oil and pour in about 2 teaspoons of batter, tipping pan to cover bottom of pan completely with batter. Cook until edges start to brown, turn over and cook until lightly browned (about 1-2 minutes per side.)
Crepes can be made day ahead or even frozen between sheets of waxed paper and frozen. Makes 12.
When ready to serve: Crepes can be filled ahead or guests can fill their own
* You can use other combinations of fresh herbs like parsley, thyme, cilantro.
Crab Filling – enough for 6-8 crepes
2 T. butter
1/2 c. minced onion
3 T. flour
1 c. milk
Salt and pepper to taste
1 (6-oz.) can crab meat, drained, or 1 c. cooked shrimp
1 c. shredded mild cheese, I used fontina
Chopped chives
Heat butter in skillet and cook onions until tender. Add flour and mix well. Stir in milk and seasonings and cook until sauce is thickened and bubbly. Stir in seafood and heat through. Spoon some of this mixture onto a crepe. Add some cheese and roll up. Garnish with chopped chives. Makes 6-8.
Chive Butter
I also like to make Chive butter. The recipe is pretty simple.
3 T. snipped chives
½ t. lemon zest
1/2 c. (1 stick) softened butter
Mix all ingredients until well combined. Chive butter can be stored in a jar, or wrapped in plastic wrap and chilled or frozen until ready to use. Good with fish, poultry, carrots, and potatoes.
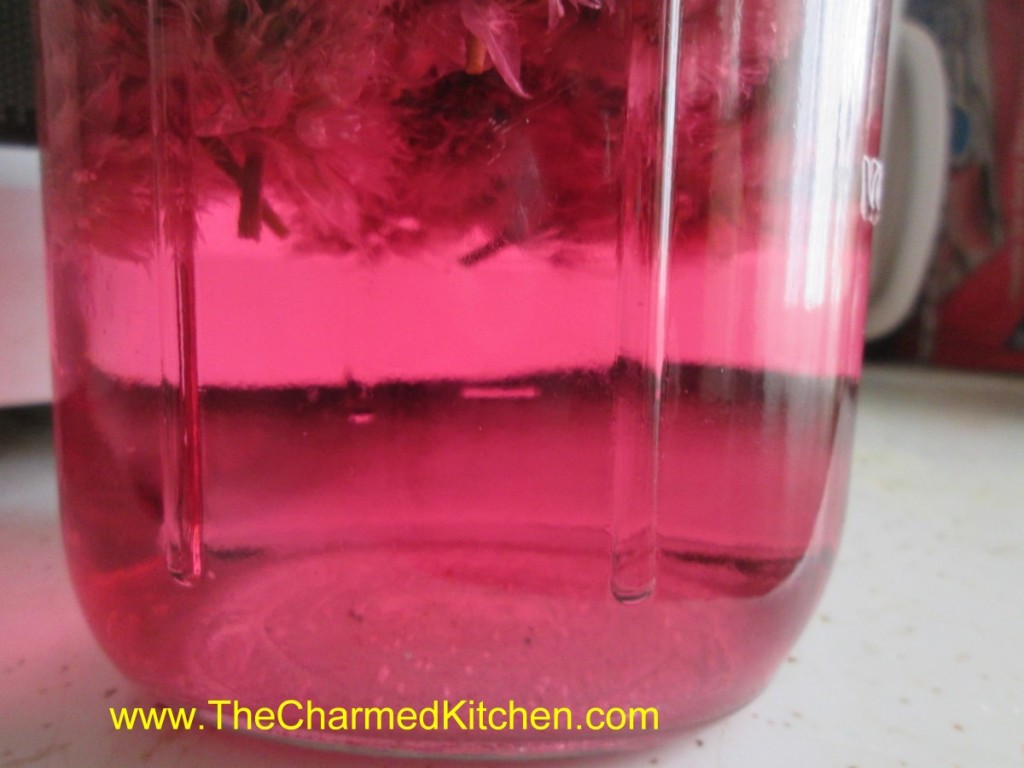
Chive Blossom Vinegar
One of the ways I preserve my herbs every year, is by using them to flavor vinegar. It is easy to do and you’ll have great flavored vinegar to use all year round. You can use the vinegar in salad dressings or in marinades and sauces. Chive blossom vinegar is one of my favorites. I often use white wine vinegar but you can use red wine vinegar, apple cider vinegar or even white vinegar. The blossoms give the vinegar a beautiful color, too.
All you need is a clean jar, chive blossoms and vinegar (5% acidity). The acidity is listed on the label. For every cup of blossoms add 2 cups of vinegar to the jar. Close the jar and put it in a cupboard for a couple of weeks, or longer. When ready to use, strain out the blossoms. Pour the strained vinegar through coffee filters or layers of cheesecloth to get out any sediment. The end result is clear and quite pretty. Store in a cool, dark place for best color and flavor.
Freezing Chives
An easy way to preserve your chives is just to freeze them. Take freshly washed and dried chives and chop them up. You can use a knife, scissors or food processor. Place the chopped chives on a tray or baking sheet and place in the freezer to harden a bit, before transferring to a freezer container or freezer bag. By pre-freezing them before packaging, you keep them from clumping up and freezing into a green lump.
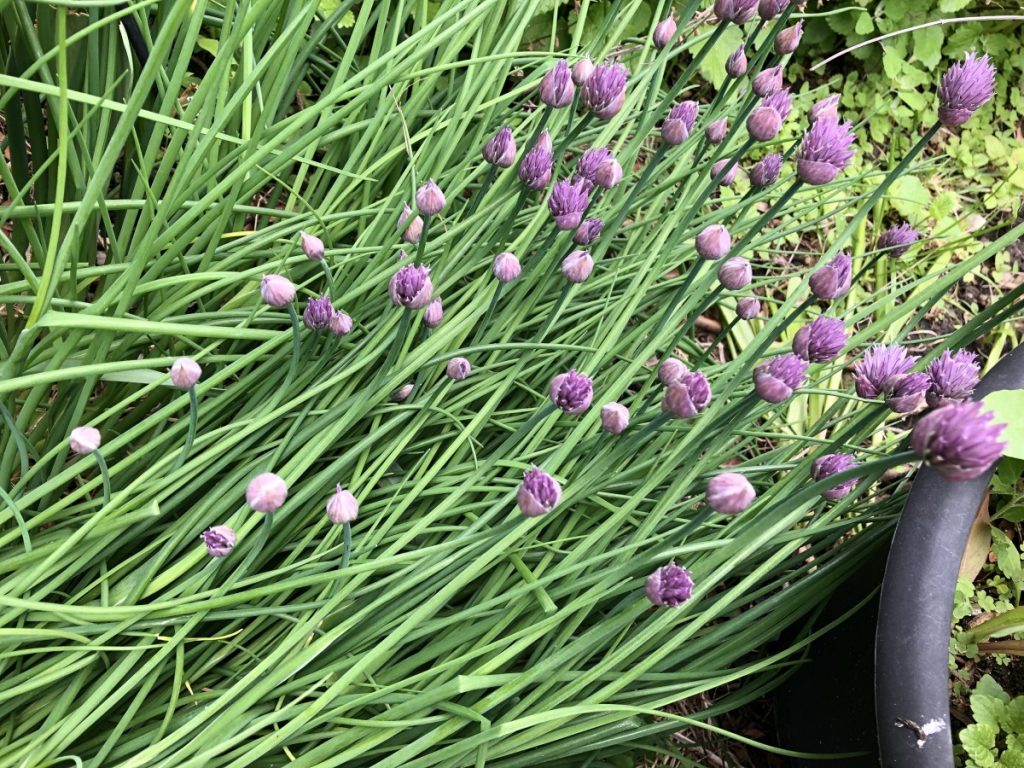
Growing Chives
When growing chives, a sunny, well drained spot is preferred, but chives will tolerate some shade. They prefer to be in the ground, but I have chives that are in pots and thriving. I even have chives that popped up in one of my hanging baskets. They return every year.
Chives require little maintenance, but there is one annual clean-up job: stem removal. At first glance, chives looks like just leaves, but there are stems in there. Each purple chive blossom that appears in Spring is on a stem. While the stems are edible, they are also tough and woody, compared to the leaves. I like to remove the stems once the chives are finished blooming. Even in a large clump of chives, this job only takes about 5 minutes.
First, identify the stems. They either have a chive blossom on them- or they will have a brown tip from where the blossom was removed. When you touch a stem, you’ll be able to tell right away that it is tougher than the leaves. Pinch the stem between your fingers and run your fingers down to the base of the stem. Give a little tug and the stem pops right out. Repeat this with the rest of the stems. Kind of boring, but only take a few minutes. Once done, your plant will be all tender leaves.


