Cashew “Cheese”
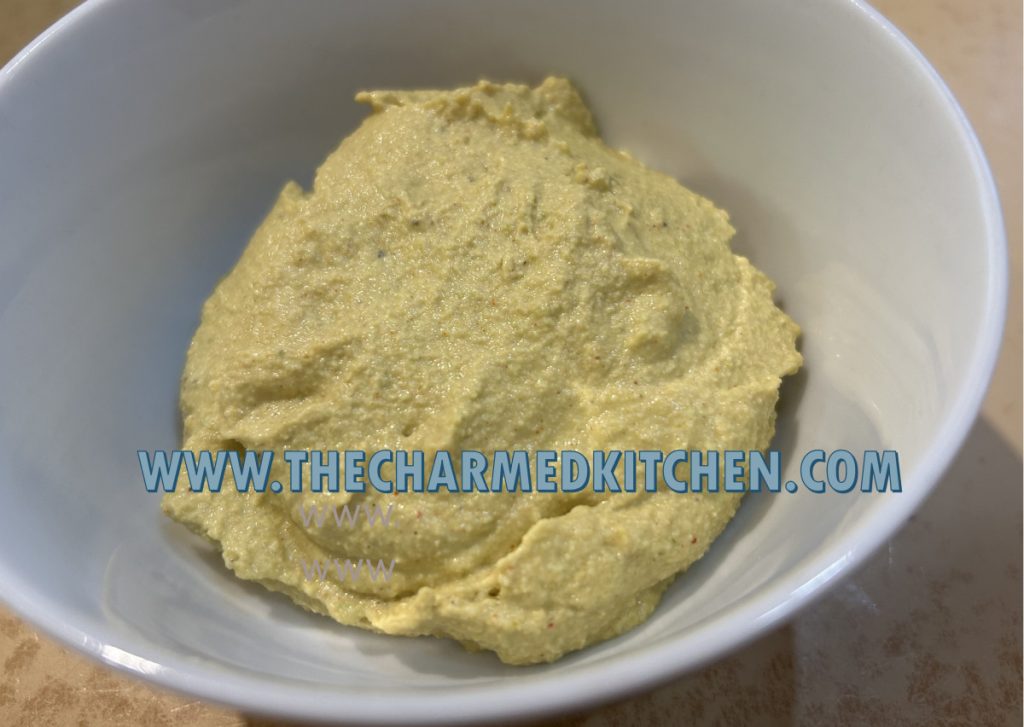
With my vegan goddaughter and her boyfriend coming for a visit, I wanted to try out a new recipe. I had decided on making a cashew “cheese”. Of course, this isn’t an actual cheese. There is no dairy in it. Its a mixture of soaked, raw cashews, nutritional yeast, almond milk and a few more ingredients. Its a nice alternative for anyone who does not or cannot consume dairy products.
There were plenty of recipes out there and I ended up with a recipe that was a mix of several of the ones I came across. The final product can be used as a “cheese” sauce or dip, depending on how thick or thin you make it. Its very easy to make. The longest part of prep is soaking the cashews in water before blending.
We made it in class the other night. For Gwen and Brian, we spooned it over vegan enchiladas and brown rice. They loved it. I have made it with almond milk, but also tried it with oat milk. Any non-dairy milk can be used. You can use less than the recipe calls for if you want a thicker consistency. Add more “milk” if you want a runnier sauce. I found the oat milk made a thicker “cheese” than almond milk.
So here is the recipe. Enjoy!!
Cashew “Cheese”
1½ cups raw cashews
3-4 garlic cloves
1/4 cup nutritional yeast
1 cup unsweetened almond or oat milk, plus more to thin if necessary
1 jalapeno, chopped (feel free to de-seed or leave out if sensitive to spice) I love what it adds
1 teaspoon ground turmeric
1 teaspoon paprika
1 t. smoked paprika
1 teaspoon onion powder
1 teaspoon Dijon mustard
1 teaspoon salt, to taste
Freshly ground black pepper
Soak the cashews in 4 cups of water for at least 2 hours; otherwise I’ve found that you can easily speed up the process by adding the raw cashews to a pot with water and placing over high heat. Bring water to a boil, then immediately turn off the heat; let the cashews sit for 30-45 minutes in the warm water, then drain. Add drained cashews with remaining ingredients to a blender. Blend until a thick sauce comes together. If you want a thinner sauce, add a bit more almond milk. Taste and adjust seasonings as necessary. Enjoy! Serves 6-8, depending on how you use it.

Chili Bean Spoon Bread -Vegetarian

This is a great dish when you want to go meat free, but still have a hearty meal. It combines the flavors of chili with a cornbread topper. A classic combination, for sure. We made this in class a few days ago. It was such a great dish to serve on a very cold night.
The base is a lentil chili that you place in a casserole dish, then top with a cornbread batter. The dish is finished off in the oven until the cornbread is baked.
To serve, spoon some of the cornbread onto your plate and top with the lentil chili. I have made it for friends and it is always a big hit, even for the meat eaters. Perfect to warm you up on a chilly day.
You can serve this as a vegetarian main dish, or as a side dish.
Chili Bean Spoon Bread
1/2 lb. lentils
pinch of ground cloves
2 c. milk
1/2 t. salt
2/3 c. cornmeal
4 T. butter
4 eggs
4 T. oil
2 large onions, chopped
1 clove minced garlic
1 T. chopped parsley or 1 t. parsley flakes
1 T. chili powder
1 t. ground cumin
1 (14 oz.) can diced tomatoes, undrained
salt and pepper to taste
In saucepan cover lentils with about 2 cups water and add cloves. Bring to a boil, turn down to a simmer and cook, covered, until lentils are tender, about 20 minutes. You may need to add a little more water. Meanwhile in another saucepan heat milk and salt almost to boiling. Stir in cornmeal and continue cooking, stirring constantly until thickened. Remove from heat. Stir in butter and eggs and set aside. In oil sauté onions and garlic until tender. Add seasonings, tomatoes and lentils and heat until bubbly. Adjust seasonings. Pour lentil mixture into greased 2-quart casserole dish. Spoon over the cornmeal mixture. Set casserole dish in larger pan and add 1 inch of hot water to larger pan. Bake in a 350-degree oven for 30-40 minutes, or until bread is firm and golden. Serves 4-6.
Basque Soup- Vegetarian

This soup has a hearty and rich flavored. We made it in a vegetarian cooking class the other night. In class we used oil and almond milk, so the soup was vegan. You could use milk and butter, if you prefer. It tastes great, either way. It also comes together quickly, with ingredients you can keep on hand, so it is a great homemade soup when you don’t have a lot of time. The combination of milk, tomatoes and corn also makes it a pretty dish to serve. I used a jar of my home canned tomatoes.
While the soup calls for canned butter beans, you can also cook up dry beans and add them to the soup after cooking them. If using dry beans, cook 1 pound of dry beans.
Basque Soup
1 c. chopped onions
1 1/2 c. chopped celery
1/4 c. oil or butter
1/4 c. flour
3 c. milk*
1 (16 oz.) jar stewed tomatoes, undrained
1 can whole kernel corn, undrained- I often use frozen corn
3-4 cans butter beans, drained and rinsed
3-4 cups water and 1T. paste-type vegetable soup base
or 3-4 cups vegetable broth
pepper to taste
hot pepper sauce to taste
shredded mild cheese, optional
Sauté onions and celery in oil until tender. Stir in flour until smooth and add milk, stirring to keep lumps from forming. Stir over medium heat until milk has thickened and begins to boil. Stir constantly as mixture simmers for an additional minute or two. Add remaining ingredients, except cheese and bring up to a simmer. Adjust seasonings. Ladle into bowls and top with cheese, if desired. Serves 8-10.
Note: You can use almond, rice, oat, coconut or soy milk in place of the dairy milk, if you like.
Curried Mixed Vegetables

On a cold winter day, a bowl of curried veggies can really warm you up. There is something about curried dishes that always feel like comfort food to me. The flavor and fragrance of curry always warms me up. It was very cold last night when we made this dish in cooking class. Seemed like a great night to make these veggies.
This dish is really a simple one to make. Saute some veggies, then added curry powder and let them all cook together until the veggies get tender. I wouldn’t call it a stew- there is no added liquid, sauce or gravy. Feel free to use the veggies you have around. I use what I have and what I like.
Curry is one of those flavors people seem to love or hate. I am a curry lover. Curry is a blend of spices, so it may vary from one recipe to the next. Depending on the ingredients used, curry can be mild (sweet) or hot. You can buy curry powder at most grocery stores, but the selection will be better at stores that carry international foods. I actually prefer to make my own curry powder. That way I can adjust the seasonings to my taste preference. A recipe for homemade curry powder follows the recipe for the curried veggies.
This dish can be a side dish, a main dish, served on its own or spooned over rice or pasta.
Here is the recipe. Hope you give it a try.
Curried Mixed Vegetables
2 T. oil
1 large onion, cut into chunks
2 cloves garlic, minced
2 medium carrots, peeled and cut in thick slices
2 ribs celery, cut into chunks
4 c. cauliflower, broken into flowerets
1 medium sweet potato, peeled and cut into chunks
2 sweet peppers, any color, seeded and cubed
salt to taste
1T. curry powder, or more to taste
¼ t. cloves
Heat oil in skillet. Add onions and cook until tender. Add next four ingredients and cook until tender, about 15-20 minutes. Add remaining ingredients and cook, covered until vegetables are tender, about 10-15 minutes. Adjust seasonings to taste. Serve as a side dish or over pasta or rice. Serves 6-8.
Curry Powder
2 t. ground cumin
2 t. ground coriander
2 t. ground turmeric
1 t. nutmeg
1 t. salt
½ t. cinnamon
¼ t. cayenne pepper
¼ t. ground black pepper
Combine all ingredients and store in a cool dry place.
“Chili” Stew

This is a great dish when time is short. Also nice to enjoy when the weather is cold. It is fast to make and still has plenty of flavor. It falls somewhere between a chili and a stew, so that is where the name came from. I like it because it can be made from so many ingredients I already have in my pantry/freezer. This is a fun dish to serve for Super Bowl Sunday!!
Can be served as is, or topped with cheese, sour cream or chopped onions. Perfect dinner for a “chili” night.
Chili Stew
1 pound ground beef or turkey
1 medium onion, chopped
1 small sweet pepper, chopped
1 (15 ounce) can black beans
2 (16 ounce) cans kidney beans, rinsed and drained
2 c. corn, fresh, frozen or canned (drained)
1 (14.5 ounce) can diced tomatoes
1 (8 ounce) can tomato sauce
1 (4 ounce) can chopped green chilies
1 envelope taco seasoning
2 tablespoons chili powder
1/2 teaspoon salt
In a Dutch oven or large saucepan, cook the meat, onion and pepper over medium heat until meat is no longer pink; drain. Stir in remaining ingredients. Bring to a boil. Reduce heat; simmer, uncovered, for 15 minutes, stirring occasionally. You can cook it even longer, if you like. Serves 4-5.
Coconut Chocolate “Snowballs”

I have wonderful memories of my Aunt Josie making these for every family gathering. Aunt Josie cut the cake into squares. They were all perfectly even. I asked her how she did that. She told me that she used her cooling racks to get the lines even. She would set the cooling racks on her cake and use the wires as guides. So clever.
I never could seem to get them even, so I bake my cake in cupcake tins and call then snowballs. Whatever the shape, these little cakes are a favorite treat in my family.
In bakeries, you’ll find them in squares or rectangles. She shared her recipe with me a long time ago, and I am sharing it with you.
You can bake the batter in mini muffin pans or standard muffin pans. It just depends on what size you want your snowballs to be. After the cupcakes are baked, freeze them. The frozen cakes are dipped in a chocolate sauce and then rolled in desiccated coconut.
Desiccated coconut is dried and unsweetened. It looks like coarse, white bread crumbs. You can find it in stores that carry baking supplies and at Asian markets. It is the same kind of coconut used to make coconut shrimp.
Here is the recipe for making the “snowballs”. The recipe for the cupcakes is listed below, as well. I just doubled my classic white cupcake recipe, but you could use a box mix, if you prefer.
Aunt Josie’s Coconut Cake Squares aka “Snowballs”
1 white cake, prepared and frozen solid* or cupcakes
Chocolate Sauce
1 c. unsweetened cocoa
1 1/4 c. sugar
2 c. water
1 t. vanilla
1 c. desiccated coconut (available at cake supply stores and some health food stores)
Cut cake into small squares, or cake can be baked in regular or mini cupcake tins. Freeze until ready to use. Meanwhile, make the chocolate dipping sauce. Combine remaining ingredients, except coconut, in a medium saucepan. Bring to a boil then simmer 5 minutes. Remove from heat and cool completely.
Using toothpicks or fondue forks, dip frozen cake in sauce let drain a few seconds, then roll in the coconut. Can be enjoyed right away or frozen again for later use.
*If you make a box cake in muffin tins you’ll get 24 cupcakes or about 60 mini cupcakes. The recipe below will yield half that amount.
Classic White Cupcakes
1 cup sugar
1/2 cup butter
2 eggs
2 teaspoons vanilla extract
1 1/2 cups all-purpose flour
1 3/4 teaspoons baking powder
1/2 cup milk
Preheat oven to 350 degrees. Line a muffin pan with 12paper liners. In a medium bowl, cream together the sugar and butter. Beat in the eggs, one at a time, then stir in the vanilla. Combine flour and baking powder, add to the creamed mixture and mix well. Finally stir in the milk until batter is smooth. Pour or spoon batter into the prepared pan. Bake 20 to 25 minutes. Cupcakes are done when they springs back to the touch. Makes 12.
Baked Potato Soup

When I was a kid I loved getting a baked potato when we went out for dinner. I loved my Mom’s home cooking, including her baked potatoes, but it was different at a restaurant. It would come to the table wrapped in foil and all puffed up in the middle. As a kid it looked very special to me. They also had so many toppings you could get. Choices included sour cream, butter, chives, bacon and cheese. This soup starts off as a cream of potato soup, and then combines many of the toppings you might have on a baked potato. It feels just like those baked potatoes at the steakhouse. Comfort food on a couple of levels.
Baked Potato Soup
4 slices bacon, chopped
1 large onion, chopped
4- 5 medium potatoes, peeled and cubed
4-5 cups chicken stock
1/2 c. chopped fresh parsley
2 c. half and half
3 T. flour
salt and pepper to taste
Toppings:
Sour cream
chopped green onions or chives
shredded cheese
extra bacon, cooked crisp and crumbled
In soup pot combine bacon and onion and cook over medium heat until bacon is cooked and onion is tender. Add potatoes and stock and simmer, covered, until potatoes are tender, about 20 minutes. Add parsley and most of the half and half. Reserve a couple of tablespoons of the half and half and combine with the flour and stir until smooth. Ladle a little of the warm soup into the flour mixture and whisk until smooth. Add the flour mixture to the rest of the soup and stir until smooth. Cook until soup is thickened and bubbly. Adjust seasonings and serve. Add toppings of your choice at the table. Makes 4 servings.
Asian Turnip Cakes

If you are planning a party for the Lunar (Chinese) New Year, you might want to make turnip cakes.
I first had turnip cakes at a local Asian restaurant. I loved them, and was intrigued at how to make them. They were little squares, lightly crisped on the outside, smooth and creamy in the middle.
When I first heard turnip cake- I was thinking of the purple and white turnips I knew. That is not what these turnip cakes are made from. It helped a lot when I realized the “turnip” cake was actually made from Daikon radish. Daikon radishes are also called Chinese turnips. They are really big, white radishes. They are available at Asian grocery stores and other grocery stores. Now that I knew the ingredient I needed, I had to find a recipe.
I searched the internet and found a lot of different variations for how to make them.
The first recipe I tried was more like a potato pancake. Shredded radish paired with eggs and bread crumbs. They were good, but not what I had at the restaurant. The turnip cake I had enjoyed was smooth and sort of starchy. Plus, it was a neat square shape.
I found several recipes that included the steaming step. This enabled the cakes to be set up with a starch, cooled and sliced before the final frying step. This was what I wanted!!
The most promising recipe included rice flour- but I was out of rice flour, so I improvised with cornstarch and a little wheat flour. It worked really well.
Many recipes included shrimp or Chinese sausage and sometimes green onions. I decided, this time, to make them vegetarian. That worked well, but you certainly could add meat or shrimp to yours.
I shredded the daikon pretty fine, but you could still discern the radish in the final dish. I liked that a lot. I did not grate them as some recipes suggested. So here is my version of turnip cakes. They sound like a bit of work, but it really is worth the time. I also like that all the prep can be done a day or two ahead of time, then just slice and fry when you want them.
Turnip Cakes
1 large Daikon radish- about 1¼ lbs., give or take
1 c. water
½ c. minced onion
1 t. salt
½ t. white pepper
½ c. cornstarch
2 T. flour
Oil for frying
Oyster sauce for dipping, optional
Peel and shred radish. I used a fine shredding blade. Squeeze out some of the liquid from the radish. Place shredded radish in bowl with the water and onion and steam in microwave for 4-5 minutes- you can also place radish and onion in saucepan with water and simmer 4-5 minutes. Set aside to cool. Combine the radish mixture with the cornstarch, flour salt and pepper. Oil an 8×4-inch loaf pan. Place the radish mixture in the prepared pan and steam for 50 minutes.* I placed plastic wrap over the pan to prevent water from dripping into the pan. Remove pan from steamer and cool down for at least 30 minutes. . At this point you can finish preparing the turnip cakes- or place in fridge until ready to make them. When ready to fry the turnip cakes, remove from the pan and cut into slices- about ¾ -inch thick. Heat oil in a skillet over medium high heat. Cook cakes in oil on both sides until golden brown and crisp. Drain on paper towels. Serve with oyster sauce- or whatever dipping sauce you prefer. Makes about 10.
* To steam the mixture- I just used a large stock pot with a cooling rack in it. I brought about 2 inches of water to a boil, placed the pan on the rack and covered the pan. You could also steam in the oven with a roasting pan, with an inch of boiling water in it and covered with foil.
Slicing the turnip cakes before frying
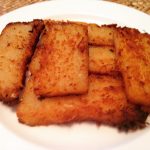
Ready to serve
Orange Tea Bread

Winter is citrus season and I have been eating a lot of oranges lately. Besides eating them fresh, I also like to cook with oranges. If you are looking for a new recipe for a quick bread, I would recommend trying this one.
The bread is flavored with orange zest in the batter, then a warm orange syrup is drizzled over the bread, right out of the oven. This makes for a bread that is flavorful and moist. It can be breakfast, a brunch dish or even a dessert, when topped with ice cream or whipped cream. The recipe makes one loaf, but I often double the recipe and make two. It seems to disappear around here pretty quickly. The bread freezes well, too.
Orange Tea Bread
2 cups all-purpose flour
1-1/2 teaspoons baking powder
1 teaspoon baking soda
1/2 teaspoon salt
2/3 cup Greek yogurt or sour cream
2/3 cup sugar
2 large eggs
3 tablespoons melted unsalted butter
1 tablespoon grated orange zest
Syrup:
1/2 cup orange juice
1/4 cup sugar
Preheat oven to 350 degrees. Grease an 8×4″ loaf pan. Line pan with wax paper or parchment and set aside. Sift flour, baking powder, baking soda and salt into a bowl. In a separate bowl, whisk together yogurt, sugar, eggs, butter and orange zest. Add liquid ingredients to dry ingredients, and stir mixture until well combined. Transfer batter to loaf pan, smoothing top, and bake in oven for 45 to 50 minutes, or until skewer inserted in middle comes out clean. While the bread is baking, combine orange juice and sugar in a saucepan. Bring mixture to a boil over moderate heat while stirring, and simmer for 1 minute. Keep syrup warm. Make holes in top of bread with a thin wooden skewer and drizzle with syrup. Let stand in pan until cool. Makes 1 loaf.

