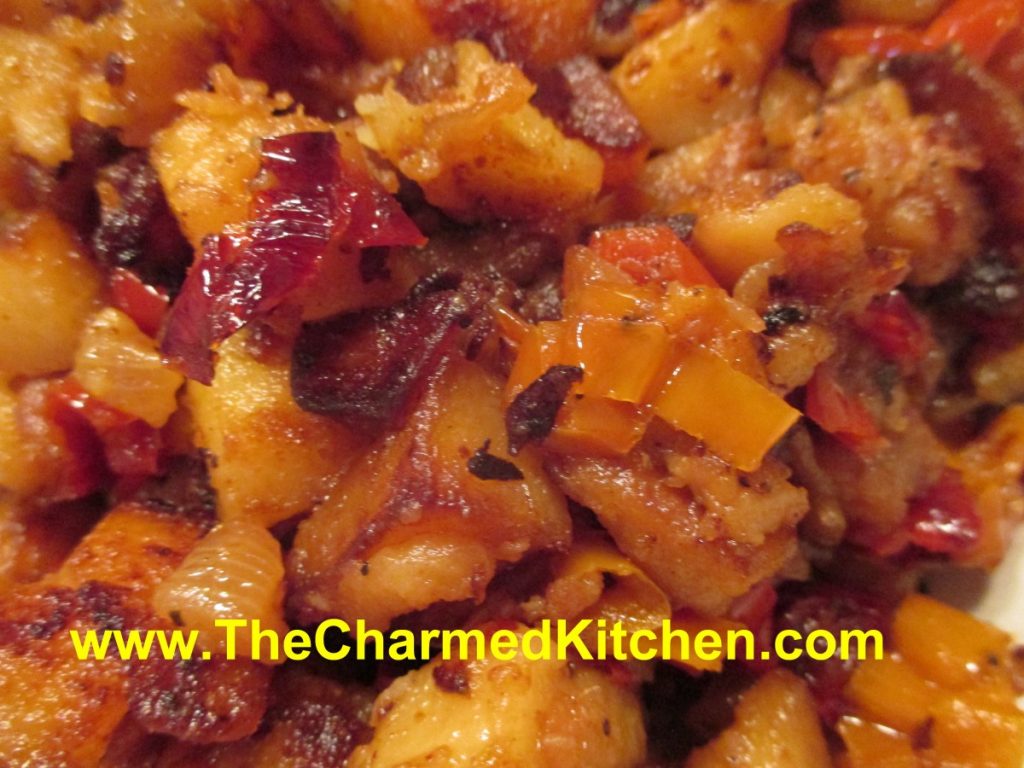
Mom’s Jelly Doughnuts

I remember how fun it was to watch my parents making doughnuts. The making of the dough, then cutting the dough into circles. The dough circles would then rise on the counter, under linen towels until puffed up. Gently they would be fried, then set on paper towels to drain. Once cooled, the filling would be piped into them through a pastry bag filled with some wonderful jelly or jam.
I also remember learning to fill them. Squeezing the jelly from the pastry bag into the doughnut was tricky. You wanted to make sure there was enough filling, but not so much that they split open. After a couple of tries, I realized you could figure it out by the weight of the filled doughnut in your hand.
My parents were both excellent bakers. My father had even been a professional baker at one time. I thought it was normal to have parents who made doughnuts. It was the norm in my family.
My folks only made them for special occasions. Unless my Mom got a taste for homemade jelly doughnuts. Then, my dad would make them for her. She loved jelly doughnuts. More than pretty much anyone else I knew.
You can fill them with any number of jellies, jams and cream fillings. I had fresh strawberries and dried apricots so I used them to make both a strawberry filing and an apricot filling. Once fried and filled, the doughnuts can be eaten plain or topped with a drizzle of powdered sugar glaze or just rolled in powdered sugar. They are a bit of work, but well worth the effort.
Jelly Doughnuts
Dough:
4 c. flour
2 T. sugar
1 t. salt
½ c. butter
1 packet yeast
¼ c. warm water
2 t. sugar
1 c. evaporated milk
2 eggs, beaten
Combine flour with sugar and salt. Cut in butter and set aside. Dissolve yeast in warm water and 2 t. sugar and set aside. Combine milk with eggs. Stir in yeast mixture and add to flour mixture stirring well. On lightly floured surface knead dough until dough is smooth, about 5 minutes. Dough will be very sticky. Cover and let rise until doubled, about 1½ hours. Remove dough from bowl and punch down. Using about a third of the dough at a time roll dough out to about an ½ -inch thickness and cut out with a 2½ -inch biscuit cutter. Re-roll scraps and cut out. You should get about 2 dozen. Place dough circles on a floured surface and cover with a towel until doubled, about an hour. Heat oil in a deep pan until it reaches 375 degrees. Cook doughnuts a few at a time until golden on both sides, about 1 minute per side. Drain on paper towels and cool before filling.
Note: You can also refrigerate the dough after kneading it if you would prefer. Just place dough in an oiled bowl, cover with plastic wrap and chill overnight. Roll and cut dough into doughnuts when cold from the fridge. Allow to rise, covered, until doubled in bulk, about 2-3 hours. Fry as directed.
To fill doughnuts use a pastry bag fitted with a long tube tip for filling. I have these handy plastic syringes which are easy to use. Insert tube tip into doughnut and squeeze gently until doughnut is filled with jam. Be careful not to overfill or doughnut will split. Once filled doughnuts are topped with a powdered sugar glaze or rolled in powdered sugar.
Apricot Filling
12 oz. dried apricots, chopped up
2 c. water
2 c. sugar, or to taste
Combine apricots with water in saucepan and simmer, covered until apricots are really tender. This will take at least an hour- add more water, if needed. Add sugar to taste and cook until thickened. Puree mixture in a blender.
Strawberry Filling
1 lb. strawberries
1½ c. sugar
½ c. water
3 T. cornstarch
Crush berries and place in saucepan with the sugar. Cook until berries are tender, about 10 minutes. Combine water with cornstarch and add to strawberries. Cook until thickened and bubbly. Cool. , Puree. Makes 2 cups.
Onion Prosciutto Bread

I have made a lot of different breads in my life. This is one of my absolute favorites. The bread has a wonderful, chewy texture and is studded with onions, garlic and the smoky flavor of prosciutto. What’s not to love?
I first made this bread a long time ago. I even shared the recipe in bread baking classes. I only had the recipe in hard copy and at one point, I could not find it. Over time, I kind of forgot about it. Until a little over a week ago when I was going through a pile of old recipes and found it!! I decided to make it right away. It is every bit as good as I remember. I have shared slices of this bread with friends. The feedback has been great.
I made a few minor changes to the original recipe- a little more garlic and salt, but that was it. You don’t want to mess around with perfection. 🙂
I love the bread toasted and slathered with butter.

Onion and Prosciutto Bread
1 packet active dry yeast
¼ t. sugar
1⅔ c. warm water, 105-115 degrees F, divided
4-4½ c. flour
1 T. salt
2 T. olive oil
1 large onion, minced- about 1-1½ cups
4-5 garlic cloves, minced
4 oz. prosciutto, minced- 1½ cups
Cornmeal
1 egg
2 t. water
In large mixing bowl, combine 1/3 cup warm water with the sugar, 3 tablespoons of the flour and yeast. Stir until dissolved and let sit until mixture gets bubbly, about 10 minutes. Add the rest of the water, 3 cups of the flour and the salt. Stir until well mixed. Add enough of the flour to make a soft dough. Turn out onto a floured surface. Let rest 3 minutes, then knead until smooth and elastic, about 10 minutes. Dough should be on the soft side. Place dough in a lightly greased bowl and cover with a towel. Place in a warm place until dough has doubled in size. While dough is rising, prepare the onion mixture. Sauté the onions in the olive oil over medium heat until just tender, about 3 or 4 minutes. Add the garlic and cook 2 more minutes. Set aside to cool and stir in the prosciutto. Once the dough has risen, punch down and place on a floured surface. Roll dough out into a circle, about ½-inch thick. Sprinkle the onion-prosciutto mixture evenly over the dough. Fold the sides in, in thirds- like folding a piece of paper to go in an envelope. Then fold in the top and bottom in the same way. The dough will look like a bundle. Place back in the bowl, cover and let rise again until doubled. Turn dough onto a floured surface. Let rest a few minutes, then knead a couple of times. Roll the dough out again into the big circle. Do the same folding that you did before- sides folded in thirds, then the top and bottom folded in. This helps to distribute the onion-prosciutto mixture evenly. Place the dough on a baking sheet lightly greased and coated with cornmeal. Shape the dough into a 14-inch loaf. Cover with a towel and let rise until doubled. Preheat oven to 400 degrees. Place a pan with hot water on the bottom rack of the oven. Combine the egg with the 2 teaspoons of water, mix well and brush lightly over the bread. With a sharp knife make three slashes on the top of the bread. Place in oven and bake 25 minutes. Remove the pan of water and bake another 25 minutes or until bread is golden brown and sounds hollow when tapped lightly. Remove from oven and place on a cooling rack. Makes one very large loaf.


Chocolate Lovers Waffles

These waffles can make a great start to Valentine’s Day. Chocolate for breakfast? Why not? They also make a wonderful dessert.
The waffle batter has cocoa in it, for the chocolate flavor, but I added some cinnamon and nutmeg for a little spice. The flavor is wonderful.
Top them with whatever you like. For breakfast, warm maple syrup or a dusting of powdered sugar work well.
I enjoy topping them with whipped cream and berries. You can also top with a scoop of ice cream and hot fudge. If you like, you can even add some chocolate chips to the batter for a stronger chocolate taste.
Chocolate Waffles
2 eggs, room temperature
1/2 stick butter, melted and cooled
1 t. vanilla
1 c. buttermilk
1 c. flour
3/4 c. sugar
1/2 c. cocoa
1 t. cinnamon
1/2 t. each baking powder and baking soda
1/4 t. salt
1/4 t. nutmeg
Beat first three ingredients until light and foamy, about 2 minutes. Stir in milk. Beat in dry ingredients just until blended. Bake until waffles are cooked through. Makes 4 cups batter. Serve with whipped butter or sour cream and fresh fruit. I like them just dusted with powdered sugar, too.
Turnip Cakes

If you are planning a party for Chinese New Year, you might want to make turnip cakes.
I first had turnip cakes at a local Asian restaurant. I loved them, and was intrigued at how to make them. They were little squares, lightly crisped on the outside, smooth and creamy in the middle.
When I first heard turnip cake- I was thinking of the purple and white turnips I knew. That is not what these turnip cakes are made from.
It helped a lot when I realized the “turnip” cake was actually made from Daikon radish. Daikon radishes are also called Chinese turnips. They are really big, white radishes. They are available at Asian grocery stores and other grocery stores. Now that I knew the ingredient I needed, I had to find a recipe.
I searched the internet and found a lot of different variations for how to make them.
The first recipe I tried was more like a potato pancake. Shredded radish paired with eggs and bread crumbs. They were good, but not what I had at the restaurant. The turnip cake I had enjoyed was smooth and sort of starchy. Plus, it was a neat square shape.
I found several recipes that included the steaming step. This enabled the cakes to be set up with a starch, cooled and sliced before the final frying step. This was what I wanted!!
The most promising recipe included rice flour- but I was out of rice flour, so I improvised with cornstarch and a little wheat flour. It worked really well.
Many recipes included shrimp or Chinese sausage and sometimes green onions. I decided, this time, to make them vegetarian. That worked well, but you certainly could add meat or shrimp to yours.
I shredded the daikon pretty fine, but you could still discern the radish in the final dish. I liked that a lot. I did not grate them as some recipes suggested.
So here is my version of turnip cakes. They sound like a bit of work, but it really is worth the time. I also like that all the prep can be done a day or two ahead of time, then just slice and fry when you want them.
Turnip Cakes
1 large Daikon radish- about 1¼ lbs., give or take
1 c. water
½ c. minced onion
1 t. salt
½ t. white pepper
½ c. cornstarch
2 T. flour
Oil for frying
Oyster sauce for dipping, optional
Peel and shred radish. I used a fine shredding blade. Squeeze out some of the liquid from the radish. Place shredded radish in bowl with the water and onion and steam in microwave for 4-5 minutes- you can also place radish and onion in saucepan with water and simmer 4-5 minutes. Set aside to cool. Combine the radish mixture with the cornstarch, flour salt and pepper. Oil an 8×4-inch loaf pan. Place the radish mixture in the prepared pan and steam for 50 minutes.* I placed plastic wrap over the pan to prevent water from dripping into the pan. Remove pan from steamer and cool down for at least 30 minutes. . At this point you can finish preparing the turnip cakes- or place in fridge until ready to make them. When ready to fry the turnip cakes, remove from the pan and cut into slices- about ¾ -inch thick. Heat oil in a skillet over medium high heat. Cook cakes in oil on both sides until golden brown and crisp. Drain on paper towels. Serve with oyster sauce- or whatever dipping sauce you prefer. Makes about 10.
* To steam the mixture- I just used a large stock pot with a cooling rack in it. I brought about 2 inches of water to a boil, placed the pan on the rack and covered the pan. You could also steam in the oven with a roasting pan, with an inch of boiling water in it and covered with foil.

Slicing the turnip cakes before frying

Ready to serve
Mini Chocolate Eclairs

If you want to surprise someone with a very special sweet treat, you could make them some eclairs. These are a bit or work, but the end result is so wonderful. I think they are worth the effort, especially for special occasions.
I decided to make a mini version this time, just for fun.
You start by make a pate a chou, or cream puff pastry. This is the same dough used to make cream puffs. It is a combination of water, butter, milk and flour- cooked on top of the stove, then enriched with the addition of eggs. The dough is piped onto baking sheets and baked until puffed, golden and crisp. Once cooled, they are filled with sweetened whipped cream or, more traditionally, a custard filling, then topped with chocolate ganache.
Mini Eclairs
1 recipe Cream Puff Pastry (Pate a Chou)- recipe follows
Egg custard- for filling, or sweetened whipped cream- recipe follows
Chocolate Ganache- for topping- recipe follows
Start by making the dough. This recipe will make 12-18 medium eclairs or 3 dozen of the mini ones.
Cream Puff Pastry
¾ c. water
¼ c. milk*
¼ t. salt
½ c. (1 stick) unsalted butter
1¼ c. flour – unbleached or bread flour preferred
4 large eggs
Extra milk for brushing
In saucepan, heat together water, milk butter and salt into a full boil. Butter has to be melted. While stirring, dump flour into saucepan, stirring constantly. Mixture will form into a ball. Reduce heat to medium and continue cooking dough, while stirring, for another minute or two. Place dough in an electric mixer and allow it to cool down a little before adding the eggs. Mixture has to be at 140 degrees F, or below, before you start adding the eggs. I use the paddle attachment and beat the dough before adding the eggs. This cools the dough down faster. Beat in eggs, one at a time, until each is fully incorporated. Beat until dough is shiny. A spoon, lifted out of the batter, should leave a peak that does not fall down. *You can use all water, instead of the combination of water and milk, if you prefer. Use 1 cup water in total, if omitting milk.
Preheat oven to 425. Line a baking sheet with foil or parchment. Don’t grease the pan. Using a piping bag, squeeze the dough into 2-3-inch strips on the baking sheet- leaving a little room in between. Strips should be about ¾ -inch in diameter. Using a little milk on your finger, smooth down any peaks on the puffs. They should resemble miniature hot dog buns. Bake at 425 for 10 minutes, then turn oven down to 375. Bake eclairs 10 more minutes, or until golden brown. Tap the shells. They should sound hollow. Turn off the heat and leave oven door open a crack, allowing them to dry completely. Cool before filling. Makes about 36.
Custard Filling
2 cups milk
2 tablespoons cornstarch
1⁄3 cup sugar
2 eggs, lightly beaten
1 teaspoon vanilla
Using a whisk, combine milk, sugar and cornstarch in a medium saucepan over medium heat on stove top. Allow milk to scald (heat to the point when tiny bubbles form around edges of pan). Whisk occasionally to prevent cornstarch from clumping on bottom edges of pan. Remove milk mixture from heat, preferably to a burner that’s turned off.
Mix about 2 tablespoons of scalded milk mixture into eggs using whisk, then introduce eggs into milk mixture in a slow stream, whisking milk mixture constantly. Immediately return pan to heat and whisk gently until custard thickens, another two or three minutes. Do not allow to boil. (If you find that you have egg white strands in custard, feel free to pass it through a fine-mesh sieve into a different bowl now.) Remove pan from heat and stir in vanilla. Cool before using. Makes 3 cups.
To fill the eclairs, using a small piping tip with a pastry bag, filled with the custard. Squeeze filling in on one end, on through the bottom, squeezing until it seems full.
Once eclairs are filled, top with a chocolate ganache. I just dip the tops of the eclairs in the warm ganache and chill until chocolate sets. Filled eclairs should be stored i8n fridge until ready to serve. They can be frozen.
Chocolate Ganache
4- 6 oz. dark chocolate, chopped- or 1 cup chocolate chips
2 oz. heavy whipping cream
In saucepan, heat chocolate and cream together until just heated through. Remove from heat and stir until smooth. You can also do this in a microwave safe bowl, in the microwave for about a minute. Remove and stir until smooth. Makes 1 cup.
Clementine Marmalade

I love a really good marmalade. It isn’t everyone’s idea of what to put on their toast, but I love the bitter undertones. Marmalade is a type of jelly, but it has pieces of citrus peel suspended in it. A conversation with a dear friend inspired me to make marmalade. I used to make it, but hadn’t in a long time. Marmalade is a bit of work, but I am so glad I made it. The flavor is so much better than most of what I find in stores.
I used clementines to make my marmalade. Mandarins would be fine, or any thin skinned orange that have little or no white pith on the peels. You know why? Because if you use an orange with a thick skin, like a navel orange, you have to scrape off the white part of the peels. You are already slicing all those peels in to thin strips. Why make more work for yourself? Besides, I really like the taste of clementines and mandarins.

So here is the recipe. Enjoy.
Clementine Marmalade
3 lbs. clementines or mandarin oranges
2 large or 3 small lemons
6 cups water
About 8 cups sugar
Wash the fruit and dry off. Peel the clementines. I cut a few shallow cuts down each one to make them easier to peel in fairly whole pieces. Slice the peels into thin strips. You need to get 2 cups of sliced peels. Take the peeled clementines and open them up. Remove that little piece of white membrane in the center. Chop up the fruit and place in a bowl. You’ll need 4 cups of the chopped clementines. You should have enough with a 3 pound bag. You will have more than enough peels. Slice the ends off the lemons, cut them in half and slice thin. Be careful to remove and discard the lemon seeds. You should end up with about a cup of prepared lemon. Place the prepared fruits and peels in a large saucepan with the water. Bring to a boil, then simmer 5-10 minutes. Cool and place in the fridge overnight. You want this mixture to sit 12-18 hours. The next day place the fruit and water mixture in a pot and bring to a boil. Simmer until the peel get tender. It took about 20 minutes for me. You want to measure how much of the mixture remains and add an equal amount of sugar to the mixture. I had close enough to 8 cups to just use 8 cups of sugar. Bring the mixture to a boil. Cook until mixture reaches gel point. I know you were fine until I said that. What is gel point and how do you know when you are there?
Here is how you can tell when you are at gel point
.
1.Use a candy thermometer, attached to the side of the pan and down in the jelly far enough to cover the bulb of the thermometer, but not touching the bottom of the pan. This is the most accurate method. Gel point is 220 degrees at sea level or 8 degrees above the temperature of boiling water
2. Spoon test by using a cool metal spoon dipped in the jelly and held on its side so the jelly can run off the edge. When jelly is not ready the drops will be light and syrupy. As it gets thicker the drops will falls off the spoon 2 at a time. When it has reached the proper stage two drops will form together into one drop and sheet off the spoon. Sounds kind of vague, but you really will see a difference as it thickens.
3. Freezer test just involves spooning a small amount of jelly on a plate and placing it in the freezer for a few minutes, to cool it down quickly. If the mixture gels, it should be done. While waiting for jelly test to cool, remove jelly from heat.
I hope that helped.
So now you just boil the mixture until it thickens. It will take a while. Mine took about 25-30 minutes. I did boil it pretty rapidly, and stirred most of the time. You can turn it down a bit, if you need a break. In the beginning, when the mixture is still pretty watery, you should get your jars ready and get the water bath on. Wash jars and keep warm until ready to use. I just fill them with hot tap water. Prep lids according to what the package tells you. Get a pot simmering with water for processing. It needs to be tall enough so the water will cover the jars by at least an inch. If you don’t have a canner, any deep pot can work. You can’t put the jars directly on the bottom of the pot though. They could shatter. I have a small round cooling rack I sometimes use. You can also put a small towel in the pot and then set the jars on top of the towel, to keep them from touching.
When you are ready to fill the jars, ladle the hot marmalade into the jars, filling them until they are ½ – ¼ inch from the top of the jar. Use a jar funnel if you have one, or borrow one from a friend. It makes things so much easier. Use a damp paper towel to wipe the rim of the jar. Place lid and band on the jar and screw on until fingertip tight. Repeat until jars are filled. Place them in the simmering water. They should be submerged. Cover pot and bring up the heat and when the water comes to a boil, start timing the processing. Process 10 minutes, then turn off the heat and let the jars sit in the pot 5-10 more minutes. Remove jars and place on a towel or cooling rack. You should here pings as the jars start to seal. Once they are cool, you can check to see if they all sealed. Any that didn’t seal, you can reprocess (with a new lid) or just place in fridge and eat first.
Yield: About 9 half-pint jars.

Adapted from the Ball Blue Book


