Clementine Marmalade

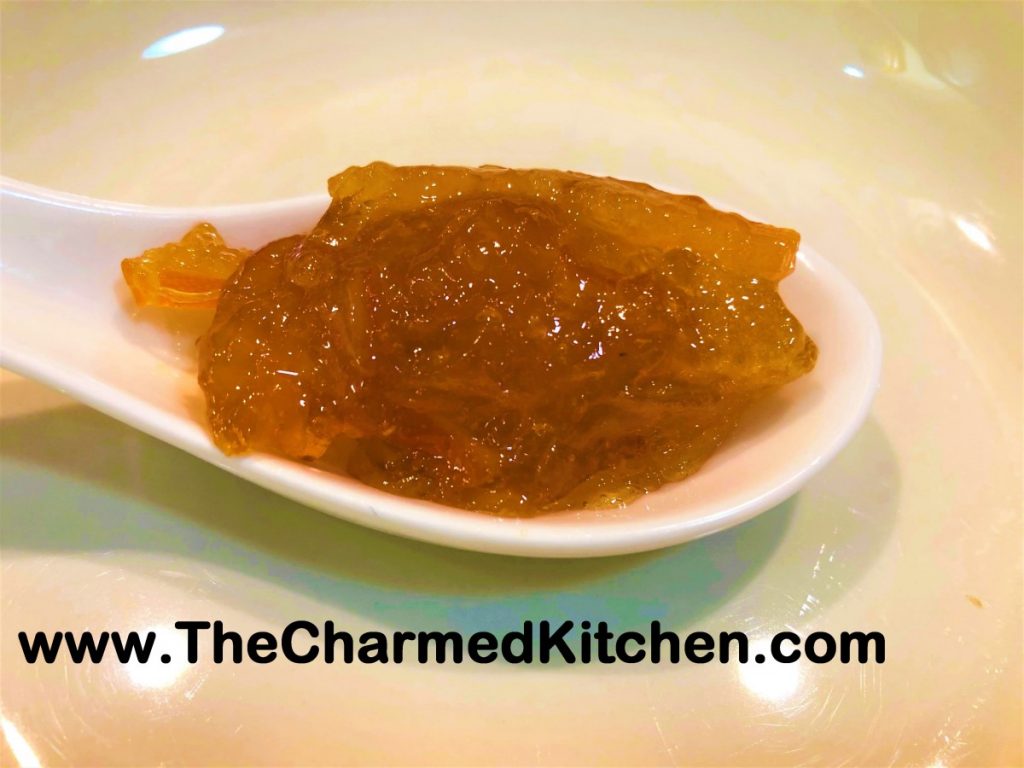
I love a really good marmalade. It isn’t everyone’s idea of what to put on their toast, but I love the bitter undertones. Marmalade is a type of jelly, but it has pieces of citrus peel suspended in it. A conversation with a dear friend inspired me to make marmalade. I used to make it, but hadn’t in a long time. Marmalade is a bit of work, but I am so glad I made it. The flavor is so much better than most of what I find in stores.
I used clementines to make my marmalade. Mandarins would be fine, or any thin skinned orange that have little or no white pith on the peels. You know why? Because if you use an orange with a thick skin, like a navel orange, you have to scrape off the white part of the peels. You are already slicing all those peels in to thin strips. Why make more work for yourself? Besides, I really like the taste of clementines and mandarins.
So here is the recipe. Enjoy.
Clementine Marmalade
3 lbs. clementines or mandarin oranges
2 large or 3 small lemons
6 cups water
About 8 cups sugar
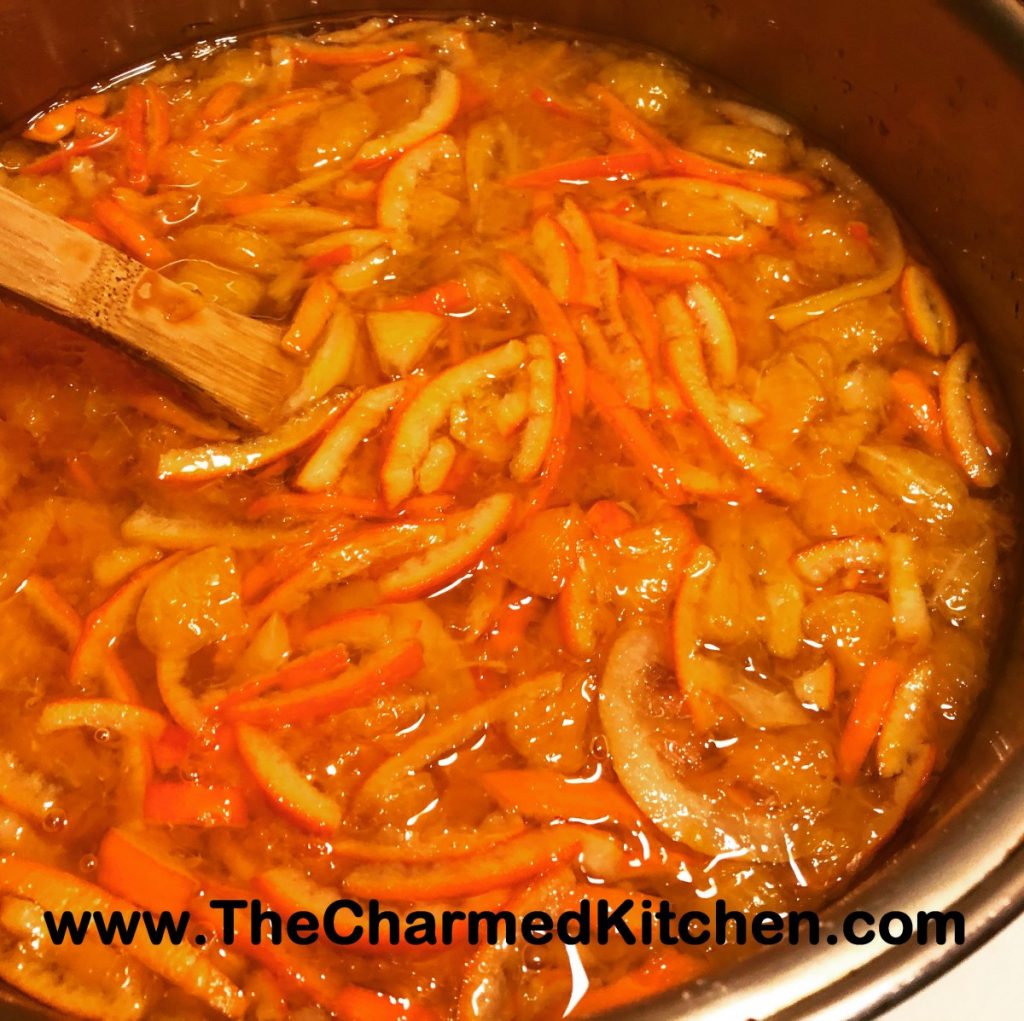
Wash the fruit and dry off. Peel the clementines. I cut a few shallow cuts down each one to make them easier to peel in fairly whole pieces. Slice the peels into thin strips. You need to get 2 cups of sliced peels. Take the peeled clementines and open them up. Remove that little piece of white membrane in the center. Chop up the fruit and place in a bowl. You’ll need 4 cups of the chopped clementines. You should have enough with a 3 pound bag. You will have more than enough peels. Slice the ends off the lemons, cut them in half and slice thin. Be careful to remove and discard the lemon seeds. You should end up with about a cup of prepared lemon. Place the prepared fruits and peels in a large saucepan with the water. Bring to a boil, then simmer 5-10 minutes. Cool and place in the fridge overnight. You want this mixture to sit 12-18 hours. The next day place the fruit and water mixture in a pot and bring to a boil. Simmer until the peel get tender. It took about 20 minutes for me. You want to measure how much of the mixture remains and add an equal amount of sugar to the mixture. I had close enough to 8 cups to just use 8 cups of sugar. Bring the mixture to a boil. Cook until mixture reaches gel point. I know you were fine until I said that. What is gel point and how do you know when you are there?
Here is how you can tell when you are at gel point
.
1.Use a candy thermometer, attached to the side of the pan and down in the jelly far enough to cover the bulb of the thermometer, but not touching the bottom of the pan. This is the most accurate method. Gel point is 220 degrees at sea level or 8 degrees above the temperature of boiling water
2. Spoon test by using a cool metal spoon dipped in the jelly and held on its side so the jelly can run off the edge. When jelly is not ready the drops will be light and syrupy. As it gets thicker the drops will falls off the spoon 2 at a time. When it has reached the proper stage two drops will form together into one drop and sheet off the spoon. Sounds kind of vague, but you really will see a difference as it thickens.
3. Freezer test just involves spooning a small amount of jelly on a plate and placing it in the freezer for a few minutes, to cool it down quickly. If the mixture gels, it should be done. While waiting for jelly test to cool, remove jelly from heat.
I hope that helped.
So now you just boil the mixture until it thickens. It will take a while. Mine took about 25-30 minutes. I did boil it pretty rapidly, and stirred most of the time. You can turn it down a bit, if you need a break. In the beginning, when the mixture is still pretty watery, you should get your jars ready and get the water bath on. Wash jars and keep warm until ready to use. I just fill them with hot tap water. Prep lids according to what the package tells you. Get a pot simmering with water for processing. It needs to be tall enough so the water will cover the jars by at least an inch. If you don’t have a canner, any deep pot can work. You can’t put the jars directly on the bottom of the pot though. They could shatter. I have a small round cooling rack I sometimes use. You can also put a small towel in the pot and then set the jars on top of the towel, to keep them from touching.
When you are ready to fill the jars, ladle the hot marmalade into the jars, filling them until they are ½ – ¼ inch from the top of the jar. Use a jar funnel if you have one, or borrow one from a friend. It makes things so much easier. Use a damp paper towel to wipe the rim of the jar. Place lid and band on the jar and screw on until fingertip tight. Repeat until jars are filled. Place them in the simmering water. They should be submerged. Cover pot and bring up the heat and when the water comes to a boil, start timing the processing. Process 10 minutes, then turn off the heat and let the jars sit in the pot 5-10 more minutes. Remove jars and place on a towel or cooling rack. You should here pings as the jars start to seal. Once they are cool, you can check to see if they all sealed. Any that didn’t seal, you can reprocess (with a new lid) or just place in fridge and eat first.
Yield: About 9 half-pint jars.

Adapted from the Ball Blue Book
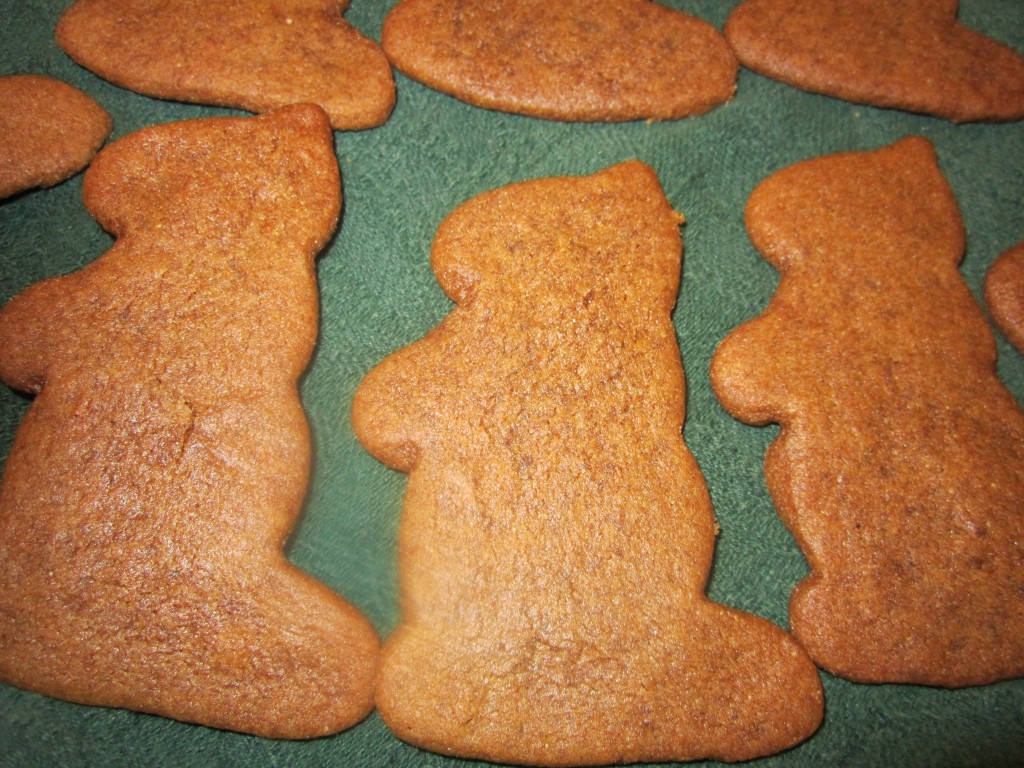
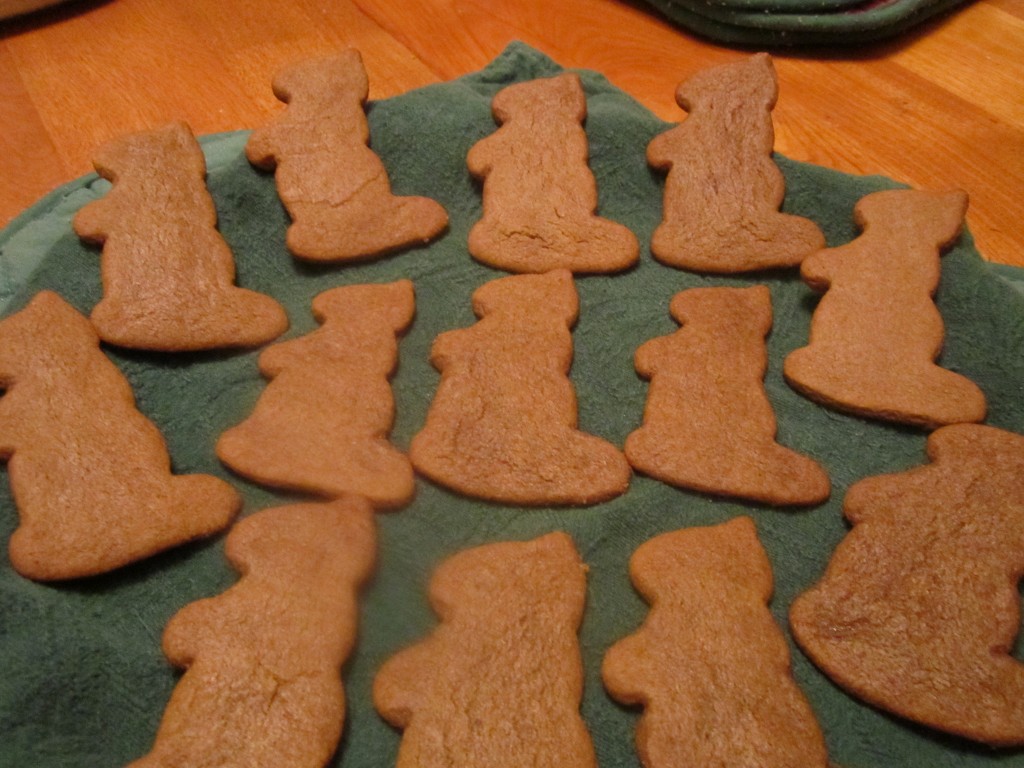
Groundhog Day Cookies!!

Even if you don’t have a groundhog cookie cutter- and I would be surprised if you did- these is a really nice cookie recipe.
Groundhog Day is just around the corner. I like to celebrate this holiday by making up a batch of groundhog cookies. Not made from groundhogs, mind you, but shaped like them.
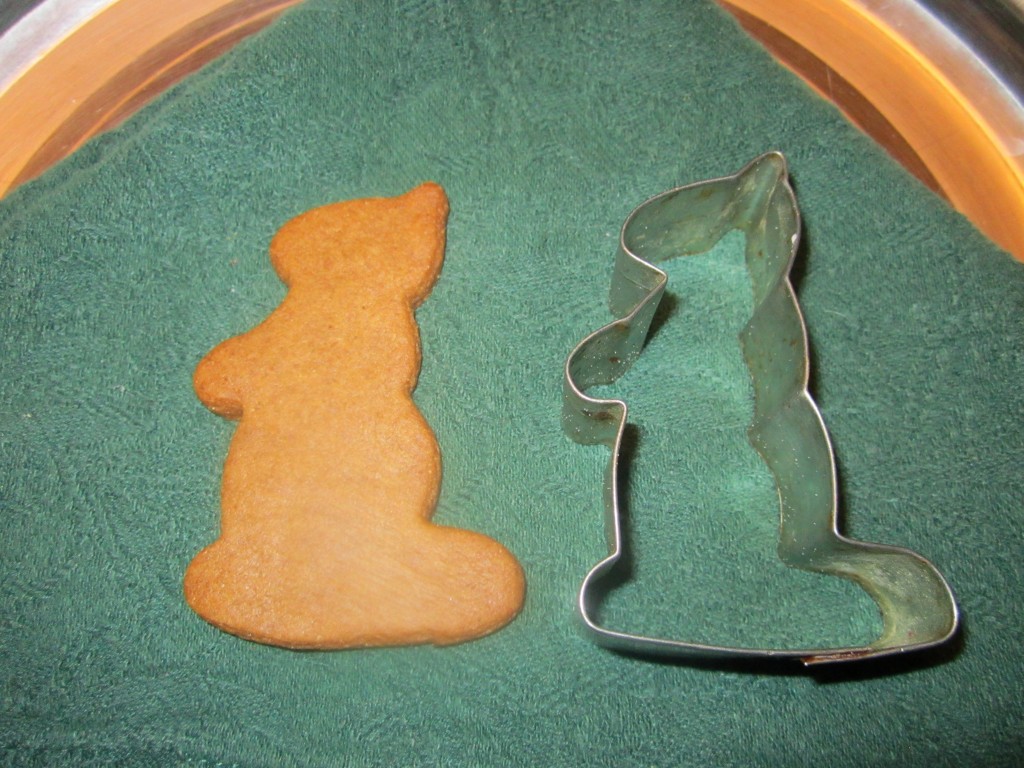
The recipe comes from my dear friend, Cindy Kotula, whose late husband Mike was from Punxsutawney, P.A. She also gave me a groundhog-shaped cookie cutter. Any cookie cutter works. These ginger-snap type cookies are good no matter what shape they end up as.
Groundhog cookie cutters are available at some baking supply stores and online. They come out a lovely groundhog brown and are positively yummy.
Spiced Groundhog Cookies
2 c. flour
2 t. cinnamon
1t. each ground ginger, ground cloves, ground allspice and baking powder
1/2 t. each baking soda and salt
1/2 c. butter, softened
1 c. sugar
1/2 c. molasses
1 egg yolk
Sift dry ingredients together and set aside. Beat sugar and butter until smooth and stir in molasses and egg yolk. Stir in dry ingredients and chill dough at least an hour. Preheat oven to 350 degrees. Roll out dough 1/8-inch thick on lightly sugared surface. Cut out with cookie cutter and place cookies on greased baking sheet. Bake 8-10 minutes. Cool slightly before removing from baking sheet. Makes 12-15 large groundhogs or 3-4 dozen small ones.
Happy Groundhog Day!
Bacon, Spinach and Mushroom Quiche


There seems to be an almost endless number of fillings for quiche. My most recent combination of bacon, spinach and mushrooms might be a new favorite. I think what made this one special is that I cooked the mushrooms in the bacon fat, after cooking the bacon. It really infused the whole quiche with that wonderful, smoky bacon flavor.
I defrosted a package of frozen spinach, but didn’t use all of it in the quiche. Not sure why not, but I would use it all the next time.
I baked my bacon and the mushrooms, but you can cook them both in a skillet, if you prefer. I had just washed my stove and didn’t want to get it dirty. Plus, I really like to bake bacon.
Here is the recipe. Enjoy.
Bacon, Spinach and Mushroom Quiche
1 unbaked pie crust – enough for a deep dish pie
4 oz. diced or shredded cheese – I like a sharp cheddar
2 T. flour
½ lb. bacon
1½ cup sliced fresh mushrooms
1 (10oz.) package frozen spinach, thawed and squeezed dry
1 c. milk or half and half
3 eggs, beaten
2 T. fresh chopped parsley
Hot pepper sauce to taste
salt and pepper to taste
Place bacon slices on a jelly roll pan and bake in a 350-degree oven until crisp, about 15 minutes. Remove bacon from pan and drain on paper towels. Place the mushrooms in the same pan you just cooked the bacon in and return to the oven. Cook about 15-20 minutes, or until mushrooms are cooked and even a little brown. Drain mushrooms on paper towels. Turn oven up to 400 degrees.
While mushrooms are cooking, crumble bacon. Start to prep quiche while mushrooms cook. In 9-inch (deep dish) pie pan place the crust. Toss cheese with the flour and place in crust. Add the bacon and spinach to the crust. Add the mushrooms. Combine milk with the eggs and add seasonings to taste. Pour over the bacon-spinach mixture. Place pan on a baking sheet to collect any drips and place in a preheated 400 degree oven. Bake for 30 minutes then turn down oven to 325 and continue baking until quiche is firm near the middle, about 25-30 minutes more. To test for “doneness” insert a butter knife about an inch from the center of the quiche. If it comes out clean, the quiche is done. Serves 4-6. Freezes well.

Naan Bread


If you have ever eaten at an Indian restaurant, you probably had naan bread. The bread has a soft, yet chewy texture, and is often topped with seeds. I still remember the first time I made naan. I bake bread all the time, but somehow I had never made naan. I was excited to give it a try. I figured there would be some challenges.
The thin rounds of dough are traditionally baked against the wall of a tandoori oven. The clay of the oven walls gets really hot, and cooks the bread quickly. Since I don’t have a tandoori oven, I baked my naan bread under the broiler. I was nervous that it would get burnt before it finished baking, but they turned out great. Soft, puffy bread pillows that I brushed with ghee right after baking. They came out even better than I had hoped.
If you never made naan bread before, I suggest you try it. It is so much fun, and not that difficult. Just keep an eye on it when baking.
Naan Bread
1 t. sugar
1 pkt. Yeast
2/3 c. warm water
1½ c. flour
1 T. ghee*
1 t. salt
Oil for baking pans
Extra ghee for brushing breads
Sesame, fennel or poppy seeds, if you like
In medium bowl, combine sugar with yeast and warm water. Stir and allow to sit until mixture gets bubbly, about 10 minutes. In mixing bowl place the flour, ghee and salt and mix to combine. Add the yeast mixture and stir until a soft dough forms. You might have to add a little more water. Knead dough on a floured surface until smooth and elastic, about 5 minutes. Return dough to mixing bowl, cover and allow to rise in a warm place until doubled in size, about 1½ hours. Turn dough onto floured surface and knead a couple more minutes. Unless you have a tandoori oven, you will need to cook the naan under a very hot broiler. Turn the broiler on. Line a baking sheet with foil and coat with some oil. Set aside while you prepare the dough for baking. Cut dough into 6-8 pieces. Roll each piece into a circle about 5 inches across and ½ inch thick. Place dough on the prepared baking sheet and place under the broiler. I set mine about 4 inches from the heat. Turn breads a couple of times. They will take about 7 minutes to bake. Remove from broiler, brush with extra ghee or melted butter and sprinkle with seeds, if you like. Makes 6-8. Best served soon after baking.
*Ghee is essentially clarified butter, or butter where all the solids have been removed. To make ghee, gently melt butter in a saucepan over medium-low heat. After melting, the butter will separate into three layers. This should only take a few minutes. Foam will appear on the top layer, the milk solids will migrate to the bottom of the pan, and clarified butter will float between the two. Let the butter come to a simmer and hold it here until the middle layer becomes fragrant, more golden than when you started, and clear – push the solids on top out of the way to have a peek. The milk solids at the bottom will begin to brown. At this point it is a matter of preference, you can let the solids lightly brown, or let things progress a bit further. When the ghee is finished, skim absolutely all of the top layer of foam into a bowl with a spoon or strainer, turn off the heat, and allow things to settle for a minute or so. Next, carefully pour the golden central layer through a strainer, into a clean glass jar, leaving the milk solids at the bottom of the pan. It can be used as a cooking oil, for flavoring all sorts of foods, and is amazing on popcorn.
I posted the complete directions yesterday.
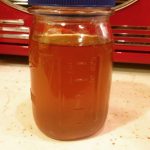
Making Ghee

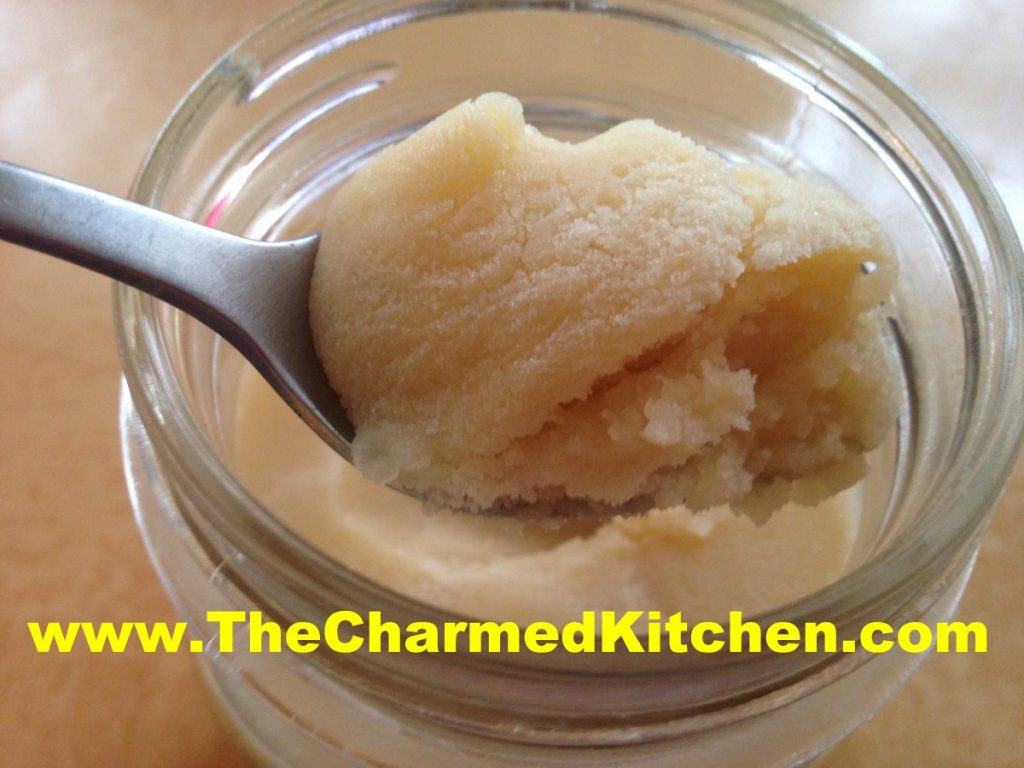
Ghee, if you haven’t had it before, is a kind of clarified butter, often used in Indian cooking. You can buy it at stores that carry international foods, but it is easy to make. I had a lot of butter left over from holiday baking, so I used some to make ghee.
Ghee has a wonderful, toasted, nutty flavor and it can be used in all sorts of dishes. You can add it to veggies or spread it on toast. I love to add ghee to rice or pasta.
A wonderful bonus when using ghee, because the milk solids have been removed, you can fry foods in it. It doesn’t burn quickly, like regular butter.
Because the solids have been removed, you can store ghee at room temperature. Although, it is recommended to use up home made ghee in a month or so. For longer storage, you can pop it in the fridge, but you don’t have to.
The difference between ghee and clarified butter is that ghee is cooked longer, to develop a darker color and wonderful toasted flavor. The longer cooking also removes any water in the butter, leaving just the fat behind.
There are several methods for making ghee. Some suggest long, slow cooking. Others a little more heat and less cooking time. I prefer the latter. I am not the most patient person.
Here is how I made my ghee.
Start with a pound of unsalted butter. Place the butter in a heavy bottomed, medium sized saucepan. Melt the butter over low heat. As soon as the butter is melted, turn the heat up a bit- to medium. It will start to form foam on the top at this point. After a few minutes, the foaming will stop. Turn up the heat a little more- not high heat, but a little higher medium, if that makes sense. Watch for the second foam to form on the top. This takes about 7-8 minutes. It will have turned a pretty, golden color. At this point, your ghee is done. You’ll have to strain it, to keep out the solids, which will have settled to the bottom of the pan. I strained my ghee twice, through several layers of cheesecloth. Be sure the container you are straining the ghee into is heat proof- it is pretty hot at this point. I used a stainless steel bowl, then transferred the ghee to a canning jar. You could also use a fine mesh strainer, if you don’t have cheesecloth. Store in a container with a tight fitting lid- you don’t want moisture to get to your ghee. It will get more solid as it cools down.
One last thing. I used a stainless steel pot and the brown bits took a bit of scrubbing to get out of the pot. Small price to pay for your own ghee.
That’s all there is to it. Try to use within a month or store in the fridge. Trust me, it never lasts that long around here!!
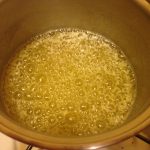
first foam
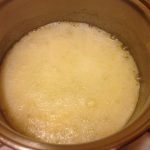
second foam
strained, still warm
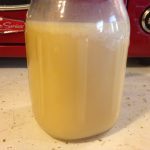
All cooled down
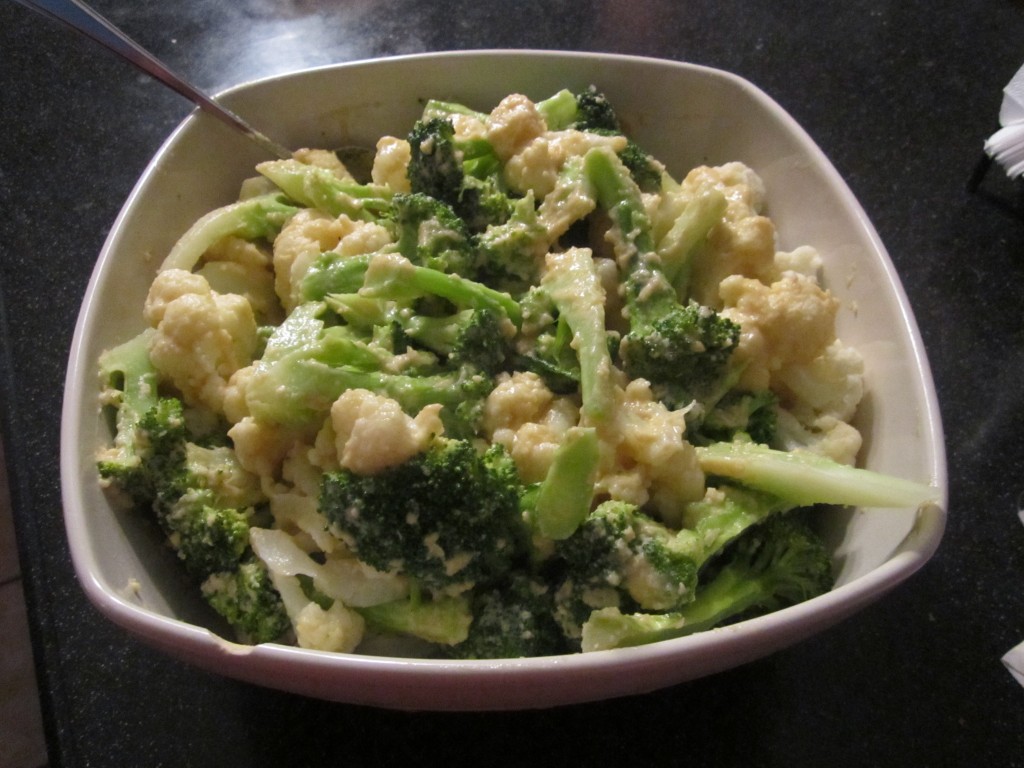
Broccoli with Hummus

When you think of hummus, I bet you think of it as a dip. It is a great dip, paired with some pita bread or fresh veggies. But hummus can be more than a dip.
I love to toss hot veggies with hummus. I especially like to do this with broccoli. I started doing this years ago for a friend who was vegan. The hummus was a nice substitute for butter or a cheese sauce.
You can use homemade hummus, but store bought is fine, too. Hummus is made from chickpeas, olive oil, tahini, lemon juice, garlic and a few seasonings. Of course, you can make all sorts of variations, if you prefer. You just combine the ingredients in a food processor or blender until smooth. Doesn’t get much simpler. I prefer to make my own, so I can flavor it the way I want.
One of my favorite combinations is hummus with broccoli. The flavors work great together. You just toss hummus with freshly cooked broccoli. So yummy.
Since I had some cauliflower, I added some of it to the dish as well.
So the next time you have some hummus around, try tossing it with hot, cooked veggies for a fun side dish.
Steamed Broccoli with Hummus
1 lb. fresh broccoli, you can also use cauliflower or a combination
1/2 c. hummus, homemade or store bought
Cut broccoli into long spears, peeling and trimming tough stems. Steam until just tender. Warm hummus over low heat or in a microwave and spoon over the cooked broccoli. Toss to coat evenly. Serves 4 as a side dish, 2 as a main course.
Hummus
1 can garbanzo beans, drained
1/4 c. olive oil
2 T. lemon juice
2 T. tahini (sesame seed paste)
2 cloves garlic
salt and hot pepper sauce to taste
Combine all ingredients in a blender or food processor until smooth. Adjust seasonings. Chill. Serve with pita bread, crackers or fresh vegetables. Also nice spread in a pita bread with sliced tomatoes, cucumbers and lettuce. Freezes well.
Reuben Bread

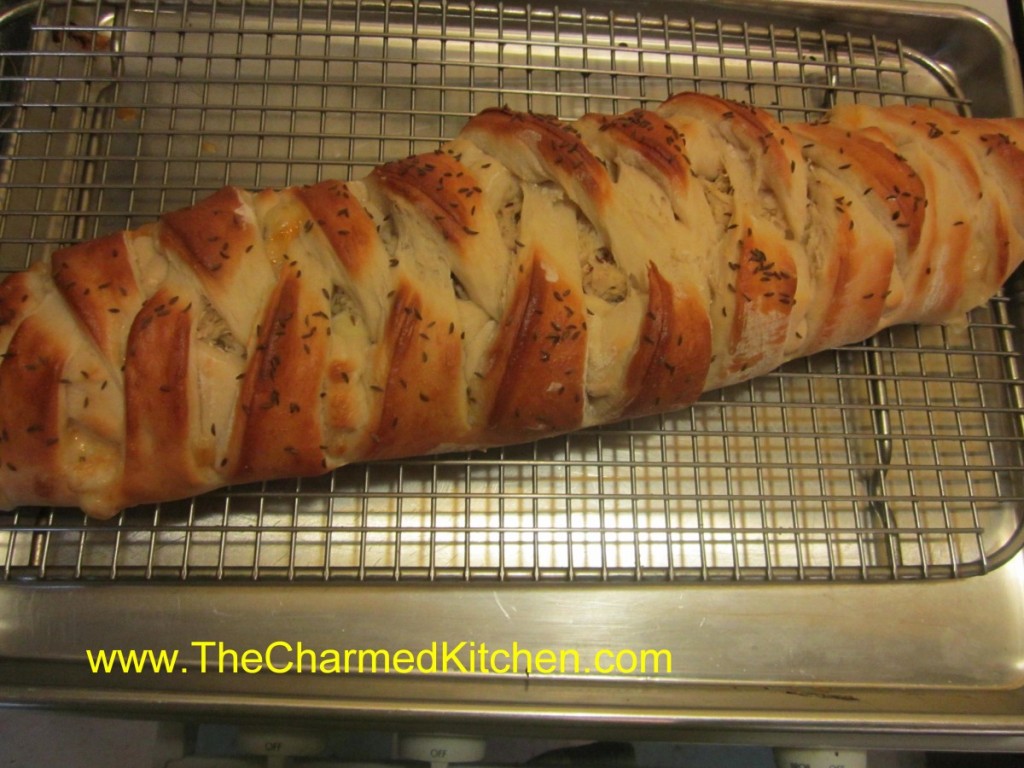
If you are looking for a twist on a Reuben sandwich try baking all the traditional ingredients into a loaf of bread. By using quick rising yeast, this bread can be ready to eat in right around an hour. It tastes amazing, and looks pretty impressive, too. Easier than you think, it will look like you spent all day making it. Plus, you can switch out the ingredients in all sorts of fun combinations.
This would make a great bread to serve for your Super Bowl party. Fun for anytime. really.
Reuben Bread
3 ¼ c. all purpose or bread flour, you can add a little rye flour, too
1 T. sugar
1 t. salt
1 package quick-rising yeast
1 c. hot water
1 T. oil
¼ c. thousand island dressing*
6-8 oz. thin sliced corned beef
4 oz. sliced Swiss cheese
1 c. sauerkraut, rinsed and squeezed dry
1 egg white, beaten
Caraway seeds
Set aside 1 cup of the flour. Combine remaining flour with the other dry ingredients in a medium bowl. Stir in water and oil and gradually stir in enough flour to make a soft dough. Turn onto lightly floured surface and knead until dough is smooth and elastic, about 5 minutes. Roll dough into a rectangle about 16 x 8. Spread dressing down center middle of dough. Top with meat slices, cheese and sauerkraut. Cut one-inch wide strips of dough from filling to edge on both sides. It will sort of look like fringe. Alternating sides, fold strips up and over the filling at an angle. Carefully lift loaf onto greased baking sheet and place at an angle. Cover with a towel and place sheet on top of a roasting pan half-filled with simmering water for 15 minutes. Brush with egg white and top with seeds. Bake in a preheated 400-degree for 20-25 minutes or until golden brown. Cool slightly before slicing. Serve warm and refrigerate leftovers.
* You can make your own Thousand Island Dressing by combining equal parts of ketchup, mayo and sweet pickle relish.
Note: The variations for this bread are almost endless. Some favorite combinations are ham and Swiss with mustard, roast beef and cheddar, chicken, broccoli and cheese, Spinach with ricotta or feta and onions, pizza, assorted fillings. You get the idea. Use your imagination and have fun. Just be careful not to overfill, or the bread will be hard to move, use fillings that aren’t too runny and always use cold fillings.
If you want to use regular yeast use warm, rather than hot water. Also, don’t let dough rise over boiling water. After kneading cover dough and let rise 45 minutes. Punch down and assemble as in original recipe. Cover with a towel and let rise until dough looks puffy, about 40 minutes. Bake as directed above. These breads can also be frozen.
Hazelnut Biscotti

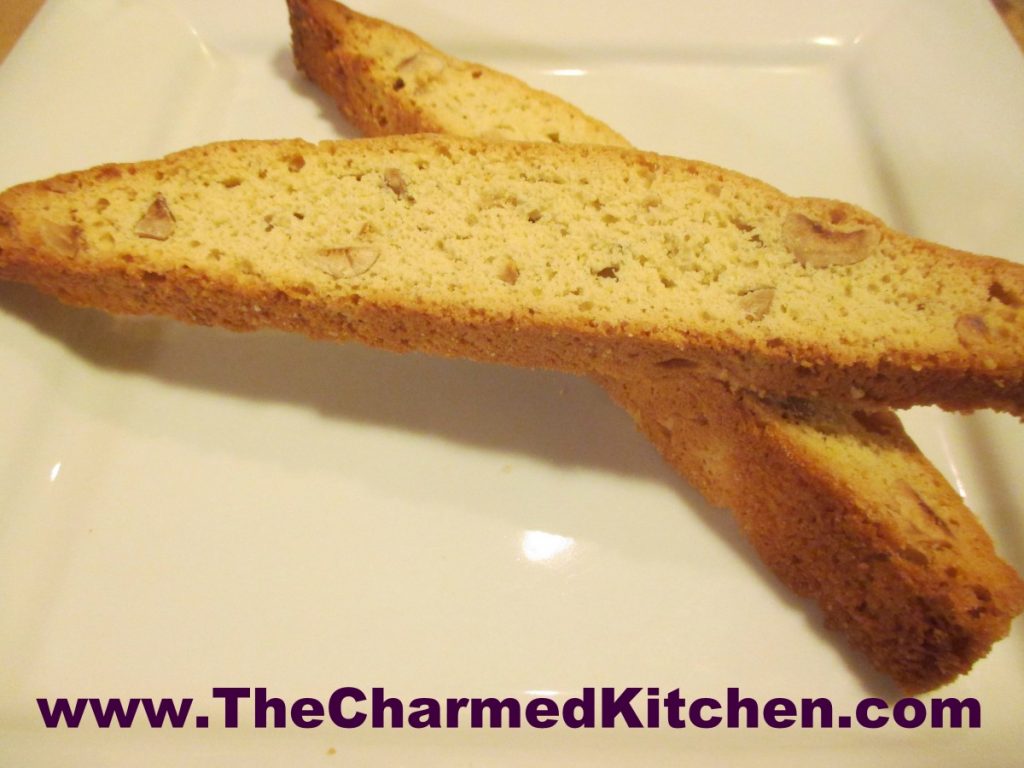
These biscotti are the perfect treat to have with your morning cup of coffee or tea. Crisp, but not too hard, they are studded with crunchy hazelnuts and flavored with vanilla and orange peel. I like them just the way they are, but you could dress them up with a drizzle of powdered sugar glaze. You can also dip one end of each biscotti in melted chocolate.
I was inspired to make these after buying hazelnuts recently.
I don’t know why more people don’t make their own biscotti. They are so easy to make, and you can flavor them to suit your own taste. Once baked, store them in an air tight container. They stay crisp for weeks. Assuming you don’t eat them first!
Biscotti get their distinctive, extra crunchy texture, from being baked not once, but twice. The batter is spread on a cookie sheet and baked until firm. Once cooled and little, the loaf is sliced and the slices are returned to the oven to get baked until crisp and toasted. I put the slices on a cooling rack, placed on the baking sheet, before the second bake. That way, the biscotti toast on both sides evenly. No need to turn them all over half-way through the second bake.
So here is the recipe. I hope if you haven’t made biscotti before, you give them a try.
Hazelnut Biscotti
3 c. flour
2 t. baking powder
1/2 t. salt
3 eggs
1 c sugar
1/4 c. butter, melted
1/4 c. olive oil
1 1/2 t. vanilla
1 t. grated orange peel
1 c. hazelnuts, toasted, peeled and chopped*
Combine dry ingredients and set aside. Mix together eggs, sugar, butter, oil, vanilla and peel. Beat until smooth and stir in flour mixture and nuts. Grease a large baking sheet, oil your hands, and place dough on sheet, forming into a 16×4-inch log. Bake at 325-degrees until tester inserted in center comes out clean, about 30 minutes. Loaf with spread a bit. Cool 15 minutes and leave oven on. Use serrated knife to cut into 1/2 -inch thick slices. Place cooling rack on a baking sheet. Place slices, cut side down, on cooling rack and return to oven for 20-22 minutes. Cool. Makes about 24.
If you like, you can dip one end of the finished biscotti in melted chocolate.
- to toast hazelnuts, place on a baking sheet and bake in a 325 degree oven for about 10-15 minutes. You don’t want them to burn. While they are baking, place a tea towel on a rimmed baking sheet. When the nuts come out of the oven, dump them on the tea towel. They tend to roll around, so the rimmed baking sheets is to save you from cursing as nuts roll off the towel and onto the floor. Fold the nuts up in the towel and rub them to get the skins off. Most of the skins will come off, which is fine.
Hazel’s Sweet Potato Pie

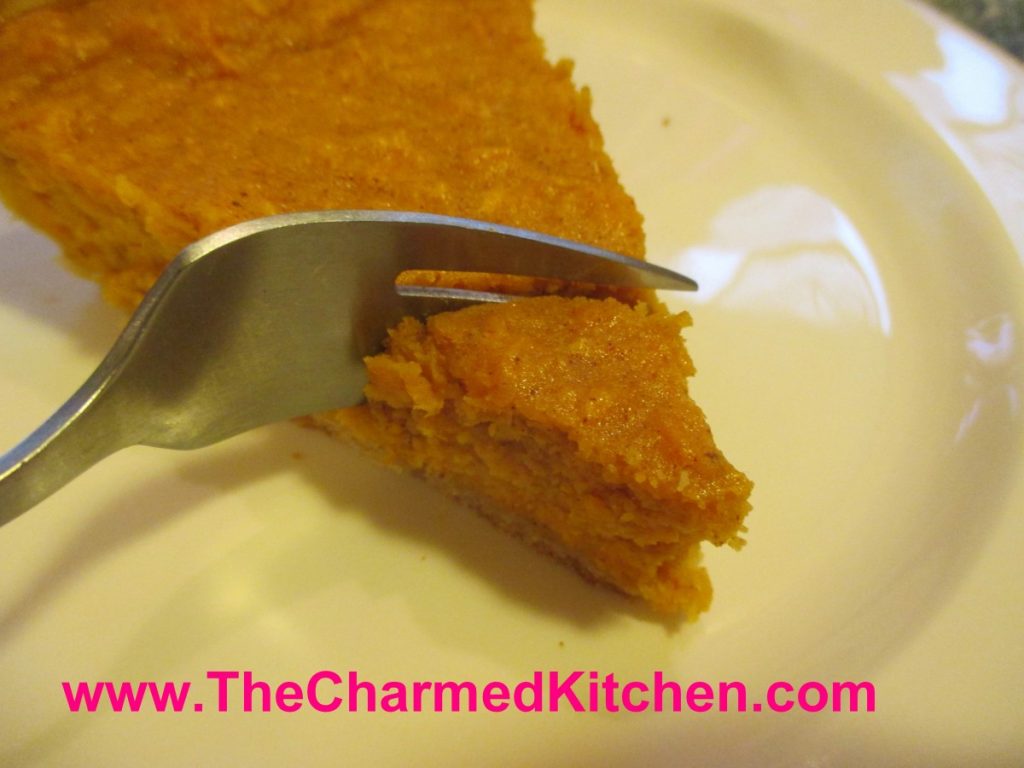
I love sweet potato pie. I am always surprised when someone tells me they have never had it. Maybe it is a north/south thing? I have made it for friends several times, and there is always someone who says they never had a sweet potato pie before. Once they taste it, they love it.
I used to work with a wonderful woman named Hazel Pruitt. She grew up in Alabama and taught me so much about southern cooking. I first made collard greens with Hazel. She also taught me how to make sweet potato pie. This is her recipe and I want to share it with you. I think of her every time I make it.
I used Martha Stewart’s recipe for the crust, but use whatever crust you like. Her recipe makes two crusts, so I will use the other half of the dough for another pie.
Hazel’s Sweet Potato Pie
½ c. sugar
1 t. cinnamon
½ t. allspice
½ t. salt
¼ t. cloves
1 ½ c. cooked, mashed sweet potato
2 eggs, beaten
1 c. milk or almond milk
2 T. melted butter or 2 T. olive oil
1 (9-inch) unbaked pie crust
Combine sugar with seasonings. Stir in remaining ingredients and combine until smooth. Pour into pie crust and bake in a preheated 400 degree oven for 40 minutes, or until filling is set.
Martha Stewart’s Pie Crust Recipe
2½ c. flour
1 t. salt
1 t. sugar
2 sticks (1 cup) butter, very cold
About 6 T. ice water
Combine dry ingredients and cut in butter to resemble coarse crumbs. Using a fork to mix the dough start to add the ice water a tablespoon or 2 at a time until mixture just holds together. Wrap and chill until ready to use. Makes 2.
Homemade Rye Crackers

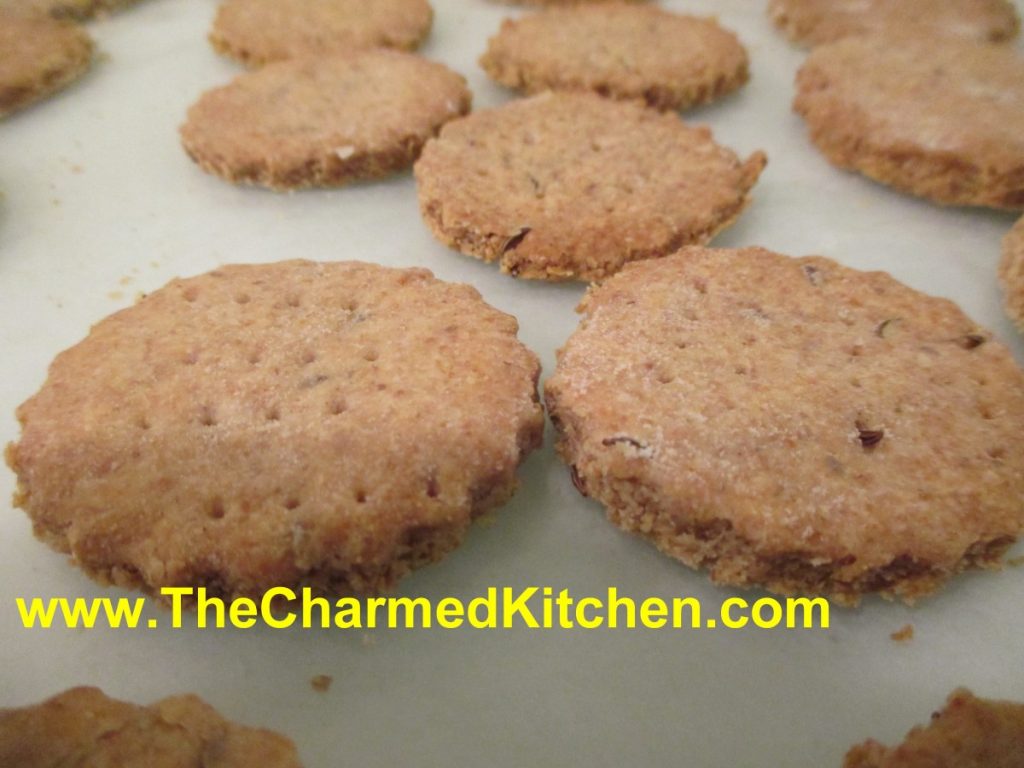
Making crackers is fun, and actually pretty easy. These rye crackers are as simple to make as a batch of cookies. They are crisp and full of flavor. The thinner you roll them out, the crisper they will be.
I am a big fan of rye bread and a fan of these rye crackers, too. I just love the flavor of rye flour. I think it pairs so well with any number of toppings. These are great with a little Swiss cheese melted on the top. You can also cut the crackers out in fun shapes.
So here is the recipe for rye crackers. I hope you’ll give cracker making a try.
Rye Crackers
1 c. rye flour
1 c. all-purpose flour
1 T. caraway seed
1½ t. salt
1 t. onion powder
1 t. garlic powder
1/3 cup oil
1 t. honey
¼ c. water, or as needed
Combine the rye flour, all-purpose flour, caraway seed, salt, onion powder, and garlic powder in a bowl. Stir in the oil and honey. While stirring with a fork, slowly add the water until the dough comes together in a ball. Cover and rest for 10 minutes. Preheat oven to 375 degrees. Divide the dough into 4 sections, rolling each piece out on parchment paper to 1/8 inch thick. Cut into desired shapes, then place on a baking sheet. Prick each cracker a few times with a fork. Bake until the edges are brown and the crackers are crisp, 10 to 12 minutes. Remove immediately to a cooling rack.


