Candied Bacon

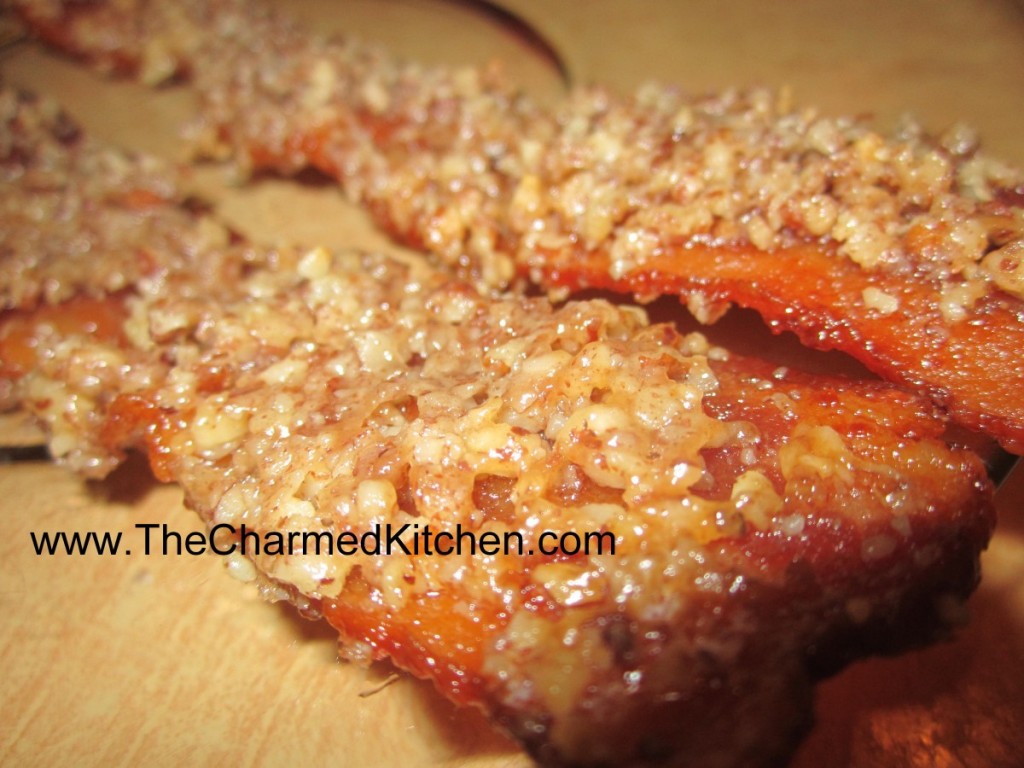
This candied bacon only has three ingredients- bacon, maple syrup and chopped nuts. The combination in sublime. Salty, sweet, smoky all in one crunchy bite. Friends and family love it!!
The bacon is baked, and then coated with maple syrup and chopped nuts. It is returned to the oven, where it bakes until the bacon is crisp and the coating it toasted, almost caramelized. It gets crisper once it cools down.
You can make a spicier version by sprinkling with a little cayenne pepper or adding hot sauce to the maple syrup.
Candied Bacon
1 lb bacon
3/4 c – 1 c maple syrup
3/4 c – 1 c crushed pecans (or any nuts you like! I like to leave some
larger pieces and then mix in some more finely ground)
Preheat oven to 350. Put bacon in baking pan and bake about halfway through (about 5-7 minutes or so). Drain most of the grease and allow to cool slightly. Coat each piece in syrup, roll in nuts and put back on pan. You may need more nuts as you go along, though it’s up to you how much to cover them. Bake another 7-9 minutes, until desired crispness. If you do like crisper bacon, just be sure to move the cooked bacon quickly off the baking sheet onto parchment paper, since the syrup will harden. Allow longer cooking times with thicker bacon.
100 Dandelion Flower Muffins


The curious name for this recipe comes from my own curiosity. I wondered just how many blossoms I would need to get about a cup and a half of petals. I decided to make muffins with some of the dandelions blooming in my yard. I have a lot of dandelions, and I wanted to use a really decent amount in my muffins. I started counting as I trimmed them and stopped when I had a cup and a half. It turned out to be 100 flowers. So now, if you want to make this recipe, you will know when you can stop picking!!!
If you can’t beat them, eat them. I actually am a big fan of dandelions. I have organized dandelion cook-offs and edited a dandelion cookbook. I eat the leaves, and a tea made from the roasted roots. The flowers are a wonderful ingredient in cooking, too. They are used to make dandelion wine and I enjoy adding them to fritters, pancakes and other baked goods. So here is my recipe for dandelion muffins. They are pretty tasty, tender, light and not too sweet.
100 Dandelion Flower Muffins
2 c. flour
1 T. baking powder
½ t. salt
1 egg, beaten
1½ c. half and half
1/3 c. honey
¼ c. melted butter
1 t. vanilla
1 t. orange zest
1 ½ c. dandelion petals*
Preheat oven to 375 degrees. Line 12 muffin cups with paper liners or grease them, set aside. In medium bowl, combine flour with baking powder and salt and set aside. In another bowl, combine egg with half and half, honey, butter, vanilla and orange zest. Beat by hand until well mixed. Stir in dandelion blossoms, then stir in flour mixture. Do not over mix. Stir just until flour is mixed in. Spoon batter into prepared pans, filling them about ¾ full. Bake for 20 minutes or until lightly browned on top. Great served warm with butter and honey. Makes 12.
* To prepare the dandelion blossoms you want to trim of the tough base and just use the petals in the recipe. Some of the green sepals will get mixed in, and that is OK. Measure the petals after trimming. I picked 100 flowers and ended up with about 1½ cups of petals.
The Art of Biscuits

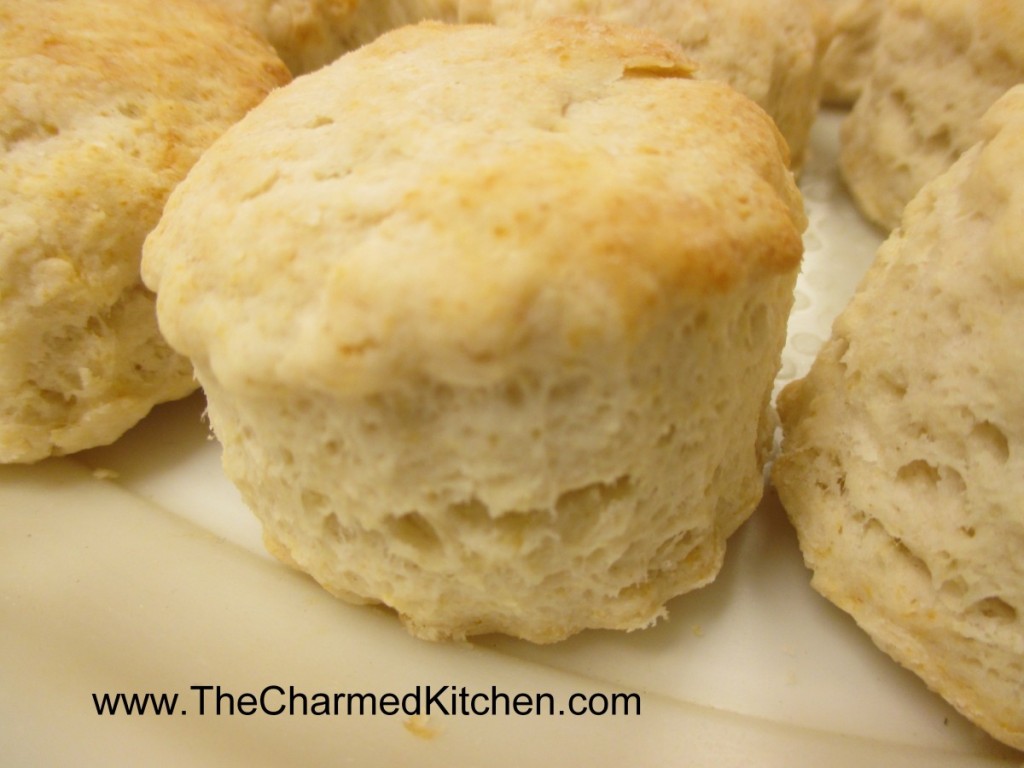
Biscuits are easy to make. They really are. Fast, too. You can mix up a batch of biscuits in the time it takes the oven to preheat. Yet, I know people who seem to struggle with them. The other night, a friend and I were talking about the secret to a light and flaky biscuit.
So what goes wrong? How do you make light, flaky biscuits every time?
For the moment I’ll assume you have a decent recipe. There are a lot of great biscuit recipes out there. I know people that have treasured family recipes. Biscuits that have been made the same way for generations.
Assuming also, that the baking powder is fresh*, there has to be some other reason that some folks just seem to struggle with biscuits.
The problem is, more than likely, over-mixing the dough. When I talk to someone who tells me that their biscuits are always heavy or tough, I first ask about how they are put together.
Once the dry ingredients have been mixed and the fat cut in, there is just liquid to be added. I prefer to chill whatever fat I am using.
At this point the dough should be handled just enough to hold together. A light hand means a light biscuit. The same is true for making scones. The more you knead the dough, handle the dough and roll the dough, the less flaky biscuits become.
Don’t treat biscuit dough the way you would a yeast-based dinner roll. The two are very different in how they are handled. Yeast-based doughs benefit from kneading and “working” the dough. Biscuits are the opposite.
Even when cutting out the biscuits, it will help if you cut them out as close together as you can. That way you have fewer scraps to re-roll. Every time you roll the dough out- it becomes a little tougher.
Here is a recipe for one of my favorite biscuits. They are light and very flaky. Is there anything better than a fresh, warm biscuit with some butter?
Biscuits Supreme
2 c. flour
4 t. baking powder
2 t. sugar
½ t. cream of tartar
½ t. salt
½ c. cold butter, shortening or coconut oil – you can even use lard
2/3 c. milk
Stir together dry ingredients and cut in butter to resemble coarse crumbs. Make a well in the center and add milk all at once. Stir until dough sticks together and knead on lightly floured surface 10-12 strokes. Roll or pat to ½ inch thickness. Cut with 2-21/2 inch biscuit cutter and place on ungreased baking sheet. Bake in 450-degree oven for 10-12 minutes. Serve warm. Makes 10-12.
*If your baking powder might be old, you can test it. Place a couple of tablespoons of boiling water in a cup. Add a teaspoon, or two, of baking powder. The mixture should bubble vigorously. If there are no bubbles, or very few bubbles, you might want to get a new container of baking powder.
Making Macarons


Macarons are French cookies, made from almond flour, egg whites and sugar. Simple ingredients, with an elegant end result. They are similar to meringues, which I have made often in the past.
I remember the first time I tried to make macarons. They can be tricky, so I decided to do some research before trying to bake them myself. I watched videos, searched recipes, and then decided it was time to go for it. My first batch did not go according to plan. They got over- baked and the dough was too stiff. I went back and tried again.
Sometimes failure can teach us more than success.
I had clearly not mixed the dough long enough. Not the stage where you beat the egg whites. They were mixed to perfection in very stiff peaks. Where I messed up the first time, was not mixing the egg whites with the almond flour mixture long enough. I was so focused on the folding in directions, I was afraid to over mix it. Big mistake.
When you get to the “folding in” part, don’t be afraid to mix the batter. The more you mix, the softer the batter gets. The second time around, I folded and stirred long enough for the batter to get a little runny. Think of a bowl of oatmeal.
After that, the rest was pretty easy. I piped the dough into circles on the baking sheet. They weren’t perfect, but so much better than the first batch. I expect them to look even better with more practice.
When they baked, they got their “feet”. When done the right way, macarons rise a bit, forming a ring below the original circle of batter.
Once baked, I let them cool before filling with a strawberry buttercream frosting. For the buttercream, I just mixed a few tablespoons of softened butter with half a cup of powdered sugar and a tablespoon of strawberry jam. I had added a little pink food coloring to the batter, so I thought the pink frosting would look pretty.
You can tint them any color you like and use all sorts of jams and frostings to fill them.
So here is the recipe I used.
Macarons
¾ c. almond flour
1 c. powdered sugar
2 egg whites
3 T. granulated sugar
Food coloring, optional
½ -¾ c. jam or frosting for filling the cookies
Sift almond flour and powdered sugar together. Mix well and set aside. In mixing bowl, beat egg whites for 3 minutes on medium. Egg whites should be foamy. With mixer running, sprinkle in the sugar. Beat another 3 or 4 minutes, or until soft peaks form. Add food coloring at this point, if using, and increase speed on mixer to high. Continue to beat egg whites until stiff peaks form, another 3 minutes, or so. Take about a third of the egg whites and mix into the almond flour mixture. Mixture will be sort of dry- don’t worry. Fold in the rest of the egg whites and stir/fold until mixture has the consistency of a thick batter. Think of cooked oatmeal. You don’t want to over or under mix at this point. Just stir until it gets to the “oatmeal” stage. Probably 50 strokes or so. Line a baking sheet with parchment- or use a silicone liner. Place batter in a piping bag with a round tip. Squeeze the batter into circles on the baking sheet, trying to keep them even in size. I did circles just under 2 inches across. They don’t spread during baking. Batter should settle, but if there are any little peaks, use a wet finger to press them down. Tap baking sheet on the counter 4 or 5 times to remove any air bubbles. Set aside for about 15 minutes. You need to let the dough form a kind of dry skin on the top. The way to test is to lightly touch the dough. If it sticks your finger, wait a few more minutes. Once the dough had dried enough- bake them in a preheated 350 degree oven for 12-15 minutes, depending on the size of your macarons. Remove from oven and allow to cool on baking sheet before removing. Use frosting or jam to sandwich cookies together.
Black and White Cookies

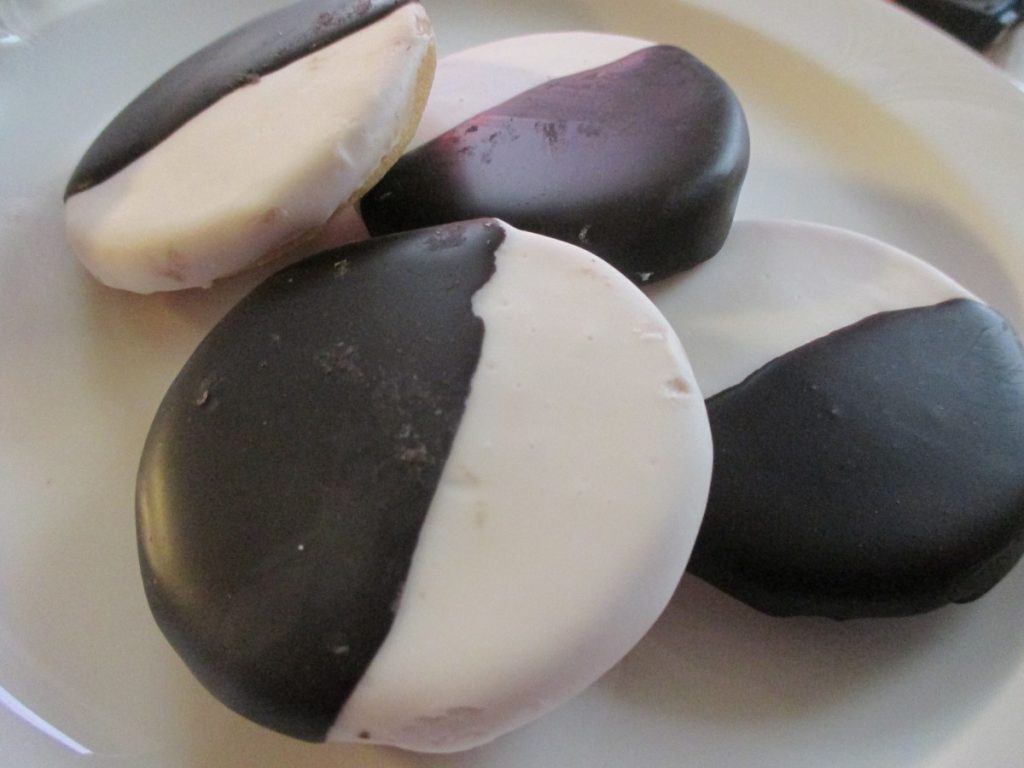
These lovely cookies are always a lot of fun to make and to serve. The name comes from the mix of both white and dark frostings used to decorate them. Black and White Cookies are a classic. They are tender, cake like cookies and one of my favorites. After the cookies are baked, you brush them with both white and dark chocolate frostings. The effect is dramatic and tasty. If you have never tried one, you really should.
Black and White Cookies
1 3/4 cups sugar
1 cup unsalted butter – room temp.
4 large eggs
1 cup milk
1/2 tsp. vanilla extract
1/4 tsp. lemon extract or
2 1/2 cups cake flour
2 1/2 cups all purpose flour
1 tsp. baking powder
1/2 tsp. salt
Frosting:
4 cup confectioner’s sugar
1/3 to 1/2 cup boiling water
1 ounce bitter or semi sweet chocolate
Preheat the oven to 350. Line two baking sheets with parchment paper. In a large mixing bowl, combine sugar and butter until fluffy. Stir in eggs, milk, vanilla, extracts, until smooth. Fold in flours, baking powder, salt and stir until mixed. Using a soup spoon (or a small ice cream scoop) drop spoonfuls of dough onto baking sheet, leaving 2 inches of room between them. Bake until edges are browned – 20-30 minutes.
Frosting: Place confectioner’s sugar in a bowl. Gradually stir in boiling water until you have a thick spreadable mixture. Remove half of frosting to a bowl and stir in melted chocolate. With a brush, decorate each cookie half with white frosting, half with chocolate. Let set until thoroughly dry.
About 4 dozen cookies.
Buckwheat Waffles

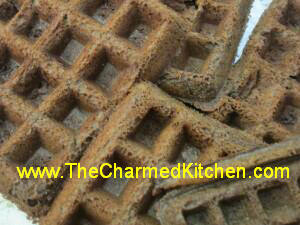
I really love these whole grain waffles. Buckwheat flour adds a different flavor from most waffles. They have a lovely crisp outer texture and are soft inside.
Buckwheat waffles have a savory side that makes them a nice base for sandwiches, in place of bread.
Dressed up with butter and syrup, they still work for breakfast or brunch.
So, if you are looking for something different, why not give buckwheat waffles a try?
Here is the recipe.
Buckwheat Waffles
1 cup of buckwheat flour
1 egg
1 cup of milk
1 tsp. baking soda
1/2 tsp. baking powder
1/2 tsp. salt
1/2 cup of sour cream
3 tablespoons of cooking oil or melted butter
Combine all ingredients. Cook in preheated waffle iron that has been oiled or sprayed with non-stick cooking spray.
Red Beans and Rice

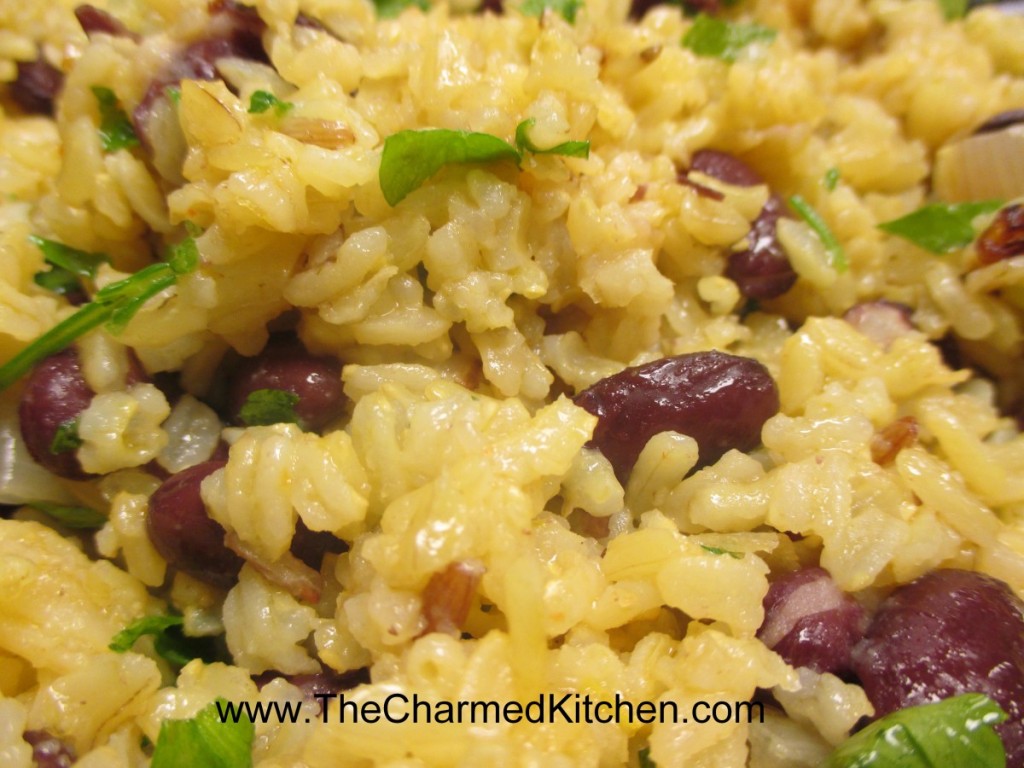
Red beans and rice does not get the respect I think it deserves. I know the ingredients are pretty humble, but the flavor is so good. It can be a main dish, a side dish or even a decent breakfast when reheated the next day. I speak from personal experience on the breakfast thing.
You can change it up by using different beans- I used dark red kidney beans this time. Red beans are traditional. You can use different rice – I used brown jasmine rice. You can also add any number of different seasonings to change it up. It is one of those dishes loved by carnivore and vegetarian alike. To add more interest to the batch I made this time, I cooked the jasmine rice in a vegetable broth with turmeric in it. That added a pretty yellow color to the rice. It tasted good and looked pretty, too.
So if you are looking for a quick and really easy dish maybe make some red beans and rice.
Red Beans and Rice
1 c. brown or white rice
2 c. water or broth
1 can kidney beans or red beans, drained and rinsed – use whatever beans you like
1 T. oil
½ c. chopped onion
¼ c. chopped parsley or cilantro
Salt and pepper to taste*
Simmer rice, covered until tender (40 minutes for brown, 15 minutes for white rice). Meanwhile heat oil in skillet and cook onions until tender. Add beans, cooked rice, and seasonings. Stir until heated through. Serves 4.
* In addition to salt and pepper, I like to play around with adding other seasonings. I sometimes add cumin, oregano, garlic, basil, cinnamon, mace and coriander to name a few.
Chocolate Biscotti

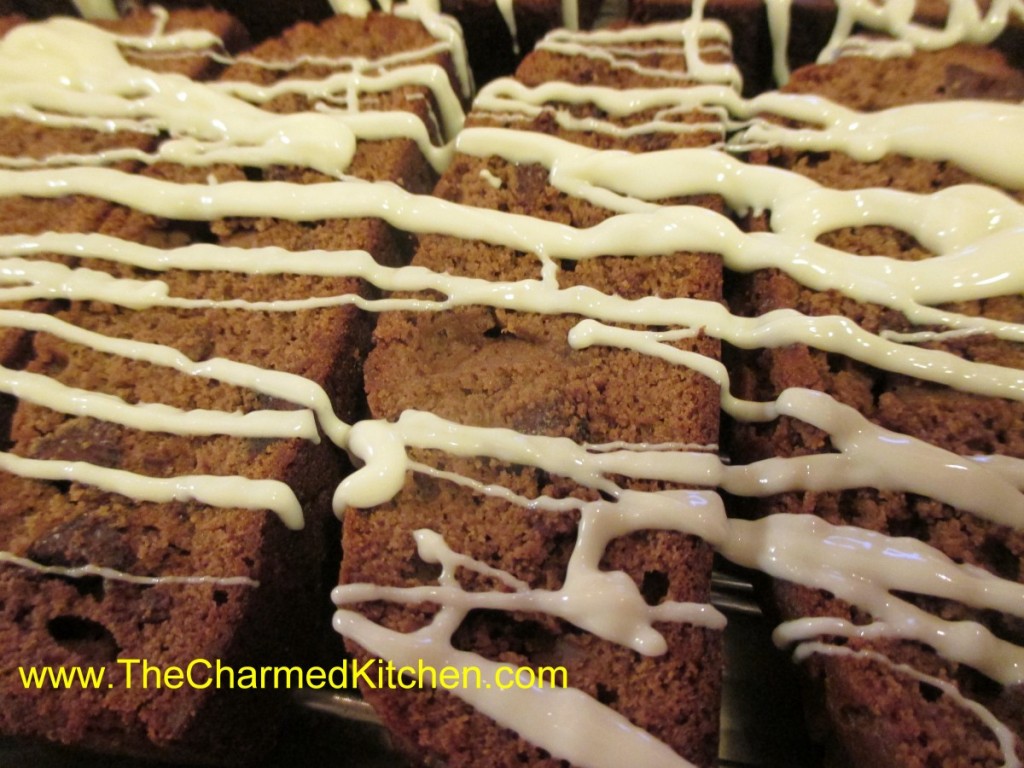
I don’t think I ever met a biscotti I didn’t love. These chocolate biscotti are so good. They are not too sweet and have plenty of chocolate flavor. If you haven’t made your own biscotti before, you should. These crisp, twice baked cookies, are easy to make. The second bake is where biscotti get their famous crunch. They are baked until they have this lovely crisp texture, meant to be dipped in coffee. Of course they are also good dipped in tea or even a glass of milk.
Handy tip: Once biscotti are baked the first time, they are sliced and baked a second time. Most recipes call for you to turn the biscotti over half way through the second bake- to get them crisp/dried evenly. To save time, I just place a cooling rack on my baking sheet before the second bake. I then lay the sliced biscotti on the cooling rack. Now, during baking, air flows under the biscotti and there is no need to turn them over while baking. Saves time.
Chocolate Biscotti
3/4 c. brown sugar
1/2 c. butter, room temperature
2 eggs
3/4 c. chocolate syrup
2 1/2 c. flour
2 t. baking powder
1/2 t. salt
1 c. chocolate chips (mini, regular or flavored)
1 c. chopped nuts, optional
3 oz. white chocolate
Grease 2 9×5-inch loaf pans and set aside. Beat sugar and butter together than beat in eggs and syrup. Beat in dry ingredients. Dough will be soft. Stir in chips and nuts. Divide batter in prepared pans and use spatula to spread evenly. Bake in a 350-degree oven for about 35 minutes. Tester inserted in center should come out clean. Turn loaves onto rack and cool 15 minutes. Reduce oven temperature to 300-degrees. Using a serrated knife cut loaves into 3/4 -inch slices. Place cooling rack on a baking sheet. Place biscotti slices cut side down on cooling rack and bake about 18-19 minutes. Cookies will become harder/crisper as they cool. Cool completely. Melt white chocolate and drizzle over biscotti. Allow to set up. Makes about 2 dozen.
Aunt Josie’s Clam Chowder


I was in the mood for a nice, comforting bowl of chowder the other night. It was unseasonably cold and chowder sounded like the perfect choice for dinner. Since I had some frozen clams, I opted to make clam chowder.
Aunt Josie’s clam chowder is a favorite recipe of mine. I have loved it from the first time I had it. I used her recipe and was not disappointed. It is pretty simple, but full of flavor.
You have the option of adding some stock or water at one point. I sometimes have seafood stock in the freezer, but since that wasn’t an option this time, I used vegetable broth. It worked really well.
So here is the recipe. I hope you enjoy it as much as I do.
Aunt Josie’s Clam Chowder
2 T. butter
1 onion, chopped
1 rib celery, chopped
2-3 small potatoes, cubed
1 c. water or stock
2 (10 oz.) cans clams, undrained*
1 T. butter
2 T. flour
2 c. milk
salt and pepper to taste
Sauté onions and celery in butter until tender, but not browned. Add potatoes and water or stock and cook, covered until potatoes are tender. Stir in clams and set aside. In another saucepan, combine butter and flour over low heat and stir in milk, stirring to make a white sauce. Cook mixture until it thickens and starts to bubble. Add it to the clam mixture and adjust seasonings. Bring to a gentle simmer. I added some parsley right before serving. Serves 4.
* I didn’t have 2 cans of clams, but I did have a pound of clam meat in the freezer. I added it to my chowder, with a little extra vegetable stock. Worked out well.
This post is dedicated, with love, to Aunt Josie.
Naan Bread


If you have ever eaten at an Indian restaurant, you probably had naan bread. The bread has a soft, yet chewy texture, and is often topped with seeds. I still remember the first time I made naan. I bake bread all the time, but somehow I had never made naan. I was excited to give it a try. I figured there would be some challenges.
The thin rounds of dough are traditionally baked against the wall of a tandoori oven. The clay of the oven walls gets really hot, and cooks the bread quickly. Since I don’t have a tandoori oven, I baked my naan bread under the broiler. I was nervous that it would get burnt before it finished baking, but they turned out great. Soft, puffy bread pillows that I brushed with ghee right after baking. They came out even better than I had hoped.
If you never made naan bread before, I suggest you try it. It is so much fun, and not that difficult. Just keep an eye on it when baking.
Naan Bread
1 t. sugar
1 pkt. Yeast
2/3 c. warm water
1½ c. flour
1 T. ghee*
1 t. salt
Oil for baking pans
Extra ghee for brushing breads
Sesame, fennel or poppy seeds, if you like
In medium bowl, combine sugar with yeast and warm water. Stir and allow to sit until mixture gets bubbly, about 10 minutes. In mixing bowl place the flour, ghee and salt and mix to combine. Add the yeast mixture and stir until a soft dough forms. You might have to add a little more water. Knead dough on a floured surface until smooth and elastic, about 5 minutes. Return dough to mixing bowl, cover and allow to rise in a warm place until doubled in size, about 1½ hours. Turn dough onto floured surface and knead a couple more minutes. Unless you have a tandoori oven, you will need to cook the naan under a very hot broiler. Turn the broiler on. Line a baking sheet with foil and coat with some oil. Set aside while you prepare the dough for baking. Cut dough into 6-8 pieces. Roll each piece into a circle about 5 inches across and ½ inch thick. Place dough on the prepared baking sheet and place under the broiler. I set mine about 4 inches from the heat. Turn breads a couple of times. They will take about 7 minutes to bake. Remove from broiler, brush with extra ghee or melted butter and sprinkle with seeds, if you like. Makes 6-8. Best served soon after baking.
*Ghee is essentially clarified butter, or butter where all the solids have been removed. To make ghee, gently melt butter in a saucepan over medium-low heat. After melting, the butter will separate into three layers. This should only take a few minutes. Foam will appear on the top layer, the milk solids will migrate to the bottom of the pan, and clarified butter will float between the two. Let the butter come to a simmer and hold it here until the middle layer becomes fragrant, more golden than when you started, and clear – push the solids on top out of the way to have a peek. The milk solids at the bottom will begin to brown. At this point it is a matter of preference, you can let the solids lightly brown, or let things progress a bit further. When the ghee is finished, skim absolutely all of the top layer of foam into a bowl with a spoon or strainer, turn off the heat, and allow things to settle for a minute or so. Next, carefully pour the golden central layer through a strainer, into a clean glass jar, leaving the milk solids at the bottom of the pan. It can be used as a cooking oil, for flavoring all sorts of foods, and is amazing on popcorn.


