Rainbow Pierogi


I enjoy making pasta with veggie- based dough. The colors are so pretty, and I love the way they taste. So, since it is almost Easter, I went a step further and used my veggie-based dough to make pierogi.
They remind me a little of Easter eggs. I used a potato and cheese filling, so that part is pretty traditional. The pierogi are also a nice choice for a meat-free dinner.
I served them with sauteed onions and sour cream. Here is the recipe for the pasta and the pierogi filling.
Rainbow Pierogi
All of the vegetable doughs were mixed using a food processor. If you want to mix them by hand- puree the veggies first. Once the doughs are made allow them to rest at least 30 minutes. Since veggie pasta dough tends to be a little softer than traditional pasta- I actually prefer to make them a day ahead and chill. Chilling the dough, even for an hour, will help. The traditional pierogi dough was mixed in a stand mixer.
To make the pierogi a little sturdier, you can also make regular pierogi dough and mix a little of that dough in with the veggie-based doughs.
When ready to roll out your dough, grab a hunk of each dough and press them together. If the the dough is a little sticky that will help. On a floured surface, roll out to the desired thickness. Folding and rolling a couple of times helps to mix up the color pasta better. I use a template to make my pierogi- but you can cut them out with any round cutter or even a glass or jar. Spoon filling of your choice on center of dough circle. Fold dough in half over filling and press edge with fork to seal. Wetting the edge of the dough will help the dough to stick. Don’t overfill or pierogi will split. Test a couple first to get the hang of it. Place a few at a time, into salted boiling water, and cook until they float. You can eat them as is, or brown cooked pierogi in butter, in a skillet. Serve with grilled onions and/or sour cream. We would often make a larger batch and then freeze them, uncooked, on wax paper-lined baking sheets. When frozen they would be transferred to a freezer bag or container. Place right from the freezer into boiling water when ready to use.
Carrot Pasta
1 c. flour
1/2 t. dried dill
1/3 c. carrot puree
1-2 T. water, if needed
Beet Pasta
1 c. flour
1/2 t. dill
1/3 c. beet puree
1-2 T. water, if needed
Spinach Pasta
2 c. flour
1 10 oz. package frozen spinach, cooked, drained, reserving some of the liquid
Mix this dough as for other pastas, but don’t be too quick to add reserved liquid. While kneading you’ll get water out of the spinach. May require more kneading and rolling than other pasta doughs. Be patient, it’s worth the work.
Classic Pierogi Dough
2 c. flour
1 t. salt
½ c. water (you can also use half milk and half water)
1 egg
Mix all ingredients together and knead on floured surface until smooth.
Cover and let rest at least 15 minutes. Roll out thin and cut into
circles. Re-roll scraps. You should get between 20-30.
Pierogi Filling
1 lb. Potatoes, peeled and boiled
4 oz. cream cheese – normally I would use farmer’s cheese or cottage cheese, but cream cheese was what I had
1/2 c. shredded cheddar cheese 1/4 c. chopped sweet onion, optional
salt and pepper to taste
Mash potatoes with other ingredients and season to taste.
Dessert Focaccia


Focaccia is a wonderful Italian flat bread. Baked in a jellyroll pan, it is about an inch thick, and is often used in savory dishes with cheese and other toppings. It is also sometimes split to make sandwiches. When I make focaccia, I often add sauteed shallots, garlic and fresh rosemary.
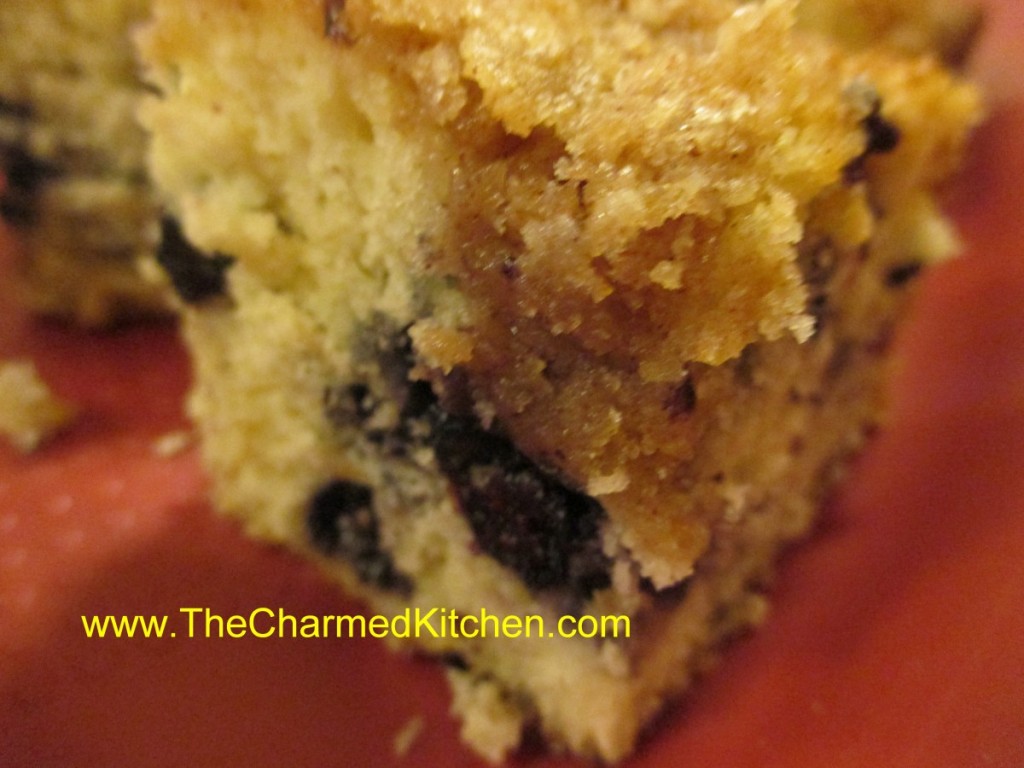
This time I made a lightly sweetened version. It only has 1/2 cup of brown sugar in it total- but gets a lot of natural sweetness from the dried fruit and orange juice. Loaded with dry fruits it is a great dessert, but could also be served for breakfast or brunch. If you have some dried fruit you were looking to use in something- this is a great recipe for that.
It is moist, and has a wonderful flavor and texture. You can leave it plain once baked, or add a powdered sugar glaze.
Dessert Focaccia
3 cups assorted dried fruits (cherries, raisins, currants, cranberries, prunes or blueberries)
2 c. orange juice
1 packet yeast
1 t. sugar
3 ½ c. flour
2 t. salt
1/2 c. firmly packed brown sugar
½ t. cinnamon
¼ t. nutmeg
6 T. cold butter, cut into bits
In a bowl combine the fruit and orange juice and let stand 20 minutes. Drain fruit, reserving 1 cup of the liquid. Heat liquid until it is lukewarm. In the bowl of an electric mixture combine yeast with warm juice and sugar and let stand 5 minutes. Add flour, half the brown sugar, seasonings and butter and mix until dough is well-mixed. Knead dough with dough hook for 5 minutes, dough will be sticky. Add fruit and mix until evenly blended. Transfer dough to floured work surface and just roll around to coat with the flour. Place in oiled bowl, turning to oil top. Cover with plastic wrap and place in a warm place to double, about 11/2 hours.
Note: At this point, if you would rather, you can punch the dough down and wrap it, then chill it overnight. Bring to room temperature before continuing.
Press the dough into an oiled 15×10 inch jellyroll pan and let it rise, loosely covered, for about 1 hour. Dimple the dough using your fingertips and sprinkle with the remaining brown sugar. Bake in a preheated 400-degree oven for about 30-35 minutes or until golden brown. Can be served warm or at room temperature.
Note: The focaccia is just fine the way it is, but you can drizzle it with a powdered sugar glaze, or dust with powdered sugar. It makes a great breakfast dish, or the base for fruit shortcake,. If you wish to use large pieces of fruit like apricots, pineapple or mangoes, dip scissors in oil and use them to snip the fruit into smaller pieces. I sometimes also add 1/2 c. chopped nuts to the dough when I add the fruit.
Note: Any focaccia made with fruit, vegetables, meats or cheese should be refrigerated. Also, baked focaccia can be wrapped well and frozen for a couple of months. Just defrost in the wrapping and then warm a little, if desired.
Honey Bunny Rolls


If you are looking for a fun dish to serve for Easter, you might want to bake a batch of bunnies. They can be served with Easter dinner, or with breakfast or brunch.
The honey-sweetened yeast dough is rolled into ropes, and then the ropes are formed into these bunny shapes. After the rolls are baked, they are brushed with a mixture of warm honey and melted butter. This is a fun recipe to make with kids.
I make them every Easter. Sweet and so cute, they are sure to be a hit when you make them.
The dough is chilled before rolling, so you can mix up a batch in the evening- put in the fridge- then roll them out the next day. They are actually pretty easy to make.
You can add raisin “eyes”, if you like. It is an option.
Honey Bunnies
4-5 c. flour
2 packages yeast
1 t. salt
2/3 c. evaporated milk
½ c. each water, honey and butter
2 eggs
Raisins, optional
Honey glaze
1/2 c. honey and 1/4 c. butter or margarine heated together until warm.
In bowl combine 1 c. flour, yeast and salt. Heat together milk, water, honey and butter until very warm and beat into the flour mixture. Beat 2 minutes on high speed. Beat in 1 cup flour and eggs. Beat 2 more minutes, until batter thickens. Stir in enough flour to make a stiff batter and chill, covered with plastic wrap for 2-24 hours.
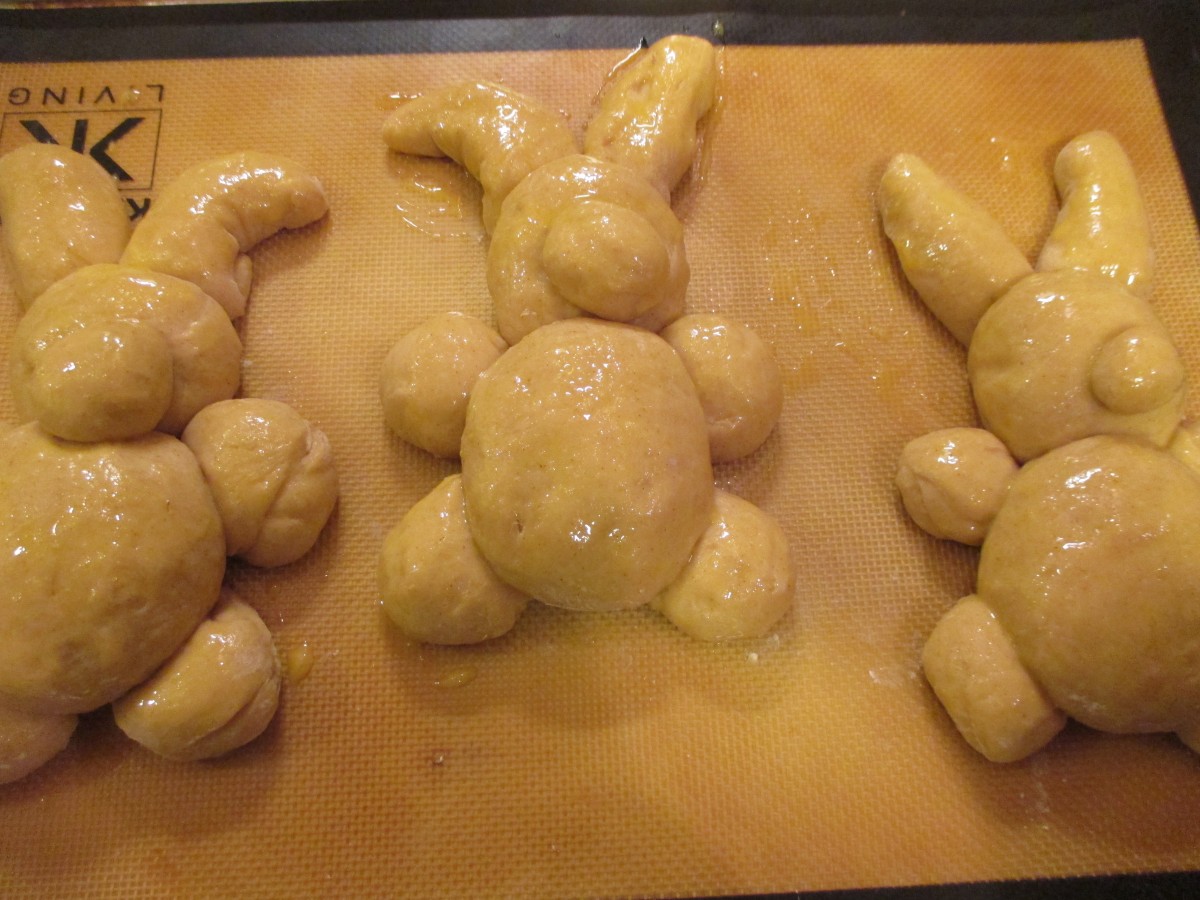
Place dough on lightly floured surface and divide into 15 equal pieces. Roll one piece of dough into a 20- inch rope. Cut rope into a 12- inch piece, a 5-inch piece and 3 one-inch pieces. Coil 12 inch piece to form body, five inch piece to form head and one inch pieces to form ears and tail. Place the body on greased cookie sheet and then place the head next to the body, making sure they are touching. Place ears and tail on the bunny, making sure they make good contact with the rest of the “bunny”. I tuck them under a little. Repeat with the remaining dough. Let rise, covered until doubled, about 25 minutes. Bake in a 375-degree oven for 12-15 minutes. Remove to cooling rack and brush with honey glaze. Place raisins on each to make eyes, if you like. Brush with additional glaze before serving, if desired. Makes 15 bunnies.
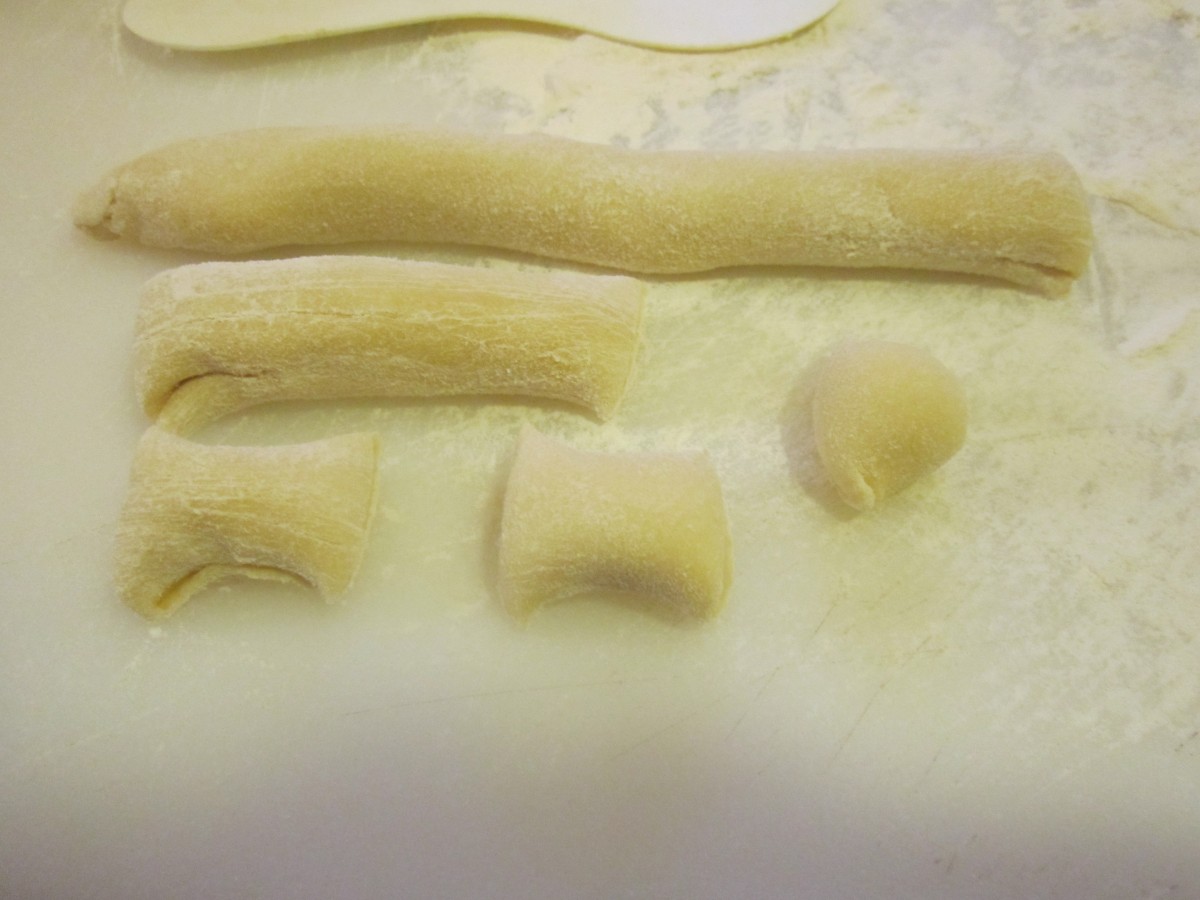
Dough is rolled out and cut into pieces for each of the bunny parts
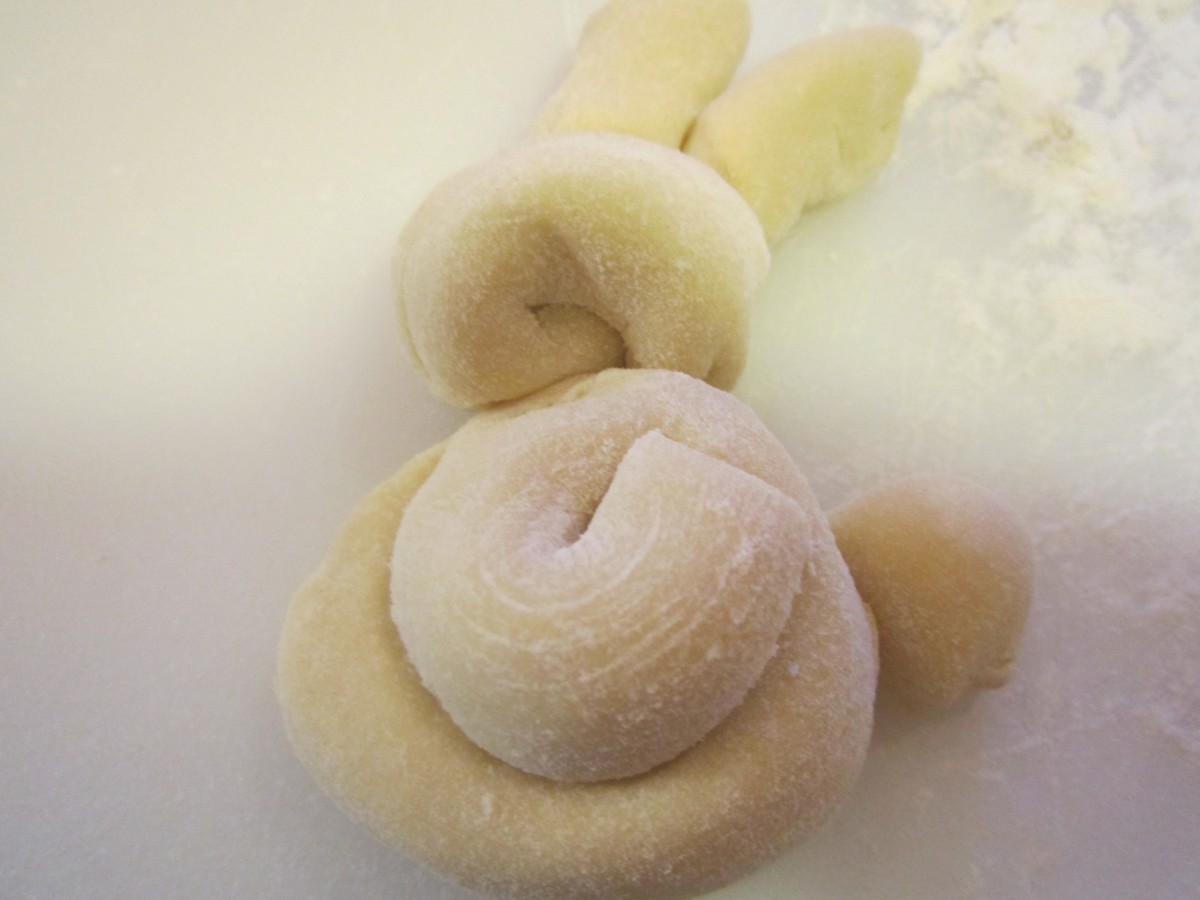
Unbaked bunny
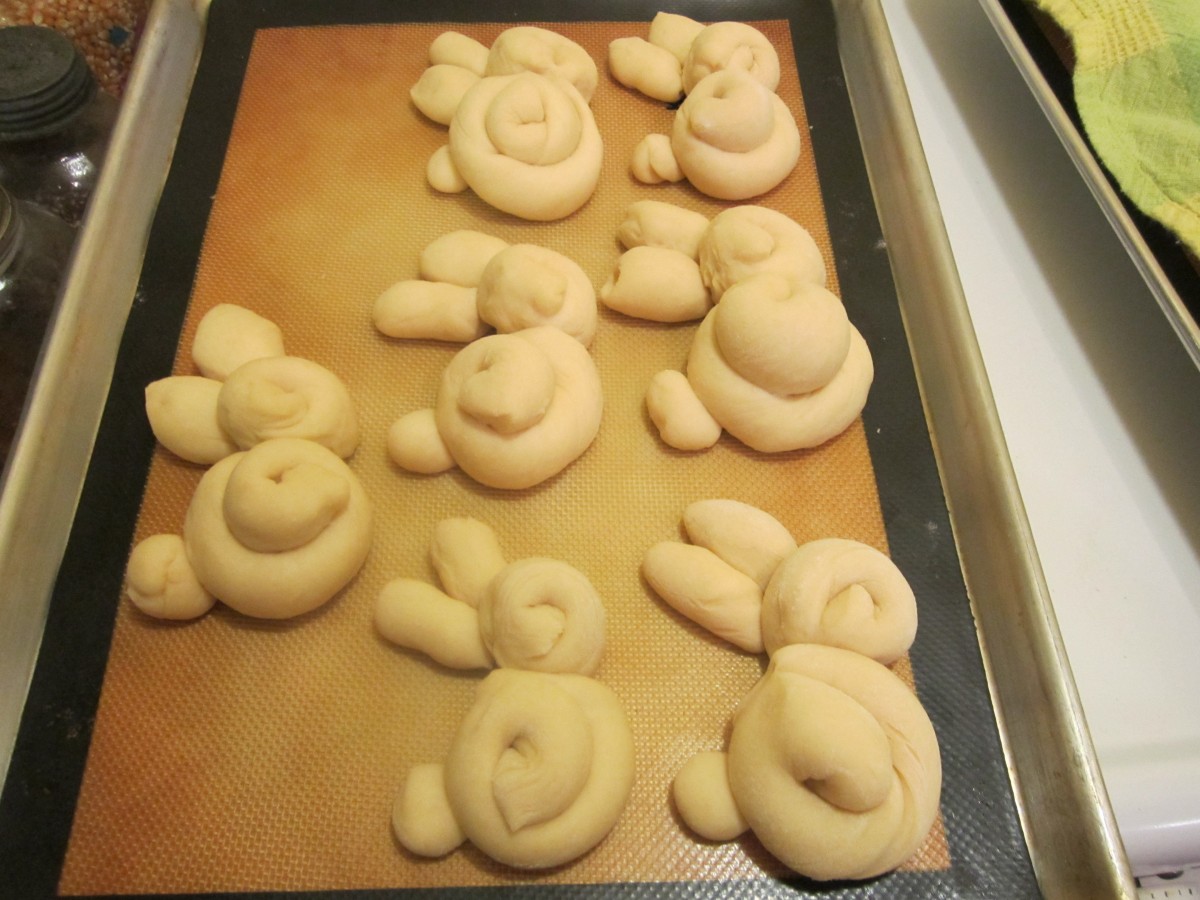
A colony of rabbits!!
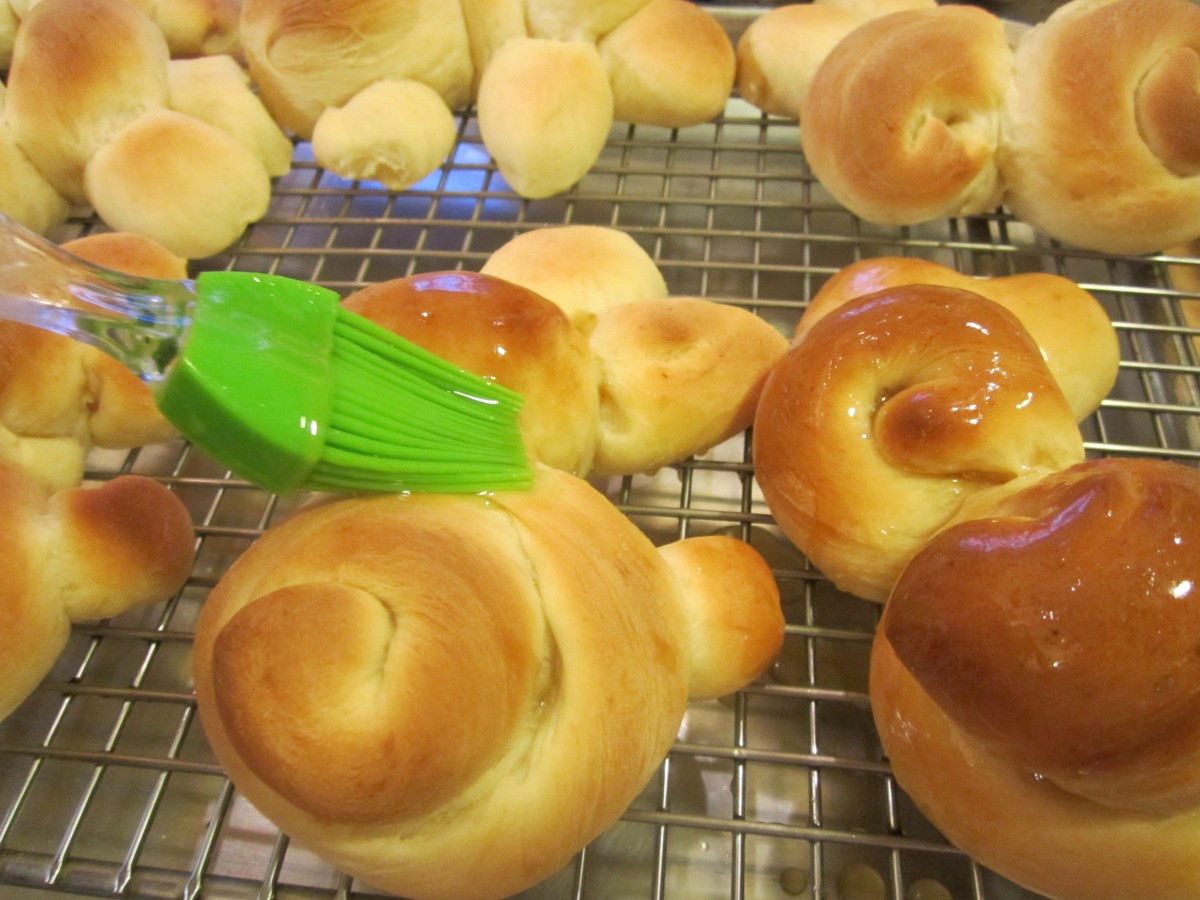
Brushing baked bunnies with honey/butter glaze
Easter Bunny Breads


I thought it was a good time to post a cheerful, holiday recipe. I think we can all use a little cheering up this year.
These slightly sweet bunny breads are a great addition to your Easter table. They can be used for breakfast or brunch. They could also be served with dinner, minus the candies!! The dough itself has plenty of cinnamon flavor and a slightly dense texture.
They are moist enough to eat just the way they are, or spread with butter. My favorite parts are the feet- which are a little crunchy. The recipe makes 6 bunnies. I chose to decorate mine with melted white chocolate and candies, but they are also pretty when left un-decorated. This would be a fun decorating activity for kids, too.
Cinnamon “Bunny” Breads
6-6½ c. flour
¾ c. sugar
2 pkts. Active dry yeast
1 T. cinnamon
1 t. salt
1 c. milk
½ c. water
¼ c. butter – half a stick
5 eggs – save one for brushing the breads
White chocolate and tiny candies for decorating
In mixing bowl place 2 cups of the flour with the other dry ingredients. Heat milk, water and butter together until very warm. Butter does have to melt completely. Place milk mixture in bowl with flour mixture and beat for 3 minutes. Add another cup of flour and beat another 2 minutes. Beat in 4 eggs and gradually add enough flour to make a soft dough. Place dough on a floured surface. Knead until smooth. Return dough to bowl and cover, allowing to rise until doubled, about an hour. Grease two large baking sheets, or cover in parchment or use a silicone liner. You will put 3 bunnies on each sheet. Place dough on floured surface. Divide into 6 pieces. Each piece will be a bunny. To form a bunny, take about a third of one of the pieces of dough. Shape into a round and place on a greased baking sheet. This is the body. Use about ¼ cup of the dough to form the head. Flatten the head a little on one edge and tuck the flattened part under the body. Pinch off a tiny piece for the nose and place on the head. Divide the rest of the piece of dough into 6 pieces. Use 4 pieces to form the feet. Shape into balls and tuck one edge under the body, like you did with the head. Use the last two pieces for the ears. Roll each into a tube, shape a little to look like ears, and stick one edge under the head. Repeat with the rest of the dough pieces. You’ll end up with 6 bunnies. Cover with plastic wrap, then a towel, and allow to rise in a warm place until doubled, 30-60 minutes. Preheat oven to 350 degrees. Combine remaining egg with a tablespoon of water and beat to combine. Remove the plastic wrap from the bunnies. Brush the bunnies with the egg mixture, covering completely. Bake for 20-25 minutes, or until golden brown and bread sounds hollow when tapped lightly. I switched the baking sheets in the oven after 10 minutes, so the bunnies bake evenly. Cool on rack. Once cool, decorate with melted chocolate, piped on to make whiskers. You can also use the melted chocolate to affix candies. Makes 6 bunnies.
ready to bake

Freshly baked
Orange and Cream Scones


I am in love with these scones. They are just what a good scone should be, tender and crumbly, without being dry. The orange flavor comes form the orange zest used in the recipe. It is subtle, but there.
I love scones because you can have them for breakfast or with a cup of coffee or tea. You can also use them as the base for a shortcake dessert by splitting them, adding sweetened fruit and whipped cream.
I was in the mood for scones, but wanted to try something new. I had come across this recipe in an old file of mine. I had ripped it out of a magazine a long time ago. They looked promising, so I decided to make them. I made few changes from the original recipe. I was very happy with how they came out. I think you will be, too.
Orange and Cream Scones
2 c. flour
¼ c. sugar
1-2 T. orange zest, I used 1 tablespoon, but could have used more
2 t. baking powder
½ t. salt
10 T. unsalted cold butter, cut into ½ -inch cubes
1 egg
½ c. cold half and half
1 t. vanilla
Extra flour
2 T. half and half or orange juice to brush the scones
Extra sugar for sprinkling on top- 3-4 tablespoons
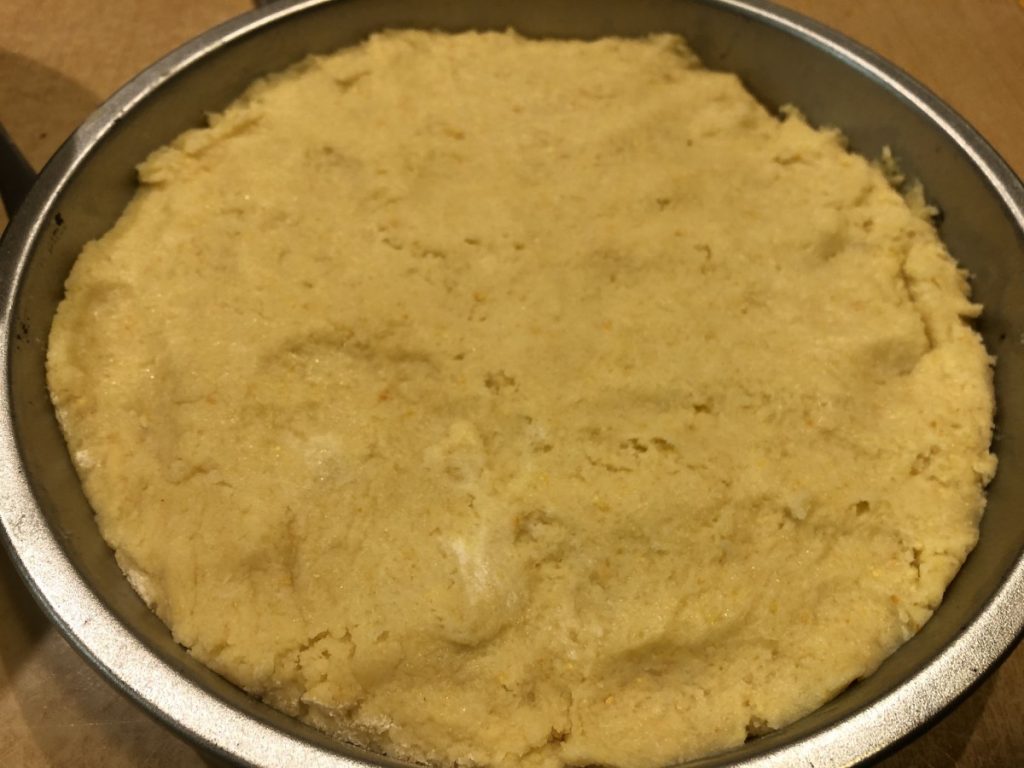
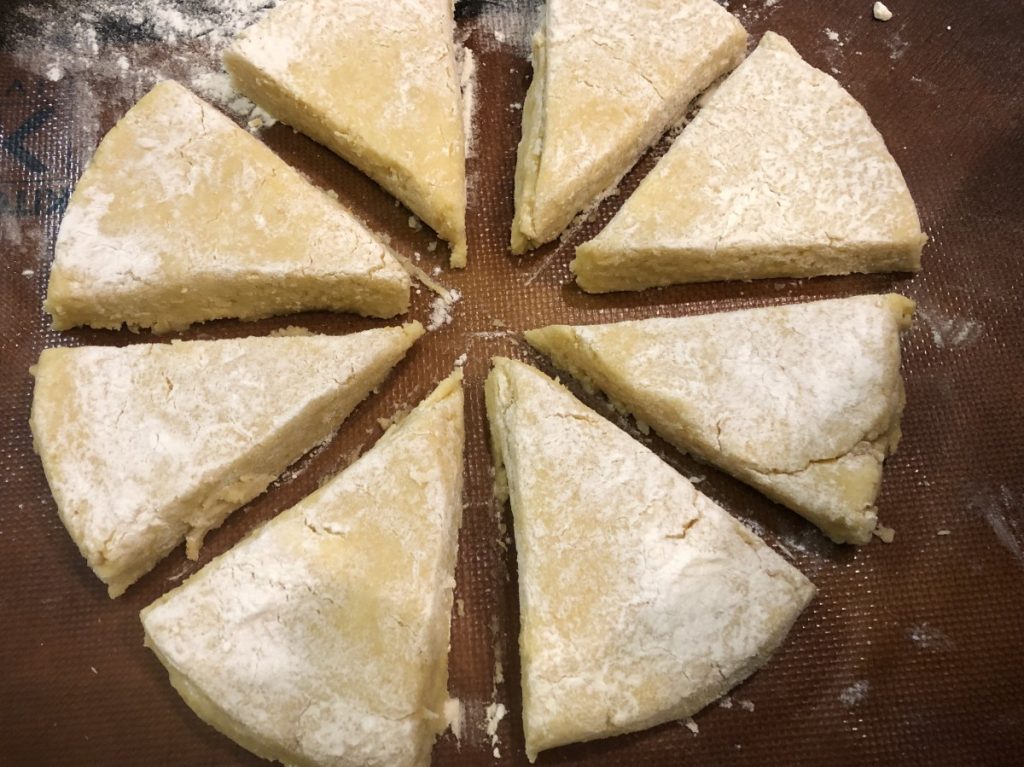
Preheat oven to 375. Line a large baking sheet with parchment paper or use a silicone liner. Set aside. In a large bowl mix together the dry ingredients. Using your fingers, rub the butter into the flour mixture until it looks like coarse crumbs. You can also use a pastry blender, but what fun is that? In a small bowl, beat together the egg, half and half and vanilla. Pour into flour mixture and stir until mixture starts to hold together. I am going to save you from messing up your counter with this next part. Get an 8-inch round cake pan and sprinkle flour in the bottom of it. Don’t be stingy, be sure there is a layer over the whole pan. One or two tablespoons should do it. Go back to your dough and sort of knead it in the bowl. That is why I said to use a large bowl. You don’t really need to knead it on your counter. Use a wooden spoon, rubber spatula or your hands to get the dough to form into a ball. Make sure you get all the dry bits from the bottom of the bowl. This isn’t a yeast dough. The idea is to get it to stick together with as little actual kneading as possible. Trust me, this is how you end up with super tender scones. As soon as the dough will hold together, and form into a ball, use a rubber scraper to get it into the floured cake pan. Press the dough evenly into the pan. Now a fun trick. You want to turn to the pan over so the dough ends up on the prepared baking sheet. You don’t want to do this slowly or the dough might plop out too soon. You also want to dough to come out. In one motion turn the cake pan over quickly onto the baking sheet. You want to actually slam it firmly on the baking sheet. Then lift up the cake pan. If all has gone according to plan, you’ll have a perfect 8-inch circle of dough on the baking sheet. I could have told you to just place the dough on the baking sheet and form it into an 8-inch circle, but I prefer the cake pan method. You get nice, even edges. There will be some flour on the dough. Leave it there for now. Using a bench scraper, or a long knife, cut the dough in half, then in half again, like cutting a pie. The dough is pretty moist, so the extra flour on top should make them easier to cut. Repeat two more times so you end up with 8 wedges. Pull them apart a little, so they can expand when they bake. I used a metal spatula to do this. If there is still extra flour on top and it is bothering you, you can brush it off. Using a pastry brush, brush a little half and half or orange juice over the scones. Then sprinkle the tops with the extra sugar. Bake for 25 minutes, or until golden brown. Makes 8. Great plain or served with jam.
My Favorite Carrot Cake

I can’t remember the first time I had carrot cake. I do know that I loved it. Carrot cake is a timeless dessert that never goes out of style.
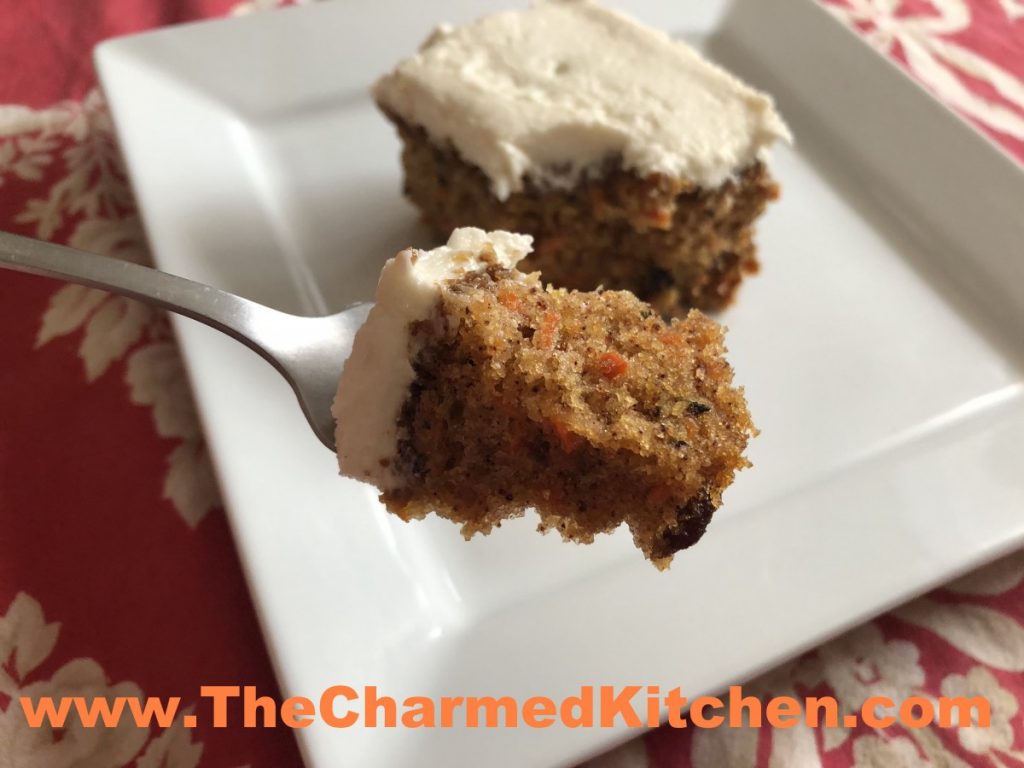
It is a simple cake, but full of flavor from cinnamon, vanilla and three cups of shredded carrots. The carrots add both flavor and moisture to the cake. Plus, with all those carrots, it’s like dessert and a veggie all in one. Practically health food.
It seems like a long time since I baked a carrot cake. Too long. Since a dear friend gave me carrots yesterday, it seemed like the right time to bake one.
I baked the cakes this morning. I only made one recipe, but instead of baking the cake in one 9×13-inch pan, I used two (8×8 -inch) pans. Baking time was about 5 minutes less. Once the cakes cooled down, I frosted them with cream cheese frosting – recipe follows. Now I have two carrot cakes. One to share with a neighbor and one to freeze for another time.
So here is the recipe. I hope you love it as much as I do.
My Favorite Carrot Cake
4 eggs
2 c. sugar
1½ c. oil
3 c. shredded carrots
2 t. vanilla
2 c. flour
2 t. each baking soda and cinnamon
1 t. salt
1 c. nuts
1 c. raisins, optional
Preheat oven to 350 and grease a 9×13-inch pan. Beat together eggs sugar and oil until smooth. Stir in carrots. Combine flour with dry ingredients and beat in. Stir in nuts and raisins and pour into prepared pan. Bake 35-40 minutes or until toothpick inserted in center comes out clean. Dust with powdered sugar or frost with cream cheese frosting.
Frosting recipe:
8 oz. Cream cheese, softened
3/4 c. powdered sugar
1 stick butter, room temperature
Beat all together until fluffy. Frost cake and refrigerate until ready to eat.
Cooking with Frozen, Canned and Dried Fruit

Since so many of us are eating out of our pantries these days, I wanted to provide some recipes for things you might already have. I hope you find these recipes helpful.
Frozen Fruit
I love to buy seasonal fruit and freeze them to use later. I normally have a nice selection of berries and bananas. Sometimes I also freeze peaches, pears and pineapples. In most cases, the frozen fruits can be used in baking recipes. When adding berries to cake batter, don’t thaw the fruit first, unless the recipe tells you to. Banana bread, blueberry muffins, raspberry bread and sorbets are just a few of the recipes I use with frozen fruit. You can also use frozen fruit in savory recipes.
Blueberry Crumb Cake
For cake batter:
2 c. flour
2 t. baking powder
½ t. salt
½ stick (¼ cup) butter, softened
¾ c. sugar
1 egg
½ c. milk
1 pint blueberries
For topping:
½ c. sugar
¼ c. flour
½ t. cinnamon
½ stick (¼ c. butter, chilled and cut into bits)
Combine dry ingredients and set aside. In mixing bowl with electric mixer, beat butter and sugar until light and fluffy. Beat in egg and milk. Add flour mixture gradually until just mixed in. Fold in blueberries. Grease and flour an 8 or 9-inch pan and add prepared batter. Combine topping ingredients until they resemble coarse crumbs. Sprinkle over batter in pan and bake in a preheated 375-degree oven and bake for 35-45 minutes. Use toothpick to test.
Note: I used a 9-inch round pan and it worked fine.
Blueberry Scones
2 c. flour
3 T. sugar
1 T. baking powder
¾ salt
6 T. chilled butter
1 ½ c. blueberries
1 t. lemon zest
2 large eggs
1/3 c. heavy cream
Mix dry ingredients together in bowl and cut in butter to resemble coarse crumbs. Toss in blueberries and zest. Beat together eggs and cream and stir into flour mixture. Mix very gently to avoid bruising berries. Press into 6×6-inch square. Cut into 3×3 inch squares, then into triangles Place on baking sheet, brush with a little cream and sprinkle with a little extra sugar. Bake in a preheated 400-degree oven for 20-22 minutes. Makes 8.
Oatmeal Banana Bread
½ c. shortening
¾ c. sugar
2 eggs
1 c. mashed bananas
1 t. vanilla extract
1½ c. flour
½ t. baking soda
½ t. salt
½ c. oats, regular or quick cooking
½ c. chopped nuts, optional
Preheat oven to 350-degrees and grease a 9×5-inch loaf pan. Cream together shortening and sugar until light and fluffy. Beat in eggs, one at a time until well mixed. Stir in bananas and vanilla. Combine dry ingredients and add to banana mixture. Beat well and stir in oats and nuts. Place batter in prepared pan and bake for 50-55 minutes, test for doneness with a toothpick. Cool 10 minutes and remove to cooling rack. Makes 1 loaf.
Orange Barbecue Sauce
1/2 c. chopped onion
oil
1/2 c. water
1 c. catsup
1/3 c. frozen orange juice concentrate
juice of 1/2 a lime (about 1-2 T.)
2-3 T. brown sugar
1 T. Worcestershire sauce
1 T. mustard
Cook onion in oil until tender. Add remaining ingredients and simmer, covered for about 30 minutes. Remove lid and continue to cook, if needed, to reach desired thickness. Stir often to prevent sticking. Makes about 1 3/4 cups.
Raspberry Sauce
2 (10 oz.) packages frozen raspberries, thawed
2 T. brown sugar
1 T. lemon juice
2 t. cornstarch
Press one package of the berries through a sieve to remove the seeds. You can do both packages, if desired. Press out as much of the pulp as possible. Place all ingredients in saucepan and heat to a simmer, stirring often to prevent sticking. This will take about 5 minutes. Serve as a glaze on meats and poultry, especially duck or serve warm as a sauce on the side.
Orange-Glazed Chicken
6 chicken breast halves, skinned if desired
1/4 c. melted butter or margarine
6 oz. frozen orange juice concentrate
1/4 c. honey
3/4-1 c. bread crumbs
1/2 c. flour
1 t. paprika
salt and pepper to taste
Brush chicken breasts with melted butter or margarine. In shallow dish combine honey and juice and set aside. Combine crumbs with remaining ingredients shallow pan. Roll chicken pieces in orange juice mixture and then dip in the crumb mixture, pressing to coat. Place breaded pieces in greased baking dish and bake in a 375- degree oven for 50 minutes, or until juices run clear. Serves 6.
You can also use frozen fruits to make sorbets, ices and ice cream
Strawberry Ice
¾ c. sugar
1 c. water
4 c. fresh or frozen strawberries or raspberries
2 c. pink lemonade
2 c. raspberry-cranberry juice drink
Cook together sugar and water, boiling gently for 10 minutes. Cool and chill. Meanwhile puree and strain berries to remove seeds. Combine all ingredients and place in a 13×9 inch pan and freeze. When mixture is almost firm, break into chunks , place in bowl and mix with a mixer. Refreeze. If mixture gets too hard, soften before beating and re-freezing. You can also freeze in an ice cream machine. Makes 8-10 cups.
Blueberry-Red Grape Sorbet
4 c. red grapes, fresh or frozen
2 c. blueberries, fresh or frozen
sugar to taste- I used a couple of tablespoons
a few sprigs of fresh mint, optional
Combine all ingredients in a food processor and blend until smooth. You might have to do this in a couple of batches. Place in a container and freeze until solid. Remove from freezer and allow to soften for about 20 minutes, or even a little less. Mixture should still be frozen, but soft enough to break into chunks. Place in processor and mix again. Mixture will get smoother and softer. You can also do this step in a stand mixer or even with a hand mixer. Return sorbet to freezer, until ready to eat it.
Strawberry Ice Cream
2 c. chopped strawberries
1 c. sugar
1 T. vanilla
2 c. cream or half and half or a combination. You can also use some milk or even almond or rice milk.
Additional sugar to taste
Place strawberries, vanilla and sugar in saucepan and bring to a simmer, stirring occasionally. Remove from heat and chill. Combine chilled berry mixture with cream. Add additional sugar if you like. Remember that once it is frozen the ice cream will not taste as sweet so make this mixture a little sweeter than you want the final product to be. How much sugar you add varies with personal taste, and how sweet the berries are. Place in an ice cream maker and process according to manufacturer’s directions. Once finished put in an air- tight container and place in freezer. Makes about 1 quart.
Strawberry Sorbet
While this recipe is made with strawberries, you can use any number of fruits in this recipe. Use what you have and get creative.
2 c. fresh or frozen strawberries (allow frozen berries to thaw a little first)
1/4 c. sugar, or to taste
3 T. fresh lemon juice
Place ingredients in food processor and process until smooth. Place in shallow pan and freeze. If you are using frozen berries re-freezing will take only about 1 hour. Up to 30 minutes before serving remove sorbet from freezer and allow to soften enough to break into chunks. Place in processor and blend again until very smooth. Serve immediately. Serves 4.
Canned Fruit
Some of the recipes for frozen fruit can also be used with canned fruit, like sorbets. Canned fruits can often be baked with, and used for sauces with savory dishes. Applesauce can be used in all sorts of recipes, too. Here are some recipes.
Peach Glazed Ribs
2-3 lbs. western-style ribs or 4-5 lbs. spare ribs, cut into sections
salt and pepper to taste
garlic powder
onion powder
2-3 lbs. fresh peaches or nectarines, peeled, pitted and sliced -or- 1 (29 oz.) cans sliced peaches, drained
1/4 c. each brown sugar and vinegar
2 cloves garlic, minced
1 T. soy sauce
1 t. fresh grated ginger
Place ribs on rack in a baking sheet and season to taste. Bake in a 350-degree oven for 1 hour. Meanwhile combine remaining ingredients in a saucepan and simmer over medium low heat until mixture is thickened and fruit is tender. Remove ribs from oven and set aside. Remove rack from bake and drain off any fat in pan. Return ribs to pan without the rack and cover with the peach sauce. Seal with foil and return to oven for 30 minutes more. Remove foil and bake an additional 45 minutes for western ribs and 30 minutes for spare ribs. Serve with rice or pasta. Serves 3-4.
Cranberry Barbecue Sauce
1 (14 oz.) can diced tomatoes
2 T. brown sugar
1 T. minced dried onion
1 T. vinegar
1 T. molasses
1 t. each dried basil, dried oregano and garlic powder
1/2 t. each cumin, paprika and pepper
dash salt
1 (15 oz.) can whole berry cranberry sauce
Combine all ingredients, except cranberry sauce in food processor and pulse a few times to chop up a bit. Combine this mixture with cranberry sauce in saucepan and cook over medium heat about 30 minutes or until thickened. Stir to prevent sticking. Makes about 2 1/2 cups.
To use: brush on chicken, ribs or beef kebobs last 15 minutes of cooking.
Pear Sauce
½ c. sugar
½ c. balsamic vinegar
1 lb. Pears, cored, peeled and diced, or 8 canned pear halves, drained
2 T. dried minced onion
1 t. minced garlic
dash hot sauce
pinch cinnamon
salt and pepper to taste
Combine all ingredients in a saucepan and cook over medium heat until thickened, about 20 minutes. Stir often to avoid burning. Serve with pork or lamb roasts. Makes about 2 cups.
Pork with Pear Sauce
1 lb. Pork loin. Sliced or 4 pork chops
oil
1 large onion, sliced
salt and pepper to taste
1 recipe pear sauce, See above
In skillet cook pork in oil, turning to brown evenly until juices run clear when meat is pierced. Remove meat and add onions, sautéing until onions are browned. Return pork to pan, adjust seasonings and add1 cup of the pear sauce. Cook 10 minutes, or until heated through and bubbly. Serves 4.
Spirited Applesauce
½ c. butter
2 c. chunky-style applesauce
¼ c. sugar
½ c. rum dark preferred
1 t. cinnamon
½ t. ground cardamom
¼ t. ground nutmeg
pinch of cloves
Combine all ingredients in a saucepan and simmer over low heat , stirring frequently until thickened. Makes about 2 cups. Use as a glaze on pork, lamb or poultry. Serve on the side as you would cranberry sauce. Can be served warm or cold. Also good with breakfast sausages or as a dipping sauce.
Sweet and Sour Sauce
1/2 c. vinegar
1/2 c. sugar
1/2 c. pineapple juice – from canned chunk pineapple
3 T. catsup
2 T. soy sauce
2 T. cornstarch
1 t. dried minced garlic
1-t. fresh grated ginger
Hot pepper flakes to taste
In saucepan combine all ingredients. Cook over medium heat, stirring as mixture gets hot, until sauce begins to bubble. It will also get much clearer. Boil gently 1 minute, stirring constantly before removing from heat. Makes 1 1/2 c. Keeps in the fridge for a couple of weeks.
Sweet and Sour Pork or Chicken
1-2 lbs. boneless pork or chicken
1 egg
1 t. cornstarch
1/4 t. salt
1 t. soy sauce
Additional cornstarch for dredging
2 T. oil
1 medium onion, chopped
1 medium carrot, peeled and sliced thin
1 sweet green pepper, seeded and chopped
1 sweet red or yellow pepper, seeded and chopped
1 20 oz. can pineapple chunks, drained, reserving juice for sauce
1 recipe sweet and sour sauce (see note)
Cut meat into cubes and place in bowl. Combine egg, 1-t. cornstarch, salt and soy sauce and pour over the meat, stirring to coat. Allow marinating at least 1 hour in fridge.
When ready to cook, heat 1T. oil in large skillet or wok. Sauté onions on high until tender. Add carrots and stir fry 3 minutes. Add peppers and sauté 3 minutes more. Remove to bowl and stir in pineapple. Dredge the meat in additional cornstarch and sauté in remaining oil until browned and when juices run clear when pierced with a fork.
Meanwhile, combine sauce ingredients in a saucepan and heat to boiling. Return vegetables to pan with meat and pour over sauce to desired amount. Serve over rice, makes 4-6 servings.
Note: If you make the sweet and sour sauce ahead of time it will get runny when reheated if made with regular cornstarch. Either use modified cornstarch (Clear Gel A) or make sauce just before using. You may also want to use only some of the sauce and save the rest for another use.
Pineapple Spice Scones
3 c. flour
1/3 c. sugar
2 ½ t. baking powder
½ t. salt
¾ c. cold butter
1 (8 oz.) can crushed pineapple in its own juice, undrained
milk
3 T. chopped nuts
1 T. sugar
½ t. cinnamon
Preheat oven to 400 degrees. In mixing bowl combine dry ingredients. Cut in butter until mixture resembles coarse crumbs. Add pineapple and stir until dough forms. It will be sticky. Turn dough onto floured surface and knead gently 10-12 strokes until dough holds together. Roll or pat dough to a ¼ inch thickness and cut with a 2 ½ inch biscuit cutter. Re-roll scraps. Place scones on ungreased baking sheet. Brush with milk. Combine nuts, sugar and cinnamon and sprinkle on scones. Bake about 15 minutes. Makes about 21.
Canned Fruit Sorbet
If you are looking for a simple dessert, sorbet from canned fruit is pretty simple. Any number of fruits could be used. Start by draining the fruit, saving the liquid. Puree the fruit. If you want to sweeten it, you can use some of the liquid from the can. You can also add sugar, honey, jam, jelly, preserves, or maple syrup. You can also use frozen juice concentrates to sweeten. Taste it to see how sweet it is. For more flavor, you can add flavorings, like extracts (vanilla, almond, mint), citrus juice or zest, herbs, etc. I sometimes add a can of coconut milk, for a creamy frozen dessert. Have fun and be creative. Save any extra can liquids in the fridge for now. Place fruit puree in a shallow pan to freeze. Once frozen, take the mixture out, chunk it up- you might have to let it soften on the counter a few minutes- then puree it again in a food processor. The mixture should get nice and creamy. If it is too hard to process, you can add a little of the reserved can liquid. Taste again to see if it needs more sugar, or more flavorings. The flavor changes when frozen. It is ready to eat at this point. You can freeze it again and process it one more time for an even smoother result. Store in freezer until ready to enjoy. You can combine different fruits. Fun project for kids.
Dried Fruit
Dried fruits can be added to baked goods, salads, granola, oatmeal or be eaten just as a snack. If they are hard, you can soften the fruit first, by placing in warm water or fruit juice. You can also melt chocolate and add dried fruits and nuts (optional). Stir together, then drop by spoonfuls on wax paper for an easy candy. Here are some of my favorite recipes using dried fruits.
Raisin Scones
2 c. flour
2 t. baking powder
½ t. baking soda
½ t. ground nutmeg
½ t. salt
½ c. cold butter
1 c. raisins
2 T. sugar
1 egg, separated
¾ c. buttermilk
additional sugar for sprinkling
Preheat oven to 375 degrees. In bowl combine dry ingredients. Cut in butter until mixture resembles coarse crumbs. Add raisins and sugar and toss to distribute evenly. Mix egg yolk with buttermilk and add to flour mixture, stirring to combine. Turn dough onto floured surface and knead gently 10-12 strokes. Cut dough in half and form each half into a six inch circle. Cut each circle of dough into 6 wedges, but do not separate. Place on ungreased cookie sheet and brush with egg white. Sprinkle with extra sugar and bake 18-22 minutes. Makes 12.
Cranberry-Buttermilk Scones
3 c. flour
¼ c. plus 2 T. sugar
2 t. baking powder
¼ t. salt
1 ¼ sticks,(10 tablespoons) chilled butter, cubed
3/4 c. dried cranberries
½ c. buttermilk
3 large eggs
1 t. water
Preheat oven to 375 degrees. Combine flour with ¼ c. sugar, baking powder, and salt. Rub in butter with finger tips until mixture resembles coarse meal. Stir in cranberries. Combine milk with 2 of the eggs and beat together. Stir egg mixture into flour mixture and stir until dough begins to form into a ball. Turn dough onto a lightly floured surface and knead about 10 stokes until dough holds together. Grease 2 nine inch cake pans. divide dough in half and place one piece in each cake pan. Press dough out evenly. Combine remaining egg with 2 teaspoons water and beat until well mixed. Score top of loaves with sharp knife into 8 wedges each. Brush with egg mixture and sprinkle with reserved sugar. Bake until golden, about 30 minutes. Cool 5 minutes, turn onto plates and cool right side up. Cut along score marks. Serve warm. Makes 16.
Whole Wheat Biscotti
¾ c. whole wheat flour
½ c. flour
1/3 c. sugar
1 t. baking powder
¼ t. salt
½ c. walnuts
¼ c. golden raisins
Combine all
Add
2 eggs
1 t. vanilla
Shape into loaf 2”x11” on oiled sheet. Bake at 350-degrees for 20 minutes. Slice thin and place on cooling rack on baking sheet then return to oven, reduce heat to 300-degrees bake 25 minutes.
Oatmeal Raisin Squares
4 c. oats
2 c. flour (whole wheat pastry flour)
½ c. brown sugar (¼ c. honey)
1 c. pecans, chopped
1 t. baking soda
1 t. salt
1 ½ c. butter, melted (1 c. applesauce, ½ c. olive oil)
2 t. vanilla
½ c. water
2 c. raisins
Zest of 1 lemon
½ t. cinnamon
Non-stick cooking spray
Heat oven to 350. Spray a 9×13-inch pan, set aside. Combine oats, flour, sugar, nuts, soda, salt pour in butter and vanilla, stir until well mixed and set aside. Heat together water with raisins, zest and cinnamon and bring to a boil. Simmer two minutes and remove from heat to cool a little. Process until almost smooth. Press half of the oatmeal mixture in bottom of pan. Spread the raisin mixture over the oat meal mix and then top with the remaining oat mix. Press down firmly. Bake until golden on the top, 35-45 minutes. Cut once cool. Makes 24 squares.
Granola
3 c. rolled oats
1/4 -1/2 c. each of any of the following to equal 1-2 c. total
Sesame seeds, sunflower seeds, wheat germ, peanuts, pecans, almonds, hazel nuts, pumpkin seeds, walnuts, coconut (chop up any big pieces)
1 t. cinnamon
1 t. orange peel
1/2 t. nutmeg
1/4 c. oil
1/4 c. honey
2 t. vanilla
Dried fruit to equal 1/2 -1 1/2 cups. Some choices could include: raisins, dried cranberries, cherries, pineapple, dates, figs, apricots, bananas, blueberries etc.
In large bowl combine oats with seeds and nuts and toss well with seasonings. Heat together oil, honey and vanilla and pour over oat mixture, tossing to coat evenly. Spread on a cookie sheet and bake in a 300 degree oven for 30 minutes. Halfway through the baking time stir mixture so the edges won’t burn. Remove from oven and return to large bowl. Toss with the dried fruit and allow to cool before storing in an airtight container in a cool, dry place. Use in 1 month. Makes 5-7 cups.
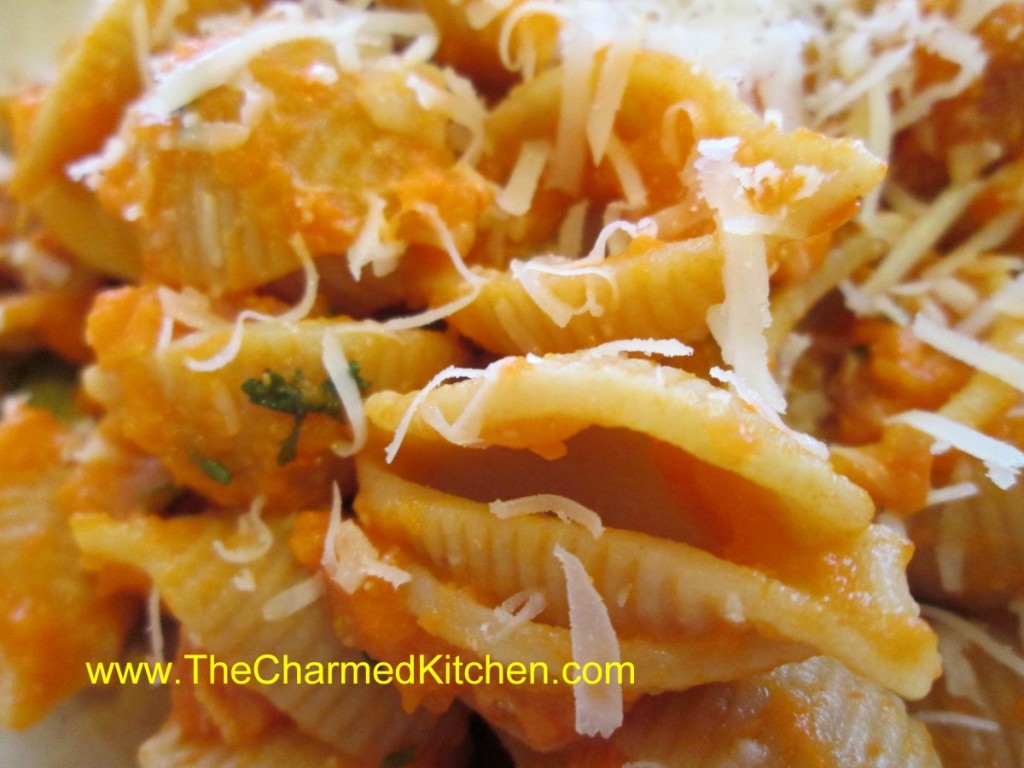
Carrot Pasta Sauce

This pasta sauce is one of my favorites. Most people don’t think of carrots, when they think of pasta sauce, but maybe they should. It tastes wonderful and looks pretty, too. Since I was gifted some beautiful carrots this morning, I decided to make this pasta sauce with some of them. Thanks Courtney and Carl!!
It’s a simple sauce that packs a lot of flavor.
The process is easy. Just cook carrots, with sauteed onions and garlic in stock, until the carrots are really tender. Most of the liquid cooks off. Puree, adding cream or half and half and some dill. Adjust seasonings and you are done!
I used chicken stock, but you could use a vegetable stock for a vegetarian version of this dish. Toss the sauce with pasta, rice, or even with veggies or meats. You can add some fresh grated cheese, too, if you like.
You might get kids to eat carrots, this way.
Here is the recipe. I hope you try it.
Carrot Pasta Sauce
1 T. oil
1 onion, chopped
1 garlic clove, minced
1 lb. carrots, peeled and sliced
2 c. chicken or vegetable stock
Salt and pepper to taste
1/2 c. cream, half and half or evaporated milk
1T. fresh dill or 1 t. dried
Hot cooked pasta
Sauté onion in oil until tender. Add garlic, carrots and stock and
cook until carrots are very tender. Much of the liquid should have
evaporated by then. Place mixture in blender and add cream or milk,
mixing until smooth. Add dill and adjust seasonings, tossing over hot
pasta to serve. I sometimes top with some shredded Parmesan cheese, too.
Variations: Use sweet potatoes, pumpkin, winter squash or even peas for different tastes.
Chicken and Herb Dumplings

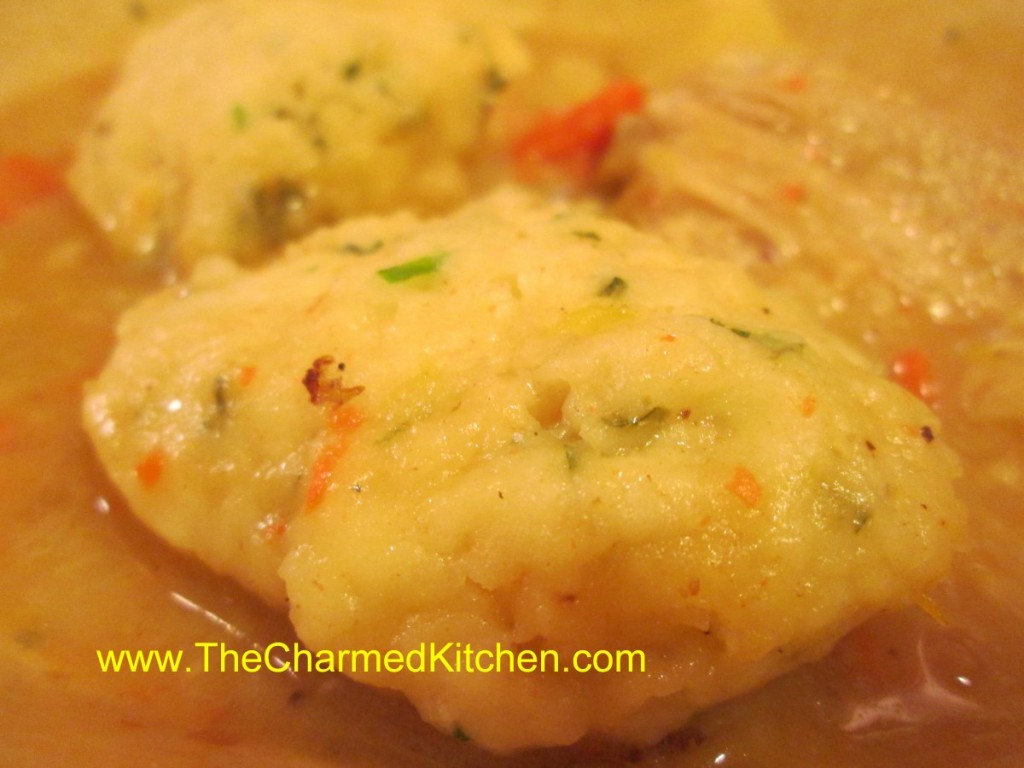
There are foods I will always associate with my childhood. Chicken and dumplings is one of those dishes. I can remember watching my Mom spooning the dumpling batter over the simmering pot of chicken and vegetables. She’d cover the pot and wait.
When she uncovered it, the dumplings had puffed up, and pretty much covered the whole dish. It was magical to me. The dumplings were so tender and light.
I can’t make this dish, all these years, later without thinking of her.
My mom made her dumpling batter with a buttermilk baking mix- like Bisquick. Eventually, she started making her own baking mix, like I do today.
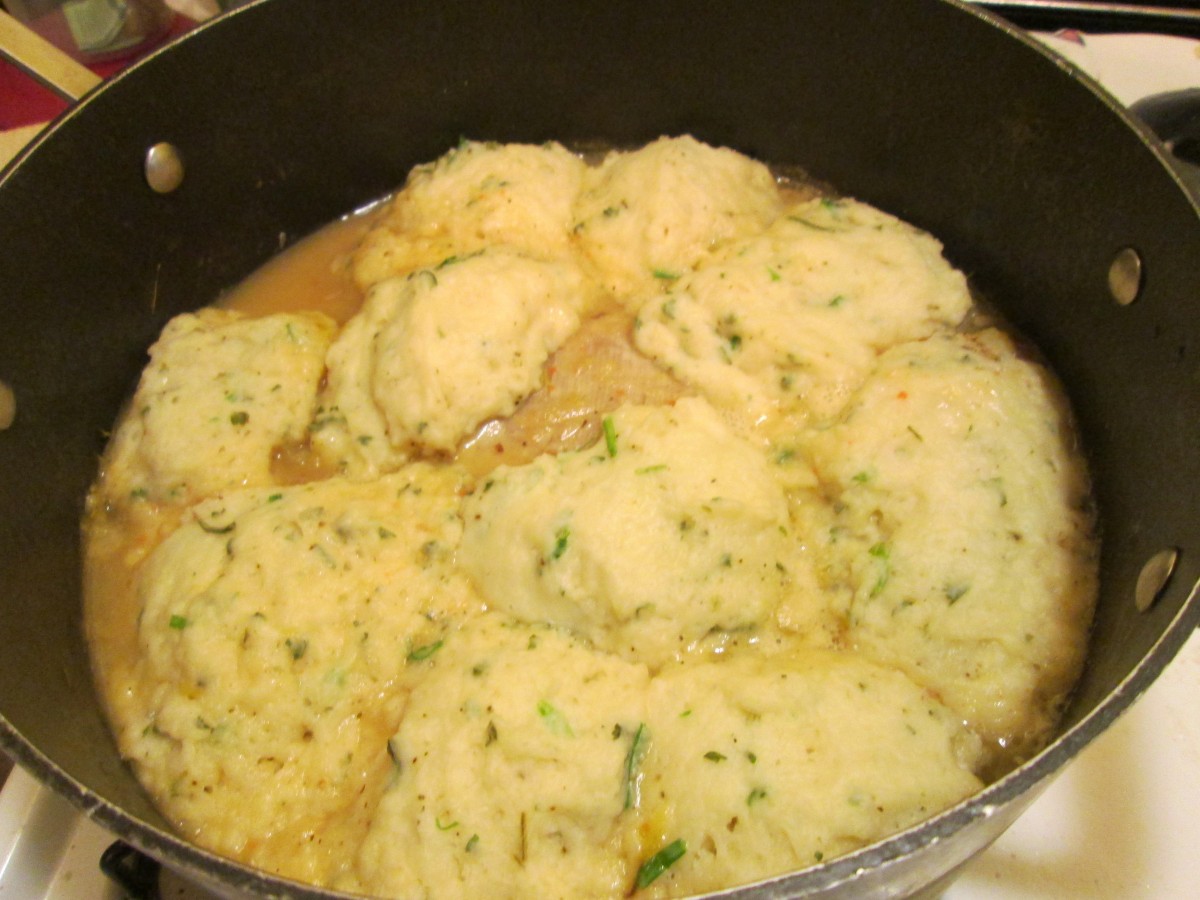
Dumplings will puff up when cooked
Mom’s Chicken and Herb Dumplings
1 T. oil
1 (3 lb.) broiler, cut into pieces
salt and pepper
flour for dredging
1 medium onion, chopped
2 carrots, peeled and sliced
3-4 potatoes, cut into chunks
2-3 c. chicken stock
1 t. each marjoram and thyme
1 c. buttermilk baking mix* , like Bisquick,I make my own, recipe follows
1/3 c. milk
2 t. fresh parsley
2 t. snipped chives or green onions
1/2 t. red pepper flakes
Season chicken pieces with salt and pepper and dredge pieces in flour.
Heat oil in large skillet and brown chicken pieces on all sides. Remove
chicken pieces and sauté onion until tender. Add carrots, potatoes,
broth and chicken to skillet and cook, covered, 20 minutes. Sprinkle
herbs over the chicken. Combine baking mix with milk, parsley, chives
and red pepper flakes and spoon batter in skillet in 8 mounds. Cover and
cook over low heat 20 more minutes. Serves 4.
*Here are two versions of the biscuit mix.
Chef Pastry Mix/ Biscuit Mix
8 cups sifted, all-purpose flour
1 c. powdered milk
1 c. powdered buttermilk
¼ c. baking powder
1 T. salt
2 c. shortening, coconut oil or butter- if using butter store in the fridge- coconut oil version should be stored in fridge in warm weather
Sift dry ingredients together 3 times. Cut in fat to resemble cornmeal. Keep in an airtight container. Store in a cool dry place and use within six months.
Whole Wheat Baking Mix
5 c. flour
3 c. whole wheat pastry flour
1 c. whole wheat flour
1/3 c. baking powder
1 c. powdered milk, not non-fat
2 t. salt
3 1/2 sticks butter
Mix dry ingredients together well, then cut in butter. Store in fridge for up to 3 months and can be frozen for up to a year. Makes about 12 cups.
Homemade Granola

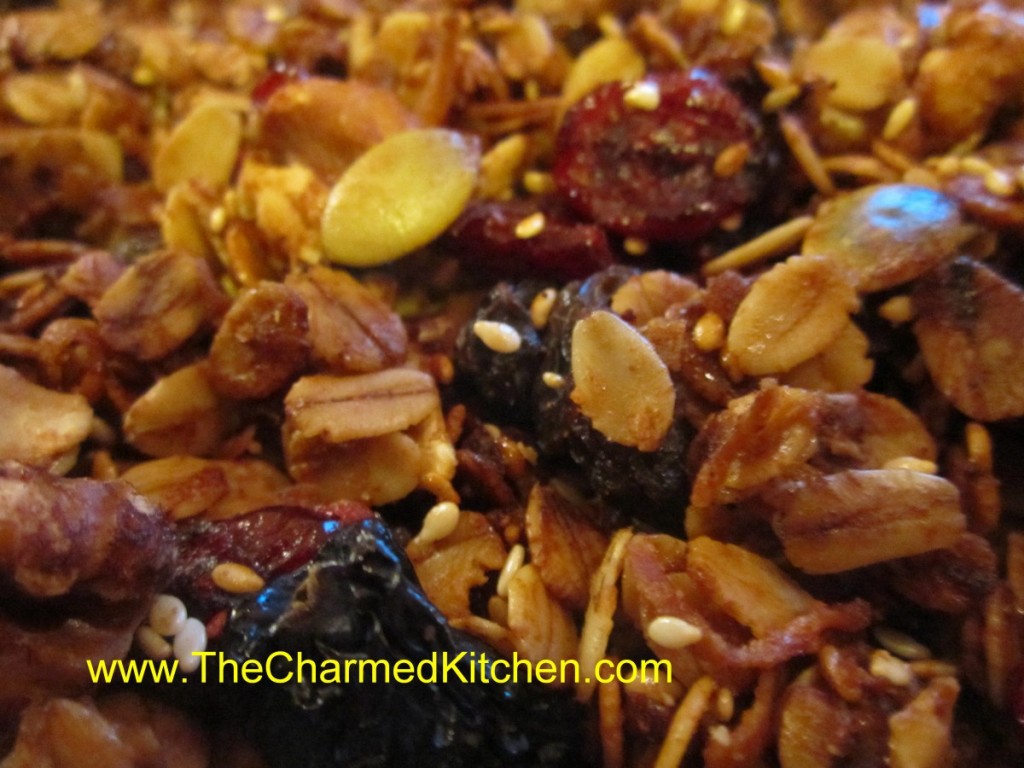
One of the advantages of making stuff from scratch, is that you get to control what goes in it. This is really true for granola. The boxed stuff in the store is often full of way too much sugar for my taste. The base for granola is toasted oats, but after that you can get creative. I use plenty of nuts and seeds, sometimes coconut, and finish it off with an assortment of dried fruits. This is a great recipes when you are eating out of your pantry. You can use what ever nuts, seeds and dried fruits you have around.
I prefer my granola less sweet than most commercial brands. By making my own, I get to control what, and how much, sweeteners to add. For my granola, I use honey to sweeten it. You can more or less, to suit your taste.
I know granola is most often thought of as a breakfast food, but it makes a great snack, and sprinkled on yogurt it can also be a tasty choice for lunch. Great to take along when hiking or going to the park. I actually like to sprinkle granola on ice cream, too.
Homemade Granola
3 c. rolled oats
1/4 -1/2 c. each of any of the following to equal 1-2 c. total
Sesame seeds, sunflower seeds, chia seeds, wheat germ, peanuts, pecans, almonds, hazel nuts, pumpkin seeds, walnuts, coconut… you get the idea. Don’t forget to chop up any big pieces.
1 t. cinnamon
1 t. orange peel
1/2 t. nutmeg
pinch of salt, optional
1/4 c. oil
1/4 c. honey- or add a little more if you like a sweeter granola
2 t. vanilla
Dried fruit to equal 1 -1 1/2 cups. Some choices could include: raisins, dried cranberries, cherries, pineapple, dates, figs, apricots, bananas, strawberries, blueberries etc. Cut up larger pieces.
In large bowl combine oats with seeds and nuts and toss well with seasonings. Heat together oil, honey and vanilla and pour over oat mixture, tossing to coat evenly. Spread on a cookie sheet and bake in a 300 degree oven for 30 minutes. Halfway through the baking time stir mixture so the edges won’t burn. Remove from oven and return to large bowl. Toss with the dried fruit and allow to cool before storing in an airtight container in a cool, dry place. Use in 1 month or store in freezer or fridge to keep longer. Makes 5-7 cups.


