My Favorite Apple Cake

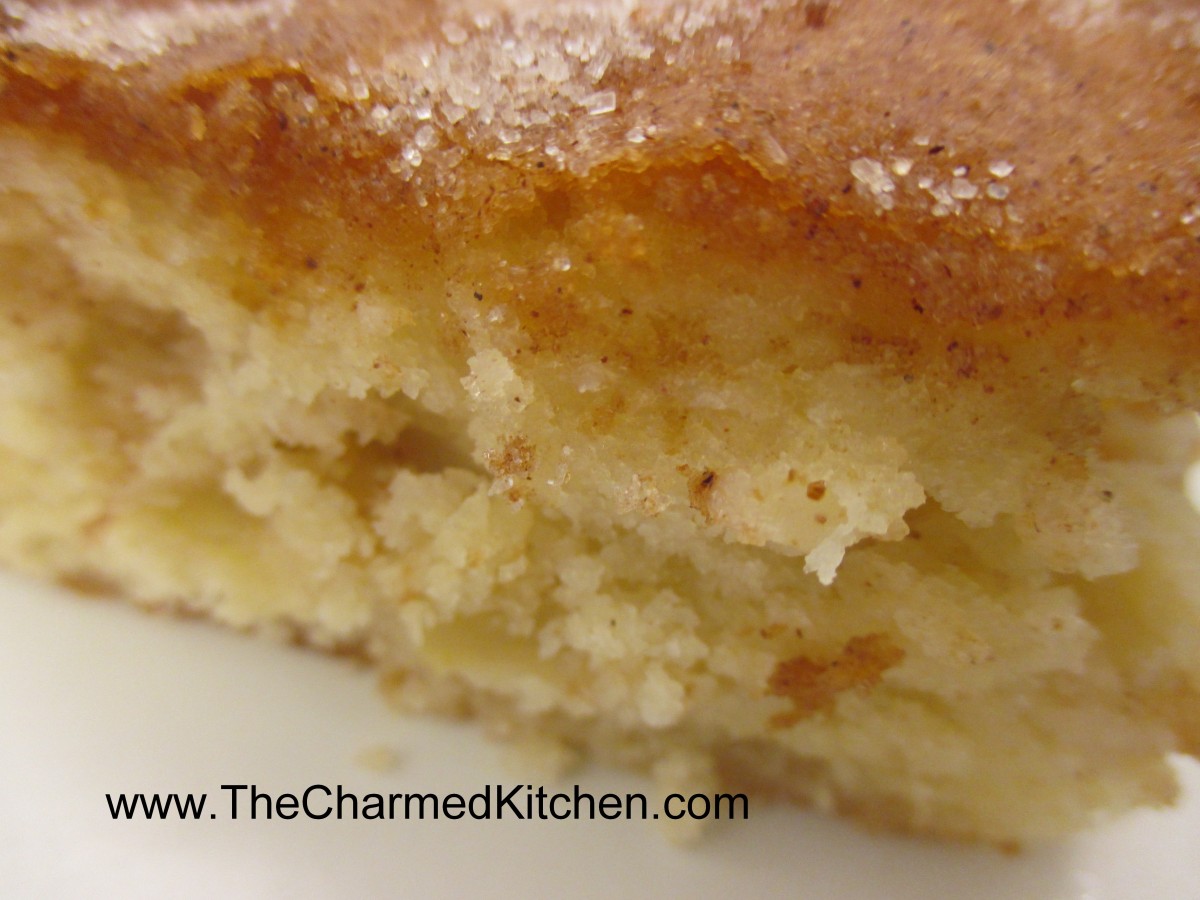
My Favorite Apple Cake
I have posted this cake recipe in the past. It truly is my favorite apple cake ever. I had a request for this recipe yesterday, so here it is.
I’ve had this recipe since I was a kid. My Aunt Josie gave it to my mom. Not sure where she got, it but it has been a family favorite since we first made it.
It’s a simple recipe that comes out moist and flavorful. I normally bake it in a 13×9- inch pan but it can be baked in a Bundt pan. While the recipe calls for cinnamon sugar- I sometimes add a little fresh ground nutmeg, too. I also like to use olive oil or even avocado oil in this cake. It gives it a really nice flavor.
Almost any apple works in this recipe- except maybe Red Delicious. Perfect for dessert or even served with brunch. Who am I kidding? I would eat this cake for breakfast.
Note: The batter is really thick. Don’t think you’ve done something wrong.
Classic Apple Cake
1 c. oil, I use olive oil
4 eggs
1 t. vanilla
1/3 c. orange or lemon juice
Combine above ingredients and set aside.
Mix together the following dry ingredients. Make a well and stir in egg mixture to make a stiff batter.
3 c. flour
2 c. sugar
3 t. baking powder
¼ t. salt
Mix ½ c. sugar and 2 t. cinnamon and set aside
Peel, core and slice 4 medium apples.
Grease a 9×13 inch pan or a Bundt pan. Preheat oven to 350-degrees. Place ½ of batter in prepared pan. Arrange apple slices on batter and sprinkle on ½ of the cinnamon mixture. Pour on remaining batter and sprinkle with remaining sugar mixture.
Bake 1-1 ½ hours. One hour for 13×9-inch pan and 1 1/2 hours for Bundt. I find that sometimes it takes less than an hour- check at 50 minutes.
Roasted Beet Salad

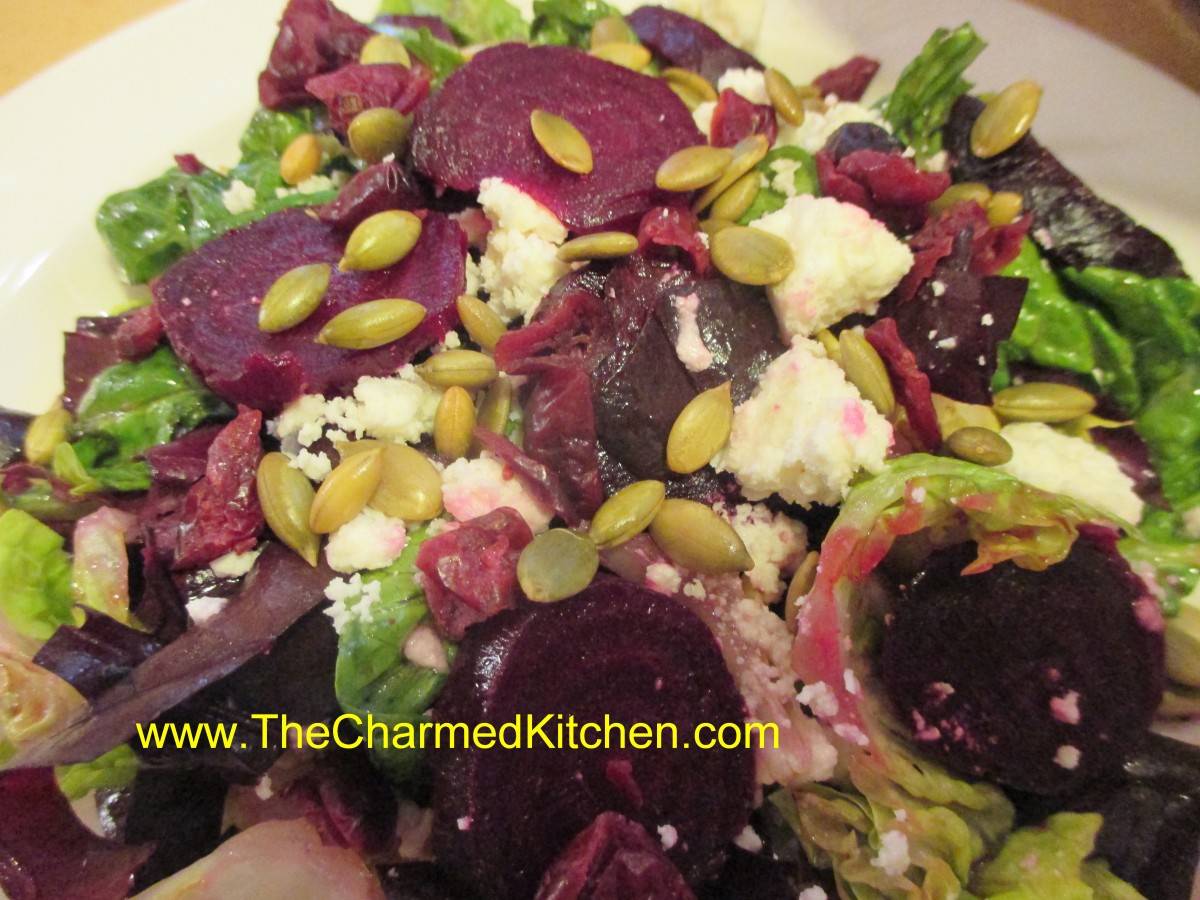
Roasted Beet Salad
I got a great number of beets a couple of days ago. I will be canning many over the weekend, but I also want to enjoy them fresh. Decided to roast some beets and then go from there. To roast beets: just wash them and trim off the greens- leaving about an inch of the stems to reduce bleeding.
My beets don’t have their greens, but trim off, if they do. The beet greens could be added to the salad.
Place beets in a roasting pan and drizzle with a little oil. I used avocado oil. Cover pan and place in a 350 degree oven for about 45 minutes. Smaller beets will be cooked in less time- about 35 minutes. Really large beets could take up to an hour. I always check by poking one of the beets with a fork. Let the beets cool a little and then remove the peels. I use a knife to do this. They come off quite easily.
I used three small beets to make this salad for lunch. I shared it with a neighbor.
Roasted Beet Salad
1 small head Bibb lettuce, washed and sliced into thin slices
2 c. spinach, torn into bite sized pieces
1/4 c. olive oil
3 T. red wine vinegar
2 t. sugar, optional
3 small roasted beets, peeled
1/2 c. crumbled feta cheese
1/4 c. hulled pumpkin seeds, toasted
1/4 c. dried cherries
coarse sea salt- I used pink salt
Place lettuce in a mixing bowl. Combine olive oil with vinegar and sugar, if using. Add salt and pepper to taste and toss over the greens. Slice beets. Divide greens on 2 salad plates. Arrange half of the beets on each salad and top with the rest of the ingredients. Sprinkle with a few grains of the sea salt and serve. Makes 2 luncheon salads.
Hot or Cold Beet Soup

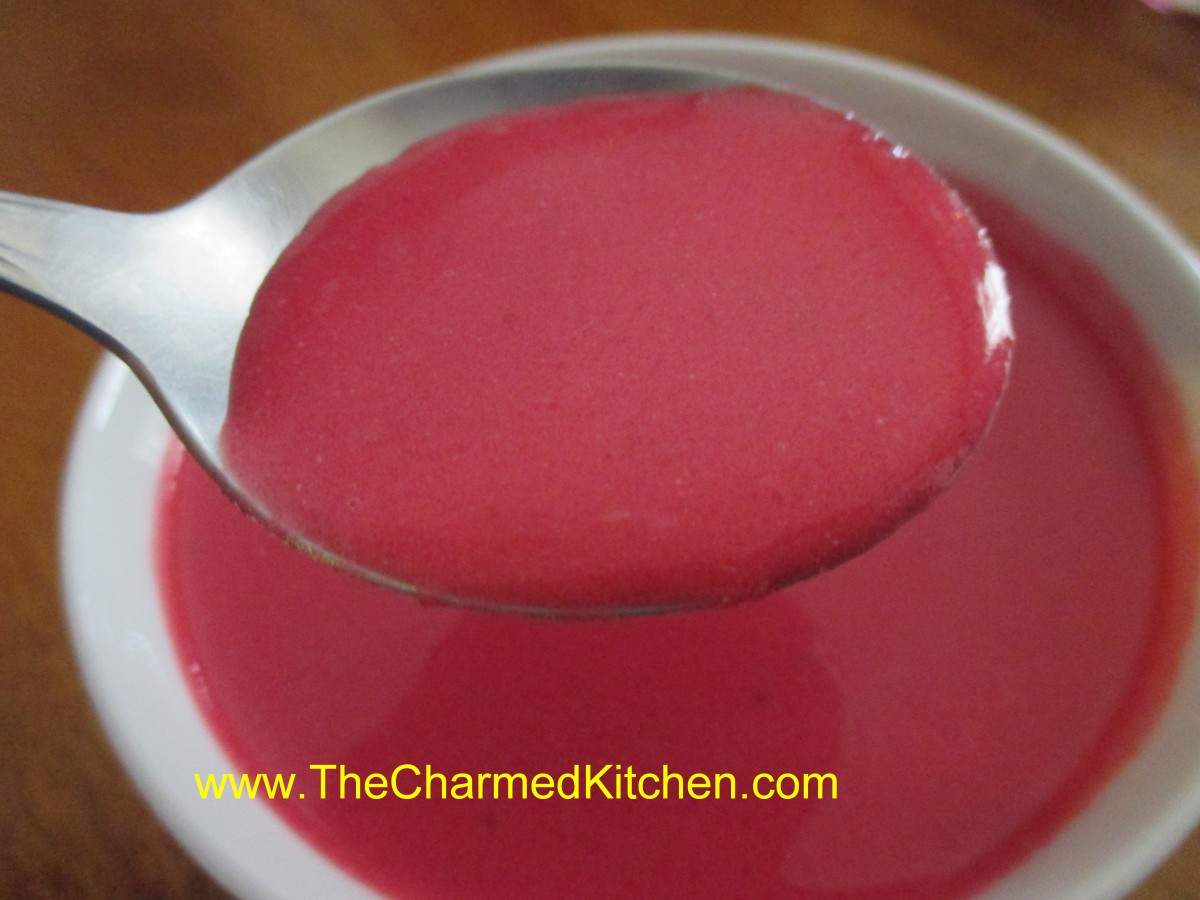
Hot or Cold Beet Soup
Since I have a large quantity of beets, I decided to make this soup. It was 92 degrees yesterday, so I enjoyed my beet soup chilled. Tomorrow, when it is much cooler, I will warm it up, before eating.
That is one of the nice things about this recipe. This soup is good, what ever temperature you serve it.
It is also a pretty soup. The color is so beautiful. A friend came over and I offered her a bowl. When I set it down in front of her she said, “Wow, this is really pink soup.”
People seem to have strong opinions about beets. They either love them or hate them. I love them and I enjoy them in soups, salads, relishes, casseroles and more. The earthy flavor really appeals to me and the color is a delightful bonus. I added some extra veggies for more flavor and sour cream for a tart, creamy flavor and texture element. The result was a very tasty dish that is also sort of striking to look at.
Hot or Cold Beet Soup
6 or 7 small beets – or 3 large beets
2 T. olive oil
1 large onion, chopped
2 carrots, peeled and chopped
1 rib celery, chopped
3 medium potatoes, peeled and chopped
6 cups stock- I used chicken but vegetable stock or beef stock would also work
2 t. dill weed
salt and pepper to taste
1 c. sour cream- or a little more if you like
Cut beets off of their stems- leaving about 2 inches attached- this will reduce bleeding and retain more color in the beets. Place beets in a pot of water deep enough to cover them and cook until the beets are just getting tender, about 20 minutes – longer for larger beets. Remove and place in cold water. Once the beets are cool enough to handle trim off the stems and slip off the skins. Cut the beets into chunks and set aside. In soup pot heat the oil and cook the onion until tender. Add the carrots and beets and cook a few minutes longer. Add the rest of the vegetables, stock, dill and simmer, covered, until vegetables are very tender. This will take at least 30 minutes- but cooking longer is better- around an hour. Puree the soup. To add the sour cream place sour cream in a bowl and add a ladle full of the hot soup to the sour cream, whisking until smooth. Add another ladle or two of the soup and whisk again. Return sour cream mixture to the soup. By warming the sour cream gently you prevent it curdling. Adjust seasonings and serve right away, or refrigerate and serve cold. Serves 6-8. Freezes well.
Chocolate Beet Cupcakes – Pink Velvet


Chocolate Beet Pink Velvet Cupcakes
I have recently been gifted with some beets. Not just some beets, but pounds and pounds of beets. I will be making a lot of dishes with them, including pickled beets and beet relish. It’s a good thing I like them so much.
Thought I would share this fun recipe for cupcakes, using beets. I already make a chocolate beet cake- which has red tones from the beets. I wanted a lighter texture for cupcakes, with more chocolate flavor, so I made some changes to the beet cake recipe and ended up with these cupcakes.
Rich, but light, with a very subtle blush of red. I decided to call them Pink Velvet. I topped them with cream cheese frosting, but a dusting of powdered sugar would work well, too, or a favorite buttercream.
Here is the recipe. I hope you will give them a try.
Pink Velvet Cupcakes (Chocolate Beet)
2 cups all-purpose flour
2 t. baking soda
½ t. salt
¾ c. cocoa powder
1 c. butter, softened
1½ c. sugar
3 large eggs
2 teaspoons vanilla
1½ cups grated cooked beets
Powdered sugar, optional
Preheat oven to 350°. Line 24-28 muffin tins with paper liners; set aside. Combine dry ingredients in a bowl; set aside. In a mixing bowl, combine the butter and sugar. Beat until light and fluffy. Beat in eggs one at a time, beating well after each addition. Beat in vanilla. Slowly beat in dry ingredients until well mixed; stir in beets. Spoon batter into prepared tins, filling about 2/3 full. Bake 18-20 minutes, or until cupcakes spring back when touched lightly or when toothpick, inserted into cupcakes , comes out clean. Cool before frosting. Makes 24-28.
Cream Cheese Frosting
8 oz. cream cheese, softened
1 stick, (½ cup butter) softened
2-3 c. confectioners’ sugar
1T. vanilla
Beat all ingredients together until smooth and fluffy. Store in the fridge.
Shrimp and Bacon Spinach Salad

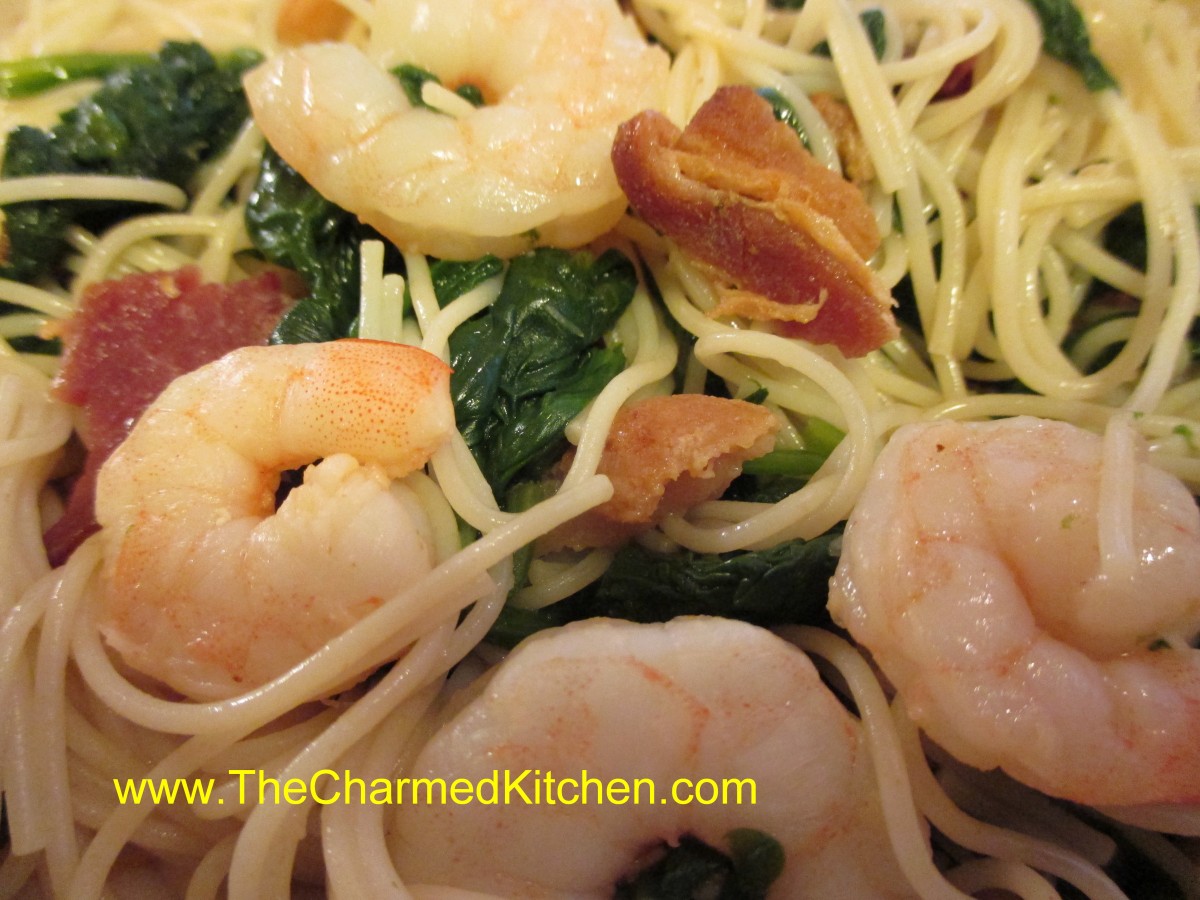
Shrimp and Bacon Spinach Salad
When I was a kid, my mom used to make a wilted salad. She would toss spinach with a hot dressing and then top the salad with hard cooked eggs and croutons. The dressing was made with some of the bacon fat, since there was always bacon in the salad, too. That was the inspiration for this salad.
I had planned to make a tossed salad with some fresh spinach, but something told me to go in another direction. Since I already had bacon and shrimp, I decided to just put them all together. With just a few extra ingredients tossed in, I ended up with a really good dinner. Sort of like those wilted salads my mom used to make.
I didn’t have a lot of time, so the fact that it was ready in about 15 minutes was nice, too. I put the pasta on to cook when I started cooking the bacon to save even more time.
Shrimp and Bacon Spinach Salad
3-4 slices bacon, cut into 1-inch pieces
2 shallots- or 1 small onion- chopped fine
2 cloves minced garlic
8 oz. fresh spinach
8 oz. raw shrimp, shelled and deveined
¼ c. sherry
¼ c. chopped parsley
½ t. grated ginger
½ t. red pepper flakes
Salt and pepper to taste
2 cups cooked pasta
Cook bacon in skillet until almost cooked. Add the shallots and cook until shallots are just turning brown. Add garlic and cook 1 minute longer. Add spinach and cook, stirring often, until spinach is wilted down. Add shrimp and continue cooking until shrimp are just barely cooked. Add sherry and seasonings and cook 2 minutes more. Toss with hot pasta and serve. Serves 2.
Note: You can add some fresh Parmesan cheese when serving, if you like.
Cinnamon Pear Coffee Cake


Cinnamon Pear Coffee Cake
This pear-studded cake is perfect to have with that morning cup of coffee- or for dessert. The tender cake is topped with a lot of pears, cubes of cream cheese, cinnamon sugar and a vanilla glaze. The taste is amazing. I used Bartlett pears, but any ripe pear would work. The 4 pears weighed about 2 pounds.
I will say up front, that this is not the prettiest cake out there. It comes out of the oven kind of lumpy, from all those pears and the tiny cubes of cream cheese. Once you top it with the cinnamon sugar, and later the glaze, it looks a lot better. It is one of the tastiest, though, and isn’t that what’s important?
So if you want to enjoy one of my favorite Autumn fruits in a new way- try making this simple, tasty pear coffee cake. I don’t think you will be disappointed.
Cinnamon Pear Coffee Cake
1 stick (½ cup) butter
1 egg, lightly beaten
1 c. half and half
1 c. all-purpose flour
1 c. sugar
2 t. baking powder
2 t. cinnamon
1 t. vanilla
½ t. salt
2 lbs. pears, about 4 large, cored, peeled and sliced *
8 oz. cream cheese, cut in small pieces
Topping
3 T. cinnamon sugar
Glaze:
½ c. powdered sugar
1-2 T. milk
½ t. vanilla
Preheat oven to 350 degrees. Melt butter and pour into a 9-by-13-inch glass baking dish. In a small bowl, mix together the egg, half and half, flour, sugar, baking powder, cinnamon, vanilla and salt. Pour directly over the butter in the baking dish, but do not stir. Drain pears well. Add the pears, arranging in a single layer as much as possible. Sprinkle cream cheese pieces over fruit. Place in preheated oven and bake for 45 minutes, or until top is golden brown and edges are bubbling. When you remove the cake from the oven, sprinkle with the cinnamon sugar. Set cake aside to cool. Make glaze by combining glaze ingredients. Add just enough milk for a nice consistency for drizzling. Drizzle over cooled cake. Store leftovers in fridge. Serves 12.
* To keep pears from discoloring place in a bowl with 2 cups of water and 2 tablespoons lemon juice
Baked Eggplant

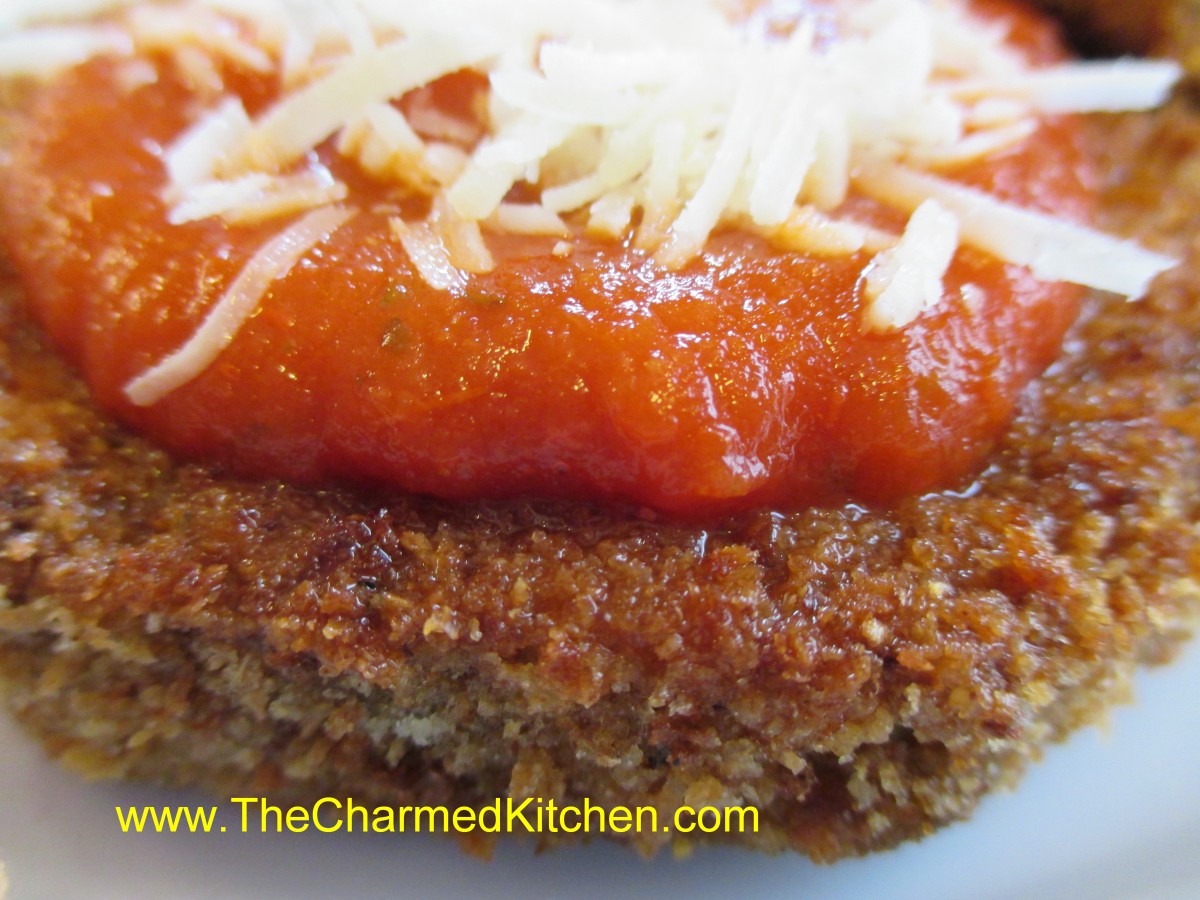
Baked Eggplant
I love eggplant prepared in a lot of different ways. I must say, this preparation is one of my favorites. I think it is because it reminds me of my parents.
My mother used to bread and bake eggplant this way. My dad loved it- and he was not a big eggplant fan. I guess pretty much anything tastes better when breaded. She would top the eggplant with some cheese and sometimes with some marinara sauce.
I cut the eggplant in slices, but you could also cut them in strips and serve like French fries, if you prefer.
One of the problems with eggplant is about how much oil it will absorb when cooking. If you fry these slices in a skillet- they will soak up the oil like a sponge. I prefer to bake the eggplant, with a drizzle of oil. They come out crispy, but not greasy.
They make a nice side dish or even main dish. I topped mine with fresh tomato sauce and Asiago cheese. Mozzarella was what my mom used. I often use Parmesan cheese or a Pecorino Romano.
Baked Eggplant
1 large eggplant or 2 medium
salt
1 egg
1/2 c. milk or half and half
pepper
1 T. Tuscan seasoning* recipe follows or use another blend of Italian herbs
1 t. garlic powder
about 1 cup of bread crumbs
1/2 c. oil
1/2 c. Asiago cheese, or more
Peel and slice eggplant. Place in a large bowl and sprinkle generously with salt. Let sit for 20 minutes. Drain, rinse and pat dry. Prepare egg wash by mixing the egg with the milk or half and half, pepper, a little more salt, Tuscan seasoning and garlic powder. Place in a shallow bowl. Place bread crumbs in another shallow bowl. Preheat oven to 400 degrees. One slice at a time, dip eggplant in egg wash, then in the bread crumbs, turning to coat evenly. Place on a baking sheet. Repeat with remaining eggplant. Drizzle with the oil and bake for about 25 minutes. Turn slices after 15 minutes and continue baking until eggplant slices are golden brown and tender. Sprinkle with cheese and return to oven for 5 minutes longer. Serve as is, or with a marinara sauce. Serves 3-4.
*Tuscan Seasoning
½ c. dried basil
½ c. dried oregano
½ c. dried marjoram
3 T. dried minced onion
2 T. dried minced garlic
2 T. dried rosemary
2 T. dried parsley
1 t. crushed red pepper
Apple Crumb Cake

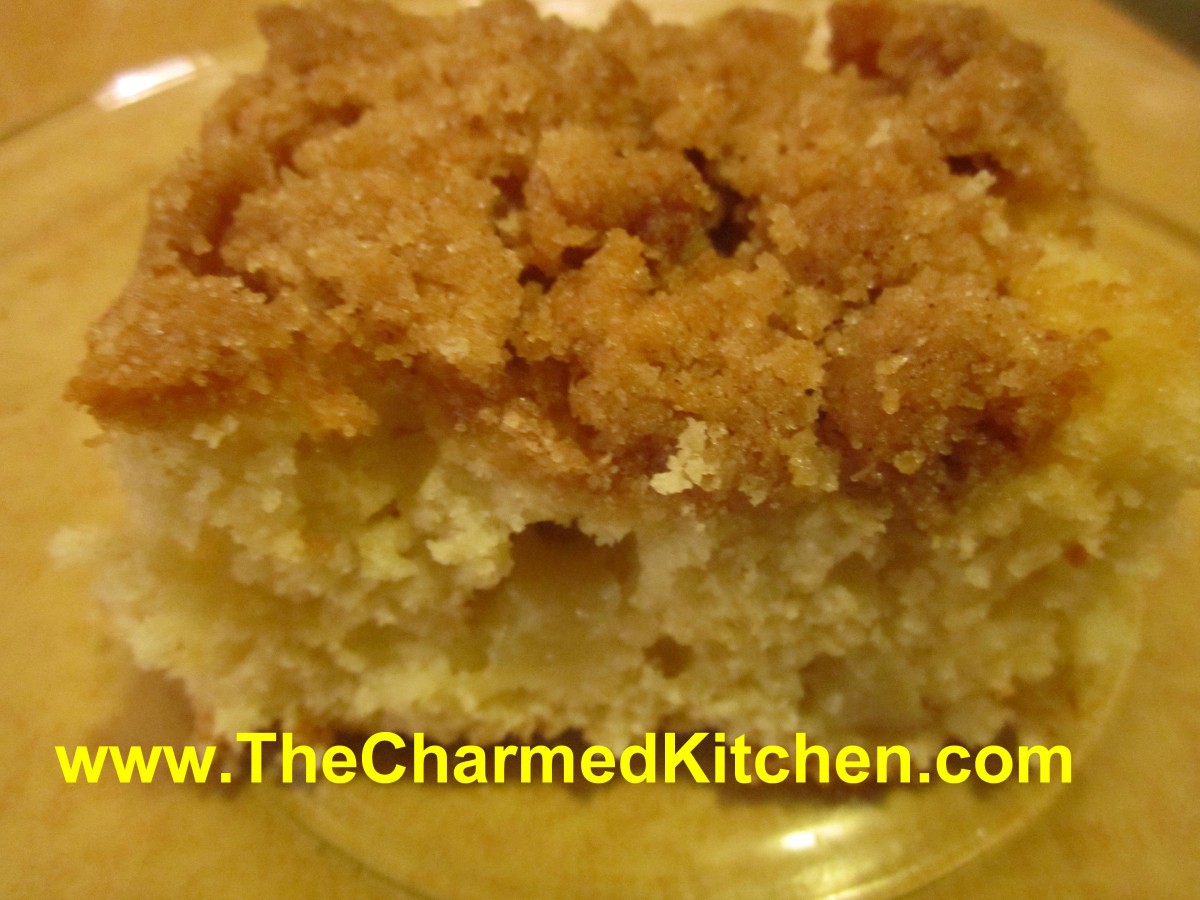
Apple Crumb Cake
I love apple season. I will go to local farm markets and orchards several times, picking out different varieties. Several of my favorite varieties won’t be around until October, but there is a great selection already.
I eat plenty of them fresh, but I also cook with them. This is one of my favorite apple recipes.
The tender cake and crunchy topping seem like the perfect combination. Most days I would rather have a crumb topping on a cake than frosting. This recipe hits all the right notes. Sweet with apple chunks throughout, a nice touch of cinnamon and that crunchy topping that I love.
Apple Crumb Cake
For cake batter:
2 c. flour
2 t. baking powder
½ t. salt
½ stick (¼ cup) butter, softened
¾ c. sugar
1 egg
½ c. milk
2 c. chopped peeled, cored apples
For topping:
½ c. sugar
¼ c. flour
2 t. cinnamon
½ stick (¼ c. butter, chilled and cut into bits)
Combine dry ingredients and set aside. In mixing bowl with electric mixer, beat butter and sugar until light and fluffy. Beat in egg and milk. Add flour mixture gradually until just mixed in. Fold in apples. Grease and flour an 8 or 9-inch pan and add prepared batter. Combine topping ingredients until they resemble coarse crumbs. Sprinkle over the batter in pan and bake in a preheated 375-degree oven for 35-45 minutes. Use toothpick to test.
Note: I used a 9-inch square pan and it worked fine.
Kahlua Chocolate Bars

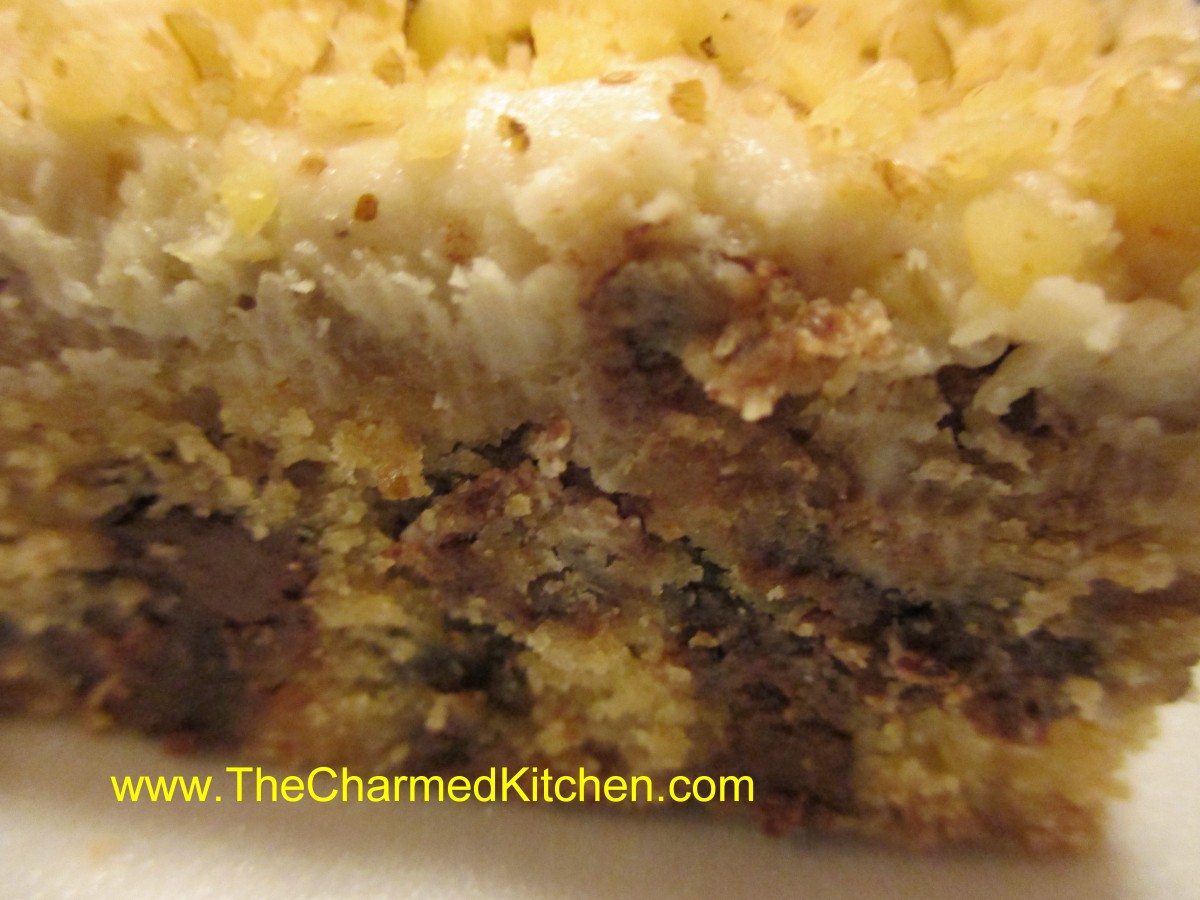
Kahlua Chocolate Bars
I taught a class on making homemade liqueurs last night. Everyone had a chance to taste a number of different liqueurs.
We also cooked with some of them. One of the recipes we had were these decadent Kahlua Chocolate Bars. These yummy treats are brownie-like in texture, studded with nuts and chocolate chips and full of Kahlua flavor. There is Kahlua in the batter, Kahlua brushed over the squares after baking, and Kahlua in the brown butter frosting.
These are definitely a treat for the grown-ups in the family.
Kahlua Chocolate Bars
1 ¼ c. all purpose flour
¾ t. baking powder
½ t. salt
½ c. butter, softened
¾ c. packed brown sugar
1 egg
¼ c. coffee liqueur
1-c. chocolate chips
1/3 c. walnuts
1 T. coffee liqueur (for tops of bars)
Brown butter icing
2 T. butter
1 T. coffee liqueur
2 t. milk
1 1/3 c. powdered sugar
Walnut halves or chopped walnuts
Combine dry ingredients and set aside. In large bowl cream butter and sugar until light and fluffy. Beat in egg then stir in liqueur, then flour mixture. Fold in chips and nuts. Turn into greased 7×11 inch pan and even out. Bake in a 350-degree oven for about 30 minutes. Top should spring back when touched lightly. Cool in pan 15 minutes then brush with remaining liqueur. When cool spread with brown butter icing and top with nuts. Makes 24 bars.
To make icing:
Brown butter in small saucepan. Do not burn. Remove from heat and beat in remaining icing ingredients. Spread on bars. Allow frosting to set up before cutting.
Apple Pie Blintzes


Apple Pie Blintzes
Since I posted the recipe for making your own apple pie filling recently, I thought I’d share a fun way to use it- other than in a pie. I made blintzes with the pie filling.
I used flour tortillas for the crepes. Don’t get me wrong, I love making real crepes. But, when you don’t have the time, the tortillas are a fun and tasty substitute.
I soaked the tortillas in milk – actually I soaked them in almond milk because that is what I had- but you could use regular milk if you prefer. By soaking the tortillas in milk, they soften up and can be used like a crepe. Soak them for at least 10 minutes, or up to 30 minutes. I placed the tortillas in a shallow baking pan and made sure to drizzle each one with almond milk as I added them to the pan.
For the filling, I used some of my homemade apple pie filling. If you have fresh apples, you can just peel and slice the apples, then cook them in a little water and sugar until softened. You can make them as sweet as you like. You made need less sugar if the apples are extra sweet. Add some cinnamon and nutmeg, too. If they are too watery- combine a little cornstarch with cold water and drizzle the mixture in until the apples thicken up. Don’t add too quickly or you might them too thick and gummy.
To assemble the blintzes, place a softened tortilla on your work surface and spoon a little apple filling in the middle. You can do this with hot filling, or even make the filling ahead of time and use it cold. Don’t over fill them or you won’t be able to fold them up. I used 8-inch tortillas and used about 1/4 cup of filling for each one. Fold the sides in until they almost meet in the middle and them roll the tortilla up to cover the filling. Place seam side down until ready to fry them.
Heat butter in a skillet, and brown the blintzes over medium heat until lightly toasted on both sides. They will be crispy on the outside, but tender in the middle. Put on a serving plate, sprinkle with powdered sugar and serve while warm. These are fine just as they are, but feel free to add ice cream or whipped cream, too.
My guestsreally liked them and said they did not realize they were made from tortillas. I have made these before and use different fruit fillings. I’ve even made a cheese filled version a few times. It seems I usually have a package of tortillas, so it is a go-to dessert for me in a pinch.


