Feed the Birds

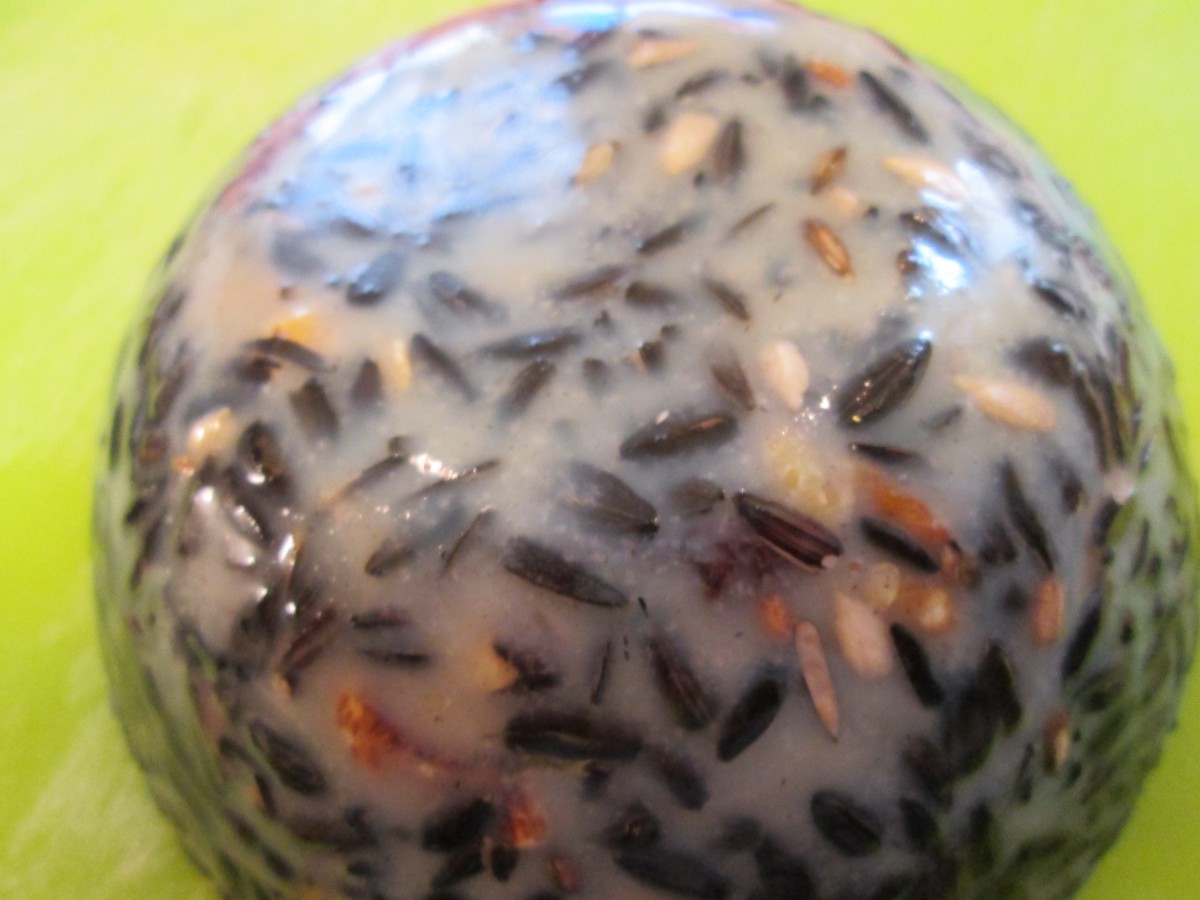
Suet/seed bowl for the birds
With cold weather it’s a great time to fill those bird feeders. Times are hard for them in cold weather. I have been feeding birds my whole life. I have fond memories of building a bird feeder with my dad when I was just a kid. Over the years I’ve fed the birds all sorts of things but I find myself most often going for black oil sunflower seeds. They are a favorite food for many birds. You can also make them a special high-fat treat for extra cold days. I melted together some suet and then combined black oil sunflower seeds with some nuts and raisins. I put the mixture in little bowls to harden. Once firmed up I dipped the bottom of the bowls in hot water for a few seconds to loosen the mixture. I then placed the suet blocks in old onion bags for easy hanging. Here are some other bird-friendly recipes.
Bird Pudding
1 c. melted suet or shortening
1 c. sugar
5 c. water
2 c. cornmeal
1/2 flour
2 c. cold water
1 c. raisins seeds or nutmeats
Bring fat, sugar and water to the boil and remove from the heat. Stir in the cornmeal and flour and stir until smooth. Add cold water and raisins, seeds or nuts, stirring until mixed well. Pour in loaf pan and store in fridge. Place slices of the pudding on feeding trays. Note: this is a cold weather treat.
Songbird Muffins
1 c. each cornmeal, whole wheat flour and bread crumbs
1/2 t. baking soda
3/4 c. dried fruit, like raisins or currants
1/2 c. rendered suet or shortening
1 c. water
Combine dry ingredients in a bowl and stir in fruit. Add fat and water and stir to combine. Spoon into greased muffin tins and bake at 350 for 15 minutes. Place muffins on feeder trays or stick on branches.
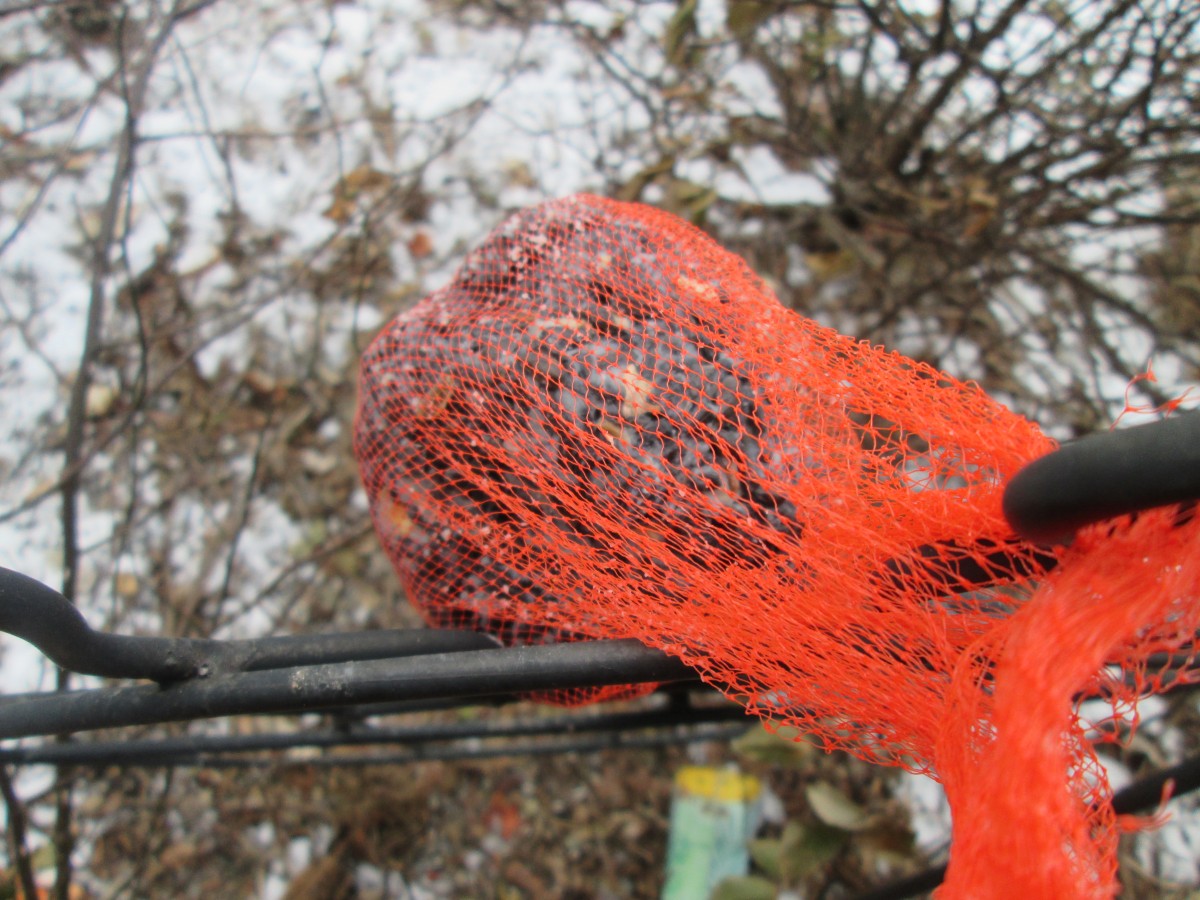
Hang suet mixture in a mesh bag
Favorite Cooking Gadget / Tool


Mouli Julienne
I will confess to having a lot of cooking tools and gadgets. I’m not talking about the basics all kitchens need like good knives and pots and pans. I am talking about an assortment of tools for very specific tasks. While I have not succumbed to buying the banana slicer yet I do have a few of the “as seen on TV” items. Some were worth the money but most end up in a cabinet somewhere almost never used or slated for donation or garage sale status. Still, there are some gadgets I could not be without. Pictured is one of them. It’s a clever device called a Mouli Julienne. Originally from France they are no longer made. My mother had one – hers was metal. By the time I was in the market for one they were made of plastic. Before food processors were around this simple device, with an assortment of different blades, made it easy to shred and grate all sorts of foods. I love it when I have a lot of hard cheeses to grate. Great for shredding veggies, too.
Why do I still use it? I have several food processors. Certainly easier to use one of them. Maybe it’s out of habit or a certain sentiment because I remember using one as a kid. But I think because, as with any good tool, it is a pleasure to use. It may have gone by the wayside and fallen victim to newer and better devices but for me it is a good tool. Simple and easy to use and I am saddened that they aren’t made anymore. Maybe I am a dinosaur- I still prefer a non-electric can opener, too.
So what tools are your favorites? What gadget could you not be without?
Chicken with Lemon Sauce

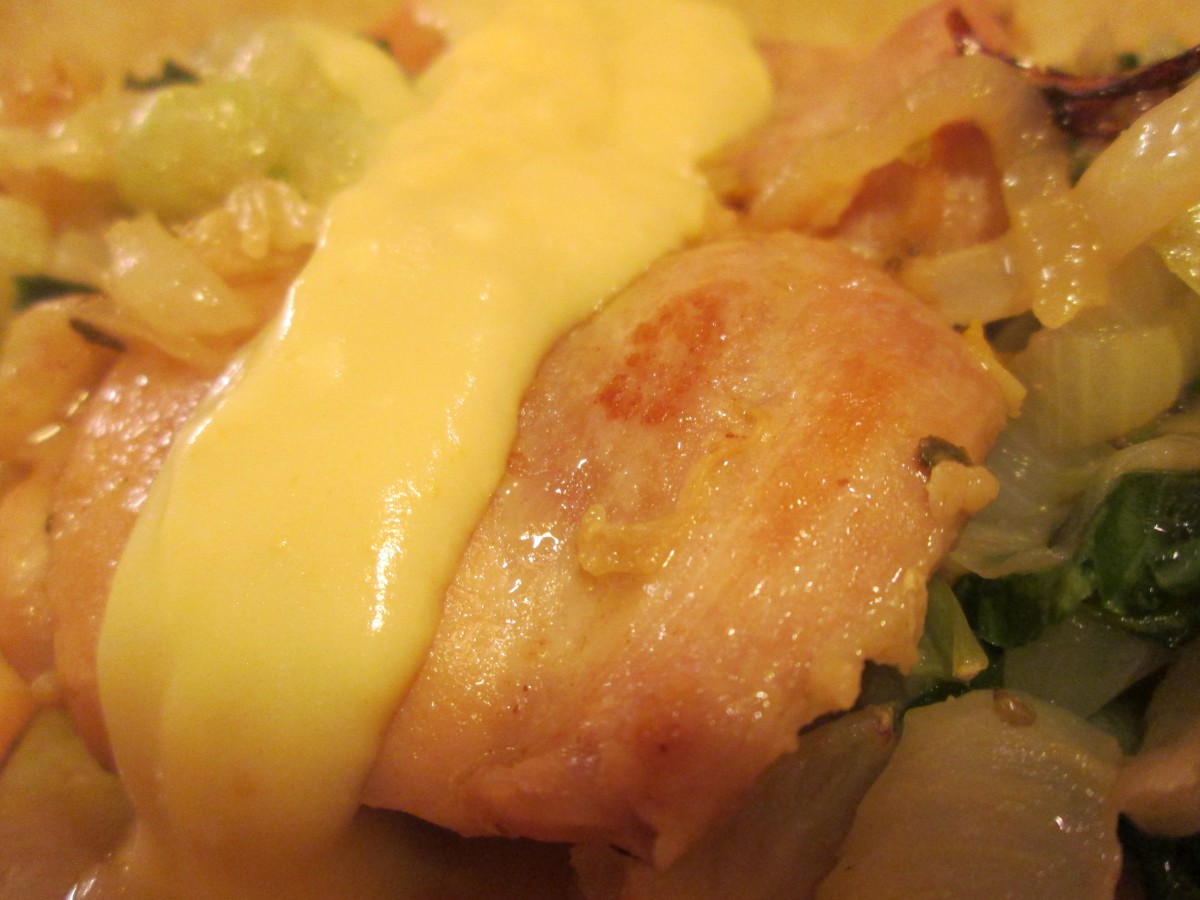
Chicken with Lemon Sauce
I did a cooking class yesterday and made lamb with lemon sauce. I loved it and wanted to make some when I got home- but alas I didn’t have any lamb defrosted. I also didn’t have the romaine lettuce the recipe called for. Part of the trouble with not going to the grocery store is having to swap our ingredients sometimes. I decided to swap out a few things and the end result was quite nice. I used boneless chicken thighs in place of the lamb and a combination of shredded cabbage and baby bok choy for the romaine lettuce. Frankly, I love the lemon sauce so much pretty much anything I served it with was going to taste pretty good.
Here is the lamb recipe with my substitutions noted. Since I had boneless thighs I didn’t have to cook the dish as long, probably simmered it for 30 minutes in total.
Fricassee of Lamb with Lettuce
2 1/2-3 lbs. lamb shoulder, or use pork- I used boneless chicken thighs
3 medium onions, chopped
2-3 heads romaine lettuce, washed and sliced thin- I used 2 c. shredded cabbage and 2 heads of baby bok choy, sliced
1/2 c. olive oil
Egg and Lemon Sauce -recipe follows
Cut the meat into serving pieces. Heat the oil in a pot and sauté the meat. Add salt, pepper, the onions, lettuce and a small amount of water. Cover the pot and let the fricassee simmer for about an hour. Prepare the egg and lemon sauce, pour it over the fricassee and serve.
Egg and Lemon Sauce
1-2 c. stock
2 eggs
juice of 1 lemon
flour, about 1-2 tablespoons, depending on how thick you want the sauce
Bring stock to the simmer. Beat eggs well. Mix the flour with the lemon juice.
Add to the eggs and keep beating. Add the hot broth slowly while you keep beating. Pour the egg and lemon sauce in the pot and bring to a simmer, stirring constantly. Makes 1-2 cups. For a thinner sauce eliminate the flour.
Roasting Peppers

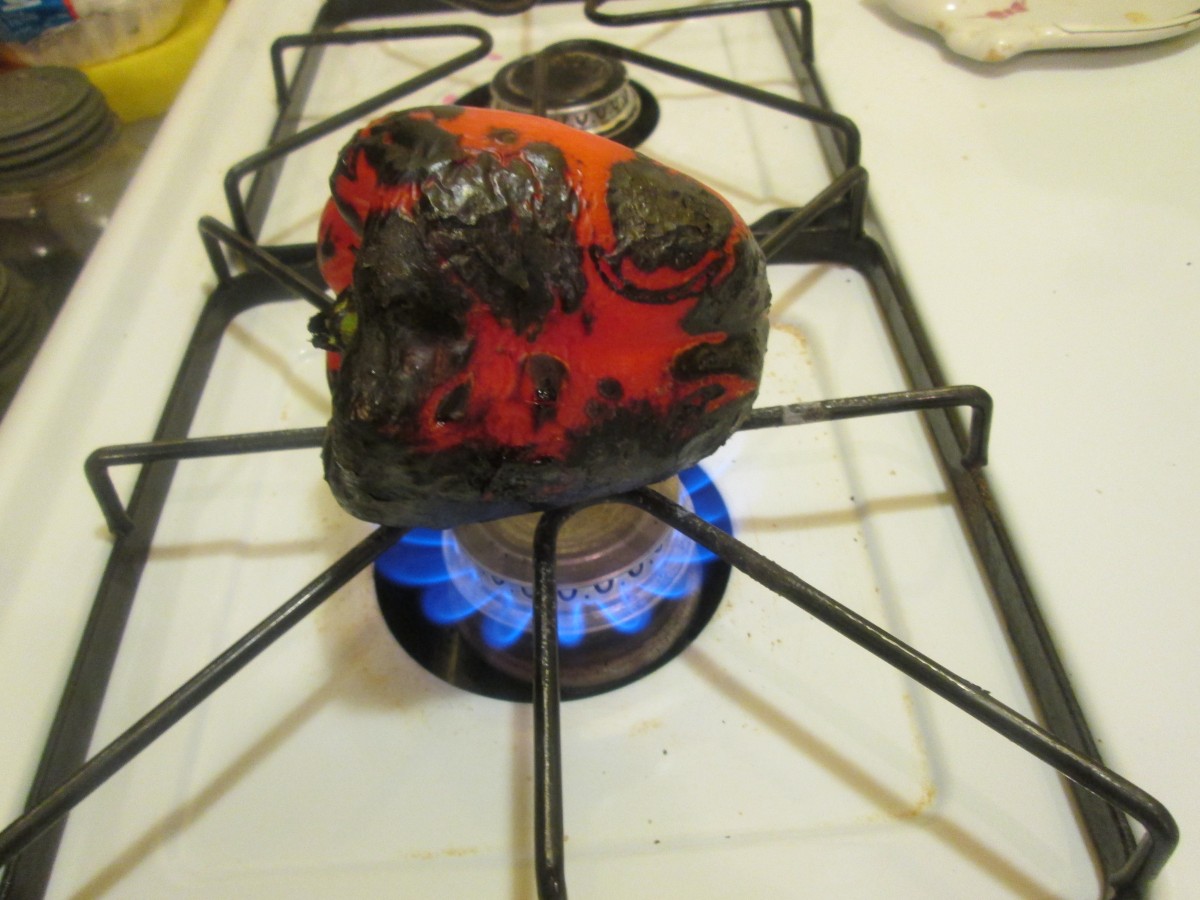
Roasting Peppers
I love the flavor of roasted peppers. They add a nice smoky flavor to many dishes from salads to soups. I made this one to use in a Greek salad. If you haven’t roasted peppers before I encourage you to try it. Since I have a gas stove I just place the pepper right on a burner and turn the burner on medium. Turn the pepper, using tongs, until the pepper it charred on all sides. I know- it doesn’t look appetizing, but trust me the flavor will be terrific. After the pepper is all blackened take it off the heat and roll in up in paper towels or place in a paper bag to steam. The steam will help to loosen the skin. Once the pepper is cool enough to handle just rub off the charred skin and discard. Seed and chop up the pepper and toss in whatever dish you are making. You can also take the seeded pepper and toss it in a blender with some herbs, salt and a little oil. Puree for a tasty salad dressing.
If you have an electric stove you can roast peppers under the broiler until charred, turning often or you can even roast peppers on the grill.
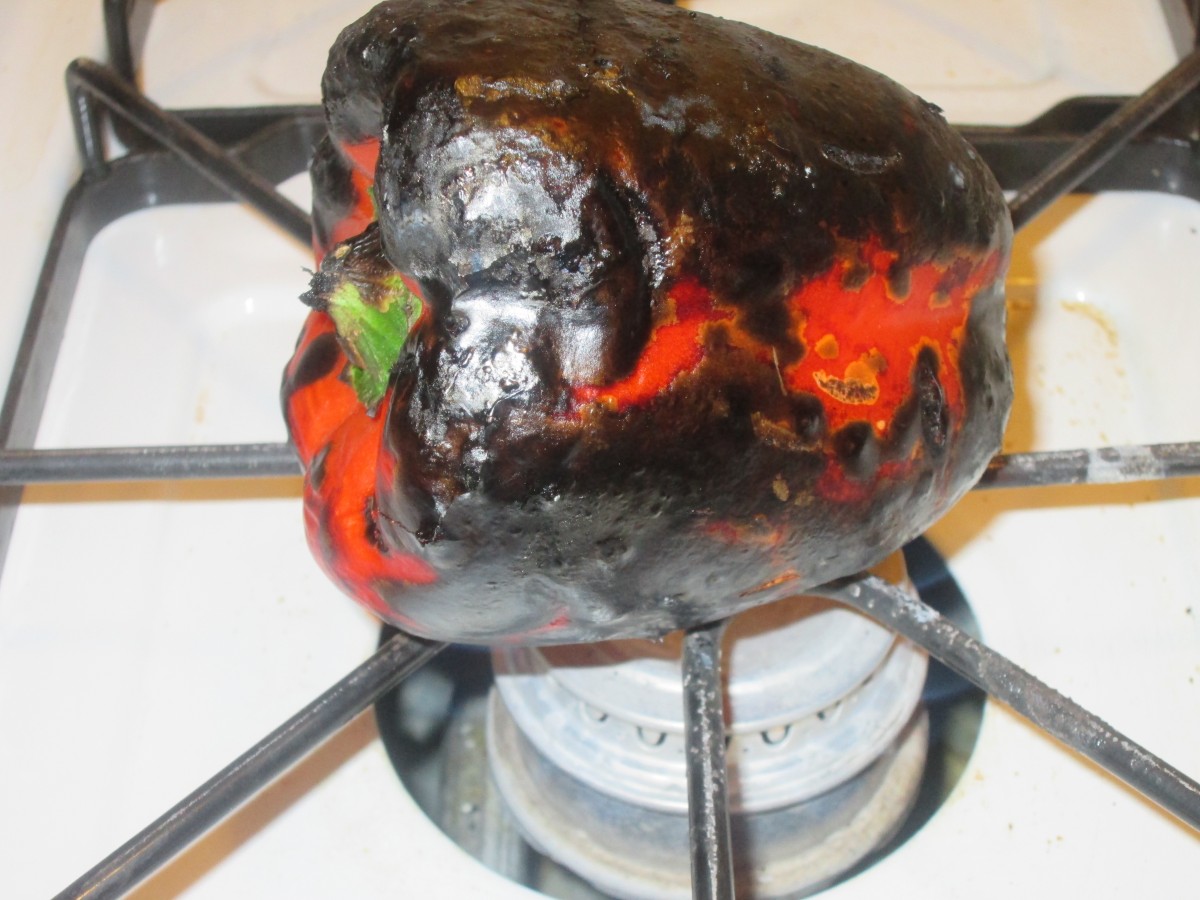
Cook until completely charred
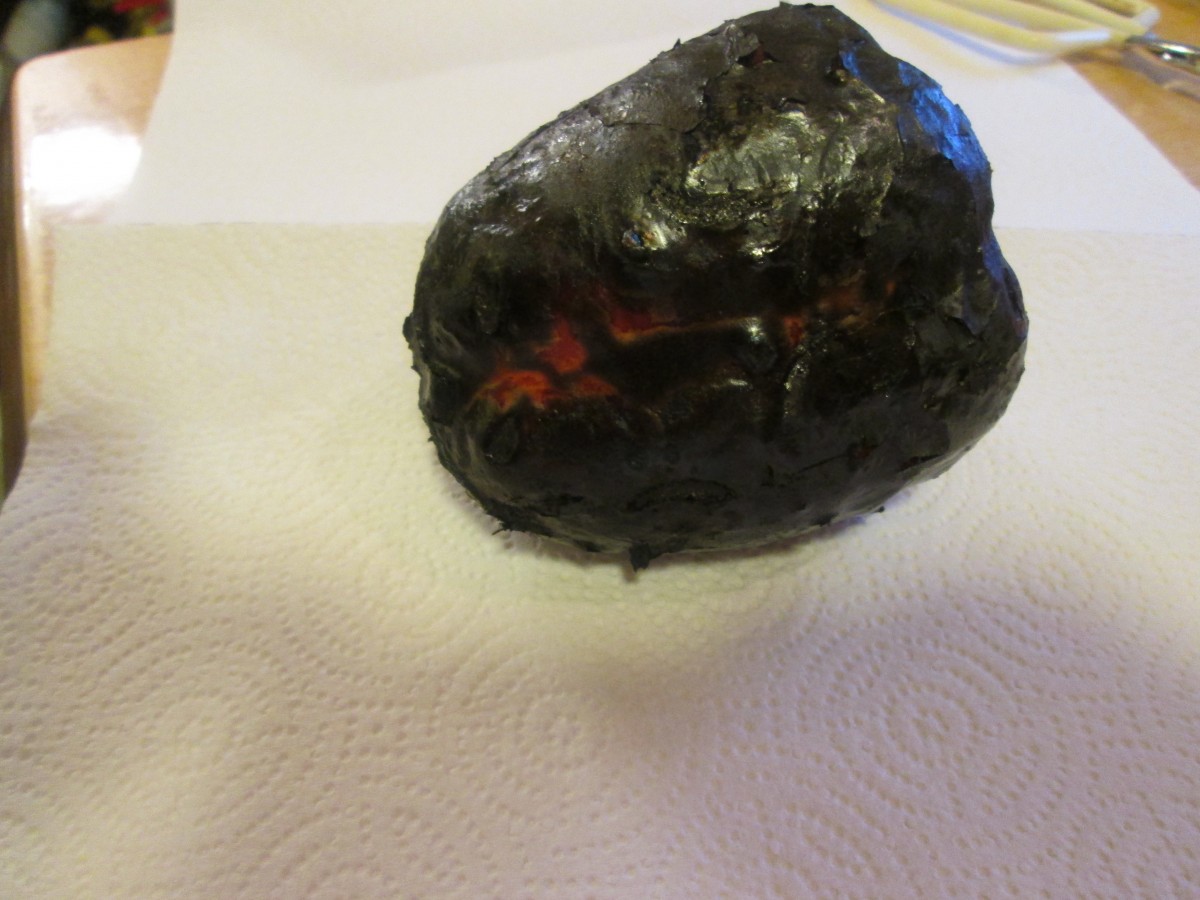
Wrap charred pepper in paper towels
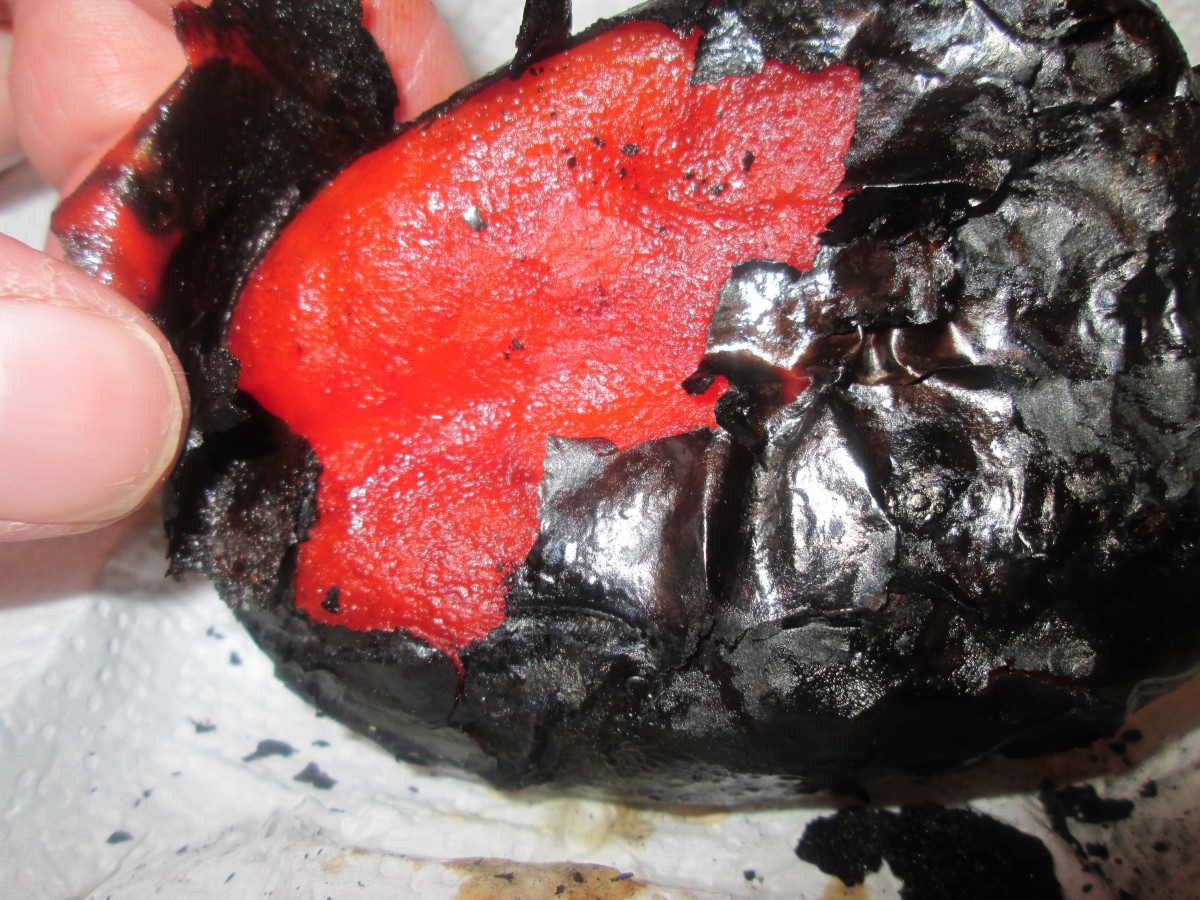
Once cooled, rub off the charred skin.
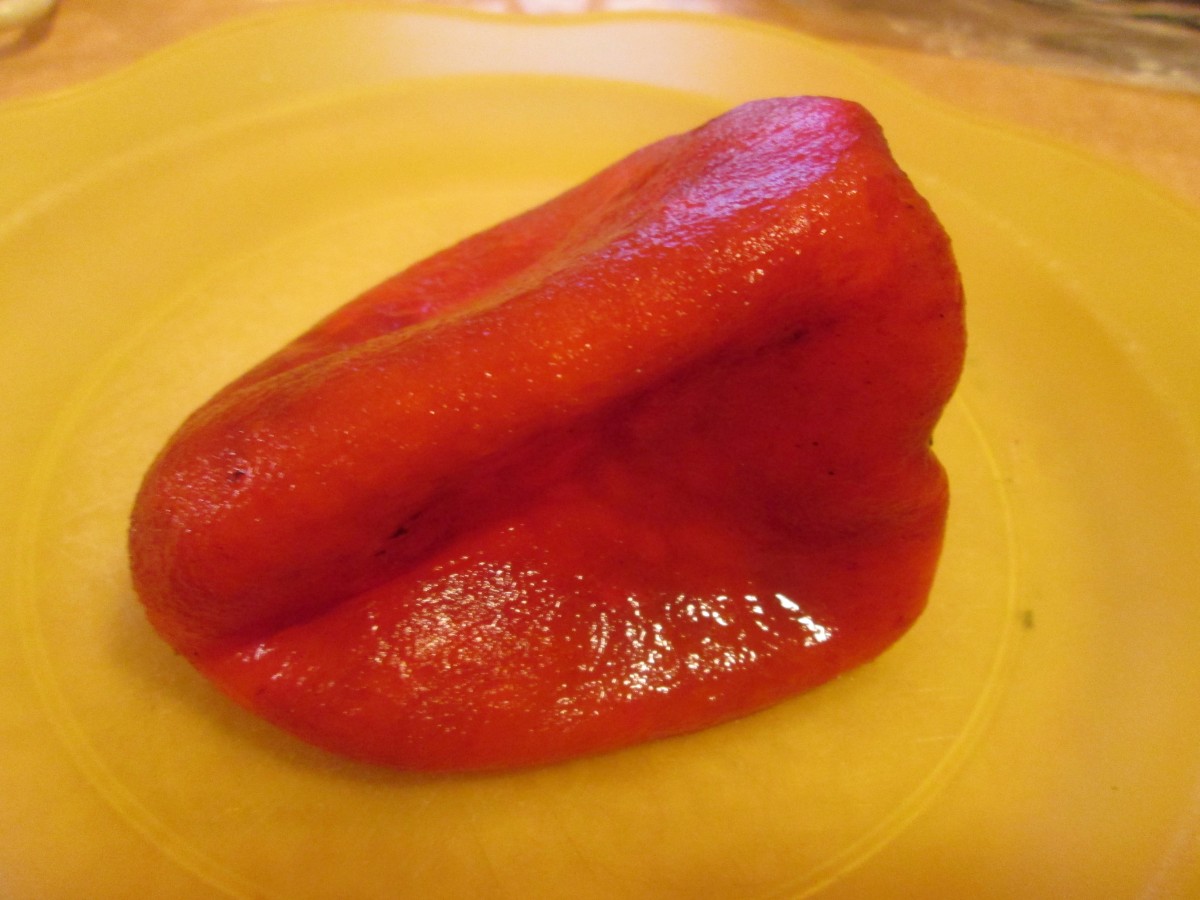
Cleaned and ready to use.
Creamy Baked Cheesecake

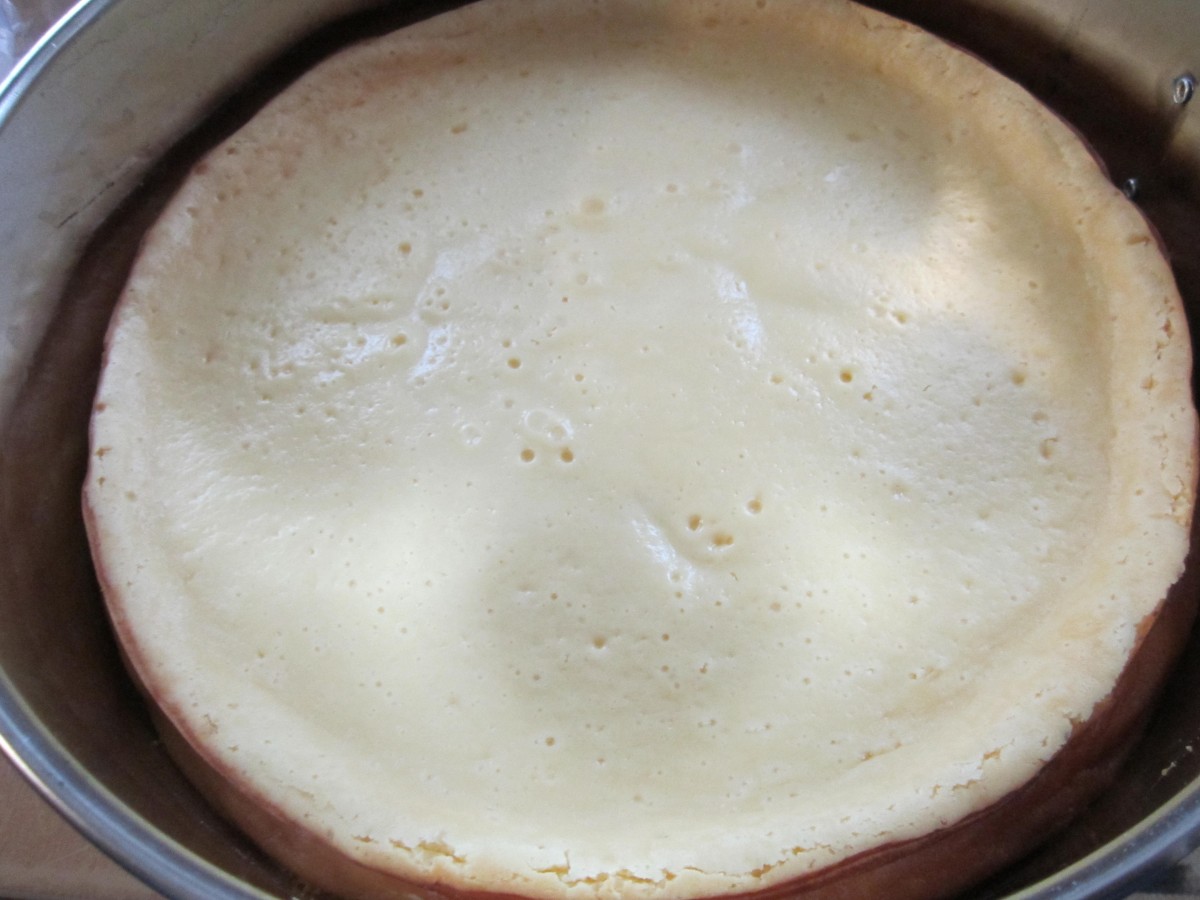
Creamy Baked Cheesecake
It’s one of our favorite desserts and for good reason. Cheesecake is rich and satisfying in a way no other dessert can be. I make a lot of different cheesecakes and this is one of my favorites. Simple to make and you can top it with any number of goodies to make it your own. If you get cracks in your cheesecake try buttering the pan first. It will help to prevent cracking. Also, don’t over mix the eggs. Just stir them in.
Creamy Baked Cheesecake
1/3 c. butter
1 ¼ c. graham cracker crumbs
¼ c. sugar
2 (8oz.) packages cream cheese, softened
1 (14oz.) can sweetened condensed milk
3 eggs
¼ c. lemon juice
8 oz. sour cream
Preheat oven to 300-degrees. Combine margarine, crumbs and sugar and press firmly into the bottom of a lightly buttered 9-inch springform pan. In a large mixing bowl beat cheese until fluffy. Gradually beat in milk. Stir in eggs and juice and mix well. Pour into prepared crust and bake 50-55 minutes or until set. Cool completely then spread sour cream over the top.
Have you had your rocks today?


Blackberry Cinnamon Muffins
Did you think you were eating rocks? If you were eating any baked goods made with baking soda you were eating something that is mined from the earth. Baking soda is used in muffins, scones, cakes, cookies, pancakes and more. It is a common leavening agent and one of the ingredients in baking powder, too. Have you ever wondered where it came from? I did so I did a web search and this is some of what I found out.
We start our story with trona, a rock that is mined and then processed into all kinds of handy things. Trona is used to make something called soda ash (sodium carbonate). Soda ash is used to make glass, fiberglass, detergents, toothpaste and yes, baking soda.
Wyoming has the largest trona mine in the world.
Baking soda (sodium bicarbonate) is made by adding CO2 to soda ash (sodium carbonate).
5,000 years ago, the Egyptians used soda ash for glass ornaments and vessels. They found the sodium bearing mineral in dry lake bed deposits, or burned seaweed that produced ashes that contained soda ash (thus the name ash).
In the 1st century, the Romans used soda ash for bread, glass, and medicine.
Detergents· Soaps, detergents, and cleaning compounds- soda ash is used as a builder to emulsify oil stains, to decrease the redeposition of dirt during washing and rinsing, to provide alkalinity for cleaning, and to soften laundry water. Liquid detergents do not contain soda ash.
In areas of Africa, Trona (called kanwa) is an important domestic culinary additive, used for softening, tenderizing, and flavoring foods in addition to being a food preservative.
Water treatment – soda ash can be added to adjust the pH of the water and reduce the acidity. It can also be used as a precipitant with lime or alum to reduce various contaminants from the water.
Swimming pool products, medicines, paper, textiles, and toothpaste all use soda ash.
So this concludes our little food science lesson for today. I hope you enjoyed learning about baking soda as much as I did.
The Challenge- Leftover Soup

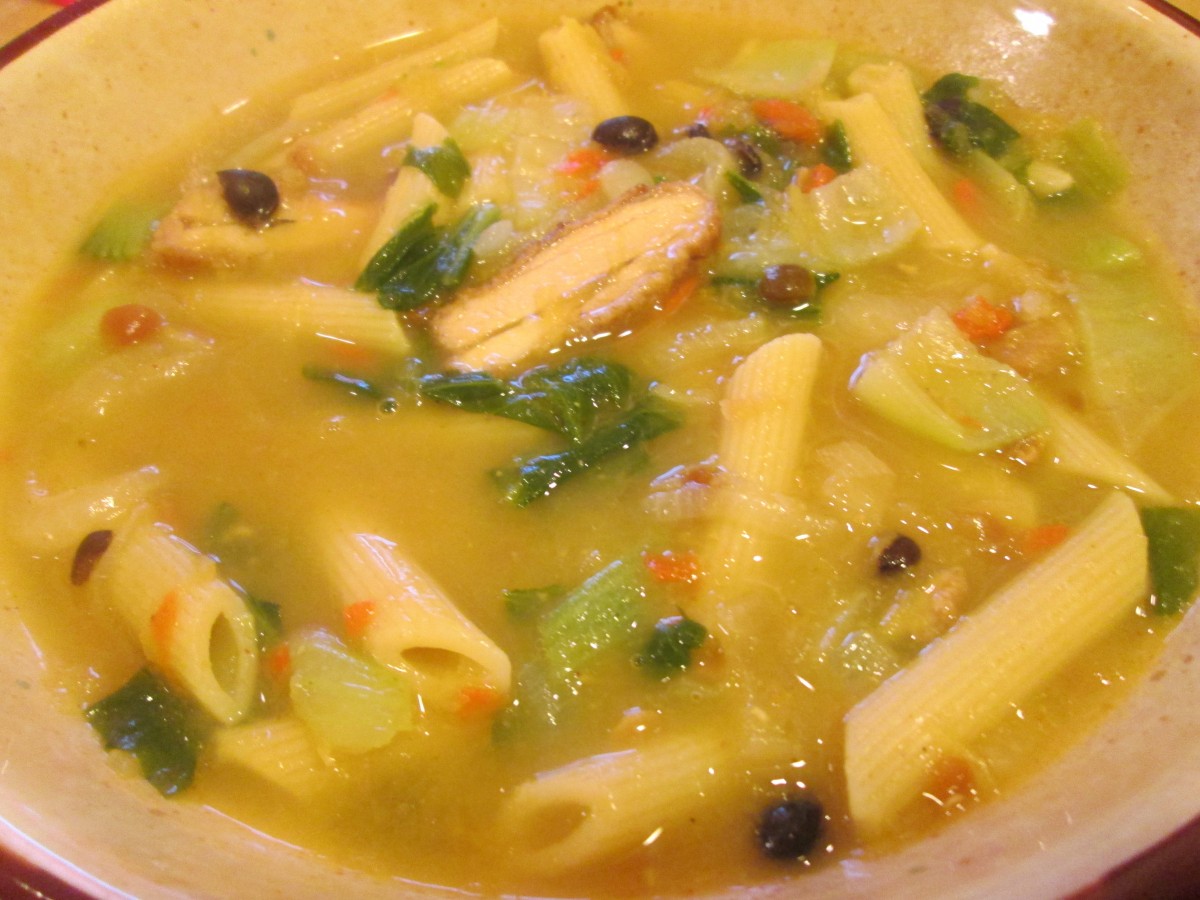
Leftover Soup
Since I have made the commitment to not go to the grocery store I have become more aware of wasting food. I try to use as much of what I have and to throw out as little as possible. I am pretty good about using or preserving fresh food. Leftovers can be problematic. I was in the mood for soup last night as the snow flew outside of my window. I had no idea what kind of soup to have so I went looking in my fridge. I had stock but I needed to find something to put in the stock. I managed to find some cooked beans, a little leftover chicken, some pasta and baby bok choy. The end result was a wonderful, satisfying batch of soup. I could never make the exact same thing again, but that is OK. I liked it and the next time I make leftover soup I’ll probably like it, too. I think that may be my weekly routine for a while. I’ll clean out the fridge and use the leftovers to make soup. The nice thing about leftover soup is that the more stuff you have the better it gets.
Dehydrating Vegetables

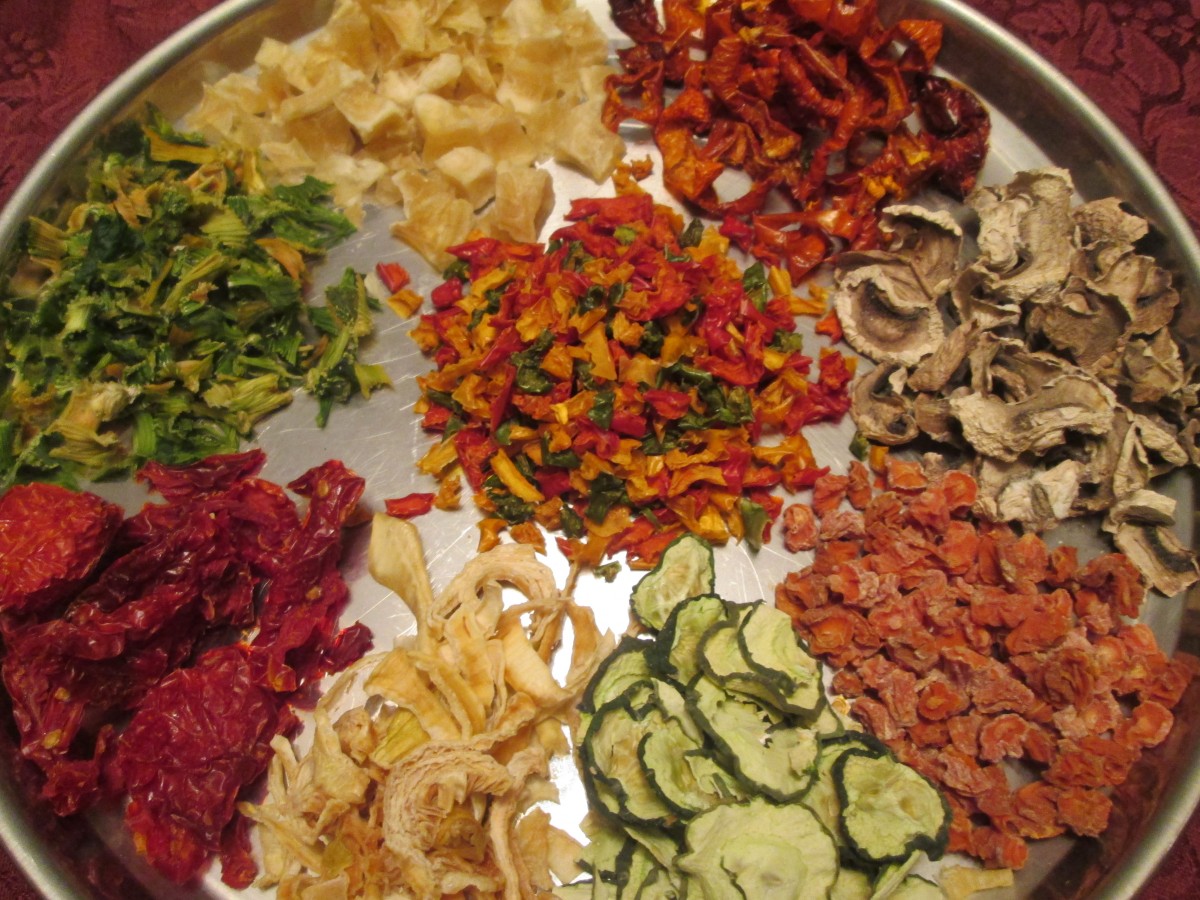
Dried Vegetables
While I love canning I also preserve a lot of food by dehydrating it. Once you get over the initial investment in a dehydrator the cost to dry food and to store dried food is pretty minimal. Dried fruits are probably the most common home dried foods. Apples, grapes, pineapple, strawberries and cherries are among my favorites. But the dried vegetables are so useful and versatile I think I enjoy them even more than dried fruits.
Drying Vegetables
Most vegetables should be dried at the lower range if you have an adjustable thermometer on your dehydrator-around 125-degrees. The big thing to know with vegetables is that some of them need to be blanched first. Blanching is just steaming the vegetables for a few minutes and draining, if needed, before drying. Blanching kills certain enzymes, prevents browning and assures a better end product.
Vegetables that need blanching include green beans, cabbage, carrots, potatoes, greens, winter squash, corn and beets; this is not a complete list, but a good start.
Vegetables that do not require blanching include onions, celery, mushrooms, peppers, tomatoes, spinach, zucchini, cucumbers and garlic and also herbs.
Broccoli and cauliflower do not dehydrate well.
Tomatoes are probably the best vegetable to dry for the home gardener and cook. They are so easy to make and so tasty. Just cut plum tomatoes in half and scoop out the seeds. Lightly spray the trays with non-stick spray and place the tomatoes cut side up for the first 12 hours. Turn them over after that until they are dried. I like them pretty crispy, but keep them in the freezer to keep their color and flavor longer. After a year they will turn black if stored at room temperature. Larger tomatoes can also be dried. Just cut them in slices and squeeze out the seeds. Cherry tomatoes are just cut in half and squeezed to get out the seeds. With small cherry tomatoes I just make a cut large enough to get out the seeds and leave them whole.
How do I use them?
Veggie chips-zucchini and cucumber slices can be used instead of chips in dip.
Powders- Tomatoes, celery, onion, pumpkin and garlic can all be powdered and used to flavor soups, stews sauces, cheeses, dips and more.
Reconstituted as fresh- potatoes in casseroles are wonderful.
Dips- Peppers, onion and celery all add great flavor.
To thicken sauces- Shredded zucchini, peppers, onions celery and tomatoes all work well this way.
Soups and Stews- most any dried vegetable is most often used this way. Easy to just let them simmer together until tender and all their flavors will enrich your stock
Chowders- Corn and potatoes are great in these dishes
Dried vegetables are best stored in a cool, dry place- I often freeze them for best shelf life.
Vegetables in photo: Starting left with bright green and going clockwise: Celery, potatoes, red peppers, mushrooms, carrots, cucumbers, onions and tomatoes. In the center- mixed sweet peppers.
Cranberry Roll-ups

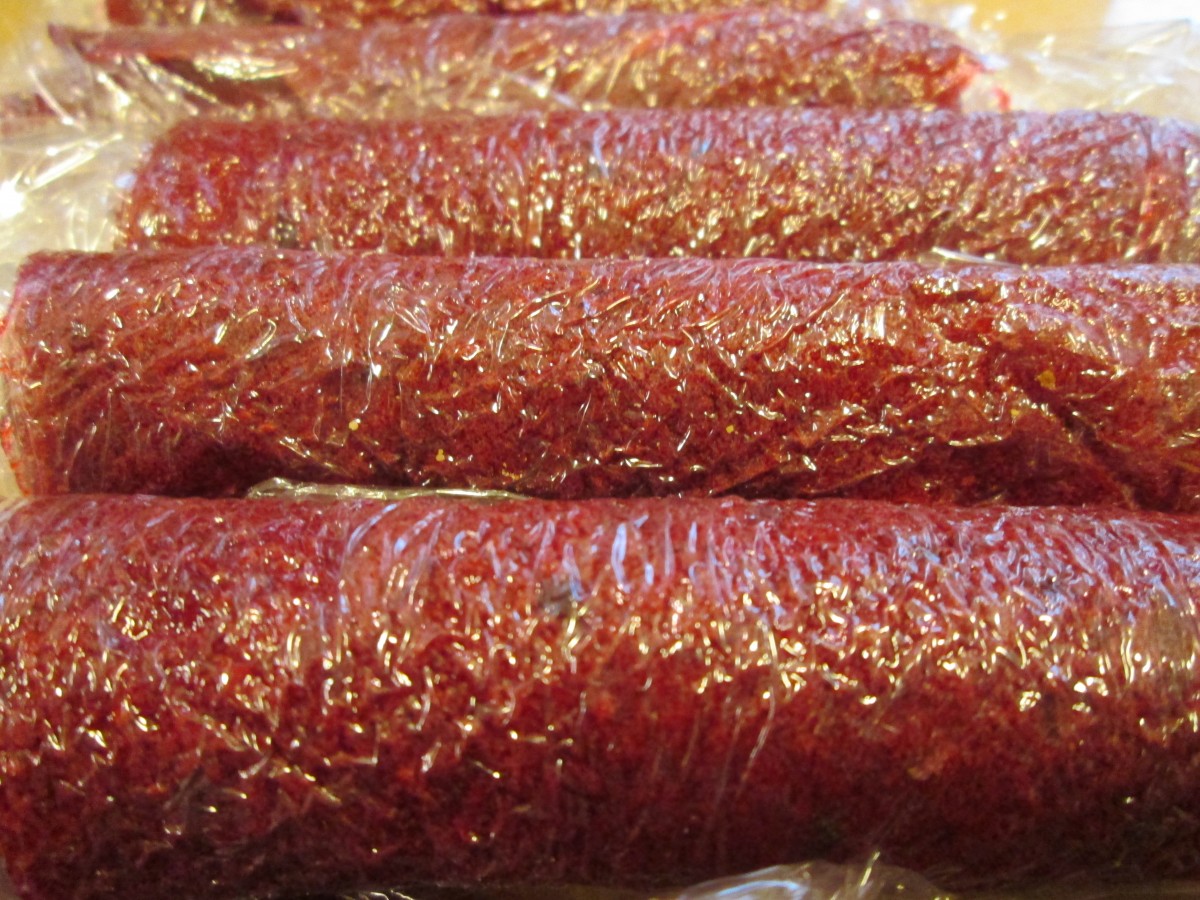
Cranberry Roll-ups
After making cranberry juice I was left with a lot of pulp. I didn’t want to toss it so I decided to make cranberry fruit roll ups with it. I ran the pulp through the coarse blade of my food mill. I then sweetened just a little- less than a cup of sugar. I then spread the mixture on plastic wrap placed on the trays of my dehydrator. I ended up with 7 in the end. I dried them at 120 degrees for 6 hours. They should be pliable but not sticky to the touch when done. A couple of friends stopped over today and they got a chance to taste them. Both said they liked that the roll ups were not too sweet- they had a nice tartness to them. Once finished I rolled them up in the plastic wrap and will store them in the fridge.
Homemade Cranberry Juice

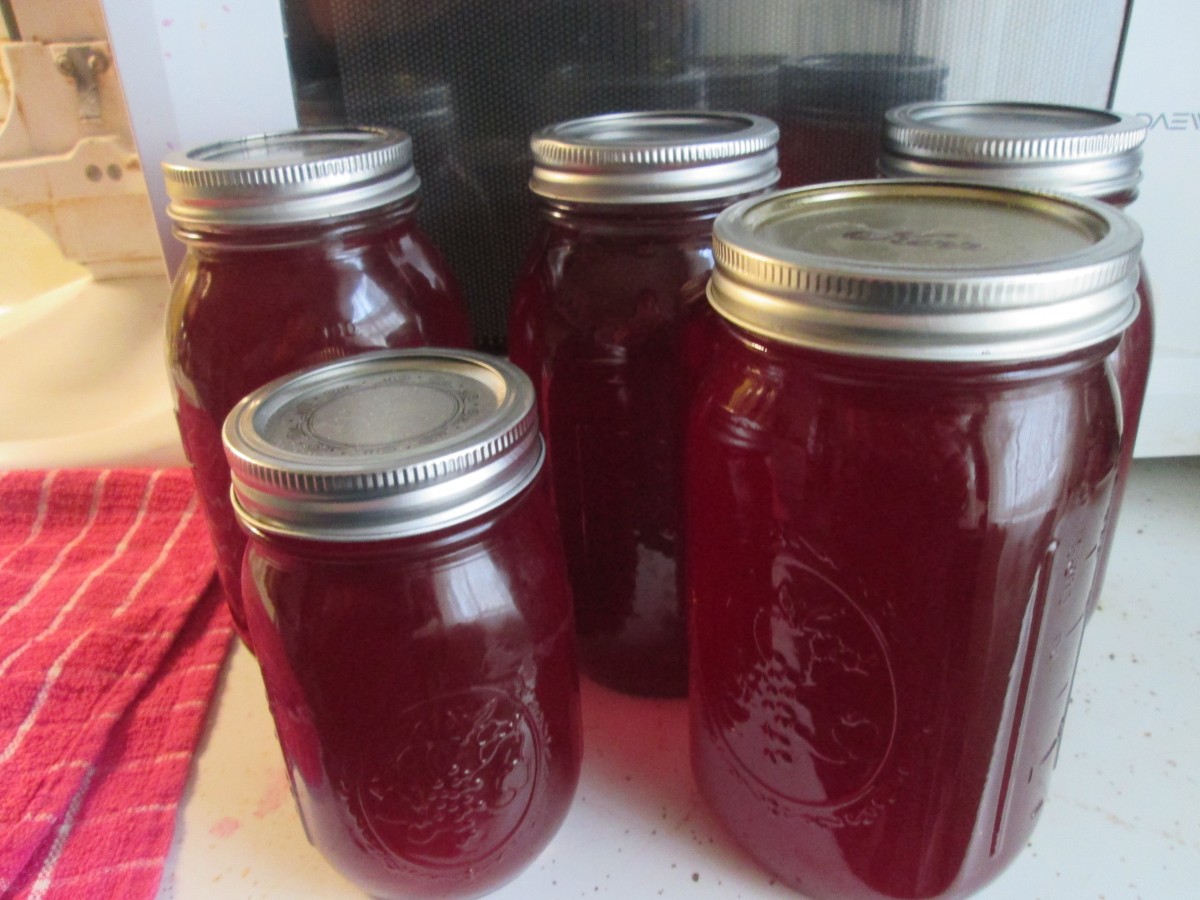
Cranberry Juice
I bought quite a few bags of cranberries right after Thanksgiving and popped them in the freezer for later use. Decided to make cranberry juice last night. The juice came out great. Nothing like store-bought. It was really easy, too. I started with 5 (12oz.) bags of cranberries. I measured them out and added the same amount of water- each bag was just under 4 cups of berries so I added 3 1/2 cups of water for each bag. I brought this mixture to a boil and let it cook until the berries starting popping. I strained the juice twice. First time through a fine strainer and second time through a strainer lined with cheesecloth. I returned the juice to the pot and brought it up barely to a simmer. To sweeten it I added 6 oz. of frozen apple juice concentrate and less than a cup of sugar. Once the juice was up to a simmer I let it cook 5 minutes and then ladled it into clean, hot quart canning jars. I filled them to about 1/4 inch from the top, wiped the rims and closed the jars. I also used the last of it to fill a pint jar. Processed in a boiling water bath for 15 minutes. Ended up with 4 quarts and 1 pint for my efforts. Don’t discard the pulp- you can make fruit roll ups with it.


