Chocolate Sparkle Cookies

These cake-like cookies are always a favorite in my house. They are full of chocolate flavor and easy to make. They have an almost brownie like texture. The sparkle comes from the sugar they are roll in just before baking. So if you are looking for a chocolate cookie for your holiday cookie collection- you might want to try these.
Chocolate Sparkles
1 c. butter, softened
1 ¼ c. sugar
2 eggs
2 oz. unsweetened chocolate, melted
½ t. vanilla
2 2/3 c. flour
2 t. cream of tartar
1 t. baking soda
½ t. salt
¼ c. sugar
Cream together butter and sugar. Beat in eggs, chocolate and vanilla. Stir in next four ingredients. Chill dough. Shape dough into 1” balls and roll in ¼ cup sugar. Place about 2 inches apart on ungreased baking sheet. Bake in a preheated 375- degree oven for 8-10 minutes. Makes 5-6 dozen.
Sweet Potato and Herb Biscuits
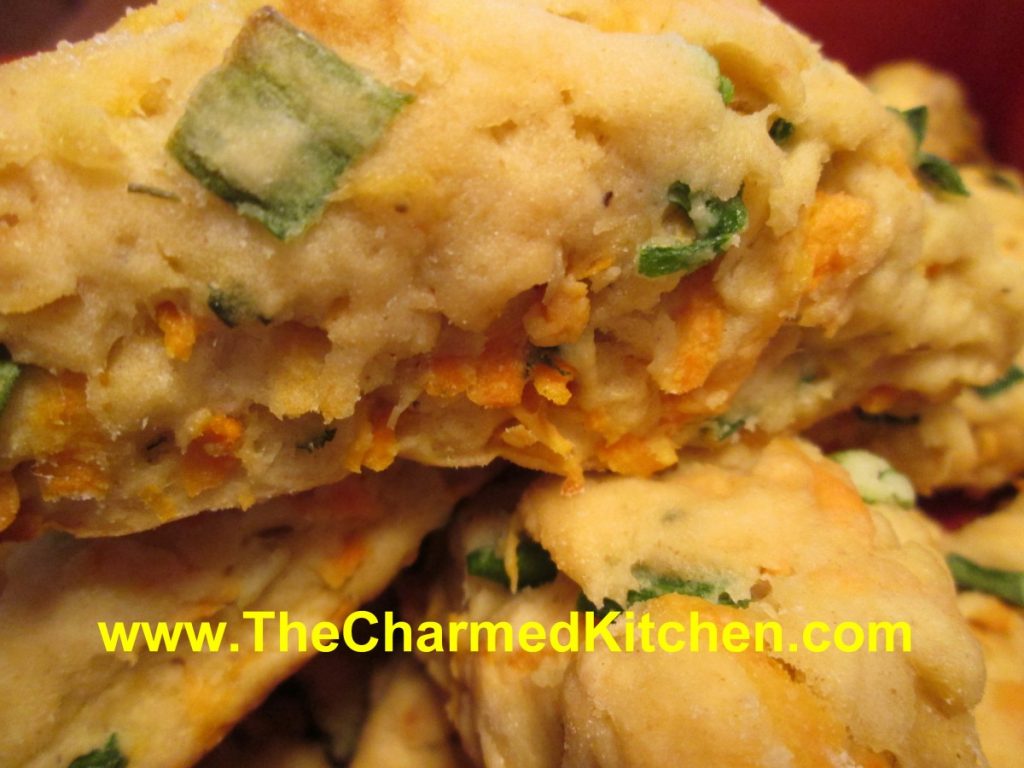
These biscuits are a favorite of mine. They go great with a bowl of chili. They also make a nice side for chowders. They could also be a nice addition to your Thanksgiving table.
I like sweet potatoes cooked any number of ways. Steamed, roasted, mashed. In this biscuit recipe, raw sweet potatoes are grated and added to the dough, along with some herbs. The biscuits come out tender, with great flavor and texture.
I enjoy them with a bit of butter, warm from the oven.
When you mix the dough, don’t be worried if it seems too dry. It takes a little bit of kneading to get the moisture out of the potatoes. The extra effort is worth it.
I cut them into triangles, but you can also just form the dough into a log shape. Then, slice the dough for round biscuits. They taste wonderful, no matter the shape.
Sweet Potato and Herb Biscuits
2 1/4 c. flour
1 T. baking powder
1/2 t. grated lemon peel
1/4 t. each baking soda, dried basil and dried thyme
1 egg, beaten
1 1/2 c. shredded sweet potato, about 1 large
1/2 c. fine chopped green onions
1/2 c. sour cream
2T. butter, melted or olive oil
Stir together dry ingredients in large bowl and set aside. Combine remaining ingredients and add to flour mixture mixing until just blended. Turn onto lightly floured surface and knead a few times until dough just stays together. Dough will look too dry- but it will come together after you knead it. Press into an 8-inch square and cut into four squares.* Cross cut each square into four triangles. Place on greased baking sheet and bake in a preheated 425 degree oven for 20 minutes. Makes 16.
* I press the dough into a lightly floured 8×8-inch baking pan and then flip it out onto the work surface, before cutting. That way you’ll get nice, even edges.
Pumpkin Cupcakes

I made these cupcakes for a class the other day. They are easy to make, moist, not too sweet and a perfect seasonal dessert. The recipe makes 30-36 cupcakes. I got 36 out of this batch, I don’t mind a smaller cake. For a larger cupcake, go for just 30.
In class we talked about winter squash and how to cook with them. Truth is, almost any winter squash can be used in recipes calling for pumpkin. Most of the time I am using butternut squash or Hubbard squash. Spaghetti squash is really the only winter squash that doesn’t work for pumpkin recipes. Its fibrous texture just isn’t best for this application.
I kept the colors of the frosting subtle. I used a standard buttercream- recipe follows. I divided up the frosting and tinted them and left about half of the frosting un-tinted.
When it was time to frost the cupcakes I used plastic wrap to make the job of filling the piping bags easier. I had already placed a large star tip in a piping bag. Then I laid a piece of plastic wrap on my work surface. I added some of each of the colors and some of the white frosting. I rolled up the plastic wrap over the frosting, forming it into a tube. I snipped off one end with scissors and dropped the frosting into the prepared piping bag. Its easier to fill the piping bag this way. Easy to pop out an empty tube of plastic wrap when it is empty and to drop a new one in.
You could add sprinkles or other seasonal decorations, too.
So here is the recipe for the cupcakes and the frosting. Enjoy.
Pumpkin Cupcakes
4 eggs, slightly beaten
3/4 c. oil
2 c. sugar- I use less
2 c. cooked pumpkin or 1 (15 oz.) can
1 3/4 c. flour
1/4 c. cornstarch
3 t. cinnamon
1 t. nutmeg
1/4 t. cloves
2 t. baking powder
1 t. baking soda
3/4 t. salt
Blend together in large bowl eggs, sugar, pumpkin and oil and set aside. In another bowl combine dry ingredients. Add dry ingredients to egg mixture and beat until well blended. Pour into paper-lined muffin tins, filling about 2/3 full. Bake in a preheated 350-degree oven for 25-30 minutes or until cupcakes spring bake when touched lightly. Cool 30 minutes before frosting. Makes 30-36. Frost with Cream Cheese Frosting or Butter Cream. I used butter cream frosting recipe.
Classic Butter Cream
1½ c. butter
5-6 cups sifted confectioners’ sugar
2T. vanilla extract
In a bowl beat butter until fluffy. Gradually add 2 cups of the confectioners’ sugar, beating well. Slowly beat in the vanilla. Slowly beat in remaining sugar. Beat in a little milk, if needed, to make of spreading consistency. Tint with food color, if desired.
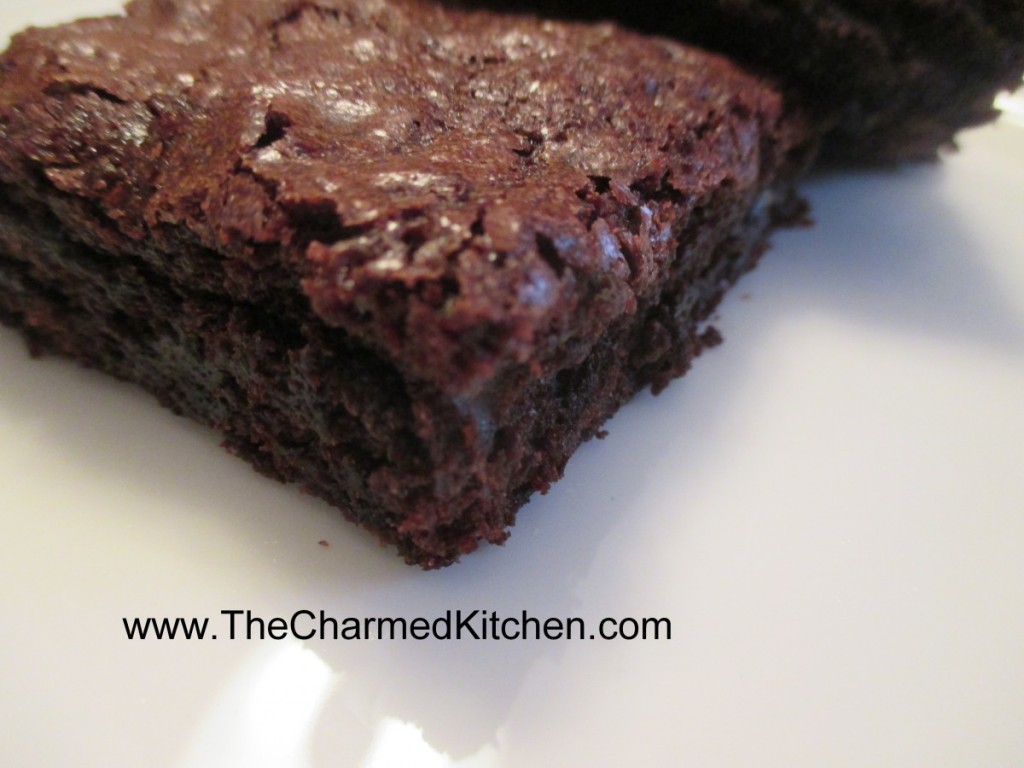
Rich and Chewy Brownies
Brownies have been around for almost 100 years. The story about the creation of brownies, is that they were an accident. A woman was making a chocolate cake. She couldn’t find her recipe, so she made the cake as best she could from memory. The cake didn’t rise- and brownies were invented.
What a happy accident that was for the rest of us.
There are a lot of versions of brownies around. Some are more like a chocolate cake, just a little denser. Others are moist, and so dense they are almost fudge like.
I have a lot of brownie recipes. This is one of my favorites. If you make them, you will understand why. They are soft, rich and a little chewy. They can be served plain, dusted with powdered sugar, or frosted. There is a lovely chocolate buttercream recipe below the brownie recipe.
Rich and Chewy Brownies
3 sticks butter, melted and cooled
3 c. sugar
1 T. vanilla
6 large eggs
1½ c. flour
1 c. cocoa
1 t. baking powder
1 t. cinnamon
1 c. chocolate chips
Heat oven to 350 degrees and grease a 13×9 inch pan. Beat together butter, sugar and vanilla. Whisk in eggs one at a time. Combine dry ingredients and stir into batter. Stir in chocolate chips and spread batter in prepared pan. Bake 40-45 minutes, or until brownies pull away from sides of pan. Cool brownies completely in pan, on a rack and cover with foil. Let stand 6 hours before serving. Makes 24.
To serve, you can leave them plain, dust with powdered sugar, or frost. Here is a great frosting recipe for these brownies.
Easy Chocolate Butter Cream
6 T. butter, softened
1/3 – 3/4 c. cocoa, depending on how dark you want your frosting.
2 2/3 c. powdered sugar
1/3 c. milk
1 t. vanilla
Cream butter. Combine cocoa and sugar. Beat cocoa mixture in alternately with the milk until frosting is spreading consistency. Beat in vanilla. You may need an additional tablespoon of milk. Makes about 2 cups.
Kale Fried Rice
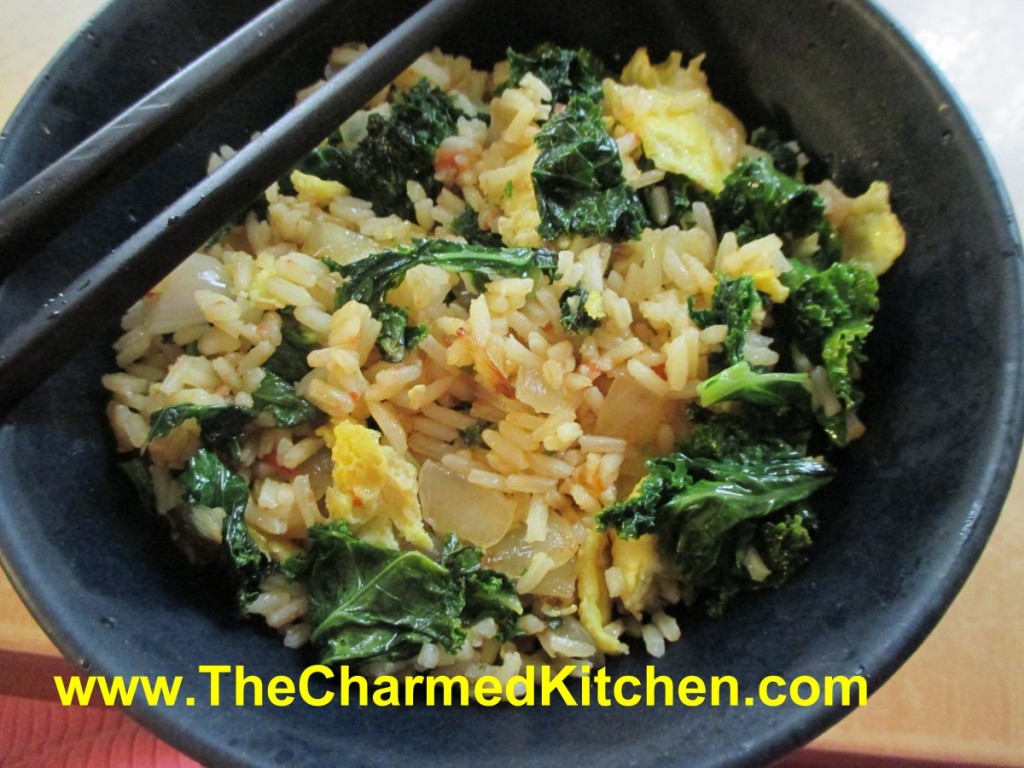
Among the planters I am growing this summer, are big pots of kale and other greens. I was watering my garden, when I decided I wanted some fresh greens for lunch.
The French Sorrel tempted me for a moment, but the kale won, in the end. I made fried rice, adding the kale and some scrambled egg. It was simple, but very satisfying.
You could make it this way, or add other greens. That’s the thing about fried rice, it is so versatile. All sorts of veggies and proteins can be tossed into fried rice.
One important thing to keep in mind: You only want to use cold rice in fried rice. The rice is even better if it is a little dry. I will lay my rice out on a baking sheet to dry it out when cooling it down, if it is on the wet side. I often make fried rice when I have leftover rice in the fridge.
Kale Fried Rice
2 T. oil
1 egg, beaten
1 onion, sliced
4 c. chopped kale
3 c. cooked white or brown rice
1 c. diced cooked chicken– you could use shrimp, pork, etc., optional
Chopped green onions
Dash of hot sauce
Soy sauce
Heat 1 tablespoon of oil and cook the egg- making it a sort of flat pancake. Cool and cut into strips. Set aside. Heat remaining oil in pan and cook onion until tender. Add kale and cook until wilted and tender. Add rice and chicken or other protein, if adding, and cook until heated through. Add onions, season and serve. Serves 4.
Peanut Butter Cupcakes
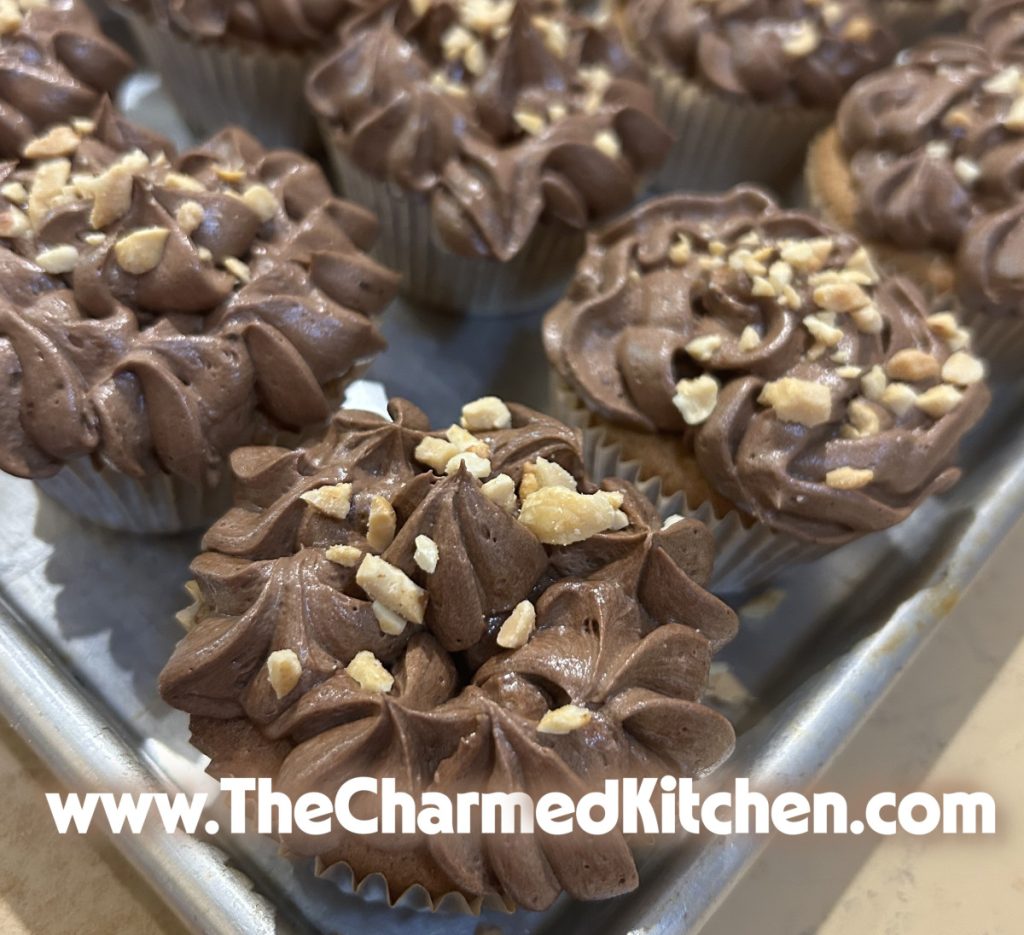
These cupcakes are tasty and easy to make. I topped them with chocolate frosting this time, but I have also used a vanilla buttercream and a peanut butter frosting. We made them in class recently. Everyone liked them. If you want to go for a peanut butter and jelly vibe, you can use a piping bag to add jelly or jam to baked cupcakes before frosting. You can also cut some of the cupcake out and spoon in jelly.
Below is the recipe and some frosting recipes you might want to use. Enjoy.
Peanut Butter Cupcakes
1½ c. brown sugar
½ c. butter, softened
1 c. peanut butter
2 eggs
1 1/2 cups milk
1 teaspoon vanilla extract
2 1/2 cups all-purpose flour
1 teaspoon baking soda
2 teaspoons cream of tartar
1 pinch salt
Preheat the oven to 350 degrees. Line cupcake pans with paper liners, or grease and flour cups. In a large bowl, mix together the brown sugar, butter and peanut butter until light and fluffy. Beat in the eggs one at a time, then stir in the vanilla. Combine the flour, cream of tartar, baking soda and salt; stir into the batter alternately with the milk. Spoon into the prepared muffin cups, filling half full. Bake for 15 to 20 minutes in the preheated oven, until the top of the cupcakes spring back when lightly pressed. Cool in the pan for at least 10 minutes before removing to a wire rack to cool completely. Makes 30-36.
I like to frost, then top with fine chopped peanuts. When using chocolate frosting, I sometimes also top with mini chocolate chips.
Easy Chocolate Butter Cream
6 T. butter, softened
1/3 – 3/4 c. cocoa, depending on how dark you want your frosting.
2 2/3 c. powdered sugar
1/3 c. milk
1 t. vanilla
Cream butter. Combine cocoa and sugar. Beat cocoa mixture in alternately with the milk until frosting is spreading consistency. Beat in vanilla. You may need an additional tablespoon of milk. Makes about 2 cups.
Super Fluffy Frosting
1 cup butter
1/2 cup shortening
1 1/2 tablespoons vanilla extract
2 pounds confectioners’ sugar
1/8 teaspoon salt
4 tablespoons water or milk
In a heavy duty mixer combine the shortening, butter or margarine, vanilla and water or milk. Add the sugar and salt, beat until well mixed. Add a tablespoon or two more of water or milk if needed. Turn mixer to the highest speed and beat for 15 minutes.
Fluffy Peanut Butter Frosting
1 cup creamy peanut butter
½ cup butter, softened
2 cups confectioners’ sugar
3 tablespoons milk, or as needed
Beat peanut butter and butter in a medium bowl until creamy and combined.
Gradually blend in sugar; when the mixture thickens, begin incorporating milk, 1 tablespoon at a time, until frosting is thick and spreadable. Beat on high speed until light and fluffy, at least 3 minutes. Scrape down the sides of the bowl with a spatula. Use it to frost a peanut butter cake or cupcakes, pipe it onto chocolate cupcakes, or spread it on cookies or brownies.
Easy Chocolate-Peanut Butter Frosting
12 oz. semi-sweet chocolate chips
1/2 c. peanut butter
Melt both together in microwave and stir until smooth. Spread while warm on bar cookies, brownies or cupcakes. Firms up at it cools.
Firecracker Chicken
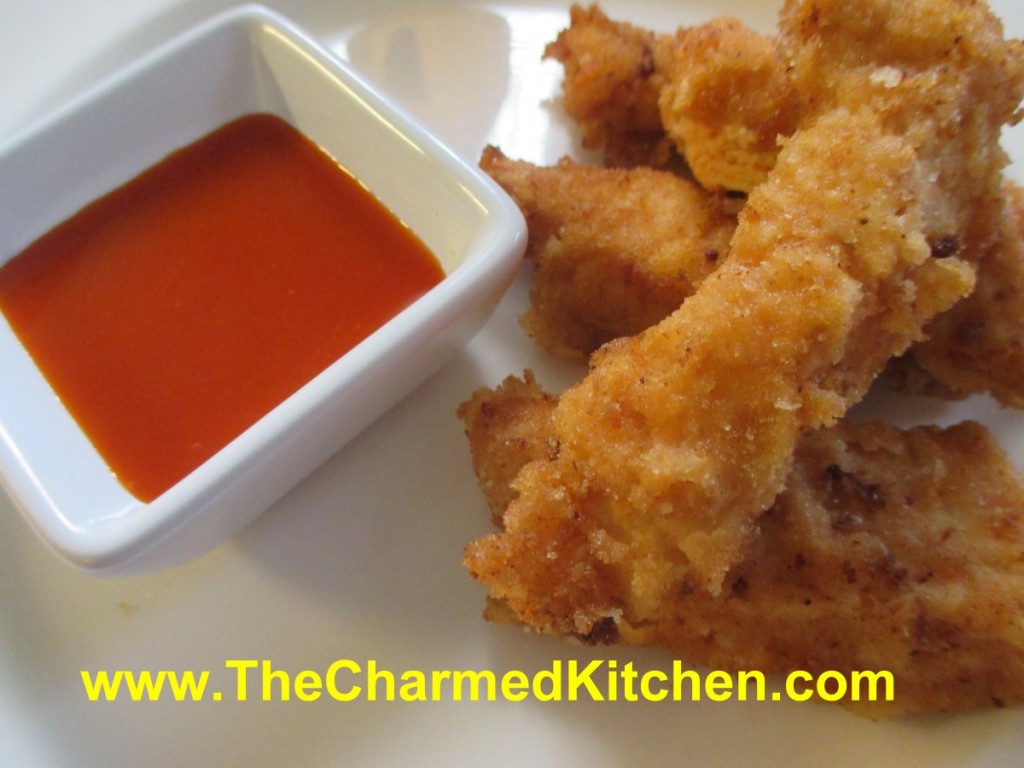
Sometimes the best recipes happen when you don’t have time to plan. This is one of those recipes. Even better because it only uses 4 ingredients. Fun for the 4th of July, too.
I needed an appetizer, but didn’t have extra time for prep. I also did not have time to go to the store, so I used what I had on hand. I had some boneless chicken breasts. I could also have used boneless thighs or even chicken wings. I used what I had.
I cut them into strips and poured a bunch of hot sauce over them. Put them in the fridge to marinade overnight. The next day I just tossed the chicken strips in breadcrumbs and fried them in a little oil. Served with extra hot sauce on the side, they were a big hit.
Firecracker Chicken
2 lbs. boneless chicken
3/4 c. hot sauce, plus extra when serving
2 c. bread crumbs
2 c. oil, for pan frying
Cut chicken into strips and place in a bowl. Pour over the hot sauce and stir to coat evenly. Cover and chill overnight, or even for a couple of days. Place bread crumbs in a plastic bag. Place a small handful of chicken in the bag and shake to coat. Place on a plate and continue with the rest of the chicken. Heat oil in skillet to 350- 375 degrees. Fry chicken in several batches- you don’t want to crowd them in the skillet- that will make the oil cool down too much. Fry for a minute or two per side. Remove to platter lined with paper towels and cook the rest of the chicken. Keep chicken warm until ready to serve. Serve with extra hot sauce on the side. Serves 8 or more as an appetizer, but can be served as a main dish, too.
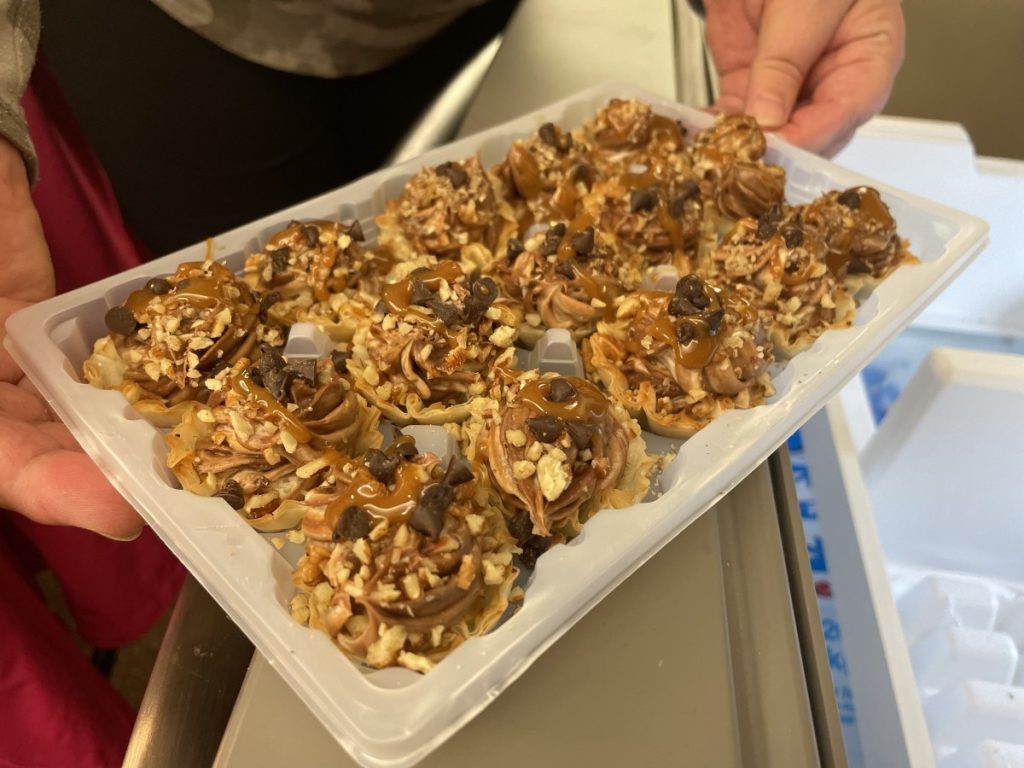
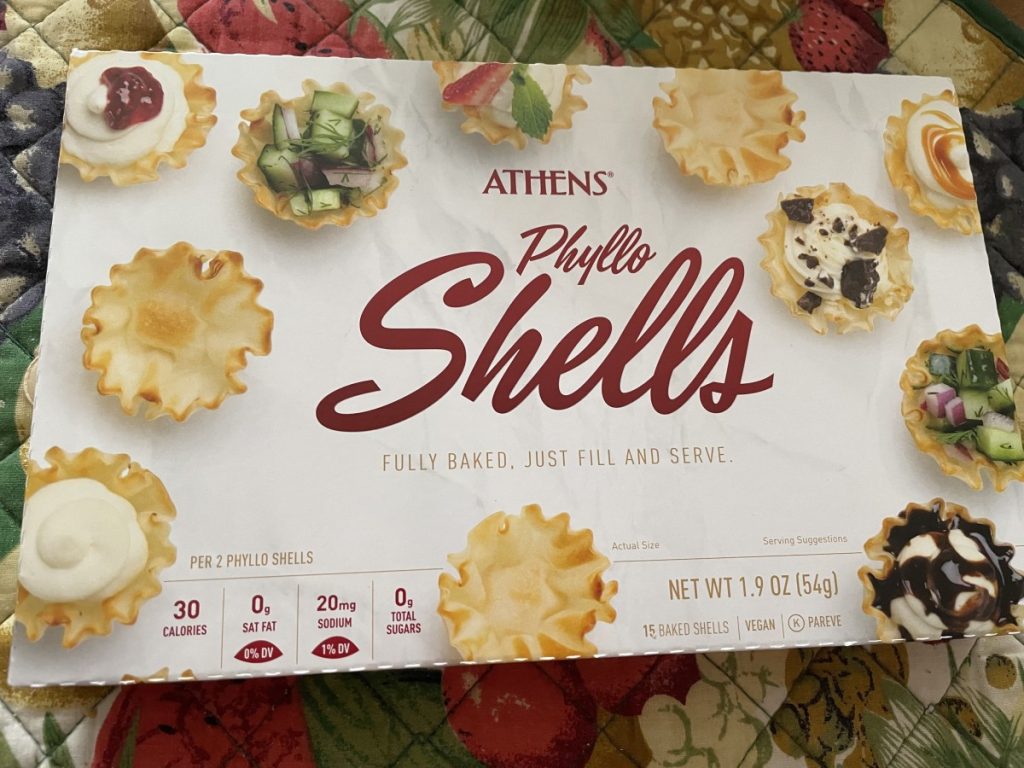
Mini Turtle Cheesecakes – No Bake
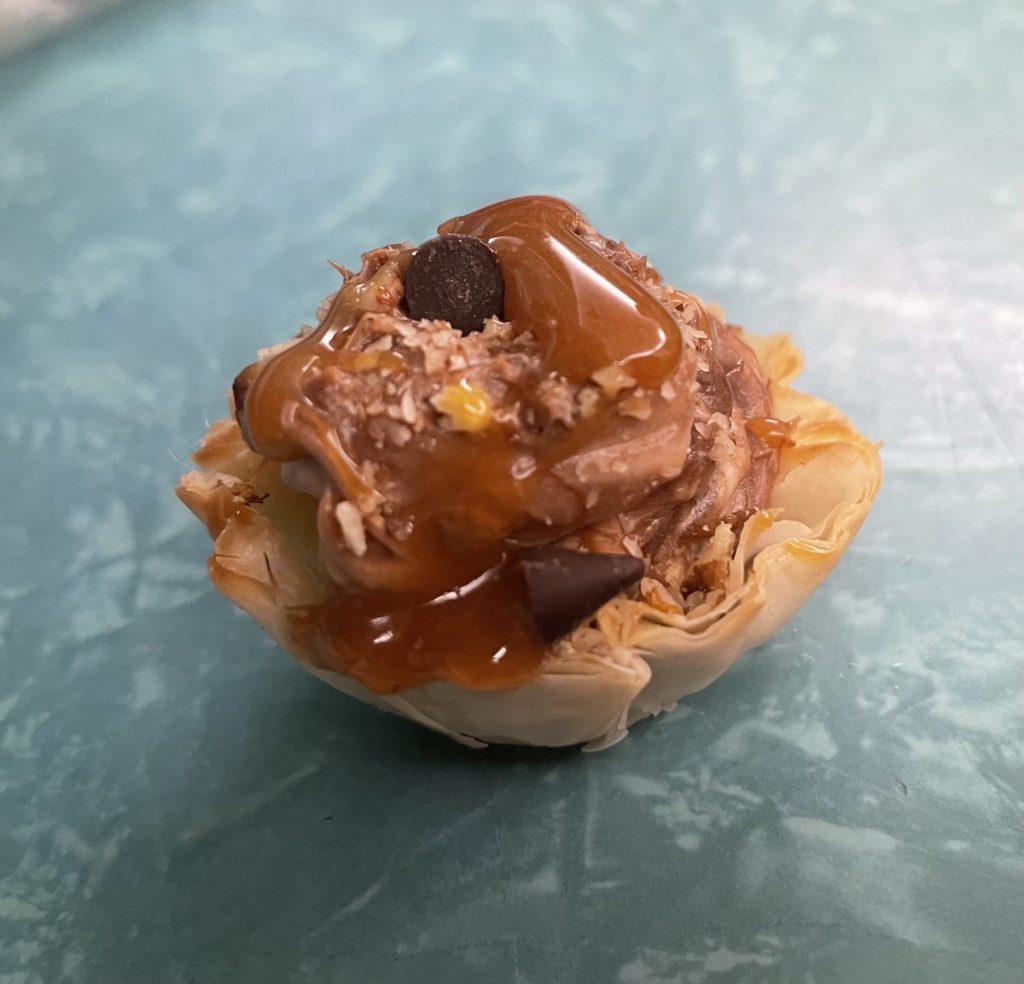
These might be one of the easiest desserts ever!! The base is filo (phyllo) shells you can buy at most grocery stores. The filling is a mixture of cream cheese, sugar, melted chocolate and whipped cream that is piped into the shells. Add a few toppings, chill and you are ready to serve. They look and taste amazing.
When you are pressed for time these are a nice dessert to make. Plus, they actually taste great and look adorable. Since we used mini chocolate chips to melt, a few were saved to sprinkle on the top. I thought that was a great idea. Thanks, Teresa!!
If you can’t find filo shells I have also included directions to make your own using phyllo dough, Recipe is at the bottom of the post.
So here is the recipe. Enjoy.
No Bake Mini Turtle Cheesecakes
1/2 cup heavy whipping cream, cold
8 ounces full-fat cream cheese, softened
1/2 cup granulated sugar
4 ounces semisweet chocolate, melted
1 teaspoon vanilla extract
2 packages (15 count each) Athens Mini Filo Shells
Caramel sauce and finely chopped pecans, for garnish
In a large mixing bowl (with whisk attachment if using stand mixer), beat the heavy cream until it thickens and stiff peaks form, roughly 3-4 minutes (when you pull the beaters up, peaks will form and not fall over). Transfer to another bowl and keep cold in the refrigerator. In the same mixing bowl (no need to clean bowl – switch to paddle if using stand mixer), beat together the cream cheese and sugar until smooth and creamy, about 2-3 minutes. Beat in melted chocolate and vanilla. Scrape down the bowl. Fold the whipped cream into the cream cheese mixture until fully incorporated.
Pipe the cheesecake filling into each filo shell then top with caramel sauce and pecans. Chill for at least 1 hour before serving. Best served the same day as making.
How to Make Phyllo Cups
5 sheets phyllo pastry
¼ cup unsalted butter melted, more as needed
Preheat the oven to 375°F. If phyllo dough is frozen, completely thaw it according to package directions. Lay one sheet of dough out and brush with a light coating of butter. Top with a second sheet and brush with butter. Repeat with remaining dough until you have 5 layers. Cut into 3.5″ x 3.5″ squares. Gently press into a mini muffin tin. Poke the bottom of the dough with a fork to allow steam to escape. Bake 7 minutes. Remove from the oven and gently press the center using a small spoon. Return the cups to the oven and continue baking 4-6 minutes or until golden and crisp. Remove from the oven and immediately remove from the muffin pan. Phyllo cups are very delicate and should be stored in a single layer in a hard container. They can be made up to 1 week ahead of time and refrigerated.
Note: I have also made these with 4 sheets instead of 5 and they still worked.
Using Phyllo (or Filo) Cups
Whether they are store bought or homemade, phyllo cups are a fun and easy way to make both savory and sweet treats. They can be filled with cheeses, veggies, smoked meats, nut and herbs for appetizers. For desserts, use puddings or custard, fruits, nuts, chocolate, whipped cream and small candies. Be creative and have fun. You can bake in them, or add ingredients that don’t need to be baked.
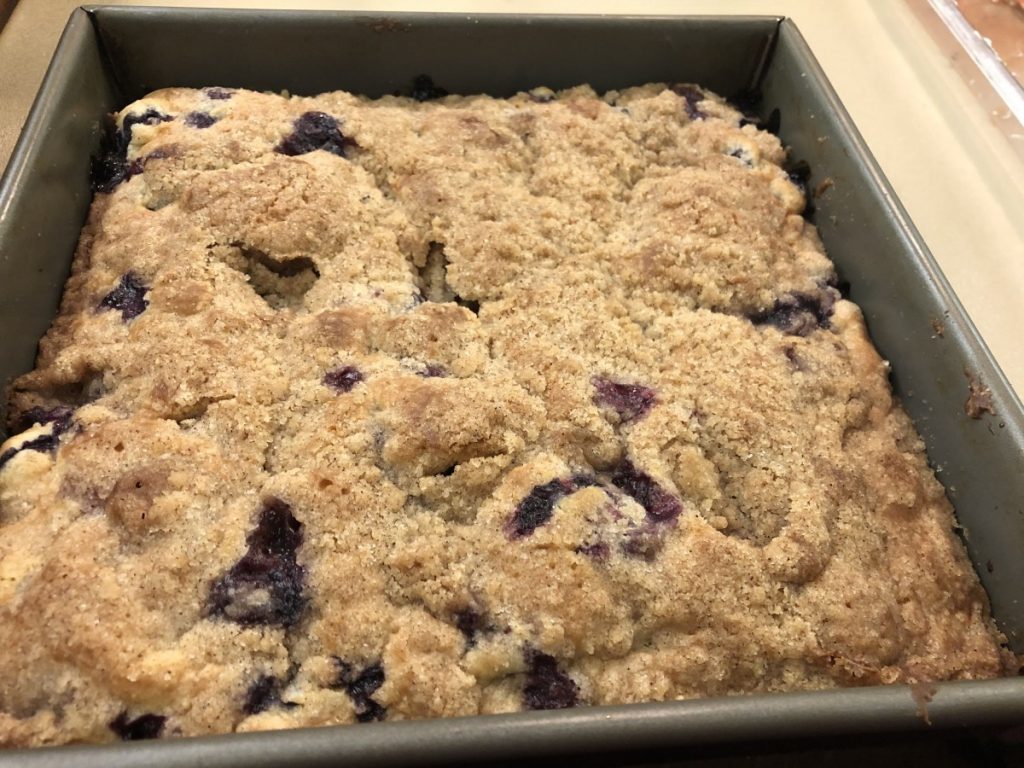
Blueberry Crumb Cake
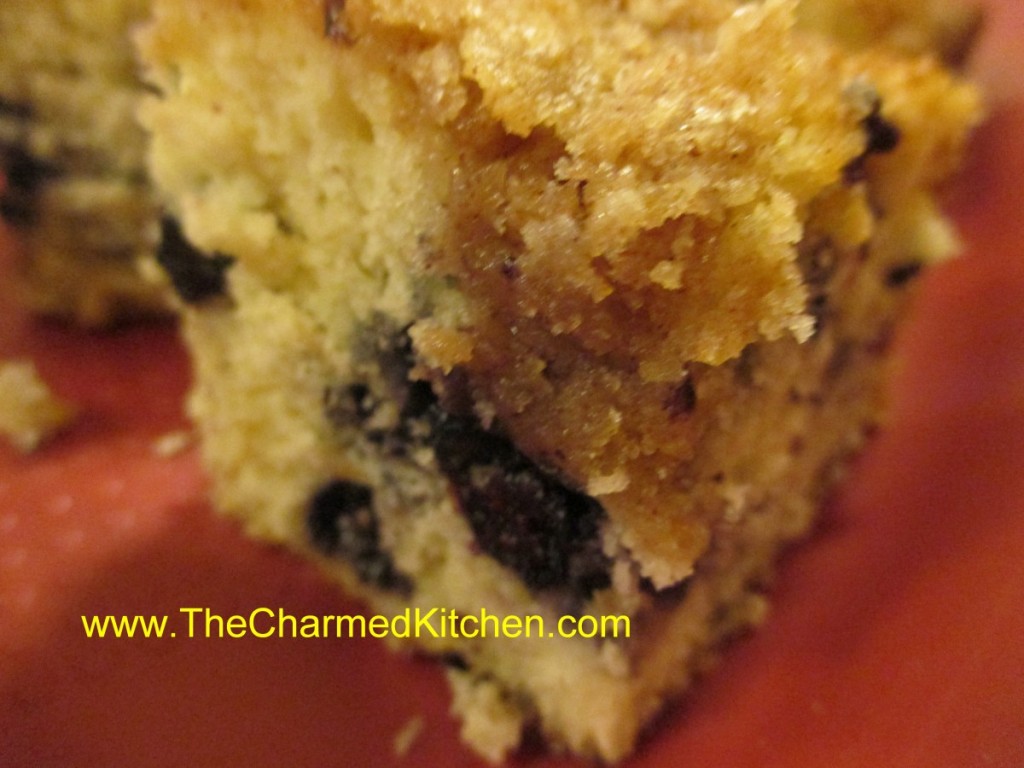
This has always been a favorite cake of mine. The mixture of moist cake and berries would be great on their own, but that crunchy, crumb topping- oh my! Talk about a wonderful combination.
It isn’t a difficult cake to make at all. It is an extra nice cake to take along to picnics and cook outs since there is no frosting to worry about. It can be served plain, or served with a scoop of ice cream or some whipped cream.
So here is the recipe. Enjoy!!
Blueberry Crumb Cake
For cake batter:
2 c. flour
2 t. baking powder
½ t. salt
½ stick (¼ cup) butter, softened
¾ c. sugar
1 egg
½ c. milk
1 pint blueberries, fresh or frozen
For topping:
½ c. sugar
¼ c. flour
½ t. cinnamon
½ stick (¼ c. butter, chilled and cut into bits)
Combine dry ingredients and set aside. In mixing bowl with electric mixer, beat butter and sugar until light and fluffy. Beat in egg and milk. Add flour mixture gradually until just mixed in. Fold in blueberries. Grease and flour an 8 or 9-inch square baking pan and add prepared batter. Combine topping ingredients until they resemble coarse crumbs. Sprinkle over batter in pan and bake in a preheated 375-degree oven and bake for 35-45 minutes. Use toothpick to test.
Note: I have used a 9-inch round pan and it worked fine.
Strawberry Ice Cream
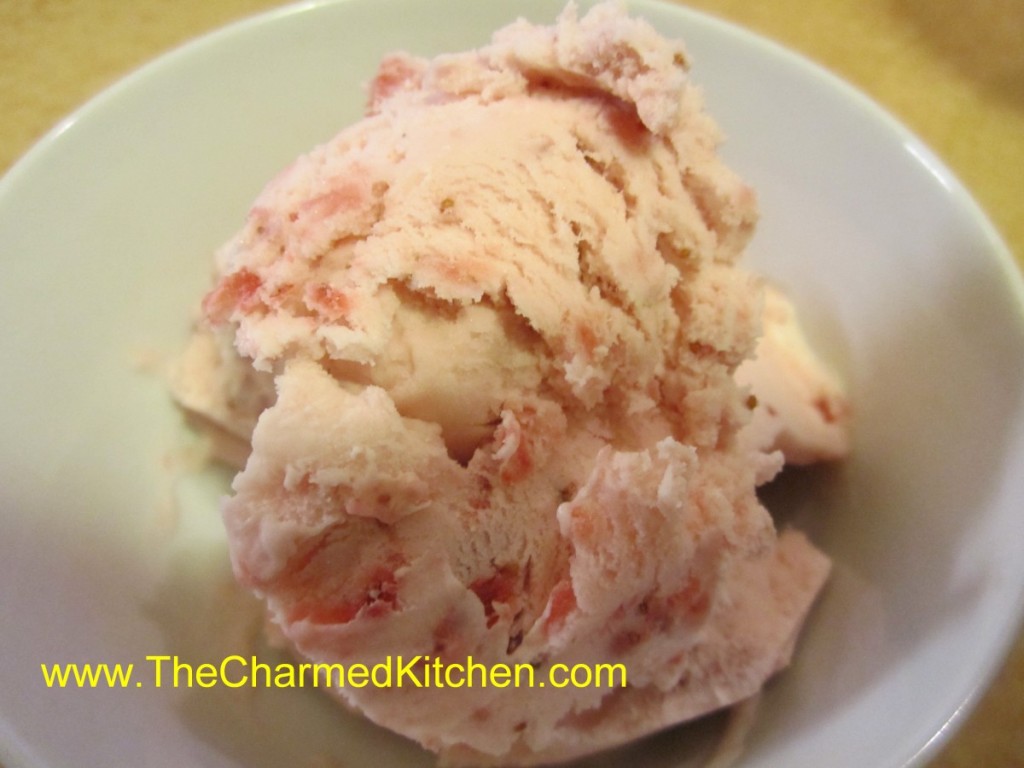
It is strawberry season around here, and I am loving it. Since the weather is warming up, I decided to make ice cream with some of the berries. Homemade ice cream is easy to make. When you make your own, you can adjust flavorings and sweetness level, too.
Studded with plenty of berries, this ice cream will put anything store-bought to shame. Feel free to add blueberries or raspberries, too. Sometimes I add other flavors, like lavender or mint.
Strawberry Ice Cream
2 c. chopped strawberries
1 c. sugar
1 T. vanilla
2 c. cream or half and half or a combination. You can also use some milk or even almond or rice milk.
Additional sugar to taste
Place strawberries, vanilla and sugar in saucepan and bring to a simmer, stirring occasionally. Remove from heat and chill. Combine chilled berry mixture with cream. Add additional sugar if you like. Remember that once it is frozen, the ice cream will not taste as sweet, so make this mixture a little sweeter than you want the final product to be. How much sugar you add varies with personal taste and how sweet the berries are. Place in an ice cream maker and process according to manufacturer’s directions. Once finished put in an air- tight container and place in freezer. Makes about 1 quart.


