Pumpkin Waffles
I know some people may be sick of pumpkin recipes. I am not one of them. I look forward every fall to the beautiful winter squashes and pumpkins that fill the farm markets. This is a simple and tasty recipe that will make breakfast special. Because of the pumpkin- or cooked squash- these waffles need to be cooked until golden brown to be crispy. I love them with maple syrup or a dusting of powdered sugar. They would also be great as the base for chicken and waffles.
Pumpkin Waffles
¾ c. mashed, cooked pumpkin or winter squash
½ c. flour
1 egg, beaten
¾ c. half and half or milk
1 T. melted butter or oil
1 tsp. baking powder
1 t. cinnamon
½ t. nutmeg
½ tsp. salt
Pinch of cloves
Combine all ingredients, mixing until smooth. Cook in prepared waffle iron until golden brown.
Flavored Butters
I enjoy making flavored, or compound butters, all the time. But even more so this time of year. My herb garden is growing wildly and there really is nothing better than the flavor of herbs, picked fresh out of the garden. Chop them up, add to some butter and you have a great spread for all sorts of foods. Now that local sweet corn is here, I have even more reason to make some herb and butter blends.
I like to make several batches, shape into rolls and wrap in plastic wrap. Now I can freeze them and just cut off a piece whenever I want. This is also a nice way to preserve some of this summer freshness for the cooler days ahead.
Herbal or spicy butters can add flavor to any meal. They can be used on breads, crackers, veggies, meats, or fish. Flavored butters can also be molded into shapes for special occasions. Here are the recipes for the butters in the picture.
Flavored Butters
All recipes are for use with one stick (½ cup) butter.
Soften butter slightly to make mixing easier. Roll into logs, balls, or press into molds. Finished butters can be rolled in herbs, spices, or nuts for a decorative appearance. Chill several hours or overnight before using. Keep butter wrapped tightly in waxed paper for freshness. Let stand at room temperature 30 minutes before serving. Flavored butter keeps in the fridge for 1 – 2 weeks. Makes ½ cup.
Chive Butter: 3 T. snipped chives, ½ t. lemon zest. Good with fish, poultry, carrots, and potatoes.
Chili Butter: 1½ t. chili powder, ½ t. cumin, ½ t. garlic powder. This is good on breads, beans, grilled chicken, or popcorn.
Curry Butter: 1 t. curry powder, 1 t. fresh lime juice. Use on lamb, poultry, rice, and veggies.
Dill Butter: 2 T. fresh snipped dill, 1 – 2 t. fresh lemon juice. Good with chicken, potatoes, seafood, or rice.
Mint Butter: 2 – 3 T. fresh chopped mint leaves, 1 t. fresh lemon juice, ½ t. lemon zest. This is great with lamb, peas, chicken, or vegetables.
Sage Butter: 1 T. fresh sage leaves, chopped very fine, or 1 t. dried sage, 1 t. each lemon juice and lemon zest. This is excellent with chicken or pork dinners. Great on breads and rolls, too.
Nisu Bread
This wonderful recipe came from the Finn grandmother of a good friend. It is a soft, slightly sweet bread made special with the addition of cardamom. Cardamom is a spice that has a rich, sweet flavor and fragrance. You can purchase it ground or whole, in pods. Cardamom is often used in baked goods and adds a nice flavor to frosting and glazes. It is also used to flavor coffee. This bread is lovely just toasted and makes great French toast.
Nisu
½ c. warm water
2 packages active dry yeast
2 c. milk
½ c. sugar
2-3 t. ground cardamom
1 t. salt
6 T. butter
6-7 c. flour, preferably bread flour
2 eggs
Dissolve yeast in water and set aside. Place milk in large bowl and add the sugar, cardamom, salt and butter. Heat in microwave until liquid is very warm. Butter might not be completely melted. Stir mixture until sugar is dissolved. Place 2 cups of flour in a mixing bowl and add the milk mixture, eggs and yeast mixture. Beat on medium speed for 3 minutes. Add 1 cup more of the flour and beat 2 minutes more. Stir in enough of the remaining flour to make a soft dough. Turn onto a floured surface and knead until dough is firm and smooth, about 10 minutes. Place in an oiled bowl and turn dough to coat. Cover with a towel and allow to rest until doubled in bulk, about 1 hour. Punch dough down and divide into 3 pieces. Roll each piece into a loaf and place in greased 9×5 inch bread pans. Cover and allow to rise until doubled in bulk, about 45 minutes. Bake in a 375-degree oven for 30 minutes or until golden and loaf sounds hollow when tapped lightly. Makes 3 loaves.
Easy Fried Catfish
I love fried fish. I don’t make it at home that often. It is more of a treat around here than an every day meal. Note to self; Make fried fish more often. To thank two of my dear friends, who shoveled my sidewalk more than a few times this winter, I decided to have them over for dinner. I made fried catfish with cole slaw, cabbage and noodles, homemade fries and tiramisu for dessert. I knew I wanted to make the fish. My friends and I often go to Friday fish fries this time of year and this was a Friday night, after all. I had some catfish and the big decision was going to be how to cook it. I toyed with the idea of baking it, but frying won out. Nothing quite as good as fried catfish in my mind.
This is going to be one of those recipes that is more narrative that exact amounts. I really am good about writing stuff out. I just can’t seem to locate my notes for this one- so I’ll share what I did as best I can remember. It is also so easy to fry fish. Don’t be scared to try. Fresh fried fish is such a treat.
I started with catfish fillets that were cut down into smaller pieces. I wanted smaller pieces to serve, since we had so many side dishes. I made a mixture of eggs, a little buttermilk, salt, pepper, garlic powder, parsley and hot sauce. I dipped the fish in this mixture and let it soak in there while I got the breadcrumbs ready. I had some bread crumbs made from plain bread, so I added a little paprika, dry parsley flakes and lemon peel to the crumbs.
I took the fish out of the egg wash a few pieces at a time and dropped them in the bread crumbs. I had the crumbs in a good sized bowl- but only filled about a quarter of the way with crumbs. I added the fish and sort of tossed it in the crumbs by shaking and tossing the bowl. Placed fish on a baking sheet. Once the fish were all coated in bread crumbs I put the oil on to heat up.
I was using an electric pot with a thermometer so I knew when the oil reached 350. I wanted to fry the fish between 350 and 375 degrees. If you don’t have a pot with a thermometer you can tell if your oil has reached 350 degrees with the use of popcorn. Yes, popcorn. Just put in a kernel of popcorn when you start heating up the oil. Popcorn pops at 350 degrees. When the popcorn pops, you know the oil is ready.
I had a pan, lined with paper towels ready as I started to drop the pieces of fish, several at a time, into the hot oil. They were cooked in just a few minutes. I pulled them when they were golden brown. Allowed them to drain on paper towels in a warm oven while I cooked the rest of the fish.
I served the fish with lemon wedges and homemade tartar sauce- which is just sweet pickle relish and mayo. I sometimes add capers and a little mustard, too.
The fish was a bit hit and I was happy to thank my very thoughtful friends.
As to the oil. You’ll have plenty left over. I let it cool and strain it out and pour it in the bottle it came from. You can save it for your next frying project, but don’t use it again and again. Just a few times, then toss the rest. The flavor get funky after a while.
Nest Egg
One of the things I resolved to do this year is eat more vegetables. I love most veggies so that isn’t the problem. I am just not eating enough of them. I know I could do better. So I have been looking for any new place I might add some vegetables to a meal. Adding veggies to breakfast is the most challenging, at least for me. For breakfast this morning I decided to have an egg and some toast. When I went to get out the egg and butter I saw a bag of fresh spinach. Why not?
I heated up a little butter in the pan and then added the spinach- probably a good 3 or 4 cups of fresh leaves. They cook down a lot. I also sprinkled the leaves with a little salt and pepper. I stirred them around until they had wilted then made a sort of nest out of them by pushing them away from the center. I poured my egg in the middle so it looked a little like a nest. I put the lid on the skillet and in a few minutes my egg was cooked and the yolk still runny. A little salt and pepper to finish off and the dish was complete. I slid it gently out of the pan onto a serving plate. I really liked it. Plan on making this again soon.
Sweet Potato Fritters
I found myself with a cup of leftover mashed sweet potatoes. I decided to play around and see if I could turn them into a dessert. I added eggs, flour, baking powder and a few other things, fried them up in oil, and ended up with a pretty decent fritter. I drained them on paper towels and then rolled them in cinnamon sugar while still warm. If you ever find yourself with some leftover sweet potatoes – now you have a fun way to use them.
Sweet Potato Fritters
1 c. cooked, mashed sweet potatoes
2 eggs
2 T. brown sugar
2 t. baking powder
1 t. cinnamon
1/2 t. baking soda
1/2 t. nutmeg
1/2 t. salt
1 1/2 c. flour
oil for frying
cinnamon sugar for rolling- powdered sugar would work, too
In mixing bowl combine all ingredients, except the flour and beat until smooth. Stir in flour. Batter will be thick. Heat oil to 350 degrees.* There should be enough oil in the pan top be at least 1 inch deep- or deeper. To save oil I used a smallish pan and cooked 3-4 fritters at a time. Drop dough by rounded teaspoonfuls into hot oil and cook, turning once until golden brown on both sides. This will take about 3 minutes. Drain on paper towels then roll in cinnamon sugar while warm. Makes 24-30. Best served warm.
* Fun way to know when your oil has hit 350 degrees. Place an un-popped popcorn kernel in the oil. Popcorn pops at 350 degrees.
Orange Glazed Duck
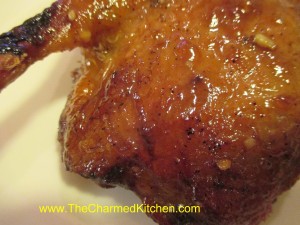
Duck has traditionally been paired with oranges forever. I remember getting a frozen duck at the grocery store years ago and it came with a packet of orange sauce.You were supposed to boil it up and serve it over the duck. I wasn’t real happy with the resulting sauce and wondered what the fuss was about duck with orange sauce. Since I was roasting a duck the other day I decided to try to make an orange sauce that I did like and see if it helped. The end result was a wonderful. I started by splitting the duck in half and sprinkling it generously with salt and fresh ground pepper. It was a local duck so not as fatty as other ducks I had gotten at the store before. If your duck is fatty- trim off some of the extra fat ( you can render it later) and score the skin. I put it on a rack, roasting it at 425 degrees for just under an hour. Then I brushed the orange glaze (recipe follows) all over the duck and placed it under the broiler for a few minutes to brown up. The result was a duck with crispy skin, sticky from the glaze. I get it now. Orange and duck, done right, is a great combination.
Orange Glaze
1 T. oil
1 shallot, minced
2 cloves of garlic, minced
1 c. orange juice
1/4 c. vinegar- I used cider vinegar
2 T. honey
2 T. brown sugar
2 T. sherry
1 T. soy sauce
2 t. hot sauce
2 t. orange zest
2 T. cornstarch
2 T. cold water
In small pan heat oil and saute the shallot until tender. Add garlic and cook a minute or two longer. Add the remaining ingredients, except the cornstarch and water, and simmer for about 10 minutes, so mixtures reduces a little. Combine the cornstarch and water and pour into the sauce, stirring, until mixture in thickened and bubbly. Makes a little over a cup. Great on duck or as a dipping sauce for other meats or egg rolls. Keeps in fridge a couple of weeks.
Duck with Pear Ginger Sauce
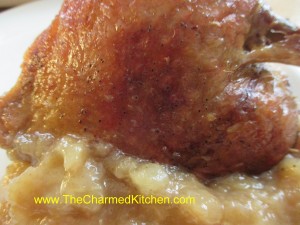
I love the way duck tastes when served with pears. Duck, with its dark, rich meat really works well with all sorts of fruit. I’ve made sauces and glazes for duck from cherries, prunes, mangoes, peaches and of course, oranges. Since I had several very ripe pears and a duck I was roasting I thought I’d try them together. Oh yum!!
I made a simple sauce out of the pears. I peeled them and diced them and put them in a small saucepan with a couple of tablespoons of brown sugar, about 1/4 cup of cider vinegar, some salt and pepper and a healthy splash of hot sauce. It needed something so I added about a teaspoon and half of grated ginger. That was the missing ingredient. It gave the sauce a nice bite. I simmered the sauce for about 10 minutes, stirring from time to time to prevent sticking. The pears were just starting to fall apart. When the duck was ready to serve I warmed up the sauce and spooned some on the plate.
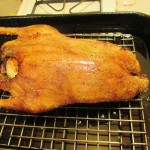
To roast the duck: Let me say this was a locally grown duck so not as fatty as ducks I get at the grocery store. For the very fatty ducks you need to score the skin and trim off extra fat. If you don’t the skin won’t get crispy and isn’t very appetizing. Still, I wanted a nice high heat to crisp up the skin. I placed it on a rack in a roasting pan. I did cut up an onion and a small orange and placed them in the cavity. Sprinkled generously with salt and pepper and placed the duck in a preheated 450 degree oven for 15 minutes. Then I turned the heat down to 425 until the duck was done. In this case, it was a smallish duck and cooked in about 65 minutes. It is OK if the duck meat is a little pink. Kind of preferred a little pink by most, but cook it to your own comfort level. Let duck rest 10-15 minutes before cutting into serving pieces.
Root Vegetable Soup
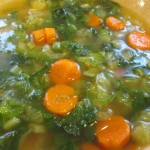
When the air is chilly I am always in the mood for a nice hot bowl of homemade soup. This soup came about as I rummaged through the veggie bin. I had a number of root vegetables so I decided to make them the focal point. I happened to have homemade turkey stock, but you could easily swap it out for chicken stock or vegetable stock as well. So here it it- the recipe that was created based on what I happened to have on hand. The end result was really good.
Root Vegetable Soup
3 T. oil
1 onion, chopped
2 large carrots, peeled and sliced
2 small parsnips, peeled and sliced
6 c. stock, I used turkey
2 c. peeled and diced turnips, about 2 medium
2 c. diced potatoes, about 2 medium
1 pint home canned tomatoes, or a (14 oz.) can of diced tomatoes, un-drained
1 medium sweet potato, diced
1/4 c. chopped parsley
2 T. apple cider vinegar
1 T. hot sauce, or to taste
salt and pepper to taste
In soup pot heat the oil and cook the onion until light golden. Add the carrots and parsnips and cook until they are light golden, too. Add the stock, turnips, potatoes and tomatoes and bring to a boil. reduce heat and simmer, covered, until veggies are tender, about 20-30 minutes. Add sweet potatoes and remaining ingredients and cook until sweet potatoes are tender, about 10-15 minutes. Adjust seasonings and serve. Serves 6-8.
Honeymoon Soup
Part of creating new recipes is coming up with names for them. The silly name for this soup stems from something I made when I was a kid. I was making a sandwich with Swiss cheese on toasted rye bread. I put one slice of cheese on the bread and then proceeded to pile up all this lettuce on the sandwich. What can I say? I really like a lot of lettuce on my sandwiches. I cut it in half and was sort of struggling to eat it without the lettuce tumbling everywhere when my father came in the kitchen. He said I had made a honeymoon sandwich, lettuce alone. Get it? Let us alone. It took a second before I got it. My dad was the king of puns. The name stuck. I make lettuce soup from time time. Mostly when I have a lot of lettuce I need to use up. The lettuce actually adds nice flavor to the soup. For this one I decided to add the other elements of my sandwich by topping the soup with some shredded Swiss cheese and fresh rye bread croutons. The combination was really nice- kind of light and satisfying at the same time. Hope you’ll try it.
Honeymoon Soup
6 c. stock- I used chicken, but vegetable or beef stock would work, too
3 carrots, peeled and sliced
6 c. shredded Romaine lettuce- you can use other lettuces – I often use Spring Mix
2 T. butter or oil
3-4 slices rye bread, cubed
1 c, shredded Swiss cheese- or whatever cheese you prefer
Heat stock and simmer carrots in stock until tender. While carrots are cooking heat butter or oil in a skillet and toast the bread cubes in the skillet. Stir often so they don’t burn. You end up with nice rye croutons. You can just set them aside and add to the soup at room temperature. I prefer to warm them in the skillet right before serving.
Back to the soup- once the carrots are tender add the lettuce to the stock. It will wilt down a lot and cook quickly. Allow about 3-4 minutes for the lettuce to wilt down. Ladle the hot soup into serving bowls. Top with some shredded cheese and then the croutons. Serves 3-4.
