Rhubarb Glazed Chicken


It is rhubarb season around here. Rhubarb is turning up at local farm markets and even in some grocery stores.
Like a lot of people, when I think of rhubarb, I first think of dessert, like pie or cobbler. But rhubarb’s tangy, tart flavor, lends itself to lots of savory uses.
I had some rhubarb and could not decide what to do with it. I chopped it up, and cooked it in a little water until tender. I ended up with 2 cups of cooked rhubarb.
I used this as the base for the sauce. I added the other ingredients, cooked it down until it was thick, and ended up with about 2 cups of sauce. It had a nice balance of sweet, tart and heat.
I used some of it as a glaze for chicken I was cooking. I froze the rest. The sauce would be good on other meats or even on grilled veggies.
Rhubarb Glazed Chicken
8 chicken thighs or 1 whole chicken, cut up
1 cup rhubarb sauce (recipe follows)
salt and pepper to taste
Place chicken pieces in roasting pan, season to taste and bake in a preheated 375 degree oven for 30 minutes. Remove from oven and drain any fat out of the pan. Pour over the rhubarb sauce and return chicken to oven for an additional 35 minutes. Baste the chicken with some of the sauce in the pan and return to oven for 15 minutes more. Serves 4.
Rhubarb Sauce
2 c. cooked rhubarb*
1 c. apple cider vinegar
1/4 c. brown sugar
2 T. honey
2 T. dried minced onion
1 T. hot sauce
1 T. paprika
2 t. minced garlic
1 t. Worcestershire sauce
1 t. cumin
1 t. cinnamon
salt to taste
Place all ingredients in a saucepan and cook over medium heat until thickened. Stir more often as mixture thickens. Cook until sauce has reduced to about 2 cups. Use as a glaze on meats and vegetables. It was great on chicken but would also go well on pork or duck. I could also imagine it on portobello mushrooms. It would make a nice dipping sauce, too. Note: I liked the tang of it but you could make it a little sweeter to suit your own taste. Makes 2 cups. Will keep a few weeks in the fridge or can be frozen.
*To cook the rhubarb, cut the stems into 2-3 inch pieces and simmer in a little water until tender. You can also steam until tender
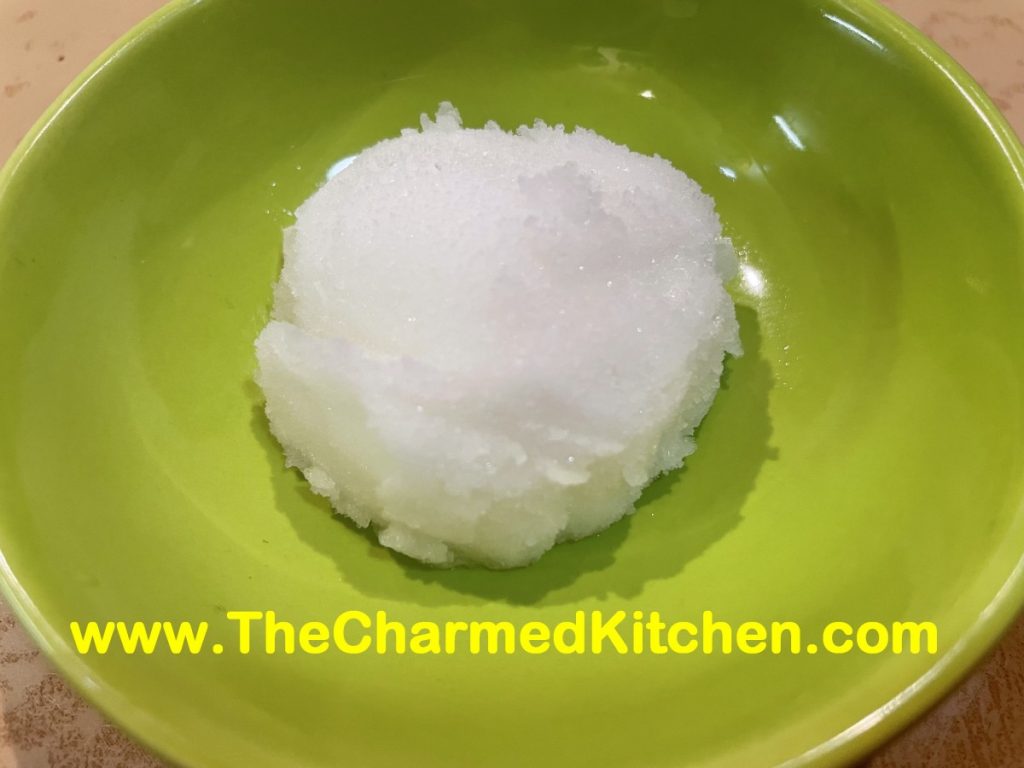
Homemade Strawberry Liqueur


This strawberry liqueur is like summer in a bottle. I make a lot of different liqueurs and strawberry is one of my absolute favorites. It is wonderful for sipping or over ice. It is also a fun addition to any number of cocktails. A friend adds it to ice cream with extra berries and blends it up for an adult strawberry milkshake.
With strawberries in season, this is the time of year to enjoy them. I want to preserve some for later, too. I made strawberry jam and dehydrated some. I will also freeze some.
Another way to preserve strawberries, is by making a liqueur with them. It is pretty simple. Just combine berries with vodka and a small amount of powdered sugar. I use half gallon canning jars for this, but you could use any food safe container with a tight fitting lid.
Let the mixture steep long enough for the berries to infuse the alcohol with their flavor. You can sweeten it later on, or even leave it unsweetened, if you prefer. I like to sip the liqueur as is, or serve on the rocks with a splash of club soda.
Strawberry Liqueur
3 cups fresh strawberries, sliced
3 T. powdered sugar
3 c. vodka
1 c. simple syrup*
Sprinkle powdered sugar over berries and let dissolve. Pour over vodka and let steep 2 weeks. Crush berries and strain then filter. Add sugar syrup and mature 1 week. Makes 5 cups.
*Simple syrup is made from 1 cup of sugar and ½ cup of water. Bring to a boil, then cool. You will have 1 cup of syrup. You can sweeten your liqueur with honey, if you prefer. Watch when you substitute honey for sugar, as it is sweeter and stronger flavored. Better to use orange or clover honey. Add to suit your taste.
Strawberry Ice Cream

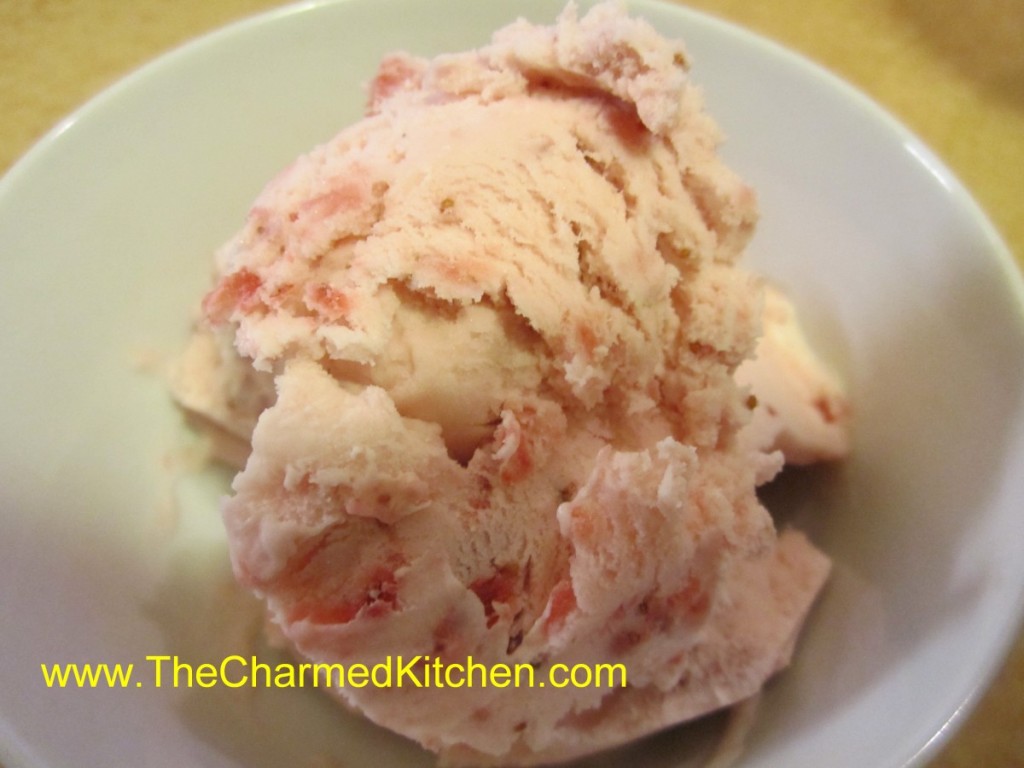
It is strawberry season around here, and I am loving it. Since the weather is warming up, I decided to make ice cream with some of the berries. Homemade ice cream is easy to make. When you make your own, you can adjust flavorings and sweetness level, too.
Studded with plenty of berries, this ice cream will put anything store-bought to shame. Feel free to add blueberries or raspberries, too. Sometimes I add other flavors, like lavender or mint.
Strawberry Ice Cream
2 c. chopped strawberries
1 c. sugar
1 T. vanilla
2 c. cream or half and half or a combination. You can also use some milk or even almond or rice milk.
Additional sugar to taste
Place strawberries, vanilla and sugar in saucepan and bring to a simmer, stirring occasionally. Remove from heat and chill. Combine chilled berry mixture with cream. Add additional sugar if you like. Remember that once it is frozen, the ice cream will not taste as sweet, so make this mixture a little sweeter than you want the final product to be. How much sugar you add varies with personal taste and how sweet the berries are. Place in an ice cream maker and process according to manufacturer’s directions. Once finished put in an air- tight container and place in freezer. Makes about 1 quart.
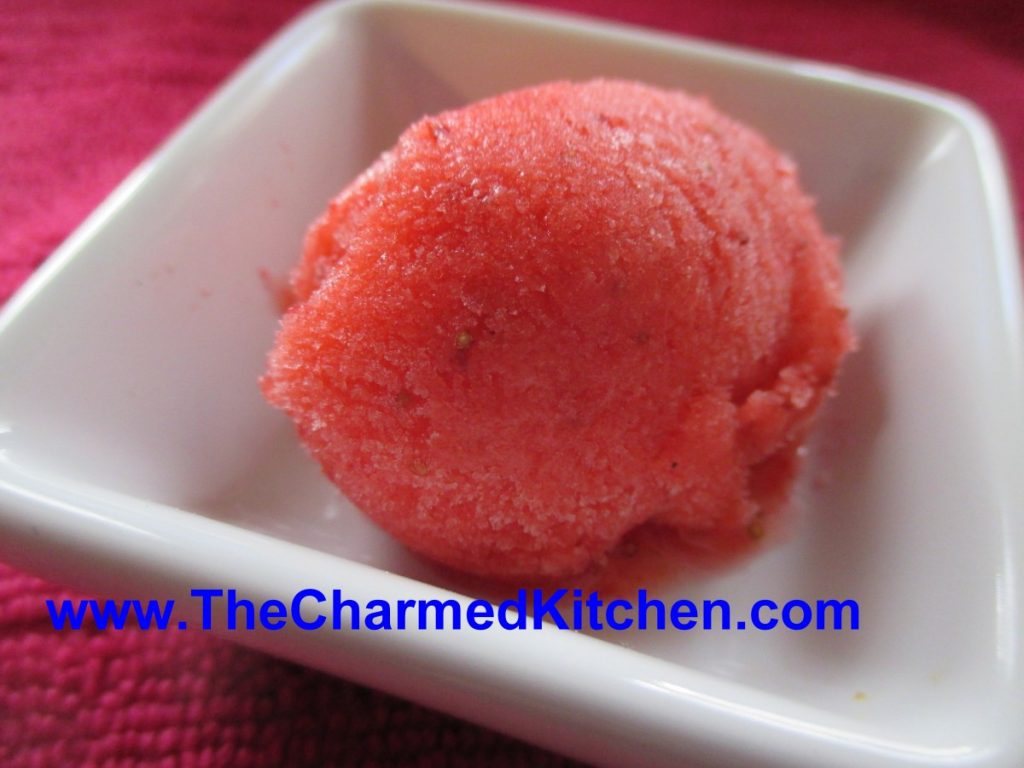
Lemon Italian Ice

I hadn’t made Italian ice in a long time. As a kid, I remember getting little cups of this treat in the summer and I loved it. I decided it was time to make some again.
The recipe couldn’t be simpler. Just water, sugar and juice. You can also add zest. You don’t even need any special equipment. Lemon is more traditional, but lime works great, too. You can add more juice or less or more sugar to suit your own taste. I like my lemon ice to have a nice strong lemon flavor. Taste it before you freeze it to make it to suit your taste.
Italian ice is a great, light dessert or it can be served as a palate cleanser. Make more than you think- it goes fast. A friend stopped over last night and we added scoops to our vodka cocktails. Very tasty!!
Enjoy!!
Lemon Italian Ice
2½ c. water
1½ c. sugar
1¼ c. lemon juice*
Zest of 2 lemons, optional
Combine water and sugar in bowl and stir until sugar dissolves. Add lemon juice and zest, if adding, and stir until well combined. Freeze.
You have options here. You can place the mixture in a shallow tray- preferably one with a tight lid- and place in the freezer. Or you can put the mixture in any shape container with a tight lid and freeze. It kind of depends on how you plan to serve your ice, once it is frozen. Some recipes call for stirring the mixture every 30 minutes as it freezes. Then to serve it, you just scrape over the surface with a heavy spoon for a grainy ice- a granita. This is one option and a tasty one. Works best in the flatter, longer container.
Another option is to just freeze it. Once frozen, allow the lemon ice to soften a few minutes, then break into chunks and place in a food processor. Run the processor until the mixture is smooth- then serve or put back in the freezer until you want to serve it. You can even repeat the food processing part another time for a smoother end product. This is what I did with this batch. I wanted a sorbet – like texture.
If you didn’t have enough choices already, you can also put the lemon juice mixture in an ice cream machine to freeze. This method will also give you a sorbet like final product.
No one way is best- it is just what you like. Makes about a quart.
* you can use lime juice and zest instead, for lime ice- or even use them together.
Mini Strawberry Shortcakes


These little shortcakes are as cute as they are tasty. You can have all the components ready, then just assemble when ready to serve.
Fun to serve at parties, picnics and cook outs. Because these are small, they work well with other desserts on larger dessert trays.
I made the shortcake base with a scone recipe, and used a small ice cream scoop to put the batter on the baking sheet. They ended up looking like little sandwich buns. One friend said they looked like sliders.
I split them, and filled with sweetened strawberries. I replaced the top and added chocolate ganache and whipping cream to finish them off.
The scone is tender and not too sweet. Satisfying and light at the same time.
Mini Strawberry Shortcakes
The shortcakes
2 c. flour
1/4 c. sugar
½ t. salt
1 T. baking powder
1 1/4 c. heavy cream or 1 cup half and half
Preheat oven to 425 degrees. Sift together dry ingredients and gradually add cream to form soft dough. Stir mixture until it just holds together. Using an ice cream scoop place batter on baking sheet a couple of inches apart. You should get about a dozen. Bake 10-12 minutes or until golden. Makes about 12. Cool on rack until ready to use.
The berries
2 lbs. strawberries, sliced thin
1/2 c. sugar, or to taste
Combine berries and sugar in medium bowl and place in fridge until ready to use. Berries should be in the sugar for at least a couple of hours and can even be prepped a day ahead to allow the juices to come out of the berries.
The ganache
1 c. semi sweet chocolate chips or 6 oz. semi sweet chocolate, chopped
1/2 c. heavy whipping cream.
Combine both in double boiler or in microwave and heat until mixture is just warm enough to melt the chocolate. Stir until smooth.
The whipped cream – use whipped cream, sweetened or unsweetened according to your taste.
Assembly: Slice the caps off the tops of the shortcakes. Place a generous spoonful of the sliced berries on the bottoms of the shortcakes and spoon some of the strawberry liquid over them as well. Place the tops of the shortcakes back on and spoon on a dollop of the chocolate ganache. I let me get to room temperature so it didn’t drip down exactly as I had planned. Top with some whipped cream and serve. Makes about 12.
Strawberry Sorbet

Strawberry sorbet is a wonderful dessert to keep around, especially in summer. It is sweet and a little tart and very refreshing. It is such a pretty color.
You can play around with adding other flavors. I sometimes add fresh herbs, like mint or pineapple sage. Vanilla or citrus zest are nice add ins, too. I added a few lavender blossoms to this batch.
Sorbets can be served on their own, with cake, or drizzled with chocolate sauce. I sometimes add a scoop of sorbet to a glass of lemonade or ice tea on a hot day. So refreshing. Sorbet can be a fun topper in cocktails, too.
You can make sorbet in an ice cream machine, if you have one, but you don’t need to. I don’t. It really is simple. As an added bonus, once your sorbet is made, you have it on hand whenever you need a dessert. The secret is to blend the sorbet a couple of times after it is frozen, if you can. Each time, the sorbet gets smoother and creamier. I use my food processor.
Strawberry Sorbet
1 1/2 lbs. strawberries, fresh or frozen
1/2 c. sugar, or to taste – you could also sweeten with honey, if you prefer, or use no sweetener
1 T. lime or lemon juice
Wash and stem berries. Place in food processor with juice and blend until smooth. Sweeten to taste, stirring until sugar is dissolved. Place in a container with a lid and freeze. Once frozen, remove strawberry mix from freezer and sit it on the counter to soften a little bit. This is really the important part. You don’t want it to thaw, but you do want it just soft enough to break into chunks. Place chunks in food processor and blend it again. It will actually start to look a little creamy and lighter in color. You can serve it right away- or put it back in the freezer to serve later. At this point the sorbet is ready- but you can repeat the soften/process step once more, if you like, for even creamier sorbet. Makes 3-4 cups.
Note: If you have an ice cream maker, you can just pour the chilled mixture into it, and process as you would for ice cream.
Spelt and Herb Slider Buns

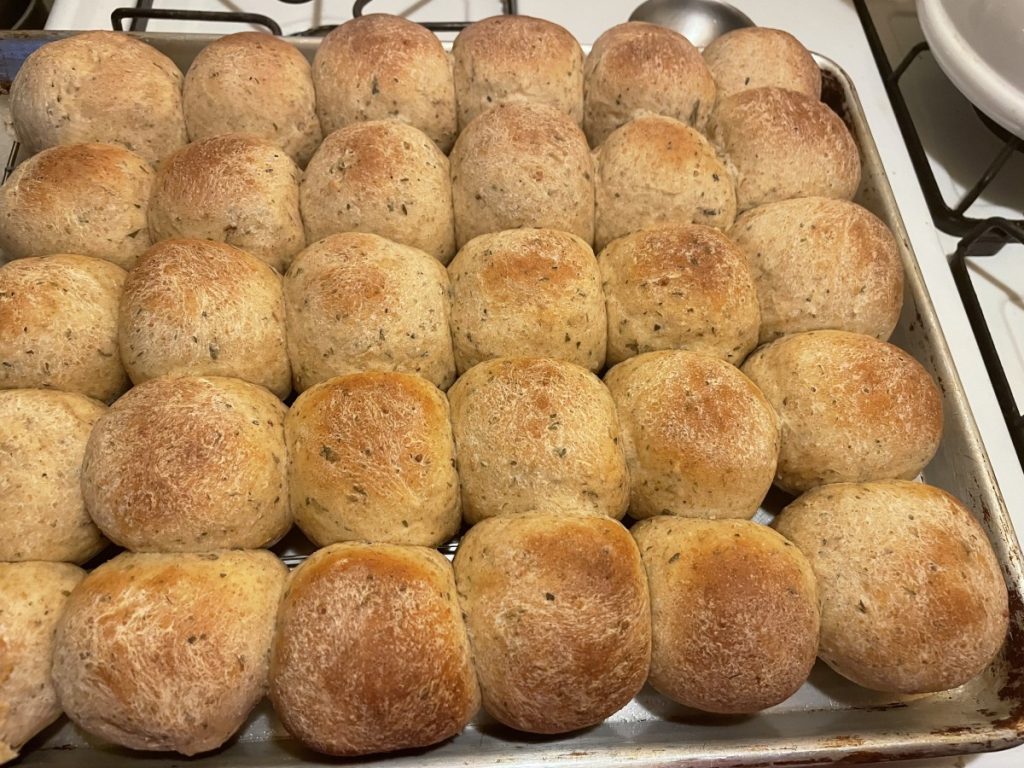
I made these mini rolls for a recent picnic with friends. We were having pulled pork and I wanted to make rolls I thought would go well with the pork. They came out really nice. Soft, with plenty of herb flavor. I used spelt flour in this recipe. Spelt can be hard to find, so you can use all purpose flour for the recipe, or substitute whole wheat flour, if you like.
The size of the rolls is really up to you. I wanted sliders so I made the dough balls pretty small. You could make larger rolls and use them for burgers.
So here is the recipe.
Spelt and Herb Slider Buns
3 c. all purpose or bread flour*
3 c. spelt flour
2 packages yeast
¼ c. dried toasted shallots or onions
2 T. each dried basil and parsley
1 T. honey
2 t. salt
¼ c. olive oil
1 c. almond milk heated to warm – you can use dairy milk instead
½ c. warm water
2 eggs
In a mixing bowl combine 2 c. of flour with the rest of the ingredients and mix until smooth. Beat with electric mixer 4 minutes then add 1-cup spelt flour and beat 1 minute longer. Stir in spelt flour ½ cup at a time until soft dough forms. Add additional all purpose flour as needed. Turn onto floured surface and knead, adding flour gradually until dough is smooth and elastic. Place dough in lightly greased bowl and turn to cover. Cover with a towel and let rise until doubled, about 60 minutes. Turn dough onto floured surface. I used a cookie scoop to get pieces of dough that were each about ¼ cup of dough. About the size of a ping pong ball. Form the dough into balls. You could also roll the dough into a rope and then cut off pieces to form into the slider buns. I placed them on a baking sheet lined with a silicone liner. You could use parchment or just grease the baking sheet. I ended up with about 34 little rolls. I got them all on the same baking sheet. They were squeezed in pretty tightly, so I brushed them with a little oil to insure they would separate later. Cover until doubled in size, about 40 minutes. Bake in a preheated 375-degree oven for 15-18 minutes, or until rolls sounds hollow when tapped lightly. Makes 34-36.
* You might not need the whole amount of flour listed. Add gradually until you get a soft dough.
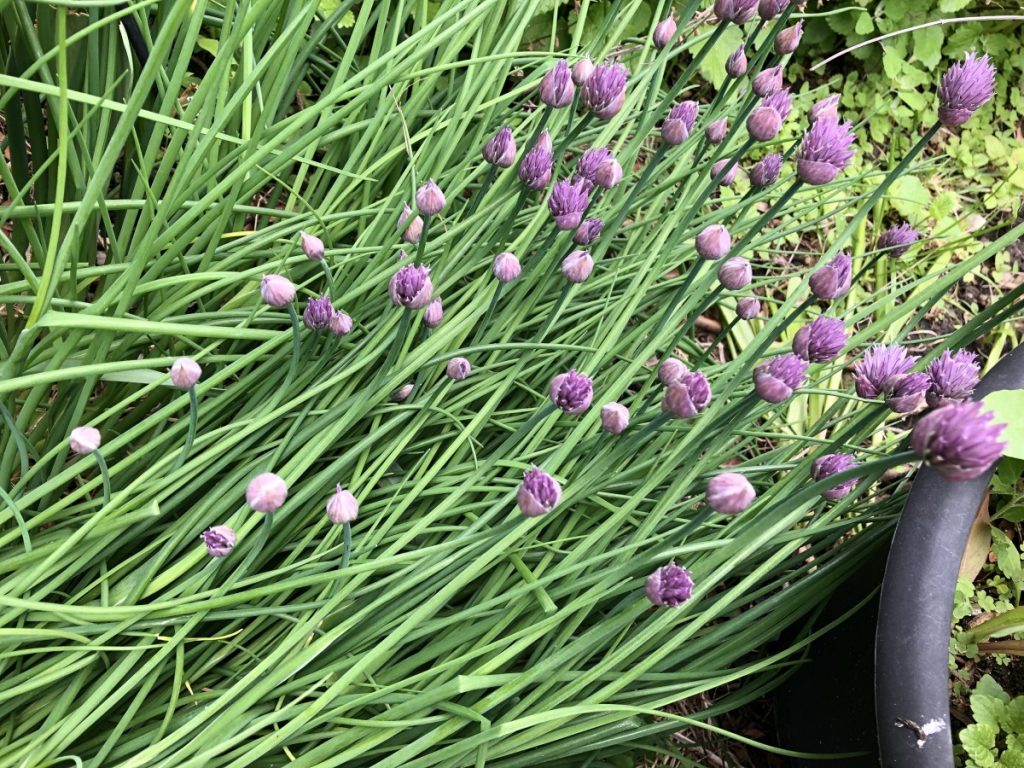
Chives – How to Use, Grow and Preserve


What’s not to love about chives? This allium family herb is an easy to grow perennial. With little effort, you will be rewarded with onion-flavored leaves and blossoms year after year.
When the chives are first up in my garden I want to use them in everything. They will be around all season, but that first Spring harvest is always my favorite.
Their delicate onion flavor goes well with so many dishes. I enjoy cooking with the blossoms, too. Anyplace you might use green onions, you can use chives. I add them to dips, salad dressings, soups, veggie dishes. You get the idea. Same thing with the flowers. Toss them in any dish where you want a mellow, onion flavor. I have a friend who likes to dip the blossoms in batter and deep fry them. Yum!!
Chive Crepes with Crab Filling
Chives add a pretty color and wonderful flavor when used in crepes. I made a crab filling, but you could fill them with any number of savory ingredients. This is a great dish for brunch, lunch or breakfast.
3/4 c. flour
1/8 t. salt
3 eggs, beaten
2 T. melted butter
3/4 c. milk, approximately
1/3 c. fresh chives*
Butter or oil for pan
In blender mix together flour, salt and eggs until smooth. Add butter, milk and chives and blend until batter consistency is that of cream. Let stand for 30 minutes before using, or can be refrigerated, covered, overnight. Mix well, just before using.
Heat 6 or 7 inch skillet. Brush with butter or oil and pour in about 2 teaspoons of batter, tipping pan to cover bottom of pan completely with batter. Cook until edges start to brown, turn over and cook until lightly browned (about 1-2 minutes per side.)
Crepes can be made day ahead or even frozen between sheets of waxed paper and frozen. Makes 12.
When ready to serve: Crepes can be filled ahead or guests can fill their own
* You can use other combinations of fresh herbs like parsley, thyme, cilantro.
Crab Filling – enough for 6-8 crepes
2 T. butter
1/2 c. minced onion
3 T. flour
1 c. milk
Salt and pepper to taste
1 (6-oz.) can crab meat, drained, or 1 c. cooked shrimp
1 c. shredded mild cheese, I used fontina
Chopped chives
Heat butter in skillet and cook onions until tender. Add flour and mix well. Stir in milk and seasonings and cook until sauce is thickened and bubbly. Stir in seafood and heat through. Spoon some of this mixture onto a crepe. Add some cheese and roll up. Garnish with chopped chives. Makes 6-8.
Chive Butter
I also like to make Chive butter. The recipe is pretty simple.
3 T. snipped chives
½ t. lemon zest
1/2 c. (1 stick) softened butter
Mix all ingredients until well combined. Chive butter can be stored in a jar, or wrapped in plastic wrap and chilled or frozen until ready to use. Good with fish, poultry, carrots, and potatoes.
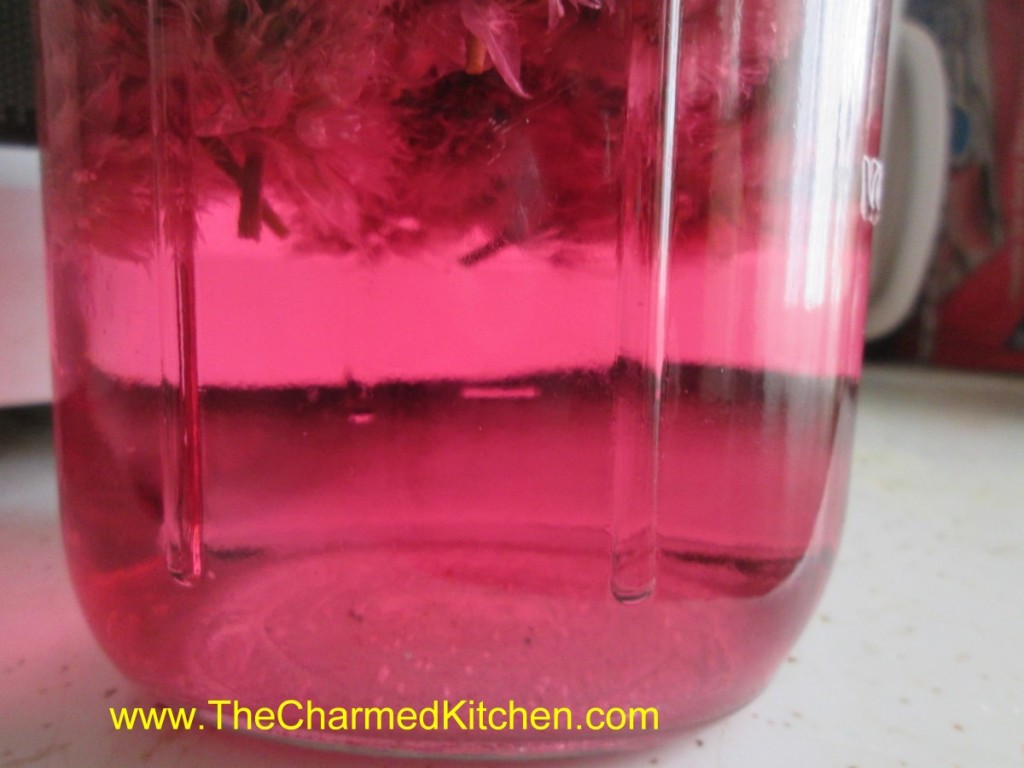
Chive Blossom Vinegar
One of the ways I preserve my herbs every year, is by using them to flavor vinegar. It is easy to do and you’ll have great flavored vinegar to use all year round. You can use the vinegar in salad dressings or in marinades and sauces. Chive blossom vinegar is one of my favorites. I often use white wine vinegar but you can use red wine vinegar, apple cider vinegar or even white vinegar. The blossoms give the vinegar a beautiful color, too.
All you need is a clean jar, chive blossoms and vinegar (5% acidity). The acidity is listed on the label. For every cup of blossoms add 2 cups of vinegar to the jar. Close the jar and put it in a cupboard for a couple of weeks, or longer. When ready to use, strain out the blossoms. Pour the strained vinegar through coffee filters or layers of cheesecloth to get out any sediment. The end result is clear and quite pretty. Store in a cool, dark place for best color and flavor.
Freezing Chives
An easy way to preserve your chives is just to freeze them. Take freshly washed and dried chives and chop them up. You can use a knife, scissors or food processor. Place the chopped chives on a tray or baking sheet and place in the freezer to harden a bit, before transferring to a freezer container or freezer bag. By pre-freezing them before packaging, you keep them from clumping up and freezing into a green lump.
Growing Chives
When growing chives, a sunny, well drained spot is preferred, but chives will tolerate some shade. They prefer to be in the ground, but I have chives that are in pots and thriving. I even have chives that popped up in one of my hanging baskets. They return every year.
Chives require little maintenance, but there is one annual clean-up job: stem removal. At first glance, chives looks like just leaves, but there are stems in there. Each purple chive blossom that appears in Spring is on a stem. While the stems are edible, they are also tough and woody, compared to the leaves. I like to remove the stems once the chives are finished blooming. Even in a large clump of chives, this job only takes about 5 minutes.
First, identify the stems. They either have a chive blossom on them- or they will have a brown tip from where the blossom was removed. When you touch a stem, you’ll be able to tell right away that it is tougher than the leaves. Pinch the stem between your fingers and run your fingers down to the base of the stem. Give a little tug and the stem pops right out. Repeat this with the rest of the stems. Kind of boring, but only take a few minutes. Once done, your plant will be all tender leaves.
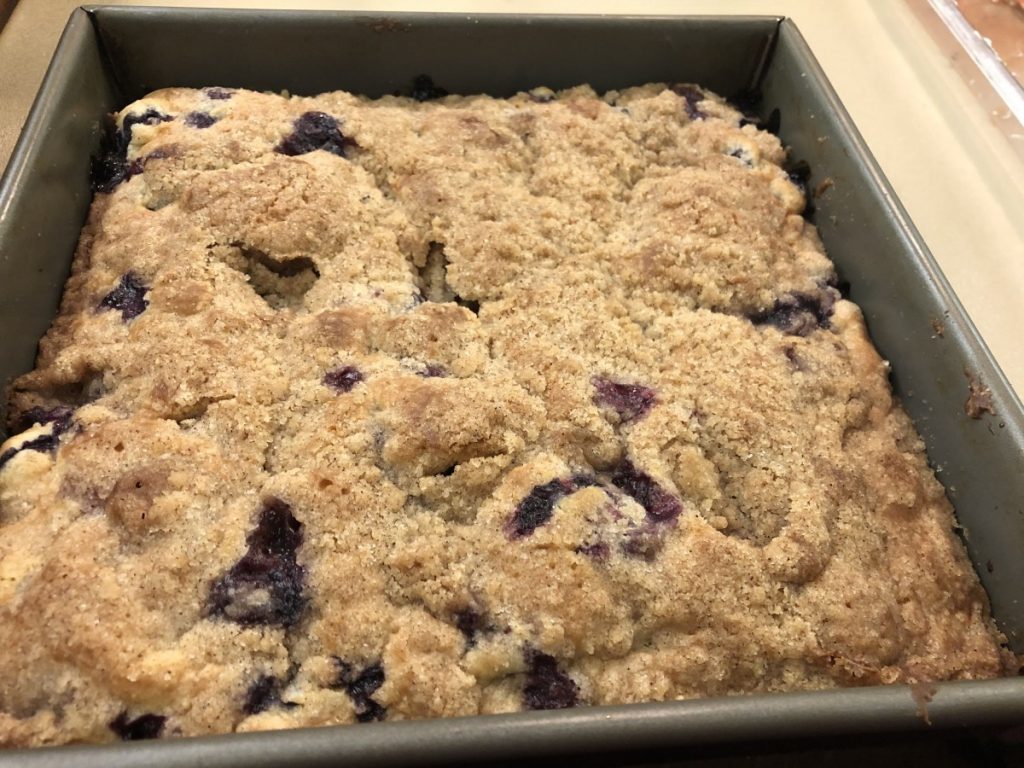
Blueberry Crumb Cake

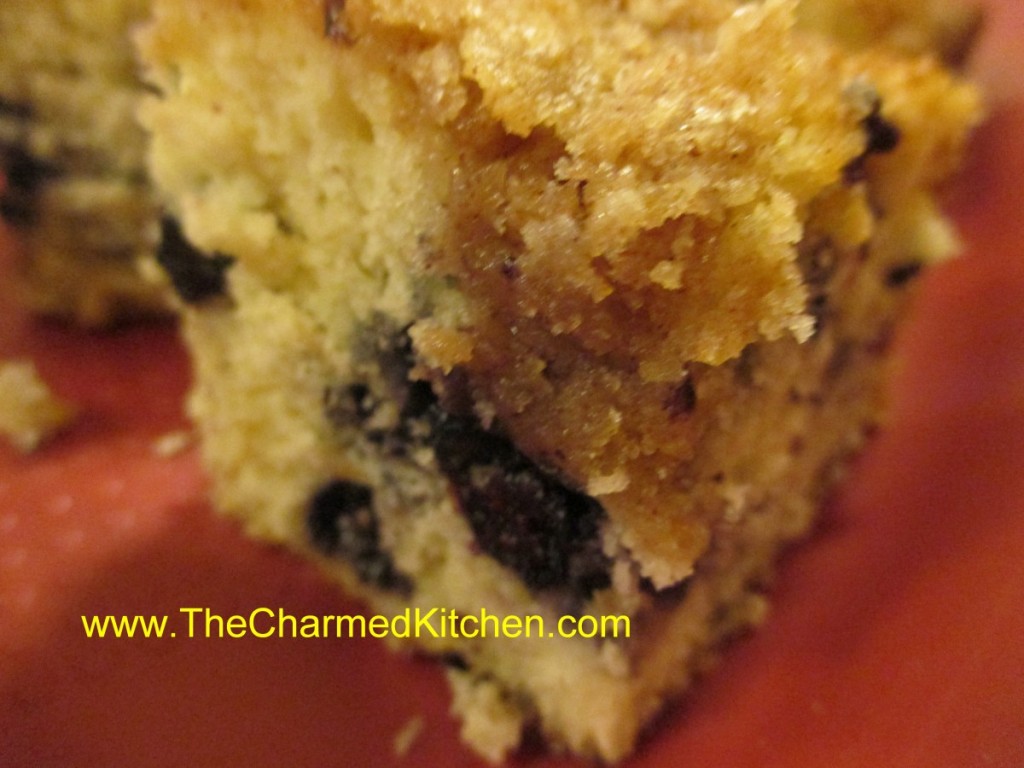
This has always been a favorite cake of mine. The mixture of moist cake and berries would be great on their own, but that crunchy, crumb topping- oh my! Talk about a wonderful combination.
It isn’t a difficult cake to make at all. It is an extra nice cake to take along to picnics and cook outs since there is no frosting to worry about. It can be served plain, or served with a scoop of ice cream of some whipped cream.
So here is the recipe. Enjoy!!
Blueberry Crumb Cake
For cake batter:
2 c. flour
2 t. baking powder
½ t. salt
½ stick (¼ cup) butter, softened
¾ c. sugar
1 egg
½ c. milk
1 pint blueberries, fresh or frozen
For topping:
½ c. sugar
¼ c. flour
½ t. cinnamon
½ stick (¼ c. butter, chilled and cut into bits)
Combine dry ingredients and set aside. In mixing bowl with electric mixer, beat butter and sugar until light and fluffy. Beat in egg and milk. Add flour mixture gradually until just mixed in. Fold in blueberries. Grease and flour an 8 or 9-inch square baking pan and add prepared batter. Combine topping ingredients until they resemble coarse crumbs. Sprinkle over batter in pan and bake in a preheated 375-degree oven and bake for 35-45 minutes. Use toothpick to test.
Note: I have used a 9-inch round pan and it worked fine.
Strawberry “Pink” Lemonade

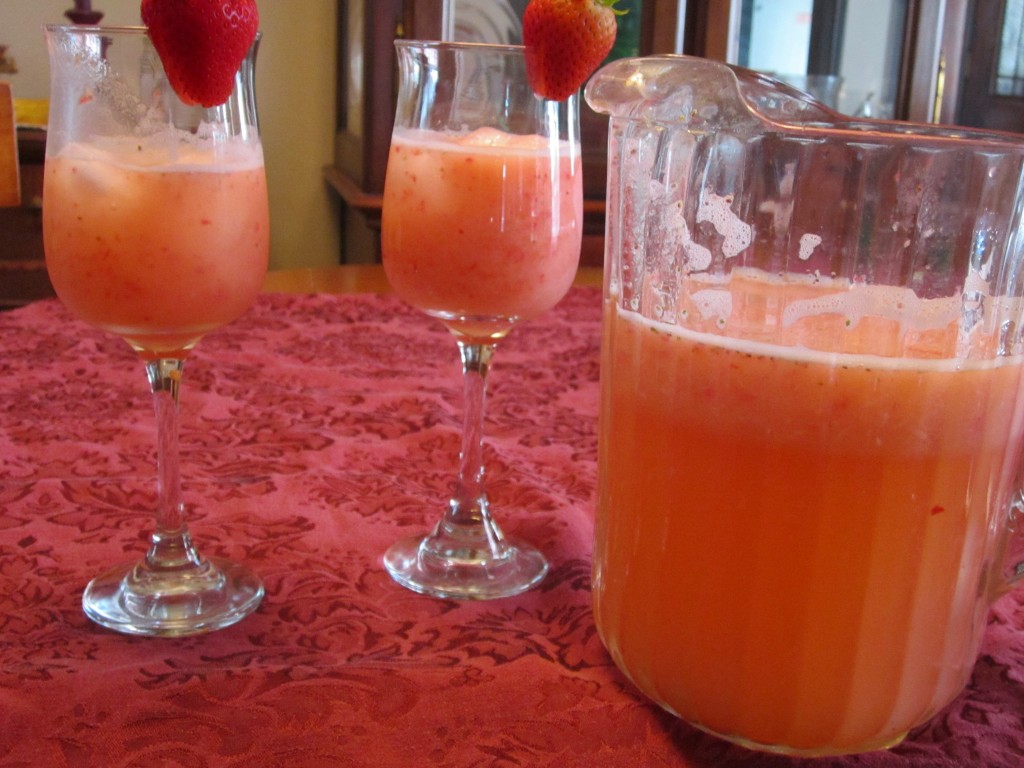
I love this “pink” lemonade. The lovely blush comes from strawberries, not artificial color. The strawberries add more than just color- they add their wonderful flavor as well.
This is a great drink for hot summer days. Heck, I think its a good drink anytime. You don’t have limit yourself to lemonade. I made a pink limeade, which is also very tasty. We had it at a picnic with friends.
The strawberry seeds will settle to the bottom of the pitcher- so be careful when pouring out the last bit of lemonade. No one wants a mouth full of seeds.
This lemonade can also be used as a base for cocktails.
Here is the recipe. I have also included some helpful information when buying strawberries.
Strawberry Lemonade
7 c. water
1¼ c. sugar
1¼ c. lemon juice
2-3 c. fresh strawberries, washed and stemmed
In a pitcher, combine water with sugar and lemon juice and stir until sugar dissolves. Place berries in blender and add about 2 cups of the lemonade. Process until strawberries are pureed. Add strawberry mixture to the remaining lemonade. Chill before serving. Serve over ice, garnishing with whole berries, if desired. Watch as seeds will accumulate on the bottom of the pitcher.
Shopping Tip
When berries are priced by weight or volume it is not always easy to decide which is the best price. If one store has quarts for $2 and another had berries for $2 per pound where would you get the better deal? Also, if a recipes calls for 4 cups sliced berries how many do you need to buy? Here are some approximate guidelines.
3/4 lb. = 1 full pint
1 1/2 lbs. = 1 full quart
1 1/2 lbs. = 4 cups sliced
1 lb. frozen = 1 1/3 c. whole berries
To help your berries last longer soak them in a water/vinegar solution for a few minutes as soon as you get them home. Then just drain and put in the fridge. This will keep them from getting mold as quickly. I use 1/2 cup of vinegar and 4 cups of water.


