Blueberry Sweet Rolls

Since I froze blueberries last summer, I have plenty to cook with now. It has been a lot of fun. Sometimes, I just eat the blueberries right out of the freezer.
These sweet rolls are a favorite recipe of mine. They are not too sweet, even with a powdered sugar glaze. Great for brunch or breakfast. Sweet enough to be dessert, too.
The base of the rolls is a rich, yeast dough. The dough is divided in half, rolled out, then brushed with butter. Then the dough is sprinkled with cinnamon sugar and topped with blueberries. The dough is rolled up, jelly roll fashion, then sliced into rolls.
The rolls are baked in 2 (9-inch) cake pans. The recipe makes 24 blueberry rolls. The rolls can be frozen.
I used frozen berries, but fresh work too. A good reason to buy extra berries and freeze them!!
Blueberry Sweet Rolls
3-3 1/2 c. bread flour
1 package active dry yeast
1 1/3 c. evaporated milk
6 T. butter
1/4 c. sugar
1 t. salt
1 egg
6 T. butter, melted
1/2 c. sugar
2 t. cinnamon
1 t. grated lemon or orange peel
2 c. fresh or frozen blueberries
In bowl combine 1 1/2 c. of the flour with the yeast, sugar and salt. Heat together the milk and 2T. of the butter until warm and add to the flour mixture, beating 2 minutes. Add egg and beat 2 minutes longer. By hand stir in enough of the remaining flour to make a soft dough. Turn dough onto a lightly floured surface and knead, adding flour as needed until dough becomes moderately stiff. Place in greased bowl, turning once to coat and cover. Allow to double in bulk, about 1 1/2 hours. Punch dough down, cover, and let rest 10 minutes. Divide dough in half. Roll each half into a 14×8 inch rectangle. Brush dough with the melted butter. Combine the remaining sugar, peel and cinnamon and sprinkle over the dough. Top with the blueberries and press the berries into the dough. Starting at the long side roll up dough jelly roll fashion and seal edge by pinching. Repeat with second roll. Cut each roll into 12 slices and place 12 rolls in greased 9 inch round pans. Cover pans and allow to rise until doubled, about 30 minutes. Bake in a 375 degree oven for 20-25 minutes. While rolls are warm, you can top with a powder sugar glaze, if desired. Makes 24.
Matzo Ball Soup
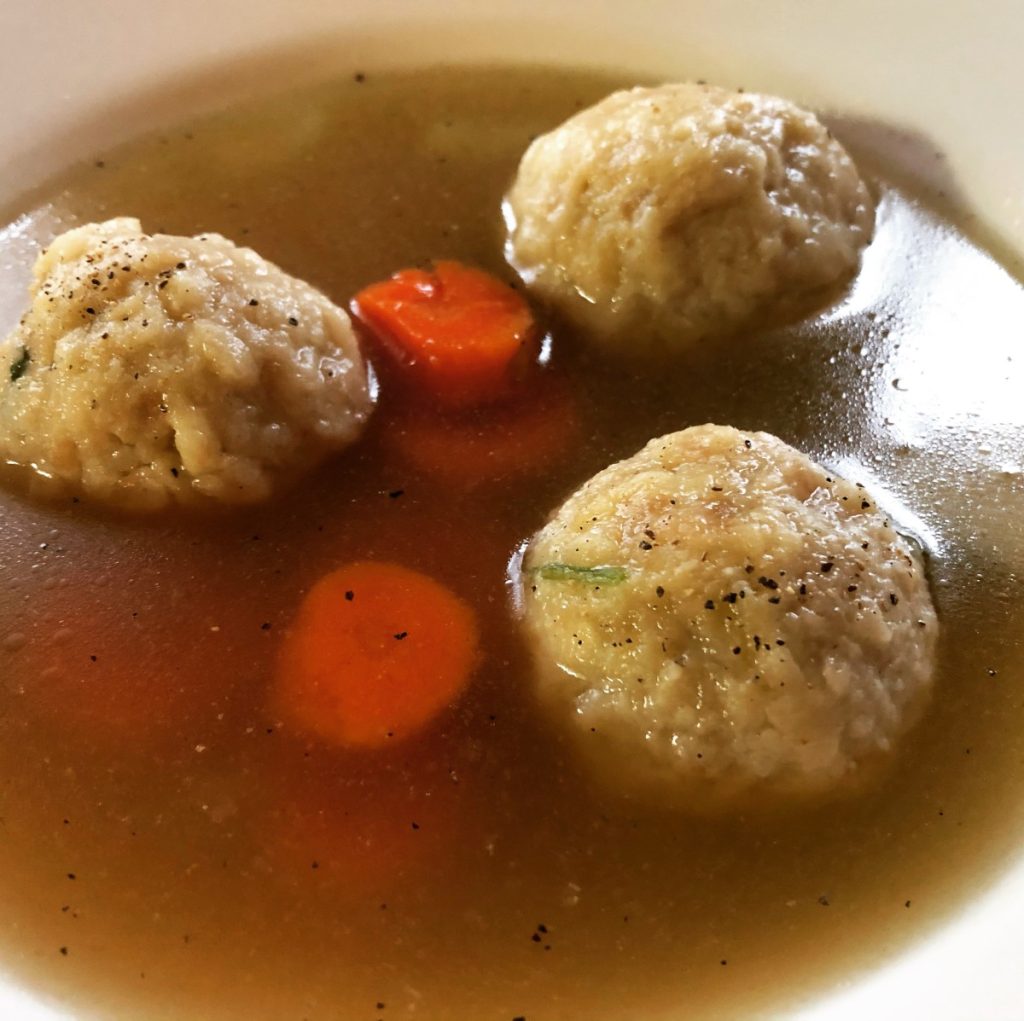
Matzo ball soup is a classic. The basic part is pretty much the same- a rich chicken stock, with or without a few vegetables, with the star of the show being the matzo balls. After that, there are a lot of subtle differences in the actual matzo balls. That is fine. If I asked 10 friends how they make chicken salad I would get 10 different recipes.
You start with matzo crackers or matzo meal, or both. Eggs are in pretty much every recipe along with chicken fat- or butter if you don’t have chicken fat. You mix the crumbled matzo and eggs to form a dough. The dough will be formed into balls that will be simmered in the broth. You want a matzo ball that won’t fall apart, but that is still tender. After you make them a few times, you can tell right away if you need to add broth, or matzo meal or an extra egg.
Matzo Ball Soup
1 (10 oz.) package matzo crackers
1/4 c. chicken fat, (preferred), or butter or oil
3 eggs
salt and pepper to taste
2 T. minced parsley
1 small onion, minced, optional
2-3 oz. matzo meal
6-8 cups chicken stock
Break matzo into small pieces and place in a large bowl and pour in cool water to cover. Allow to soften a few minutes then drain off extra water. Melt chicken fat or butter in large skillet and add matzo. Cook over medium heat, stirring often until matzo is dry and toasted. Remove from heat, cool, then stir in eggs, seasonings and onion. Mix in just enough of the matzo meal to hold the mixture together. If mixture is too dry, add some of the chicken stock, a tablespoon at a time. It really is best to mix with your hands at some point. Chill before forming into balls. Make a golf ball sized matzo ball and place it in a pot of salted boiling water. This is a test to see if the ball holds together and rises to the tops of the soup. If it will not rise in a few minutes, add an extra egg to remaining mixture. If it falls apart, add a little more matzo. Make mixture into golf ball sized matzo balls. Bring chicken stock to a simmer and add the matzo balls. Cook until heated through and floating. Serves 4-5.
Note: I like to add carrots and celery to the soup as well. I cook them in the stock until tender, before adding the matzo balls.
Chili Stew

We made this dish in class the other night. It’s a great dish when time is short. It is fast to make and still has plenty of flavor. It falls somewhere between a chili and a stew, so that is where the name came from. I like it because it can be made from so many ingredients I already have in my pantry/freezer. This is a fun dish to serve for Super Bowl Sunday!!
Can be served as is, or topped with cheese, sour cream or chopped onions. Perfect dinner for a “chili” night.
Chili Stew
1 pound ground beef or turkey
1 medium onion, chopped
1 small sweet pepper, chopped
1 (15 ounce) can black beans
2 (16 ounce) cans kidney beans, rinsed and drained
2 c. corn, fresh, frozen or canned (drained)
1 (14.5 ounce) can diced tomatoes
1 (8 ounce) can tomato sauce
1 (4 ounce) can chopped green chilies
1 envelope taco seasoning
2 tablespoons chili powder
1/2 teaspoon salt
In a Dutch oven or large saucepan, cook the meat, onion and pepper over medium heat until meat is no longer pink; drain. Stir in remaining ingredients. Bring to a boil. Reduce heat; simmer, uncovered, for 15 minutes, stirring occasionally. Serves 4-5.
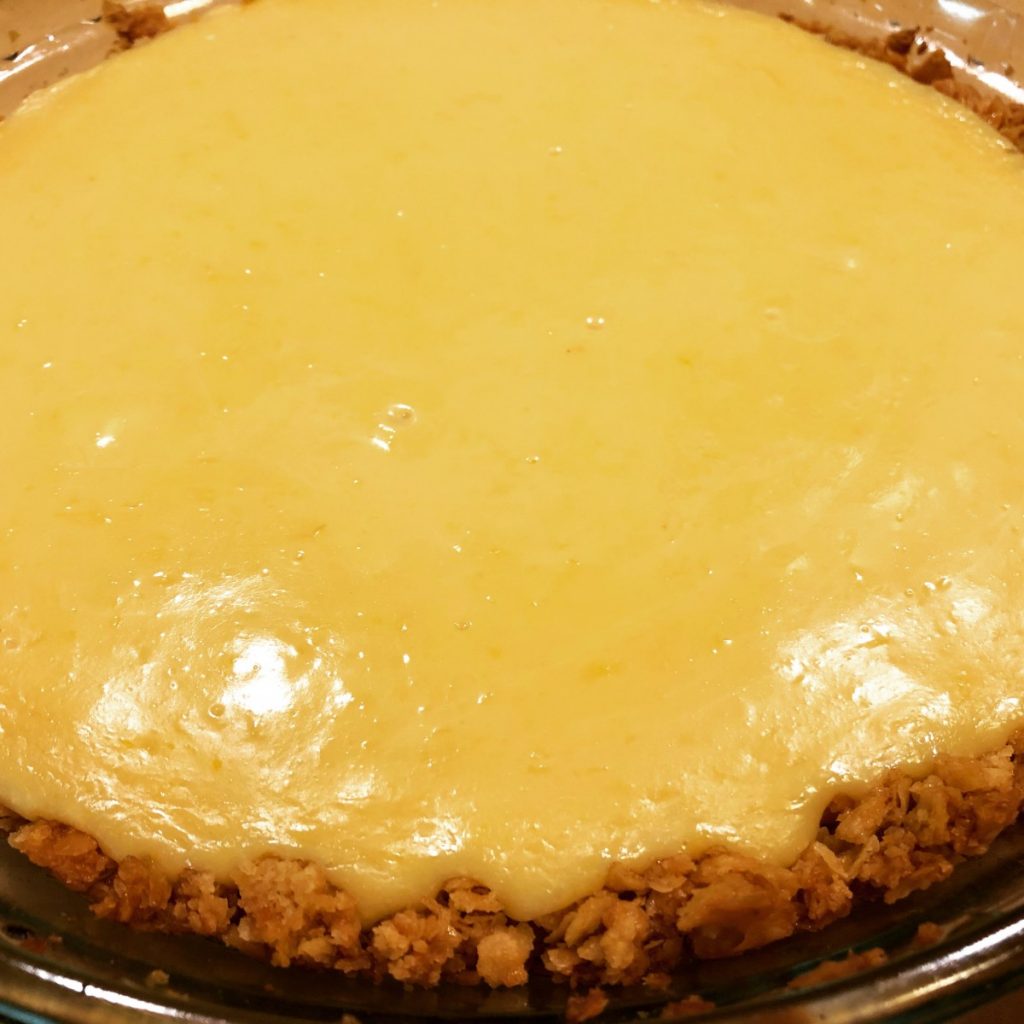
North Carolina Lemon Pie

This might be one of the best lemon pies I have ever had. It was simple to make, with a surprise ingredient in the crust. That ingredient is saltine crackers! They work so well in this crunchy and slightly salty/slightly sweet crust. Perfect with the lemon filling.
I first heard about this pie in one of my cooking classes. A woman mentioned it to me after class. Said she saw it on a TV show. I looked for it online. Odd thing was that every recipe was exactly the same. Even down to the wording in the directions.
I found one reference to the recipe first showing up in Cook’s Country Magazine about 6 years ago. I prefer to credit the source of a recipe, when possible.
I did change a couple of things from the original recipe. I added more lemon zest- from 1 tablespoon to 2. What can I say? I like a zesty pie.
I also thought it was odd to make so little whipped cream for the topping. Assuming you had a cup of whipping cream to start with, you use 1/4 cup in the pie filling. That leaves you with 3/4 cup of whipping cream. The recipe only calls for whipping up 1/2 a cup of whipping cream. I rounded it up in the recipe to 3/4 cup. Honestly, I would make even more topping the next time.
I really enjoyed the pie. I think you will, too.
North Carolina Lemon Pie
Crust
6 oz. saltine crackers (about 1½ sleeves)
1/8 teaspoon salt
10 tablespoons unsalted butter, melted
1/4 cup light corn syrup
Filling
1 can sweetened condensed milk (14-ounce)
4 large egg yolks
¼ cup heavy cream
1-2 T. grated lemon zest- I used 2 tablespoons
½ cup lemon juice
Topping
¾ c. heavy cream, chilled- increase from original recipe. I think even more whipped cream would be better. Just my preference.
1 T. sugar
1 t. vanilla extract
Preheat your oven to 350 degrees. Add the saltines and salt to the food processor and pulse until you have coarse crumbs (about 15 pulses). Add the melted butter and corn syrup and pulse until the crumbs are well combined.* Add the cracker mixture to a greased 9-inch pie plate. Use the bottom of a dry measuring cup or glass and press the crumbs into an even layer on the bottom and up the sides of the dish. Place the pie plate on a baking sheet and bake until light golden brown, 17 to 19 minutes. Prepare filling while the crust is baking. Whisk the sweetened condensed milk, egg yolks, cream, and lemon zest together in a bowl, add the lemon juice and whisk until well combined. With the pie plate on the baking sheet, remove it from the oven and pour in the filling (the crust does not need to be cooled) and place it back in the hot oven. Bake until the edges of the pie are set but the center still jiggles, 15 to 17 minutes. Place the pie on a wire rack and let it cool completely. Refrigerate the pie until completely chilled.
For the topping, use a stand mixer fitted with a whisk and whipped the cream, sugar, and vanilla on medium low until foamy (about a minute). Increase the mixer speed to high and whip until stiff peaks form, 1 to 3 minutes. Spread the whipped cream over the top of the pie and serve cold.
*Note: I will admit to just crushing up the crackers by putting them in a bag and using a rolling pin. I had a few larger pieces. Still worked. I think it gave the crust a crunchier texture. Although it sank down into the pie pan when I baked it- so maybe next time I will crush the crackers a little more.
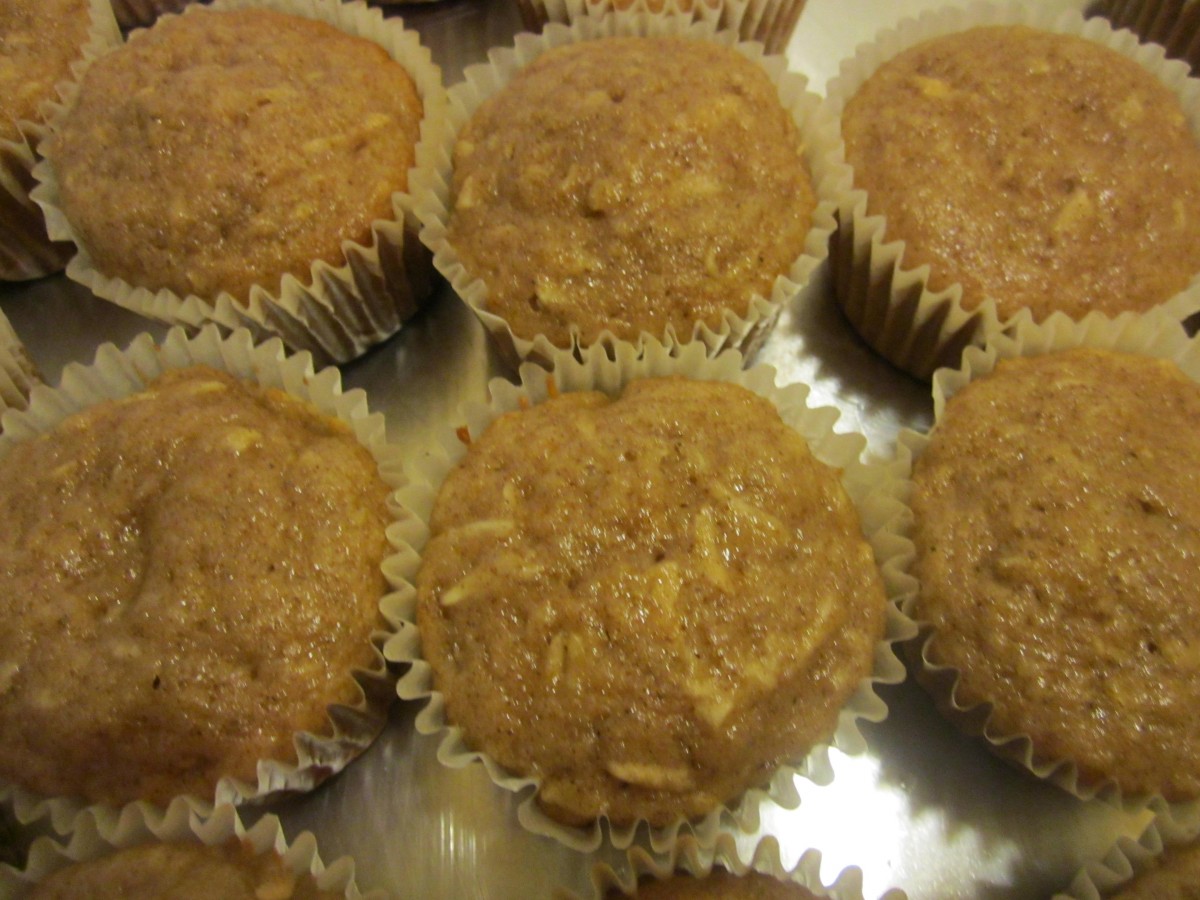
Spiced Parsnip Cupcakes

If you only use parsnips in savory dishes (or maybe you never use parsnips at all), you might be surprised to see them used in a dessert. Truth is, parsnips are similar in flavor to carrots and carrots are used in cake quite successfully. While not exactly the same in flavor, think of parsnips as white carrots.
Combined in a spiced batter, they make wonderful cupcakes. Good any time of the year, they seem especially nice for a winter dessert. Parsnips- they are not just for soup anymore!!
Spiced Parsnip Cupcakes
1 1/2 c. flour
1 c. sugar
1 T. ground ginger
1 T. cinnamon
2 t. baking powder
1 t. nutmeg
1 t. allspice
1 t. salt
1/2 t. cloves
3 eggs
1/2 c. oil
1/2 c. milk or half and half
2 t. vanilla
2 c. packed peeled and shredded fresh parsnips, 2-3 large
1/2 c. chopped nuts, optional plus extra for topping, optional
1 recipe cream cheese frosting- see below
Preheat oven to 350. Line 24 cupcake pans with paper liners- or grease lightly. Combine dry ingredients in a mixing bowl. In smaller bowl combine eggs, oil, milk and vanilla and mix well. Stir egg mixture into flour mixture until smooth. Stir in parsnips and nuts, if adding. Spoon batter into the prepared pans, filling half-full. Bake for 15 minutes – or until toothpick inserted into a cupcake comes out clean. Cool and frost. Sprinkle with fine chopped nuts, if you like. Makes 24.
Cream Cheese Frosting
8 oz. cream cheese, softened
4 0z. (1 stick) butter, softened
1 c. powdered sugar
1 t. vanilla
Beat all ingredients together until fluffy. Frost cupcakes and chill until ready to eat.
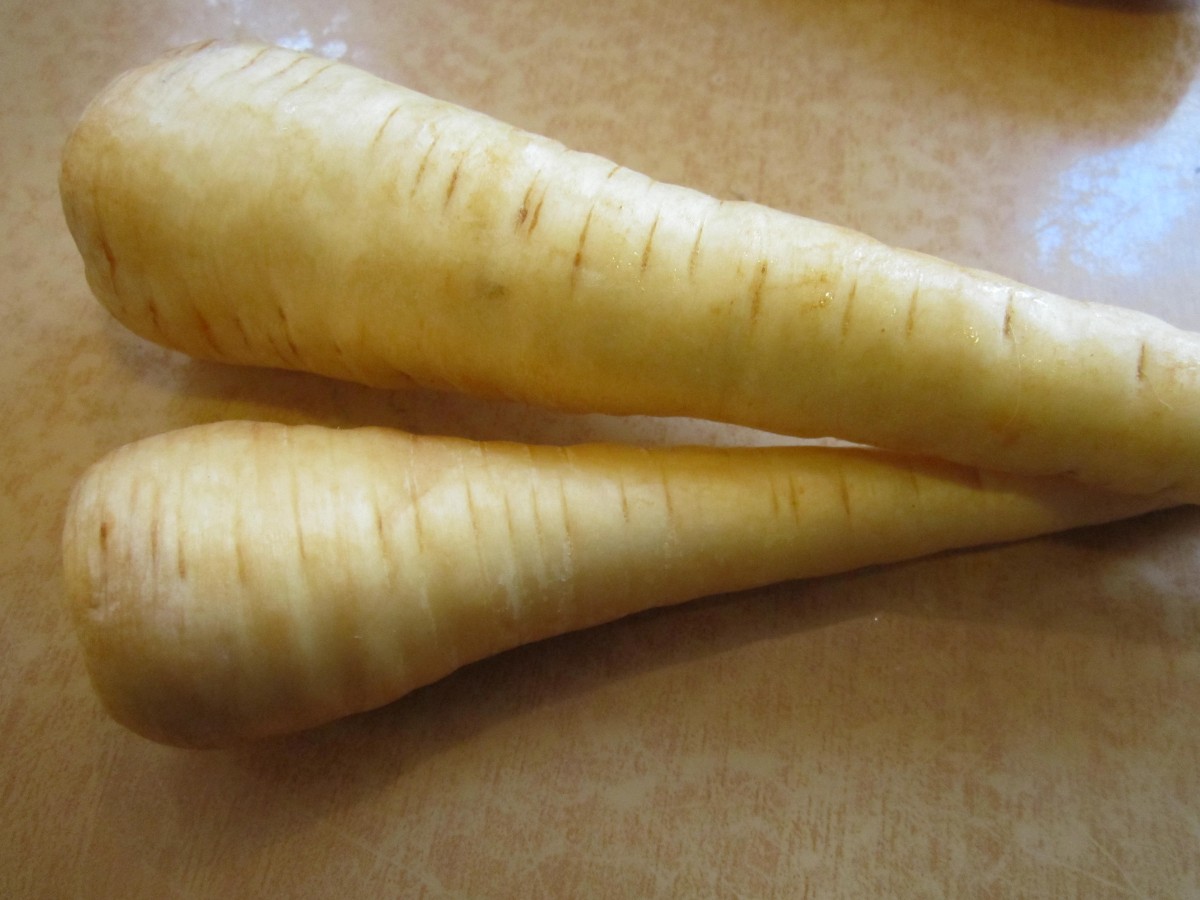
Parsnips
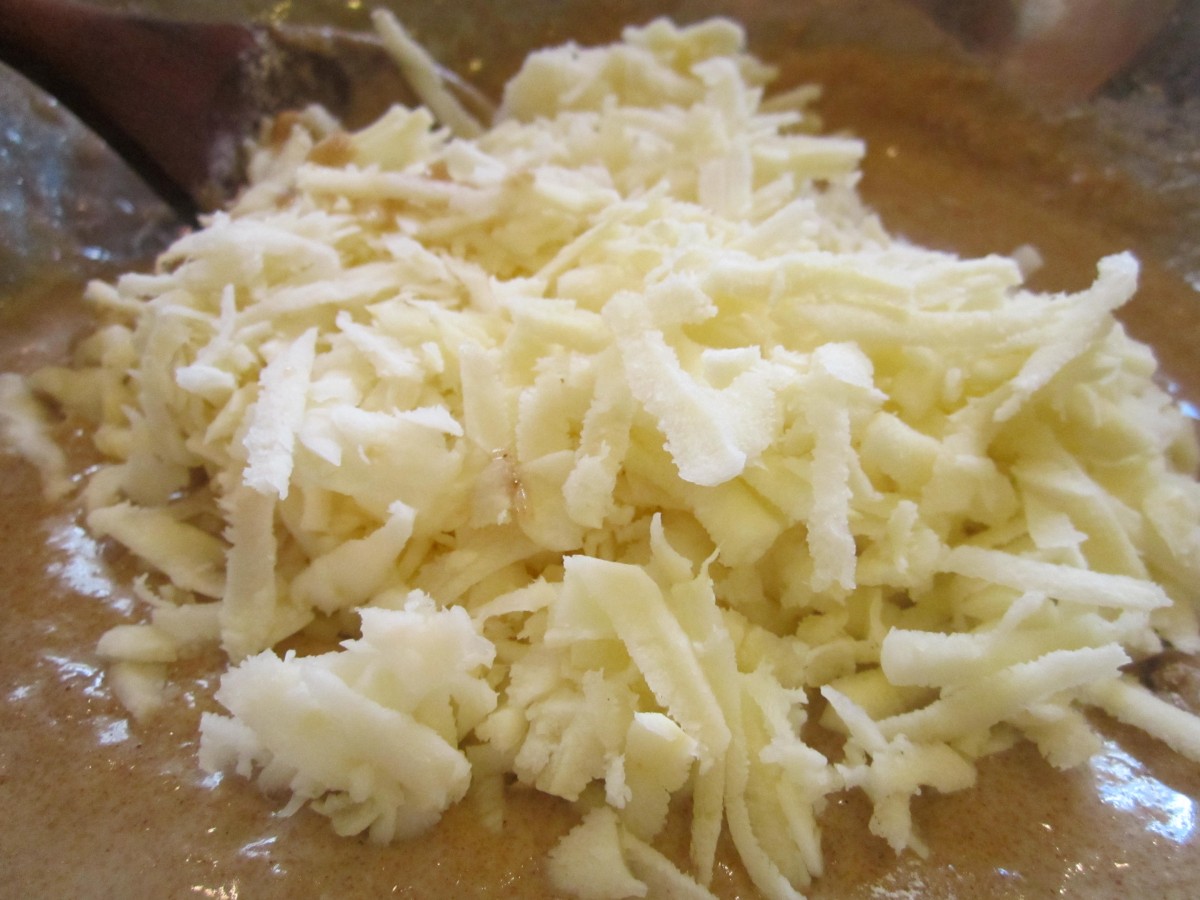
Shredded parsnips
Fresh out of the oven
Mom’s Chili

I love chili and make all sorts of variations, but I crave this simple version my Mother used to make. It was one of my favorite dishes when I was a kid. She’d often make cornbread to have with it. I admit to spicing it up more now, often adding a good shot of hot sauce, but it is still the same dish I remember so fondly. I always think about the book Rebecca by Daphne Du Maurier when I think about Mom’s chili. It was a really cold rainy day and I was stuck inside. I’d lost myself in the book and was totally engrossed when she called me to dinner. I think chili was about the only thing that would have pulled me away from that book.
Mom’s Chili
1 large onion, chopped
Oil
1 ½ lbs. coarsely ground beef
1 (28 oz.) can crushed tomatoes
2 cans (about 15 oz.) kidney beans, rinsed and drained
1 T. minced garlic
¼- ½ c. chili powder
Salt and pepper to taste
Hot pepper sauce to taste
In Dutch oven or soup pot sauté onion in oil until tender. Add meat and cook until no pink is visible. Drain off excess fat and add tomatoes, beans, garlic and chili powder to taste. Cover and simmer over low heat until flavors blend, about 30 minutes. Adjust seasonings and serve. Serves 4-6.
Peanut Butter Dipping Sauce

The year of the Tiger is coming and Asian food is on the menu. This dipping sauce goes well with all sorts of dishes. It has a creamy texture and packs a lot of flavor with a little heat. Added bonus, it is easy to make and requires no cooking. A friend had enjoyed a similar sauce in a restaurant and asked if I had a recipe for it. I did! She made it and said it was wonderful. So here is the recipe….
Peanut Butter Dipping Sauce
1/3 c. peanut butter
1/3 c. coconut milk
1/2 t. crushed red pepper
1-2 cloves garlic
1 t. fresh grated ginger
1 t. soy sauce
Dash hot red pepper sauce
Salt and pepper to taste
Combine all ingredients in a blender or food processor until smooth.
Note: If you want to use this sauce on pasta thin it with 1/3 cup of vegetable stock.
Asian Turnip Cakes

If you are planning a party for Chinese New Year, you might want to make turnip cakes.
I first had turnip cakes at a local Asian restaurant. I loved them, and was intrigued at how to make them. They were little squares, lightly crisped on the outside, smooth and creamy in the middle.
When I first heard turnip cake- I was thinking of the purple and white turnips I knew. That is not what these turnip cakes are made from.
It helped a lot when I realized the “turnip” cake was actually made from Daikon radish. Daikon radishes are also called Chinese turnips. They are really big, white radishes. They are available at Asian grocery stores and other grocery stores. Now that I knew the ingredient I needed, I had to find a recipe.
I searched the internet and found a lot of different variations for how to make them.
The first recipe I tried was more like a potato pancake. Shredded radish paired with eggs and bread crumbs. They were good, but not what I had at the restaurant. The turnip cake I had enjoyed was smooth and sort of starchy. Plus, it was a neat square shape.
I found several recipes that included the steaming step. This enabled the cakes to be set up with a starch, cooled and sliced before the final frying step. This was what I wanted!!
The most promising recipe included rice flour- but I was out of rice flour, so I improvised with cornstarch and a little wheat flour. It worked really well.
Many recipes included shrimp or Chinese sausage and sometimes green onions. I decided, this time, to make them vegetarian. That worked well, but you certainly could add meat or shrimp to yours.
I shredded the daikon pretty fine, but you could still discern the radish in the final dish. I liked that a lot. I did not grate them as some recipes suggested.
So here is my version of turnip cakes. They sound like a bit of work, but it really is worth the time. I also like that all the prep can be done a day or two ahead of time, then just slice and fry when you want them.
Turnip Cakes
1 large Daikon radish- about 1¼ lbs., give or take
1 c. water
½ c. minced onion
1 t. salt
½ t. white pepper
½ c. cornstarch
2 T. flour
Oil for frying
Oyster sauce for dipping, optional
Peel and shred radish. I used a fine shredding blade. Squeeze out some of the liquid from the radish. Place shredded radish in bowl with the water and onion and steam in microwave for 4-5 minutes- you can also place radish and onion in saucepan with water and simmer 4-5 minutes. Set aside to cool. Combine the radish mixture with the cornstarch, flour salt and pepper. Oil an 8×4-inch loaf pan. Place the radish mixture in the prepared pan and steam for 50 minutes.* I placed plastic wrap over the pan to prevent water from dripping into the pan. Remove pan from steamer and cool down for at least 30 minutes. . At this point you can finish preparing the turnip cakes- or place in fridge until ready to make them. When ready to fry the turnip cakes, remove from the pan and cut into slices- about ¾ -inch thick. Heat oil in a skillet over medium high heat. Cook cakes in oil on both sides until golden brown and crisp. Drain on paper towels. Serve with oyster sauce- or whatever dipping sauce you prefer. Makes about 10.
* To steam the mixture- I just used a large stock pot with a cooling rack in it. I brought about 2 inches of water to a boil, placed the pan on the rack and covered the pan. You could also steam in the oven with a roasting pan, with an inch of boiling water in it and covered with foil.

Slicing the turnip cakes before frying
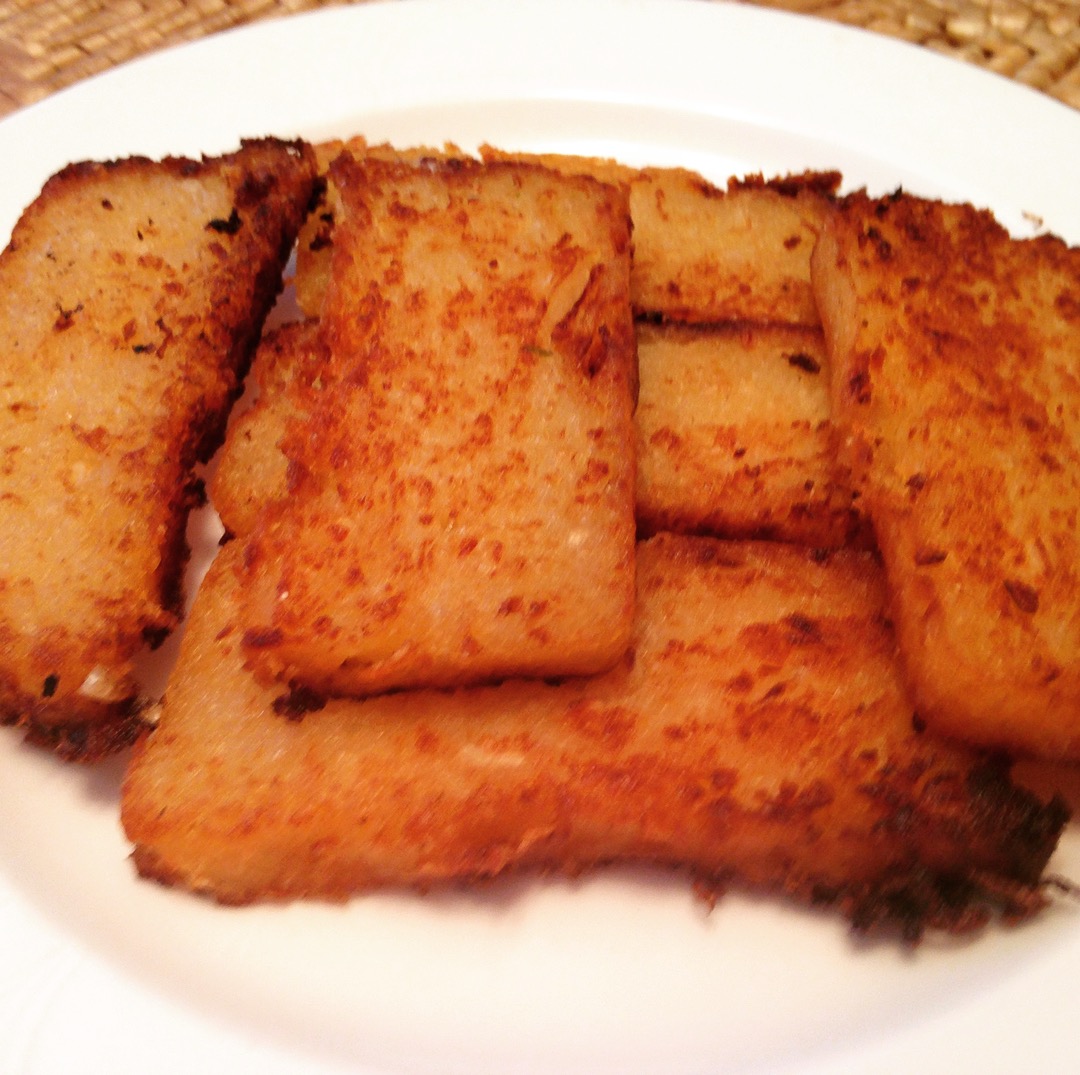
Ready to serve
Wonton Soup
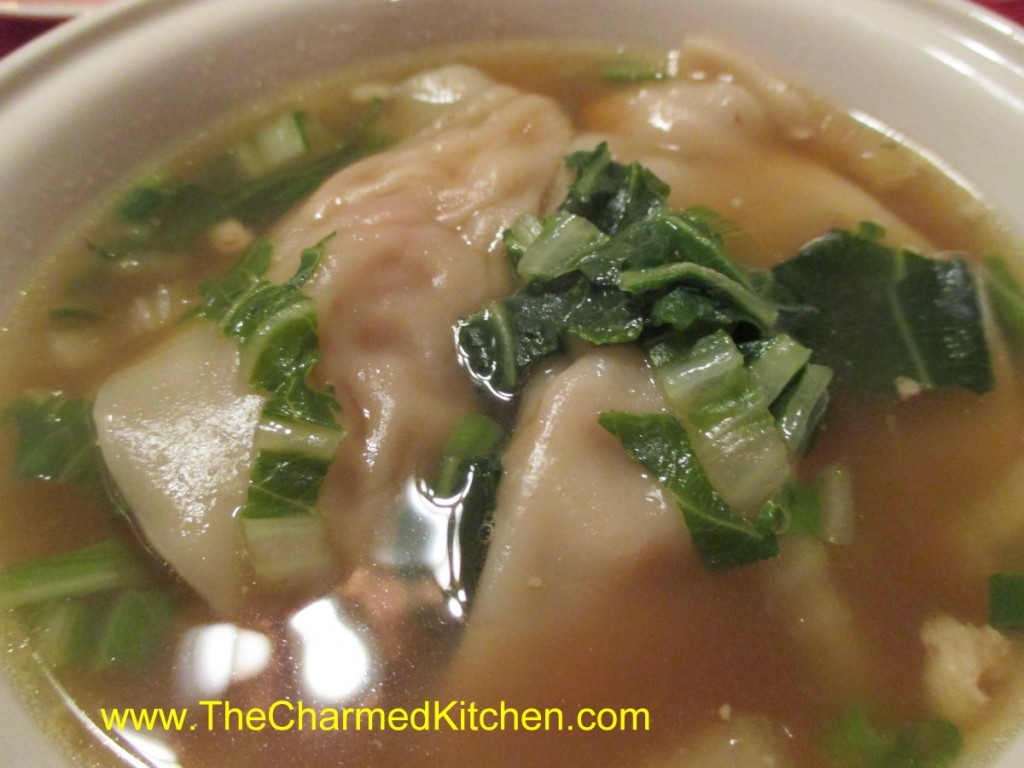
For me, Wonton soup always brings back memories of going out for Chinese food with my family, when I was a kid. The restaurant would serve it family style, and my mom or dad would ladle out everyone’s soup. It always looked and smelled wonderful. Tasted wonderful, too. Even more special, because we only had it when we out to dinner.
The one problem I find when trying to make this soup at home is finding wonton wrappers that are thick enough. The square ones I find at the neighborhood grocery store are OK, but thinner than the ones in Wonton Soup at a restaurant. At a local Asian grocery I have found round wrappers that are labelled for dumplings and are thicker. That is what I used. They worked out better. You can play around with fillings. I often add shrimp as both a filling, and to the soup itself.
Wonton Soup
1½ lb. chicken
1 head bok choy, or 4-5 baby bok choy
3 T. hoisen sauce
1 clove garlic, minced
24 won ton wrappers
2 qts. chicken stock
1 t. ginger
1 t. hot pepper sauce
Chopped green onions
Sesame oil
Bake the chicken until cooked. I used boneless chicken thighs, but even leftover roasted chicken would work. You can also used pork. Once cooled, I minced enough of the chicken to give me 1 cup of meat. The rest I cut into thin strips. I then took stems from the bok choy and minced enough of them to make 1 cup. Combine the minced chicken with minced bok choy, the hoisen and the garlic. This is the filling for your wontons. Slice more of the bok choy- using mainly the leaves, into thin shreds. This will go into the soup later, along with the strips of chicken. You should have at least a couple of cups of the shredded bok choy, but more is OK, too. To make the wontons place one on your work surface and spoon a rounded teaspoon of the filling into the middle of it. Moisten edge with water, fold in half and press to seal. I used round wrappers, but square wrappers are fine, too. Repeat with remaining wontons and fillings until done. Bring stock to a boil and add the ginger and hot sauce. Add the wontons to the simmering stock. Simmer gently for 3-4 minutes, stirring occasionally, then add the strips of chicken and the shredded bok choy greens. Cook about 5-6 minutes longer. Finish soup with chopped green onions and a drizzle of sesame oil. Serves 6-8.
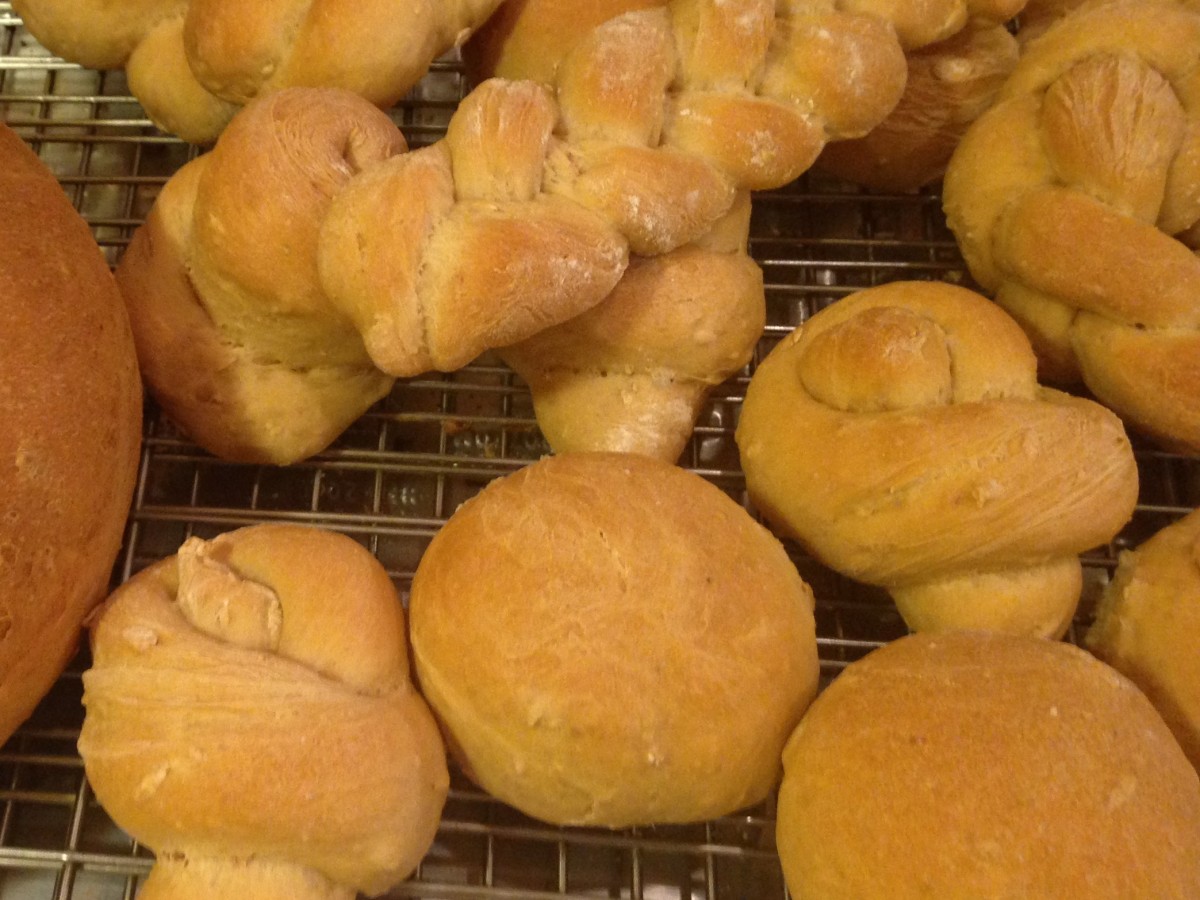
Oatmeal Bread
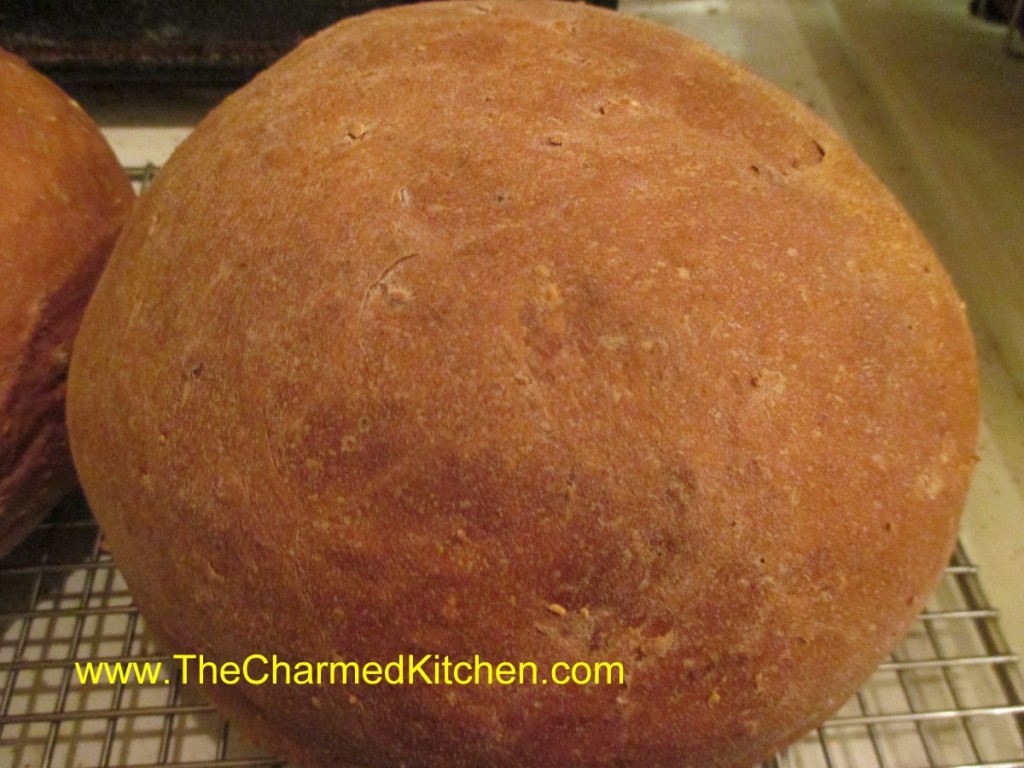
This oatmeal bread is one of my favorites. With the addition of molasses, the bread has an earthy sweetness that works well with the oatmeal. It makes a great sandwich bread and I love it for French toast.
This is a very versatile recipe. You can make 2 round loaves, or bake it in 2 loaf pans (9×5) or even make dinner rolls out of it. I sometimes make hamburger buns out of it.
When making dinner rolls, instead of loaves, reduce baking time to about 15 minutes- but check on rolls at 12 minutes. Baking temperature remains the same.
There is something about the smell of baking bread that always makes me remember my childhood and going to the movies. I know that sounds odd, but there is an explanation. When I was a kid there was a neighborhood movie theater. It was close by, and we would walk there to see movies. On the walk home we walked past a local bakery. Late at night they would be baking bread and other goodies for the next day. The air would be filled with the aroma of baking bread.
Oatmeal Bread
5-5 ½ c. flour
1 package active dry yeast – or 2 1/2 teaspoons yeast
1 ½ t. salt
1 1/3 c. water
¼ c. milk
¼ c. molasses
¼ c. butter
1 egg
1 c. old fashioned oatmeal
In large bowl mix 1 cup of the flour with yeast and salt. In small pan heat together next 4 ingredients until warm. Pour into bowl with flour mixture and beat 2 minutes. Stir in 1 cup additional flour and egg and beat 2 minutes longer. Stir in oatmeal and 1 cup more flour and stir, adding enough flour to form soft dough. Turn onto lightly floured surface and knead, adding flour as needed until dough is smooth and elastic. Place dough on a greased bowl, turning to grease top and cover, allowing to rise in warm place until doubled in bulk, about 1 hour.
Grease a large baking sheet and set aside. Punch dough down and divide in half. Shape each half into a ball and place on prepared sheet. Cover with towel and allow to rise until doubled, about 1 hour. Bake in a preheated 375 degree oven for 30 minutes or until done. Loaves are done when they sound hollow when tapped lightly. Makes 2 loaves.
This versatile dough can also be shaped into loaves and places in 8×4-inch greased loaf pans. Baking time will remain the same. Dough can also be divided into 24 equal pieces and shaped into dinner rolls. Bake rolls at 375 for 15 minutes.


