Tortellini Artichoke Salad
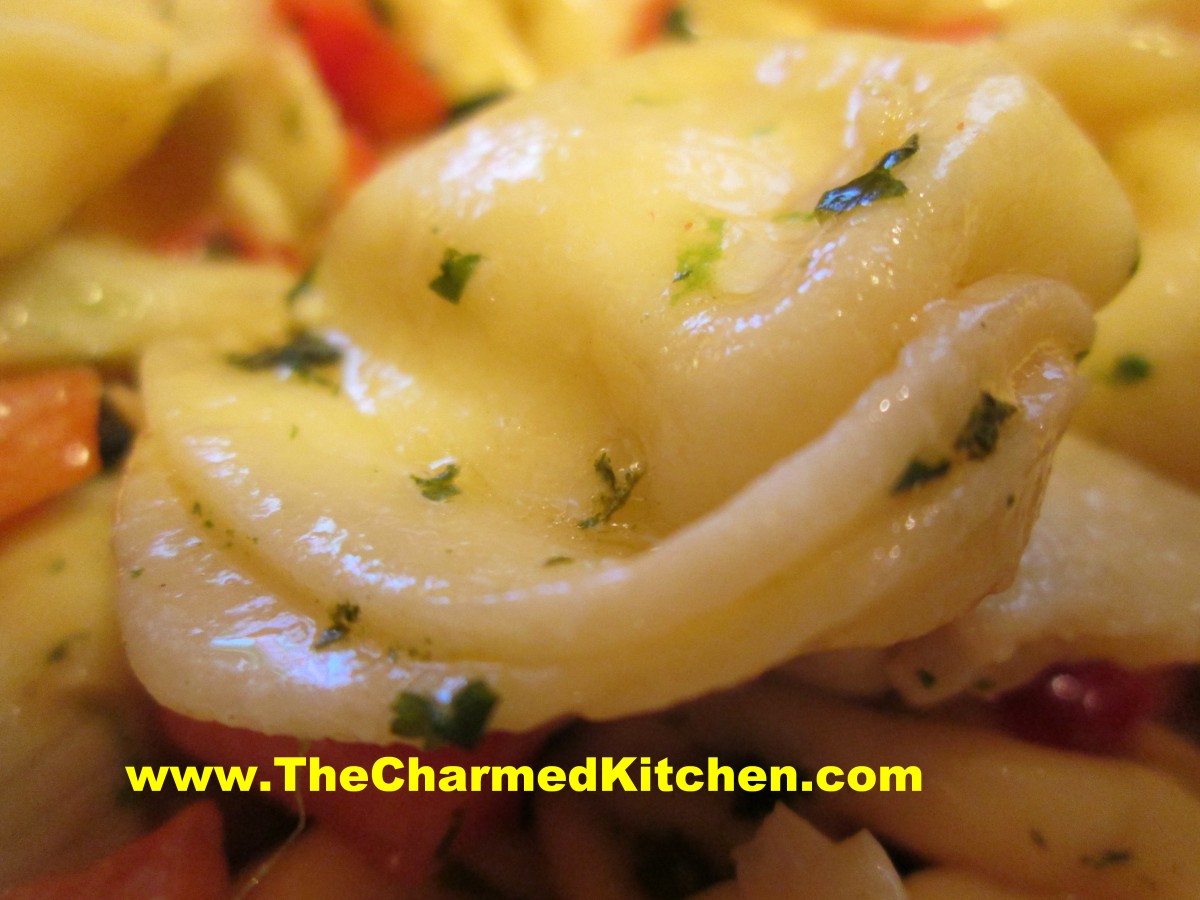
Tortellini and Artichoke Salad
With warmer weather I wanted a dish that could be a side salad or a main dish and require little cooking. I came up with this tortellini and artichoke salad. I had some frozen cheese tortellini that only required 5 minutes of gentle simmering. I also had some garlic scapes and a large scallion I got at Blue Pike Farm the other day. Zest and juice from fresh limes added some extra zip.
Tortellini Artichoke Salad
1 lb. cheese tortellini, cooked and cooled
1 can artichoke hearts, drained and chopped
1/2 c. oil
1/2 c. chopped garlic scapes*
1/2 c. chopped green onion
zest of 1 lime
juice of 2 limes
1/4 c. chopped cilantro
hot sauce to taste – I used about 2 teaspoons
salt and pepper to taste
Combine tortellini and artichoke hearts and set aside. Heat oil in skillet and cook scapes and green onion until crispy- about 5 minutes. Pour skillet contents into tortellini mixture, including the oil. Add remaining ingredients. Adjust seasonings,. Chill at least a couple of hours. Serves 8 as a side dish, 4 as a main dish.
*garlic scapes are the stems of garlic plants that are cut off the garlic plants to produce bigger cloves. They taste like garlic and look like curly green onions. If you don’t have garlic scapes add extra green onion and some fresh minced garlic to the dish.
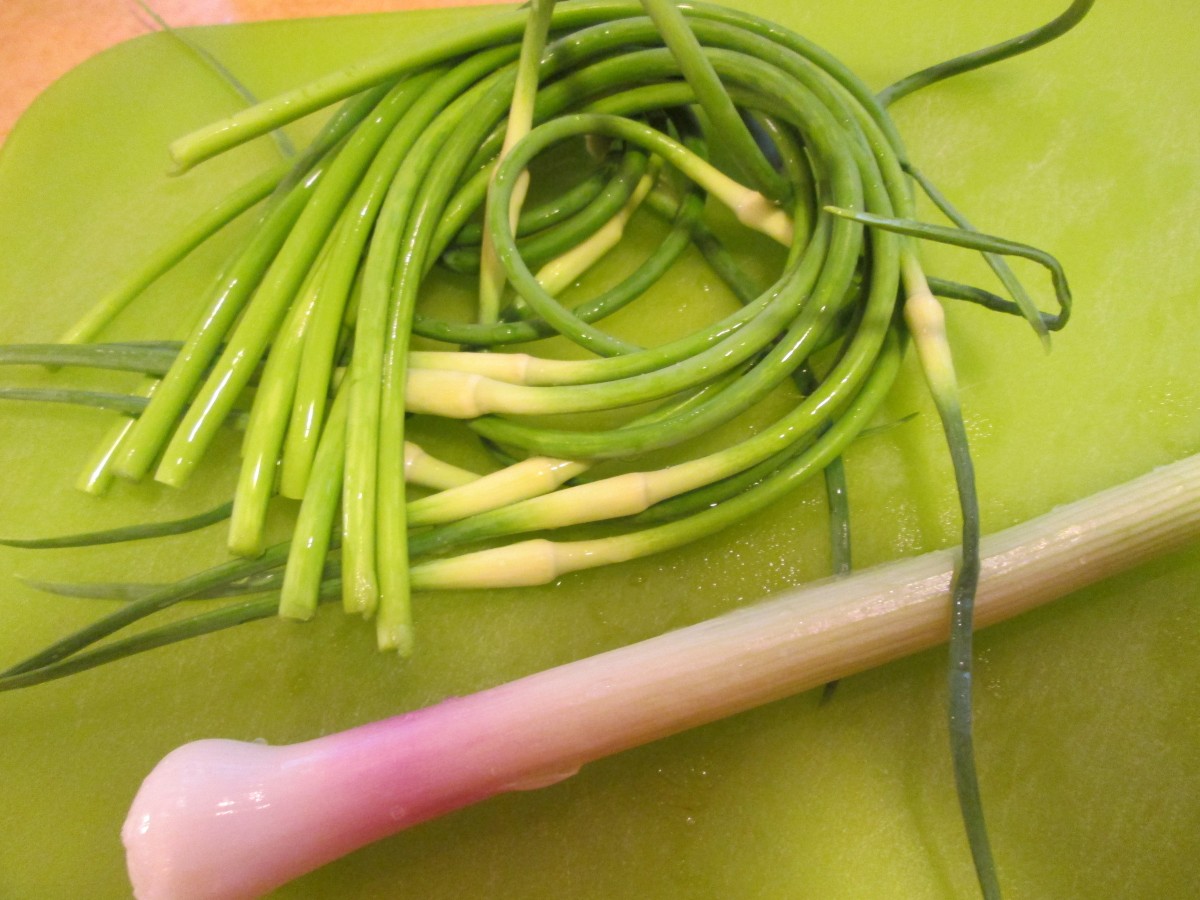
Garlic scapes and a scallion
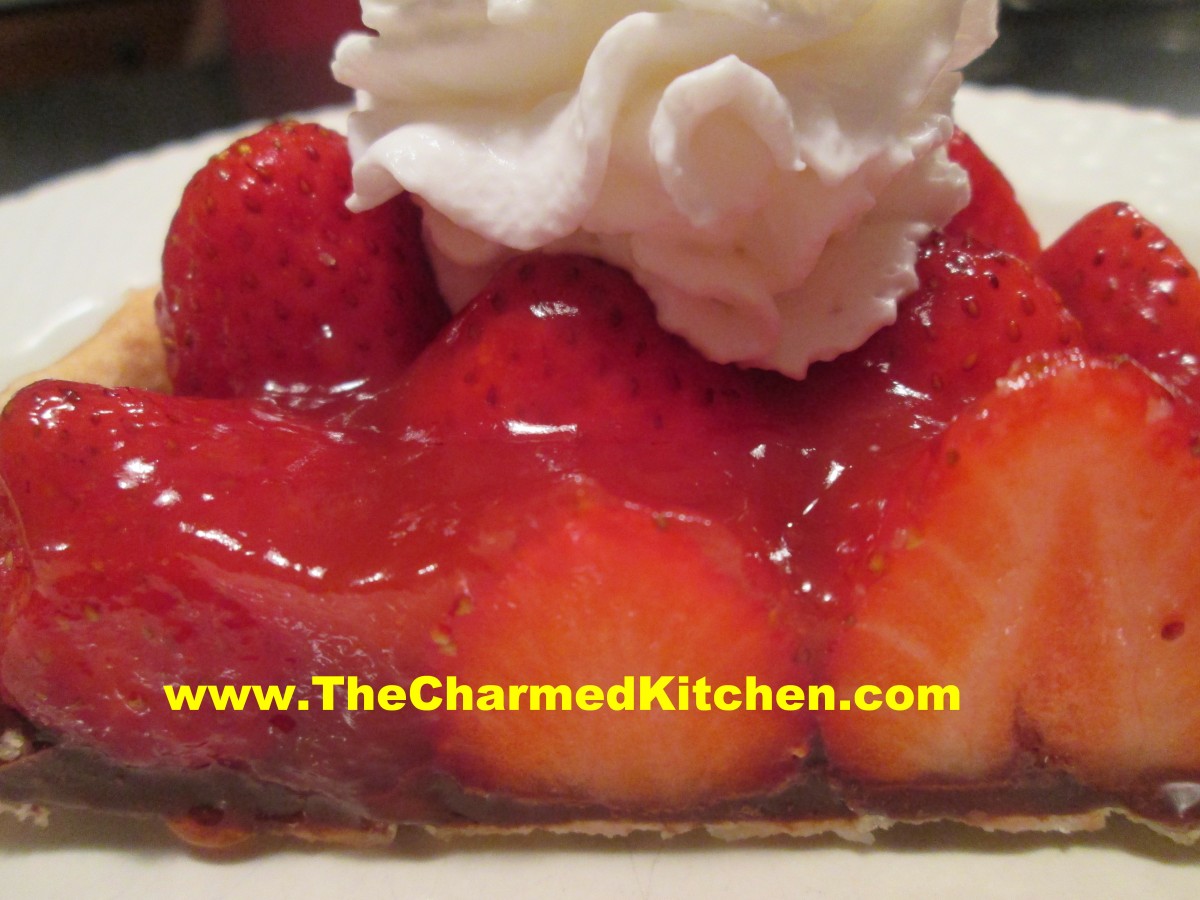
Amy’s Strawberry Chocolate Tart
Strawberry Chocolate Tart
I had an extra pie crust, some strawberries and a dinner with friends. I had said I’d bring the dessert. Since I made strawberry pie the day before for another friend I wanted to do something a little different. I decided to go with a tart. I also know the host of the dinner is mad for chocolate so I wanted to incorporate chocolate into the dessert. Here is the dessert I ended up with. It was a big hit and I plan on doing something similar with raspberries soon.
Amy’s Strawberry Chocolate Tart
1 pie crust- homemade or store bought*
1 cup chocolate chips- or 6 oz. bittersweet chocolate
2 T. butter
1 qt. fresh strawberries, washed and stem ends sliced off
Strawberry glaze:
1 c. strawberries, chopped
1/2 c. sugar, or to taste
1/4 c. water
1 T. cornstarch
Using a tart pan, roll out your crust and fit it into the pan- trim off any excess. Pre-bake your crust. To do this the prepared pie crust should be pricked all over with a fork. Cover the surface with foil and then pie weights. I use dry beans for my pie weights. Pre-heat oven to 400-degrees. Bake crust for 15-20 minutes. Check to be sure it doesn’t get too brown. Remove weights and foil and cool until ready to use. While crust is baking you can prepare the strawberry glaze. Combine 1 cup berries and sugar in small saucepan and bring to a simmer. Cook five minutes, mashing the berries a little. Strain out the solids and return the liquid to the pan. Combine the water with the cornstarch and add to the strawberry liquid, cooking until thickened and bubbly. Remove from heat to cool. Combine chocolate and butter in microwave- safe dish and microwave on high for 45 seconds to a minute . Stir mixture until smooth- you might need to nuke it a few more seconds. Spread melted chocolate over the bottom of the tart crust. Press the berries into the chocolate- pointed side up. Once the tart is full of berries spoon some of the glaze over the berries and chill at least an hour before serving. Serve with whipped cream, if desired. Serves 6.
Half and Half Dough*
This is a great crust for liquid fillings like custard type pies and fresh fruit pies.
¼ c. butter, room temp
½ c. shortening, room temp- you can use lard instead
¼ c. sugar
½ t. salt
2½ c. pastry or all purpose flour
1/8 t. baking powder
¼ c. milk
1 t. lemon juice
Cream together the first 4 ingredients until smooth. Mix together the flour and baking powder. Set aside. Combine milk with the juice and set aside. Stir ½ c. of the flour into butter mixture. Stir until smooth. Add a little of the milk, stirring until smooth. Add remaining ingredients alternately until finished. Dough will firm up once chilled. Chill at least 4 hours before using. Makes 2 crusts.

Cover crust with melted chocolate
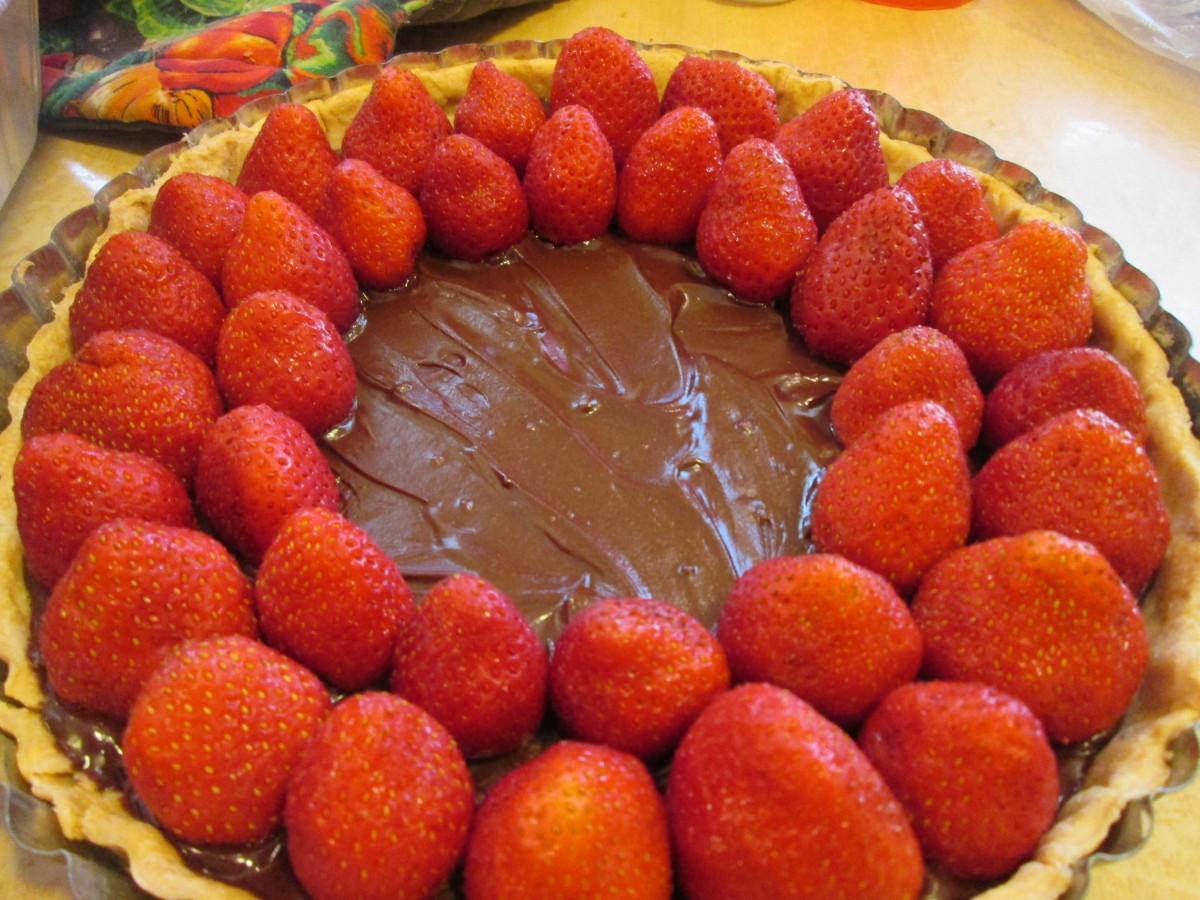
Arrange berries on top of chocolate
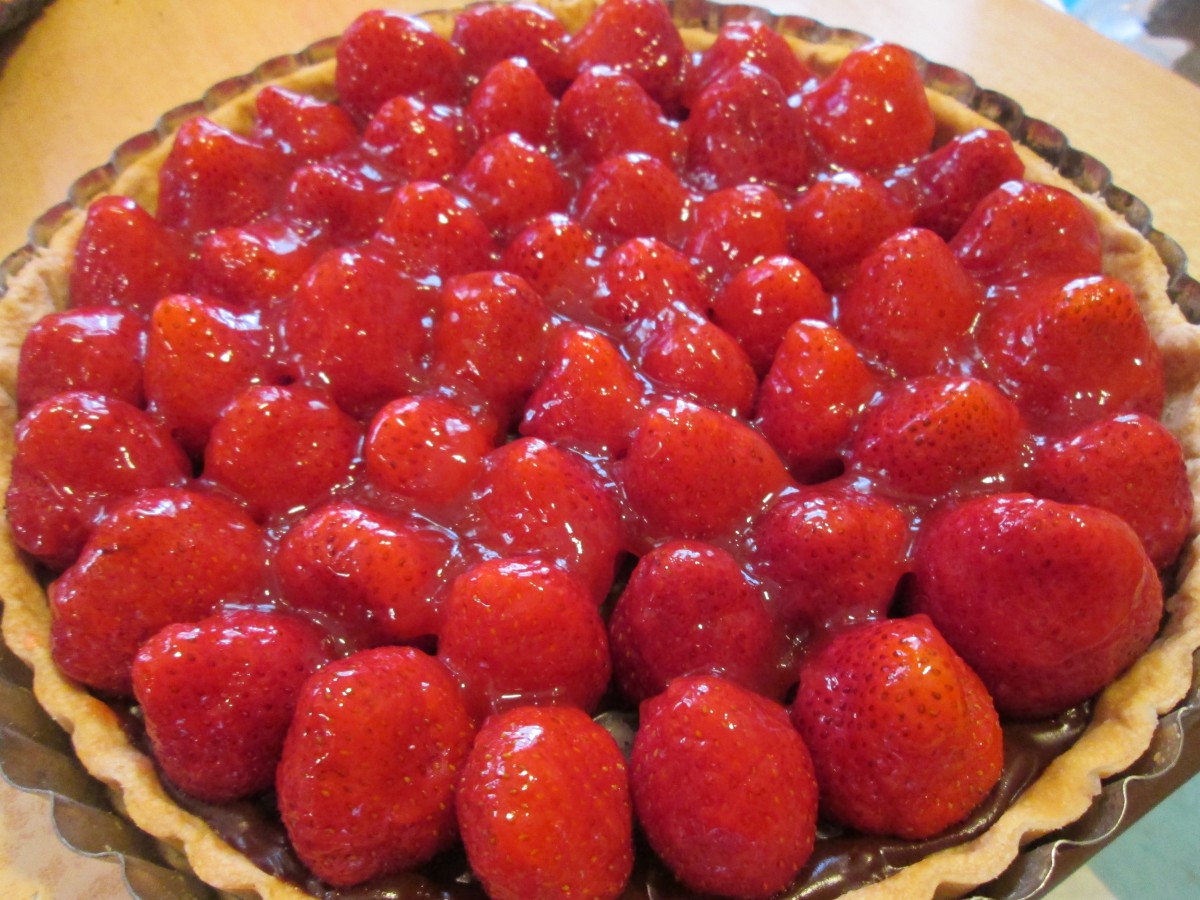
Spoon glaze over berries and chill tart before serving
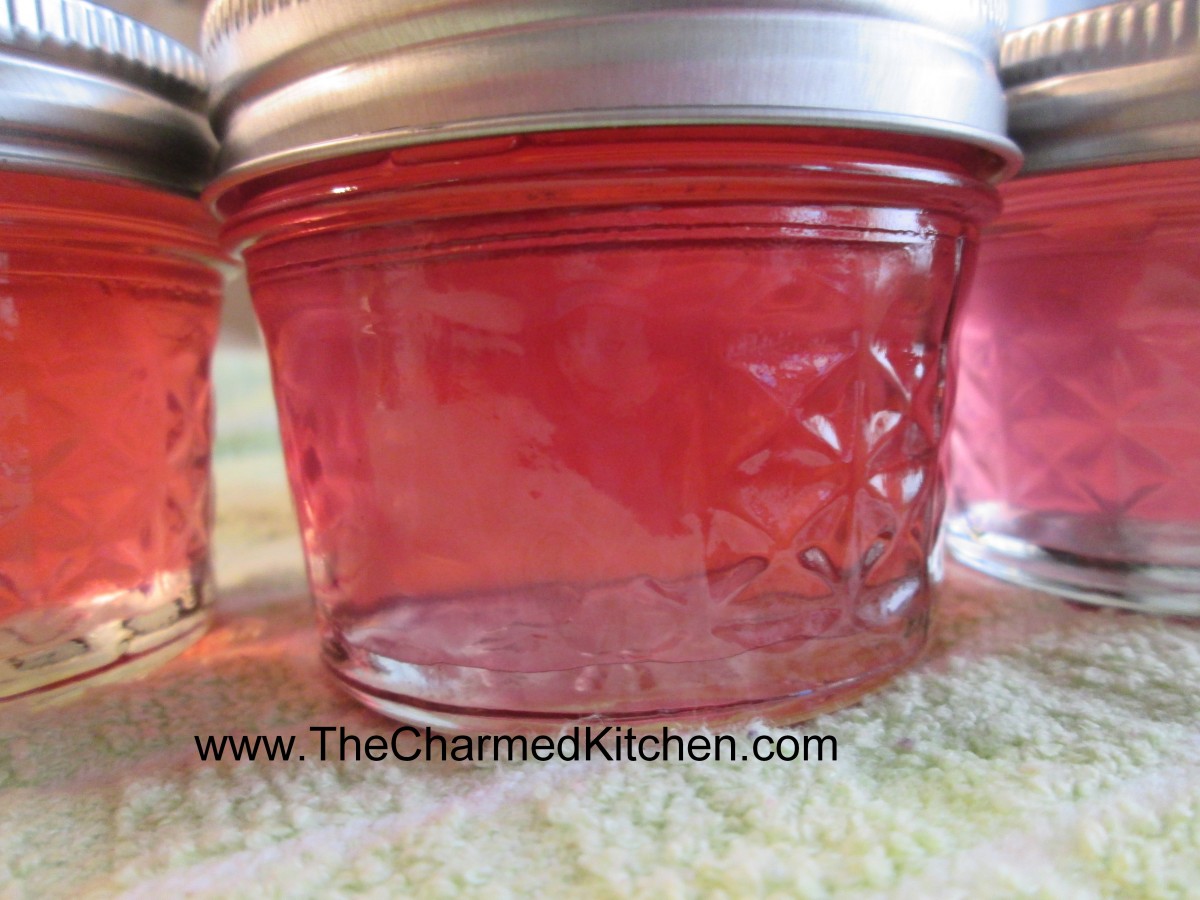
Rose Petal Jelly
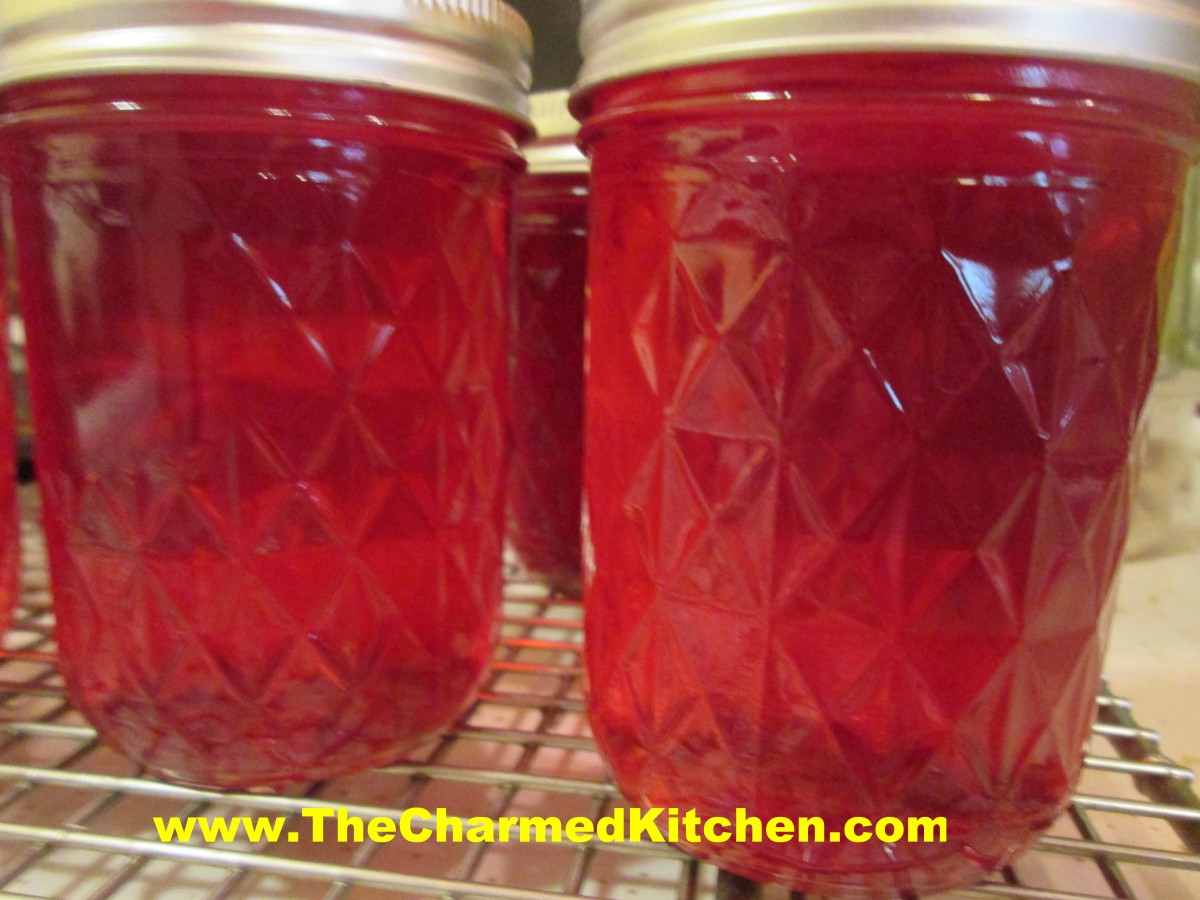
Rose Petal Jelly
I must admit I was really pleased at the color of the rose petal jelly. I have dark red roses and while I knew the jelly would not end up that dark I wasn’t exactly sure what color I would get. To start one of my floral jellies I always make a vinegar/petal infusion first.* I prefer a jelly that isn’t too sweet and the vinegar really helps. Here is the recipe- directions for making the rose vinegar are at the bottom of the post.
Rose Petal Jelly
3 1/2 cups rose petal vinegar**
1/2 c. lemon juice
1 package powdered pectin
5 c. sugar
Wash and prep jars and get water bath heating up. Place rose vinegar in pan and add lemon juice and pectin. Bring mixture to a rolling boil over high heat. Add sugar and return to the boil. Stir often. Once mixture gets to a full rolling boil, boil 1 minute. Remove jelly from heat and skim off any foam. Ladle hot liquid into jars leaving 1/4 inch headspace. Wipe rims and adjust lids. Process in a boiling water bath for 10 minutes for 4 oz. and 8 oz. jars. Remove jars to cooling rack and check seals once they have cooled down. Yield: about 7 half pint jars or 13-14 (4 oz.) jars.
*To make the infusion just put rose petals in a clean jar and cover with vinegar. Close up the jar and let the mixture steep for a week or longer. When you are ready to use the vinegar, strain it and then pour through a coffee filter to get it really clear. Use roses that are not sprayed with anything and vinegar that is 5% acidity. I like a cup of petals for every cup of vinegar for a nice strong flavor. I have gone with 1 cup petals and 2 cups vinegar and it was still pretty good.Because some roses are more fragrant than others results may vary.
**For 3 1/2 cups of rose petal vinegar you will need 3-4 cups of blossoms and 3 1/2 cups of vinegar.
Fresh Strawberry Pie
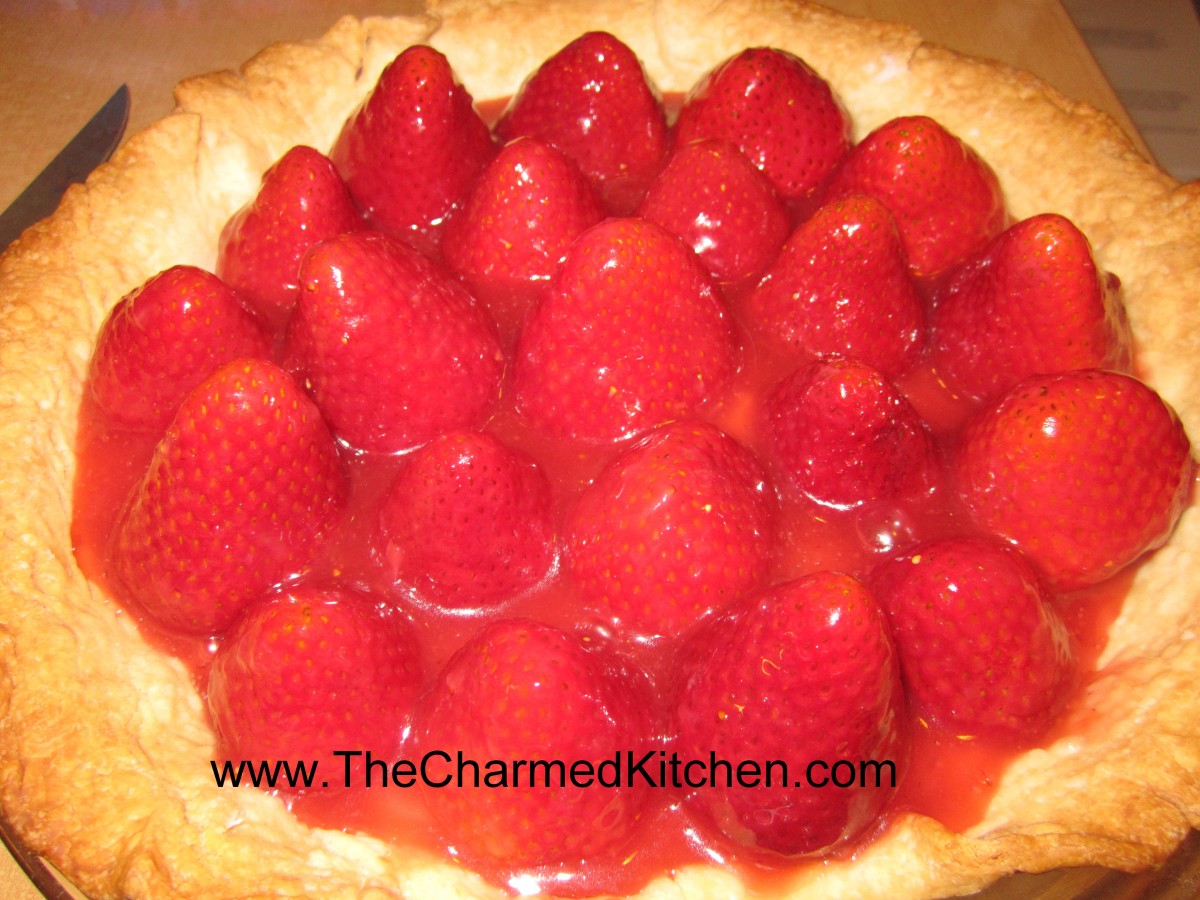
Fresh Strawberry Pie
When I was a kid there was a local restaurant known for its strawberry pie. It became a favorite of mine back then and strawberry pie is still a favorite. It wouldn’t be June if I didn’t make at least one. A nice benefit over most other pies is that only the crust has to be baked- that takes just a few minutes- so you also don’t need the oven on for very long and the house stays cooler. I used a homemade crust, but use store bought or whatever crust you like best.
Fresh Strawberry Pie
1 9-inch pie crust, baked and cooled -recipe follows
1 qt strawberries (1¼ lbs), hulled
1 c. sugar
2 T. cornstarch
¼ c. water
1 T. butter
4 oz. cream cheese
Whipped cream, optional
Select about 25-30 berries to be placed in pie crust, large side down and set aside. Puree or crush remaining berries. Place in a saucepan with the sugar and bring to a boil. Combine cornstarch with water and stir until smooth. Add to the strawberry mixture and cook, stirring constantly until mixture thickens and gets clear. Simmer about 5 minutes. Remove from heat and stir in butter. Set aside. Place cream cheese in a small bowl and mash with about a tablespoonful of the puree. Spread on the crust and arrange the reserved berries on the crust pointy side up. Put the largest berry in the middle and arrange the rest around it decoratively. Spoon the puree over the berries and allow the pie to cool down a little before putting in the fridge. Serve with whipped cream, if desired.
Note: other berries can also be used including raspberries, blackberries and blueberries, or a combination. This recipe can also be used as a filling for tarts and tartlets.
Half and Half Dough*
This is a great crust for liquid fillings like custard type pies and fresh fruit pies.
¼ c. butter, room temp
½ c. shortening, room temp- you can use lard instead
¼ c. sugar
½ t. salt
2½ c. pastry or all purpose flour
1/8 t. baking powder
¼ c. milk
1 t. lemon juice
Cream together the first 4 ingredients until smooth. Mix together the flour and baking powder. Set aside. Combine milk with the juice and set aside. Stir ½ c. of the flour into butter mixture. Stir until smooth. Add a little of the milk, stirring until smooth. Add remaining ingredients alternately until finished. Dough will firm up once chilled. Chill at least 4 hours before using. Makes 2 crusts.
* this recipe makes 2 crusts- which makes me think you should just make 2 pies. If you don’t want to do that- the other half of the dough will freeze well for a few months. Seriously though, just make 2 pies!!!
Pesto Potato Salad

Pesto Potato Salad
I never met a potato I didn’t like. This time of year it’s all about potato salads. I make them a lot and always look for new ways to change them. I love pesto sauce and the combination is quite nice.
Pesto Potato Salad
2 lbs. Boiling potatoes, cut into bite sized pieces
1 c. basil leaves
3 T. pine nuts, walnuts or pecans
3 T. olive oil
2 garlic cloves, minced
1/3 c. Parmesan cheese
Salt to taste
Cook potatoes until tender. Cool. In blender combine remaining ingredients, except 1 tablespoon of the nuts. Pour blended mixture over potatoes and sprinkle with the reserved nuts. Chill. Serves 6-8.
Farm Market Today
Violet Jelly
I will be at the Blue Pike Farm market today for the first one of the season. Looks like the rain will be gone and it will be a little cooler. I’ll have my violet jelly and lilac jelly (very limited quantities) and beet relish. I also have fresh baked zucchini bread, pumpkin bread, herb braided breads and the chocolate beet cake is back!! Also somewhat limited quantities on the beet cake. I will have my seasoning mixes, too. Hope to see you there. Blue Pike Farm is located at 900 E.72 st.- just 1/2 mile south of the Shoreway. Market hours are from 4-7.
Scallops with Broccoli Rabe
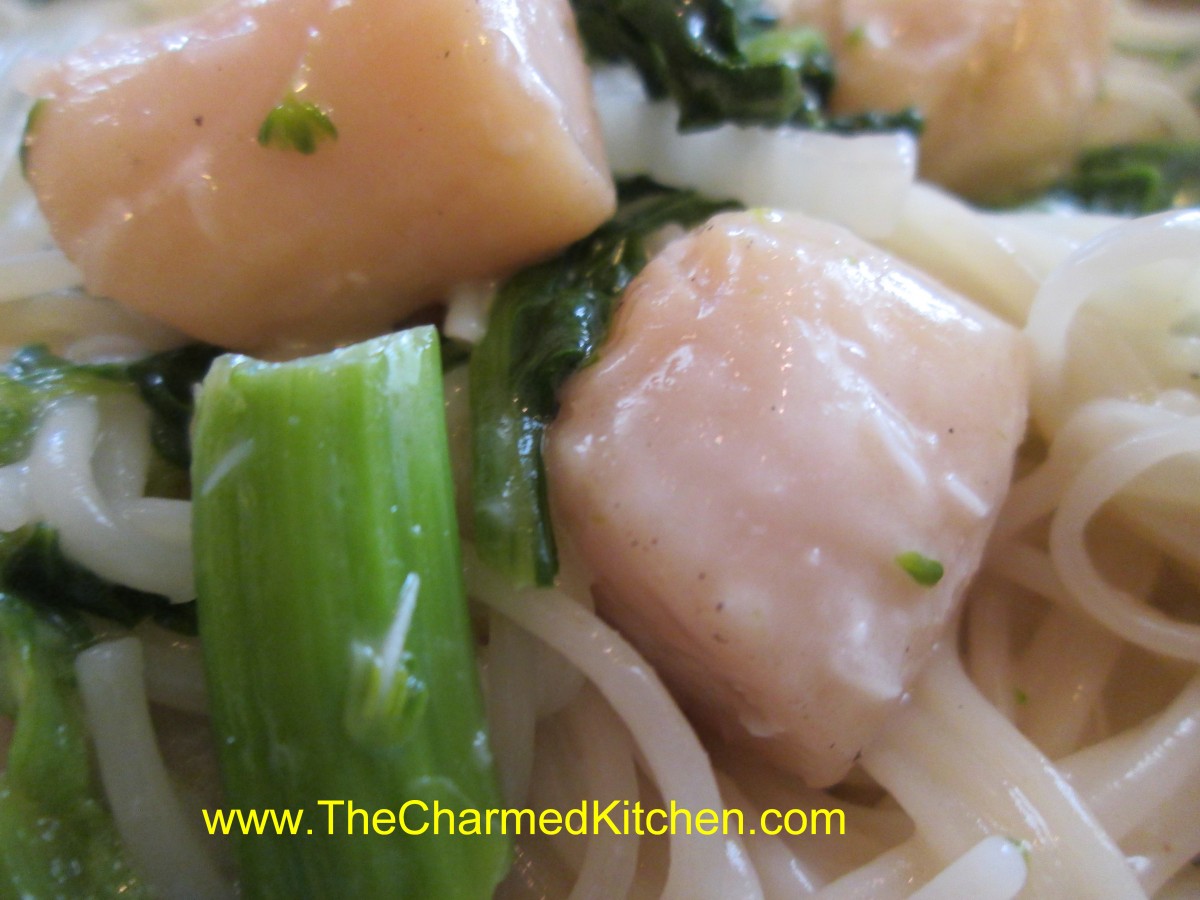
Scallops and Broccoli Rabe
I had some beautiful broccoli rabe and was looking for a quick meal to make with it. Broccoli rabe is also known as rapini. (Pictured below)
Its been hot lately and I didn’t want anything that took a long time to cook. I found some scallops in the freezer and went with it. I sauteed an onion in some oil and while that was cooking I chopped the broccoli rabe and blanched it in a small pot of boiling water. I used a slotted spoon to get the broccoli rabe out of the water and set it aside. In the same boiling water I cooked some angel hair pasta. It only takes about 5 minutes to cook. I added the scallops to the onions in the skillet and sauteed them for a couple of minutes. I pulled the scallops and onions out of the pan. I added a little more oil and then the broccoli rabe and the hot cooked pasta to the skillet. I added some salt, pepper, a little hot sauce and some parsley. I added the scallops to the pasta mixture and stirred until heated through. Easy, fast and very tasty. About 20 minutes start to finish.

Broccoli Rabe
Multi Bean Salad

Multi Bean Salad
I’ve been on a salad kick lately. Maybe the high temps have something to do with that. I was talking to my friend, Mari, last night and we were talking about favorite salads. We both agreed that we love bean salad. As a kid I remember my Mom’s three bean salad. I find myself making this dish with more than three types of beans. Everyone seems to have their favorite combination. I start with green beans and then check out my pantry for what other beans to add. Here is the one I made this time.
Multi- Bean Salad
1 lb. cooked green beans, sliced
1 can lima beans, rinsed and drained
1 can dark red kidney beans, rinsed and drained
1 can garbanzo beans, rinsed and drained
1 medium sweet onion, chopped
1/2 c. chopped fresh parsley
1 c. apple cider vinegar
1/4 c. sugar
1/4 c. oil
2 T. Tuscan seasoning- or whatever herb blend you like
1 T. hot sauce, or to taste
Salt and pepper to taste
Combine beans with onions and parsley in a medium bowl. Combine remaining ingredients in a small bowl and pour over the bean mixture. Stir well and chill a couple of hours before serving. Serves 8.
Edible Landscape Program
 I will be doing a talk tonight on edible landscapes. The program is at the Peninsula Library and starts at 7 pm. Peninsula Library is on Riverview Rd. just South of Rt. 303.

Edible Landscaping
June 18, 2014 7:00-8:00PM
Edible Landscapes with Judi Strauss
If the only food you grow in your yard is in a traditional vegetable garden it is time to think outside the box. You will learn how a number of plants can be incorporated into your yard to create a true food garden. From edible ornamental plants, edible flowers, fruit-bearing shrubs and even weeds that can be eaten, we will discuss how little changes can reap big rewards.
http://www.peninsulalibrary.org/programs.php
Smoky Succotash Salad
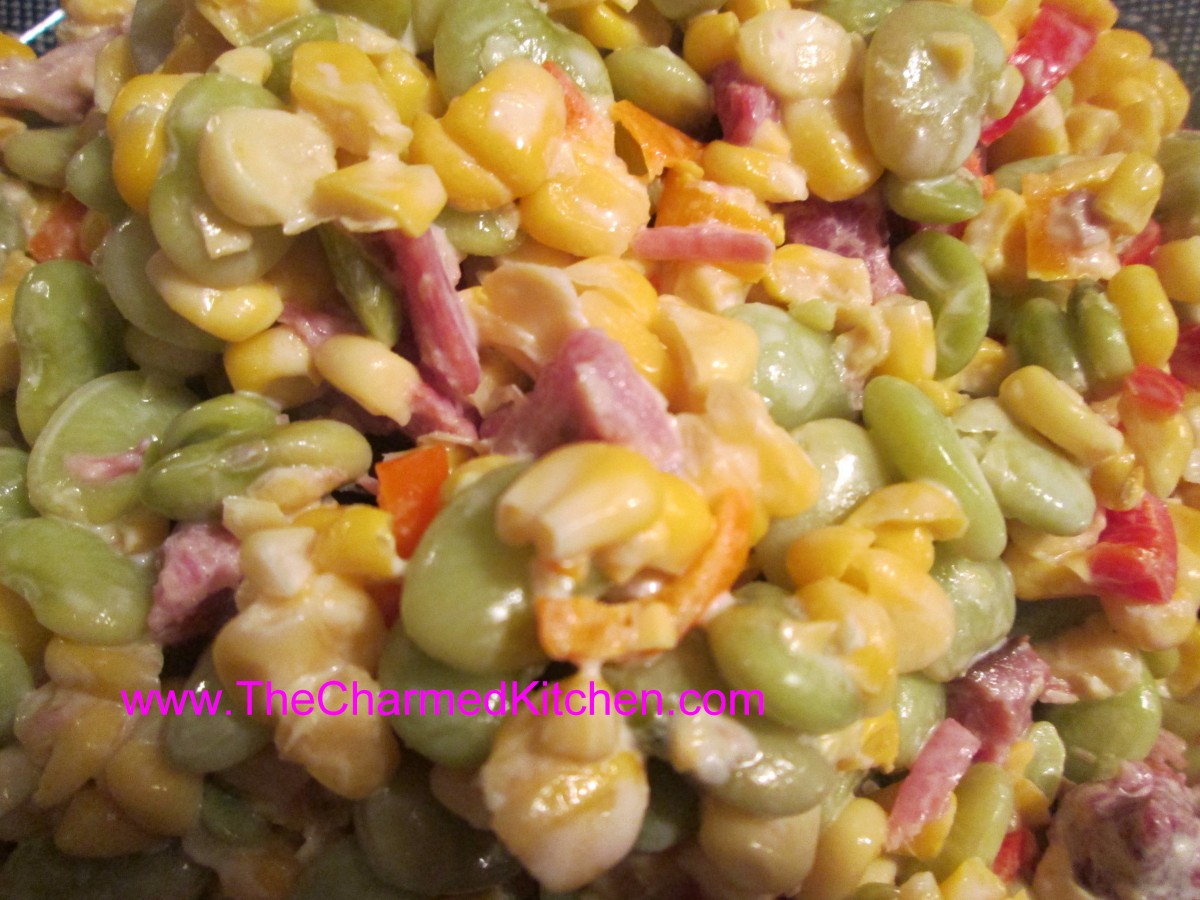
Smoky Succotash Salad
I was looking for a salad idea the other day and found the answer in my freezer. I had a bag of lima beans and some corn from last year. I also had a ham bone. Not what you might think of for a salad but I needed it to work. I started by putting the ham bone in a pot with some water and let it simmer for an hour or so- to get some of the flavor out. I added the lima beans and corn and cooked them until tender- about 10 minutes. I figured this would add flavor to them. I drained off the veggies, let them cool, and combined them with a sweet pepper and ham I’d cut off the bone. I still needed a dressing and since I had an open container of sour cream I used that. Here is the recipe I ended up with. It ended up tasting really good. Went well with steaks and tuna off the grill.
Smoky Succotash Salad
1 lb. lima beans, cooked and cooled
4 c. corn off the cob, cooked and cooled
1 sweet pepper, seeded and chopped
1-2 c. cooked ham, diced
Dressing:
2/3 c. sour cream
3 T. apple cider vinegar
2 T. sugar
1 t. grated ginger
1 t. hot sauce, or to taste
salt and pepper to taste
Combine veggies with the ham in medium bowl. In small bowl stir together dressing ingredients until smooth and toss with the veggie mixture. Chill until ready to serve. Serves 6.


