Mom’s Waldorf Salad

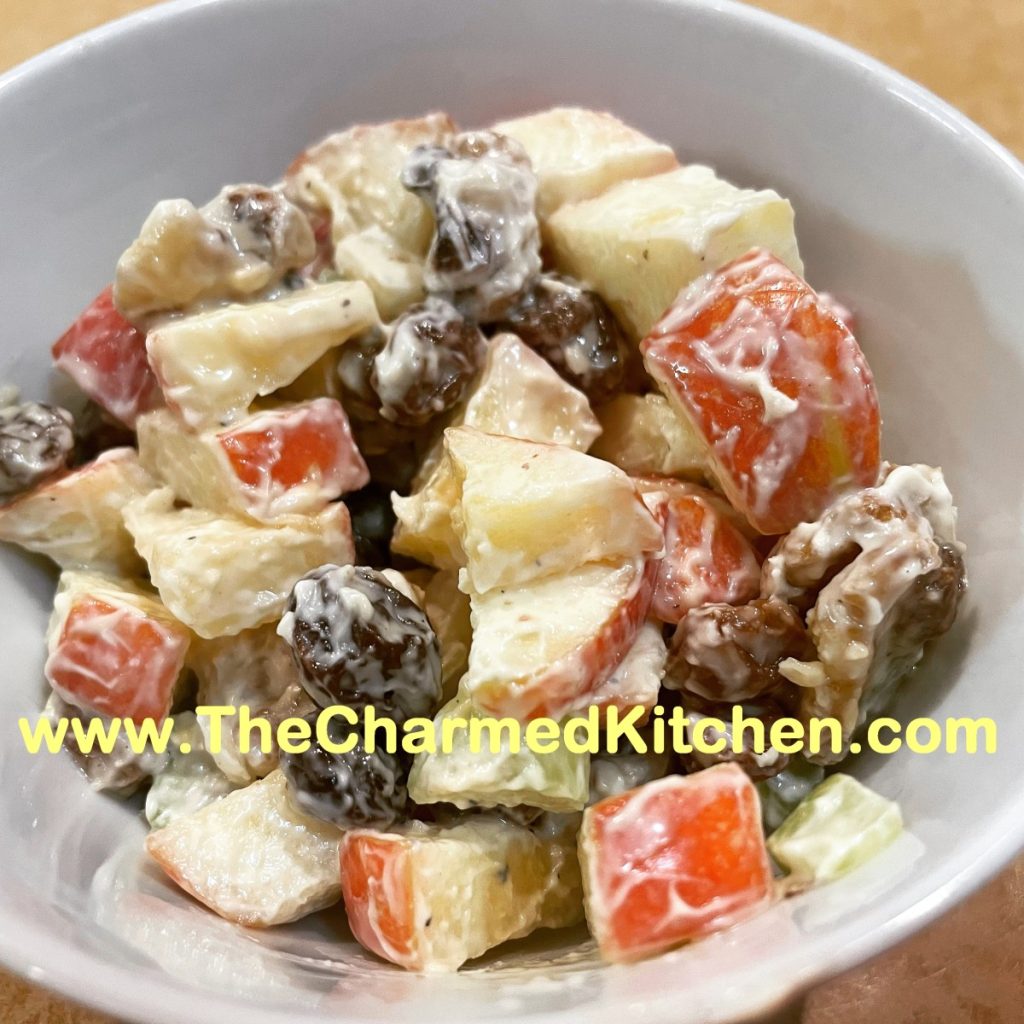
I can’t remember the last time I made a Waldorf Salad. Don’t know why it took me so long. The combination of sweet/tart apples with crunchy celery, nuts and raisins is such a classic. I remember my mom when making it. She made such a nice Waldorf salad. It always felt like a special occasion when she did.
The salad could not be simpler. Just a few ingredients, tossed together and seasoned. I went pretty basic this time, but you can add all sorts of extras like proteins (chicken, turkey, ham etc.). You can add different dried fruits, too. Dried cranberries or cherries would be wonderful.
I didn’t peel the apples. I like the peel, but you can peel them, if you prefer. I also used toasted walnuts, but feel free to play around with using other nuts or seeds. This time of year, toasted pepitas, (pumpkin seeds, hulled) would be a nice, seasonal addition.
So hear is the recipe.
Mom’s Waldorf Salad
4 apples, cored and diced, peeling is optional
1 c. diced celery
1 c. raisins or other dried fruit like cranberries or cherries
½-1 c. mayonnaise
1 c. toasted walnuts or pecans*
Salt and pepper to taste
Combine apples with celery and raisins. Stir to combine and add mayo to your liking. Stir in nuts and season to taste. Nice served on a bed of greens. Serves 4.
Variations: Mom sometimes added grapes instead of raisins. She would cut them in half. The grapes will make the salad wetter over time, where the raisins plump and absorb moisture, so add grapes right before serving or leave them whole. Another classic addition is chicken. In this recipe, a couple of cups of cooked, diced chicken make it a different, but still tasty salad. Diced turkey is also fun and a nice way to use after Thanksgiving turkey. Same for ham. Diced ham adds a smokiness that pairs great with the apples. Just use less salt if adding ham.
* To toast nuts, place on a baking sheet and bake in a 325 degree oven for 10-15 minutes, or until nuts are toasted, but not burned.
“Bat” Wings

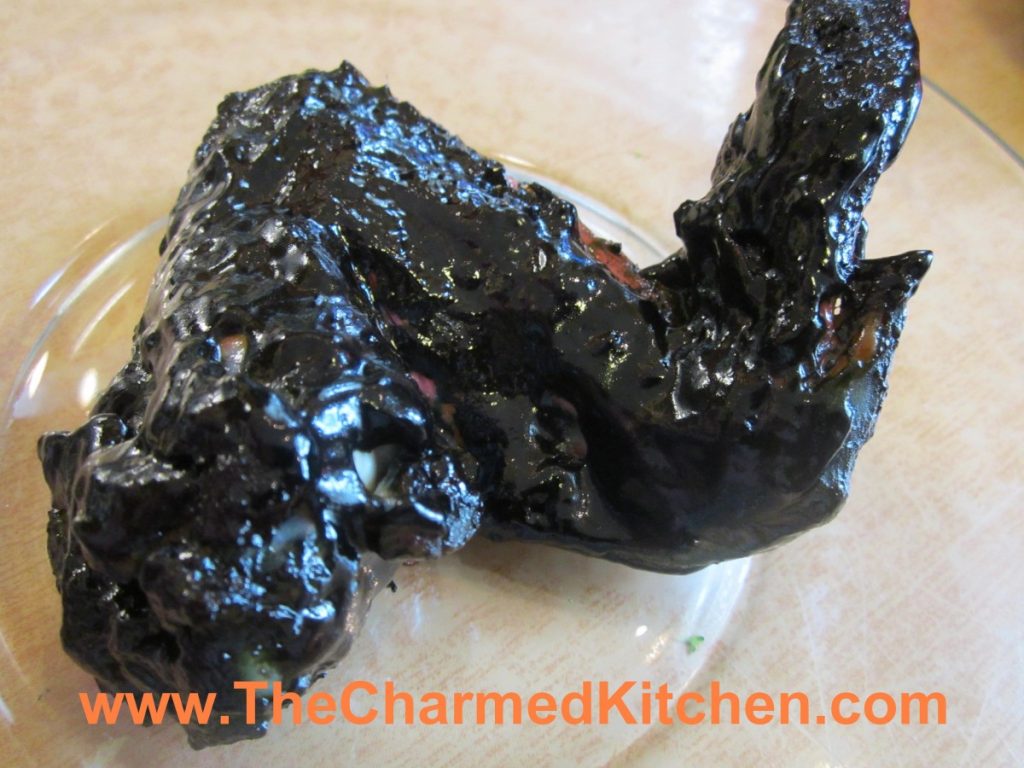
With Halloween fast approaching I thought I’d share this recipe for bat wings. OK, not really bat wings, but you already knew that. I just add black food coloring to barbecue sauce and use it to color chicken wings. I made a batch for a Halloween party a few years ago and someone actually asked if they were real bat wings.
A word of warning- when you use black food coloring it will transfer to you. No matter how careful you are when you eat the wings, you’ll end up with purple fingers. Also, for the best effect, keep the wings intact- no trimming off of the tips. You can separate the drums before serving, if you like. Makes eating a little easier. They look pretty cool when set out on the table. Creepy- but very tasty.
Bat Wings
2-3 lbs. whole chicken wings
salt and pepper
1 c. barbecue sauce- store bought or home made
black food coloring- handle carefully- it stains
Place chicken wings in a roasting pan, season with salt and pepper and bake in a preheated 400 degree oven for 30 minutes. Meanwhile in medium bowl combine sauce with food coloring. Add just a little black food coloring at a time. Too much will alter the flavor of the food. Remove wings from the oven and dip them in the bowl of sauce. Turn to coat. Place wings on a clean baking sheet and return to the oven. Bake an addition 45 minutes. You can baste them with additional sauce during the baking, if you like. Place on a serving platter and provide plenty of napkins.
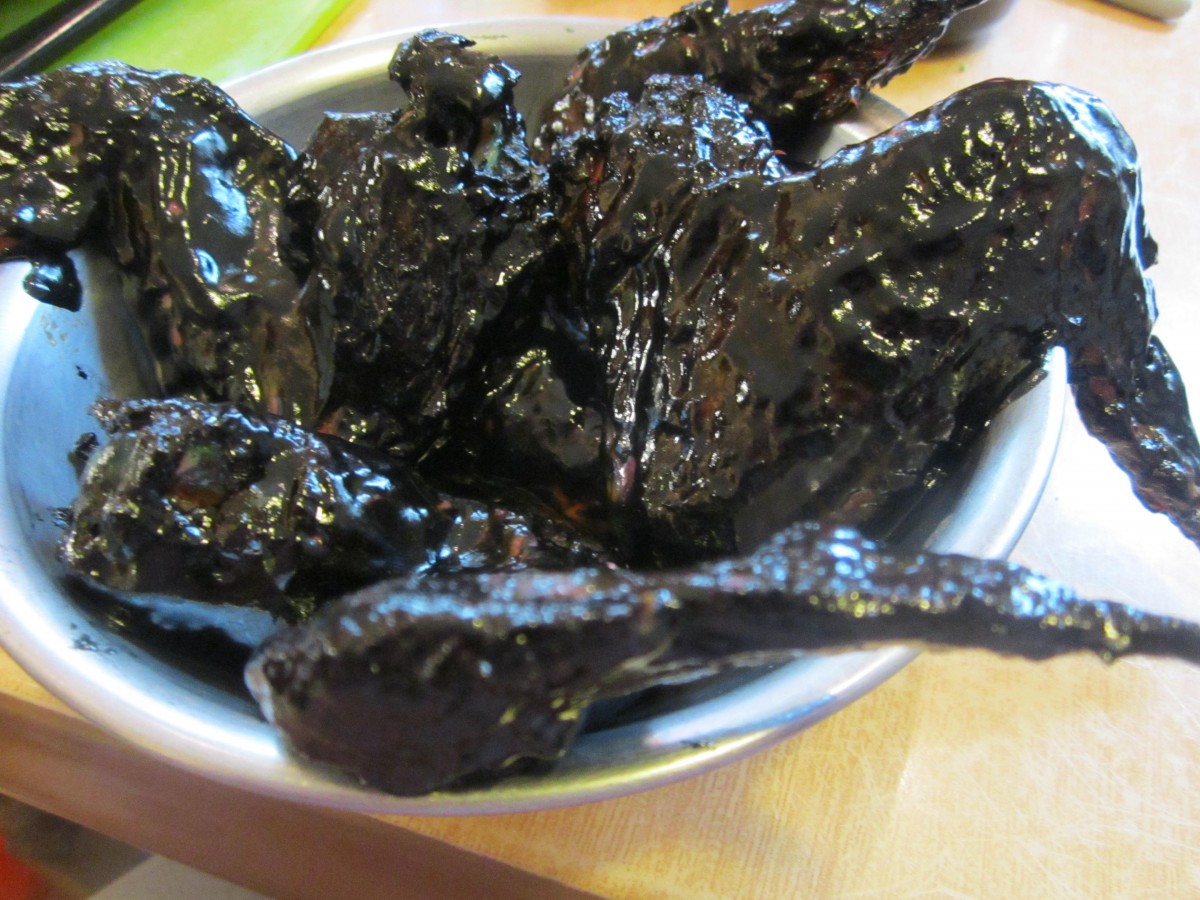
A pile of “bat” wings
Butternut Squash Saute

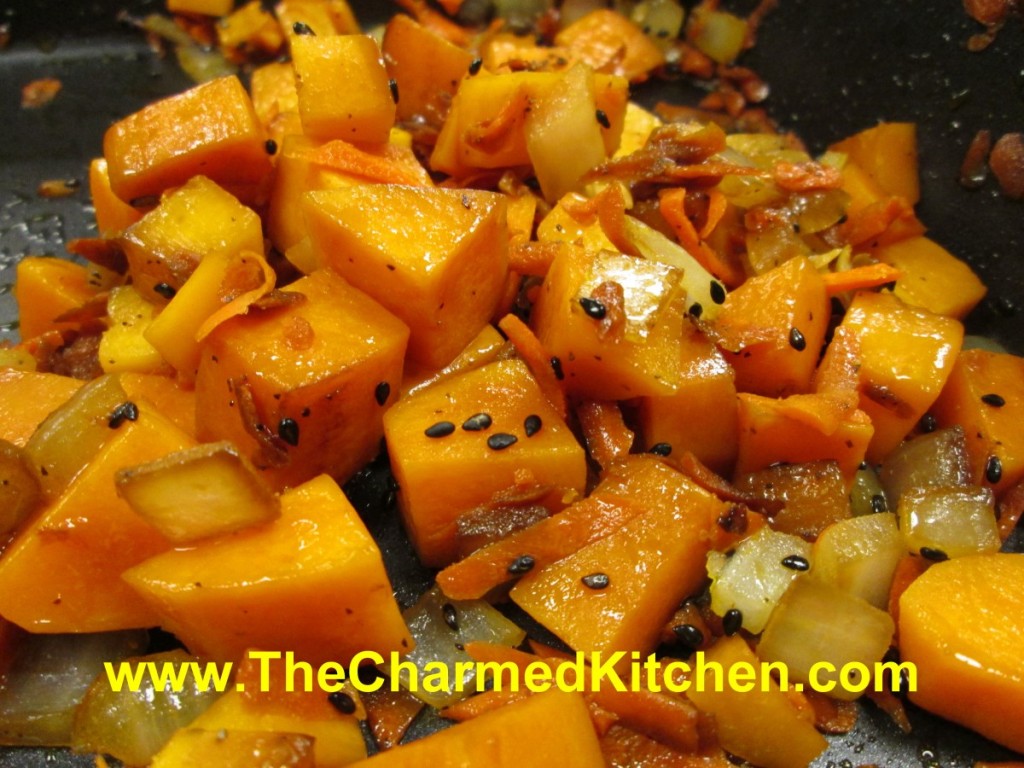
Winter squash season is here, and I could not be happier. I love the variety of squash (and pumpkin) at the markets this time of year. They are both beautiful and tasty.
This dish is a combination of butternut squash with onions, garlic, carrots, and finished off with black sesame seeds. It makes a great, seasonal side dish. Might also be a fun dish for Halloween, because of the colors.
I used butternut squash, but you could use any number of hard squashes, or even pumpkin. If you are looking for a different way to cook some of those squash- try this dish. I think you might be surprised at just how good it is.
When cutting up hard squashes, you have to be careful not to cut yourself. A round, hard squash, with a tough outer skin can be a recipe for disaster. I trim a small slice off one end of my squash, creating a flat side. Then I lay it down on that side, to make it more stable for cutting. With the butternut, once it was sliced on one side, I was able to cut in in half pretty easily.
To peel a hard squash, so you can cut it into cubes, use a vegetable peeler to remove the skin. You will need to run the peeler over the skin a few times to get off all of it. Then cut into cubes.
Thanks, Irene, for the squash!!
Butternut Squash Sauté
3 tablespoons olive oil
1/2 cup chopped onion
1 teaspoon minced garlic
4 cups cubed fresh butternut, acorn or Hubbard squash or pumpkin
1/2 cup grated carrot
2 tablespoons soy sauce
1 teaspoon salt
1 teaspoon ground black pepper
2 teaspoons black sesame seeds, or a bit more
Heat the oil in a large skillet. Add the onion and garlic; cook and stir until the onions begin to brown. Stir in the squash, carrot, soy sauce, salt, and pepper; cook, covered, another 5 to 7 minutes, until squash is tender. Sprinkle with sesame seeds before serving.
Caramel Apples

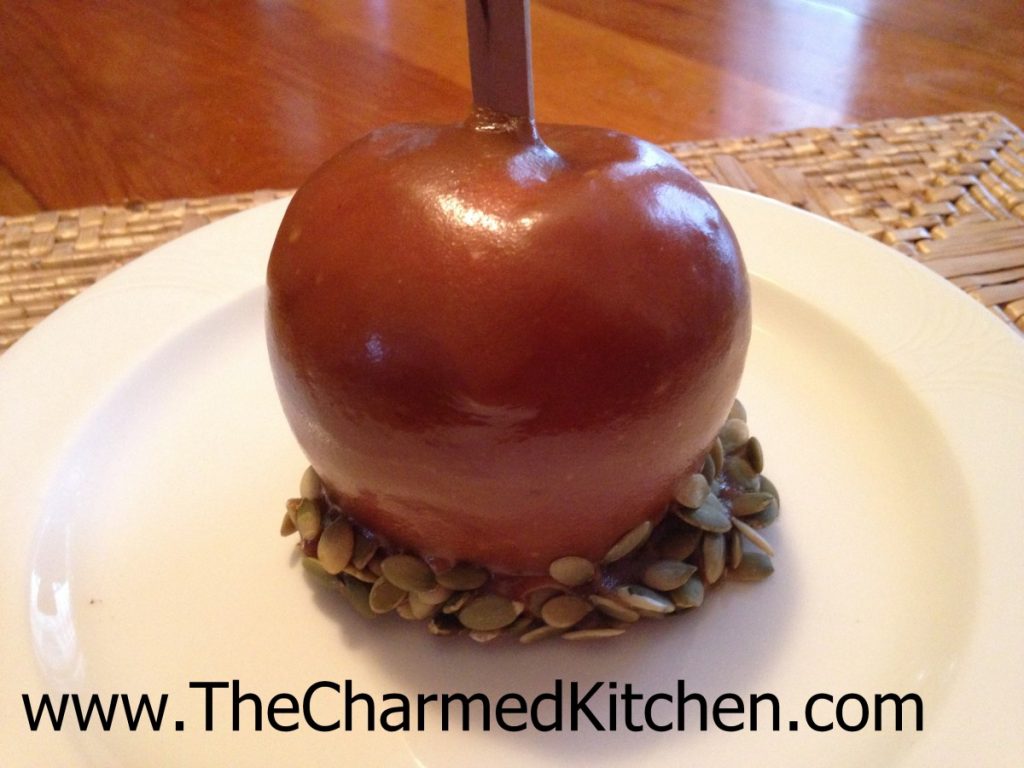
Making caramel apples is a wonderful childhood memory for me. Every Autumn, we would make a batch. We used those little store-bought caramels. I was often the one tasked with unwrapping them. I can remember unwrapping one after the other. It seemed to take forever.
I wanted to make my own caramel, so that is what I did. It is so much better than the store-bought version.
Caramel is not that hard to make. You do need to keep an eye on it. Stir constantly. Just a hint, be sure your candy thermometer is really secure. Mine was a little slippy on the pan I was using. At one point the thermometer slid into the caramel. Not what you want to have happen!!!
Once dipped in the caramel, you can dip the bottom of the apples in nuts, pumpkin seeds, sprinkles, cereal, or even popcorn.
Homemade Caramel Apples
1/2 c. butter, cut in cubes
2 c. packed brown sugar
1 c. corn syrup*
pinch of salt
1 can sweetened condensed milk
2 t. vanilla
8-12 apples
chopped nuts, pumpkin seeds, cereal, sprinkles, popcorn for dipping the bottoms of the caramel apples, optional
In heavy saucepan, combine the butter, sugar, syrup and salt. Bring mixture to a boil, stirring constantly. This will take about 10 minutes. Add milk and bring mixture up to 248 degrees. Remove from heat. Stir in vanilla. Place a Popsicle stick, skewer or chopstick down the center of each apple. Dip apples in the caramel, allowing excess to drip off- or not. Dip bottoms of apples into nuts, seeds or whatever ingredient you picked. Place on wax paper and allow to set up. If you don’t want to dip the bottoms in anything, place the dipped apples on lightly buttered wax paper. Cool before serving. Makes 8-12 caramel apples.
Note: You could also use pears in the recipe.
*If you don’t have corn syrup- or don’t want to use it here is a way to make a substitute for it.
Sugar Syrup- corn syrup substitute
3 cups granulated sugar
1 cup Water
1/2 tsp. Cream of Tartar
1/4 t. salt
Combine ingredients in a large saucepan. Bring to a boil and cover the pot. Reduce to a simmer and cook covered for 5 minutes. Uncover and cook to soft-ball stage. Stir frequently.
Soft ball stage occurs at 235-245 degrees. This stage can be determined by dropping a spoonful of hot syrup into a bowl of very cold water. In the water, use your fingers to gather the cooled syrup into a ball. If it has reached soft-ball stage, the syrup easily forms a ball while in the cold water, but flattens once removed from the water.
Remove from heat. Cool and store at room temperature. It will keep well for a month or two.
Halloween “Spooky” Sushi

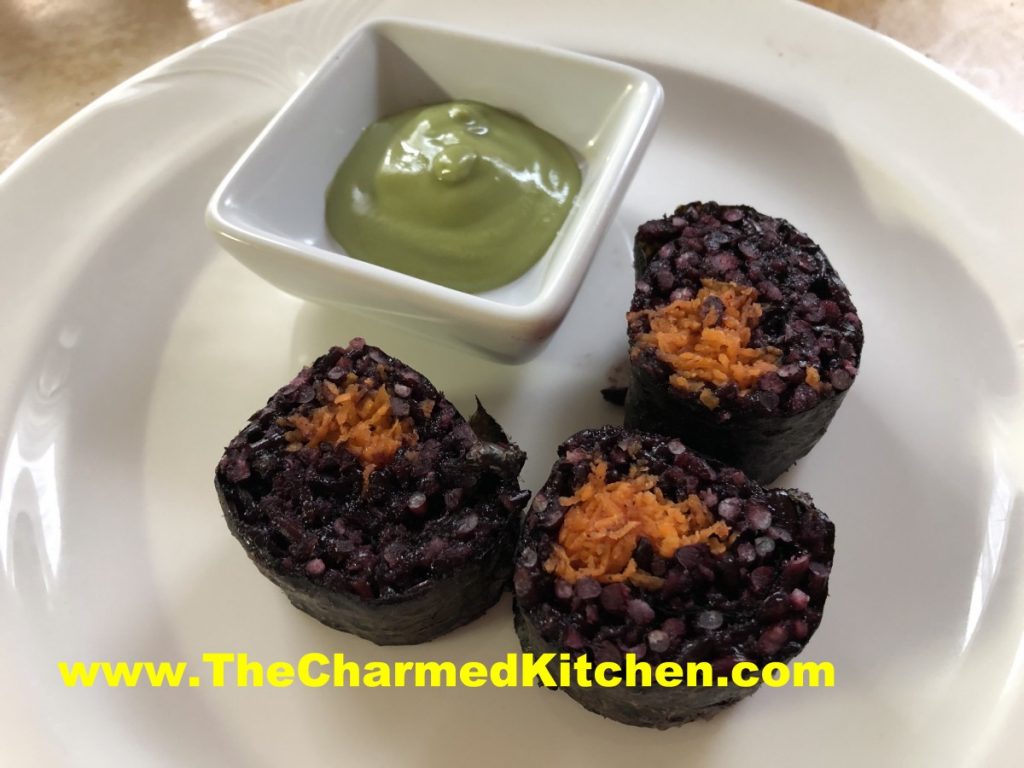
When I make sushi, I often use brown or black sticky (sweet) rice. I actually prefer the texture over the white rice. It occurred to me that the black sticky rice might make fun sushi for Halloween. I find black sweet rice at my local Asian grocery store. That is also where I get nori, rolling mats and wasabi.
To add a pop of color, I finely shredded carrots and added them to the sushi roll, too. The black rice actually cooks to a dark purple color. The color combination is fun for Halloween.
You’ll need a rolling mat, but beyond that, not a lot of special equipment is needed. I served my sushi with wasabi. You could serve with pickled ginger, too. Here is the recipe and directions.
“Spooky” Sushi
To make the rice:
4 c. black sweet rice, uncooked
4 c. water, or a little more
1 recipe Sushi Su, recipe follows
finely shredded carrots
In strainer, rinse the rice repeatedly with cold water until the water runs clear. Place rice in microwave safe container with the 4 cups of cold water. Cover container with a lid and place in microwave. I use a large Pyrex casserole dish that has a lid. Cook 20 minutes. Check for doneness and add a little more water, if needed. Cook another 10-15 minutes. Don’t stir the rice. Black rice takes longer to cook than white sushi rice. You want it to be cooked, but not mushy. Cooking times vary by microwave. Remove from the microwave once cooked and let stand, covered, for 10 minutes. Place rice in a large, cool bowl and pour on the Sushi Su, tossing in. Fan rice while tossing to give it a shiny look. Makes enough for 8 rolls.
Sushi Su:
1/2 cup rice vinegar
4 T. sugar
1/2 t. salt
msg, optional
Combine all and set aside until ready to use. You can also buy a dry powder of Sushi Su and you can use that instead. It is a 2.65 oz. packet.
Assembling Sushi
Place a sheet of nori ( dried seaweed sheets) on mat and spread about 1 cup of the rice over the nori, leaving about 1-2 inches empty on the far side. Place fillings in a strip a little off center away from the side with no rice. Start rolling up the mat using it to press the sushi roll and keeping the fillings in the nori. Once rolled, press the mat once more to seal and make the fillings stick together. Wetting the edge of the nori with a little water can also make the sushi stick better. Slice each piece using a sharp knife dipped in water.
Wrapping the sushi takes practice. Don’t be discouraged if the first few are a little less that perfect, Still, with a little practice it gets pretty easy. Just be careful not to overfill the rolls as it makes the job harder.
Pear and Pecan Coffee Cake

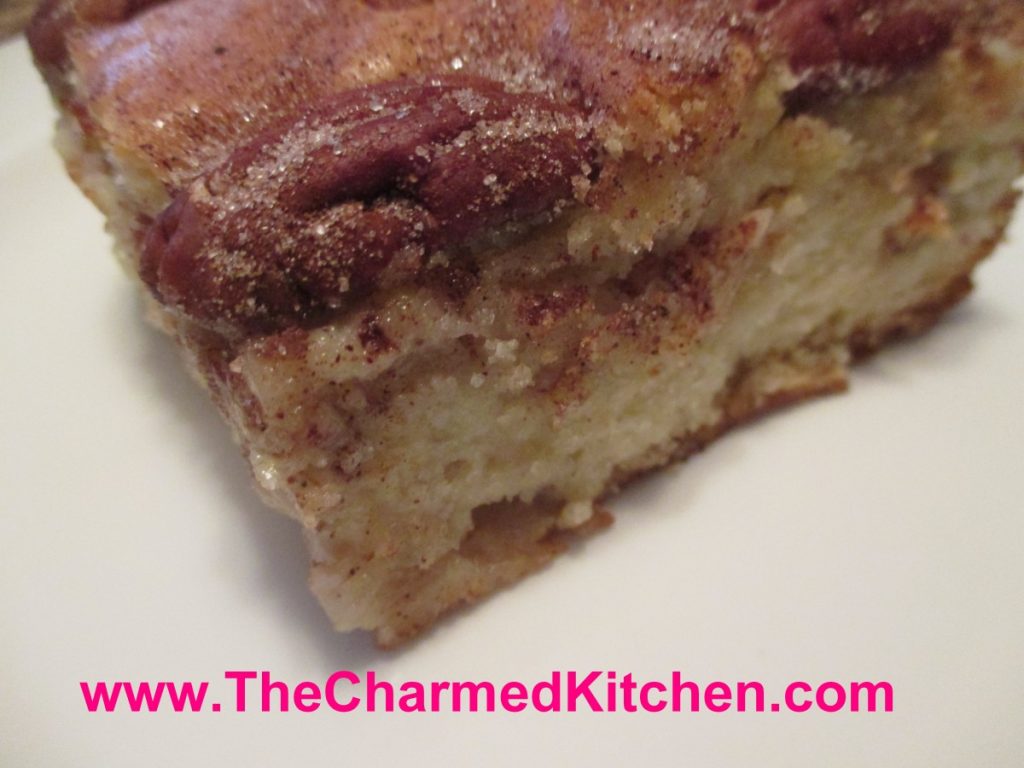
This may be one of my favorite pear desserts. I combined ripe pears with pecans and cinnamon sugar to create this moist and flavorful cake. I had both Bosc and Bartlett pears, but use whatever pears you have on hand. They should be ripe, but still firm. In the recipe directions I say to have the pears peeled and sliced, and ready to go in the cake. I actually made the batter first, then prepped the fruit. Mostly because I was distracted and forgot. It worked out just fine. The upside was that the pears did not have a chance to discolor, and I didn’t have to put them in lemon water until ready to use.
The cake is wonderful served all on its own, but I also enjoy topping it with a scoop of ice cream or whipped cream.
Pear and Pecan Coffee Cake
1 c. oil- I like to use olive oil or avocado oil
4 eggs
1 t. vanilla
1/3 c. orange or lemon juice
3 c. flour
2 c. sugar
3 t. baking powder
¼ t. salt
3-4 pears, peeled, cored and sliced
½ c. sugar
1 T. cinnamon
¾ c. pecan halves or pieces
Grease a 9×13 inch pan. Preheat oven to 350-degrees. Combine oil with eggs, vanilla and juice until well blended. In a separate bowl, mix dry ingredients and add to egg mixture. Beat together until batter is smooth. Batter will be thick. Combine the ½ cup sugar with the cinnamon. Set aside. Place ½ of batter in prepared pan. Arrange pear slices on batter and sprinkle on ½ of the cinnamon mixture. Pour on remaining batter and top with the pecans. Sprinkle with remaining sugar mixture. Bake 50- 60 minutes or until toothpick inserted in cake comes out clean. Cool before slicing. Serves 10-12.
The Gentle Art of Biscuits

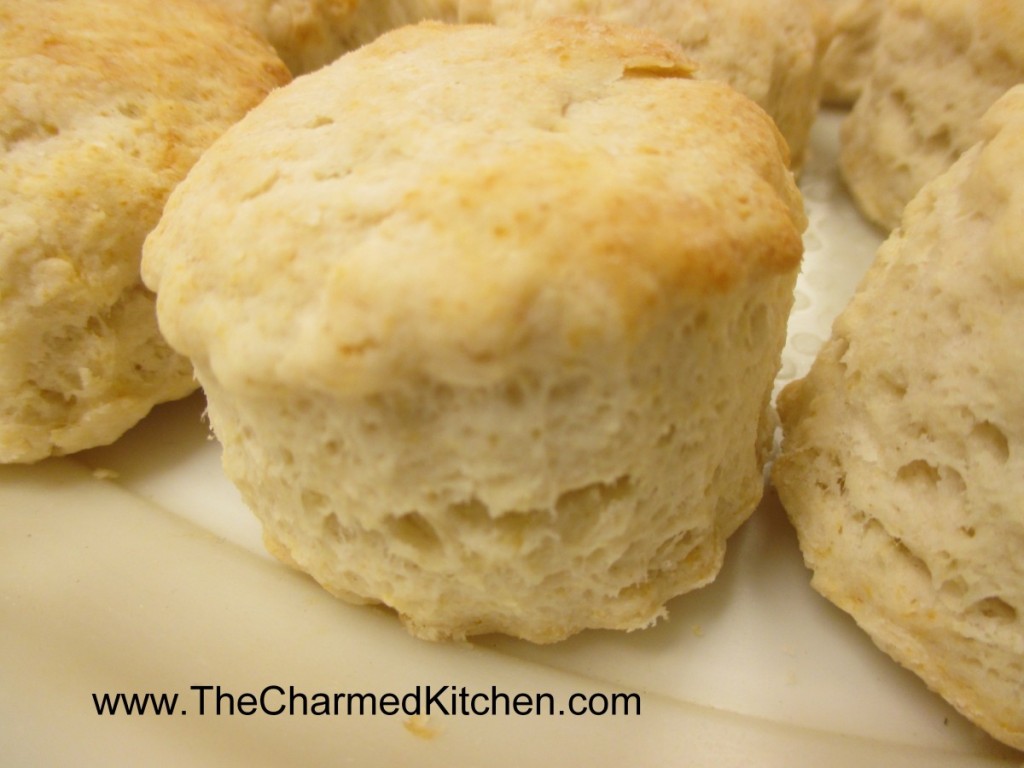
Biscuits are easy to make. They really are. Fast, too. You can mix up a batch of biscuits in the time it takes the oven to preheat. Yet, I know people who seem to struggle with them. The other night, a friend and I were talking about the secret to a light and flaky biscuit.
So what goes wrong? How do you make light, flaky biscuits every time?
For the moment I’ll assume you have a decent recipe. There are a lot of great biscuit recipes out there. I know people that have treasured family recipes. Biscuits that have been made the same way for generations.
Assuming also, that the baking powder is fresh*, there has to be some other reason that some folks just seem to struggle with biscuits.
The problem is, more than likely, over-mixing the dough. When I talk to someone who tells me that their biscuits are always heavy or tough, I first ask about how they are put together.
Once the dry ingredients have been mixed and the fat cut in, there is just liquid to be added. I prefer to chill whatever fat I am using.
At this point the dough should be handled just enough to hold together. A light hand means a light biscuit. The same is true for making scones. The more you knead the dough, handle the dough and roll the dough, the less flaky biscuits become. Be gentle with your dough.
Don’t treat biscuit dough the way you would a yeast-based dinner roll. The two are very different in how they are handled. Yeast-based doughs benefit from kneading and “working” the dough. Biscuits are the opposite.
Even when cutting out the biscuits, it will help if you cut them out as close together as you can. That way you have fewer scraps to re-roll. Every time you roll the dough out- it becomes a little tougher. You can always roll or pat your dough into a square and cut out the biscuits into triangles, leaving no scraps and no re-rolling.
Here is a recipe for one of my favorite biscuits. They are light and very flaky. Is there anything better than a fresh, warm biscuit with some butter?
Biscuits Supreme
2 c. flour
4 t. baking powder
2 t. sugar
½ t. cream of tartar
½ t. salt
½ c. cold butter, shortening or coconut oil – you can even use lard
2/3 c. milk
Stir together dry ingredients and cut in butter to resemble coarse crumbs. Make a well in the center and add milk all at once. Stir until dough sticks together and knead on lightly floured surface 10-12 strokes. Roll or pat to ½ inch thickness. Cut with 2-21/2 inch biscuit cutter and place on ungreased baking sheet. Bake in 450-degree oven for 10-12 minutes. Serve warm. Makes 10-12.
*If your baking powder might be old, you can test it. Place a couple of tablespoons of boiling water in a cup. Add a teaspoon, or two, of baking powder. The mixture should bubble vigorously. If there are no bubbles, or very few bubbles, you might want to get a new container of baking powder.
Applesauce Cake

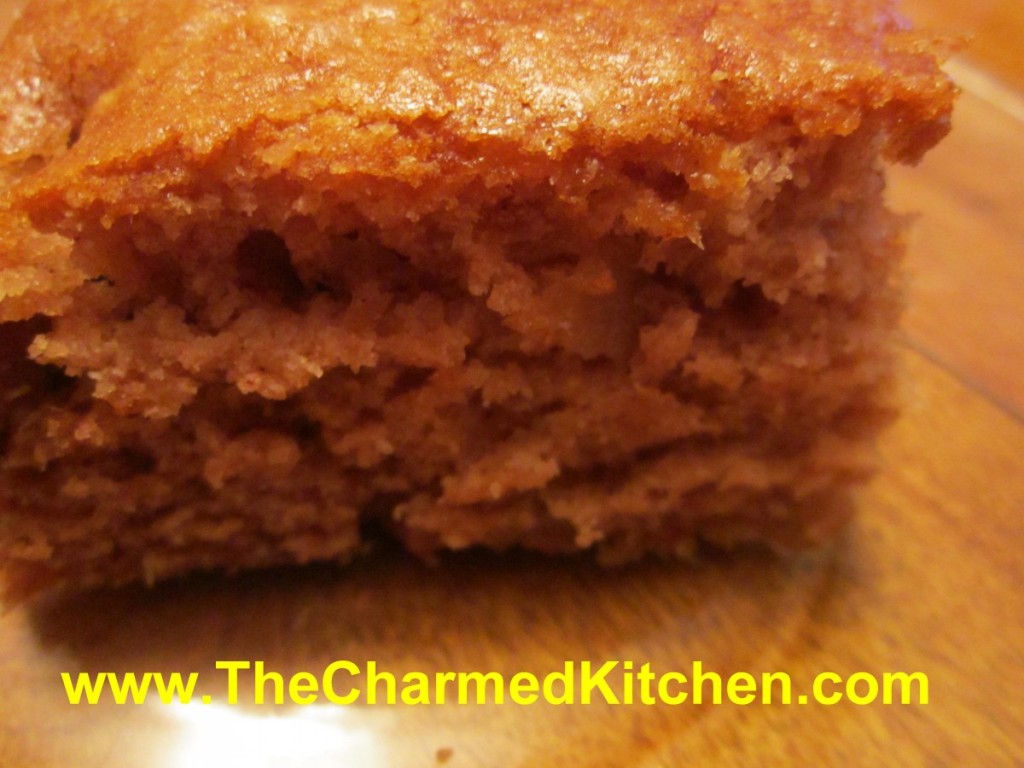
This is a favorite recipe of mine. The cake is moist, lightly spiced and very easy to make. I shared it with friends yesterday and they loved it. The applesauce adds moisture and flavor.
I used butter in the recipe, but if you used coconut oil instead, the recipe would be vegan. Actually, any oil would work in this recipe, if you don’t want to use butter. The spices work so well together. Sometimes simple is the best. Before someone asks, it is not a misprint, there are no eggs in the recipe.
I wish I remembered where this recipe came from. I have a piece of flowered stationery, a little crinkled around the edges, creased from being folded many times, with the recipe written on it. It is not my handwriting. I would love to credit the source of this wonderful recipe.
Spiced Applesauce Cake
2 c. unsweetened applesauce
½ c. butter, coconut oil or avocado oil
2 c. sugar
3 c. flour
1 T. baking soda
½ t. salt
1 t. each cinnamon, allspice and nutmeg
¼ t. cloves
1 c. raisins or chopped nuts
Heat together applesauce and butter until butter melts. Cool down a bit. Preheat oven 375 and grease 9×13-inch pan. Stir all ingredients together bake 30 minutes. Cool in pan.
Pumpkin Ice Cream

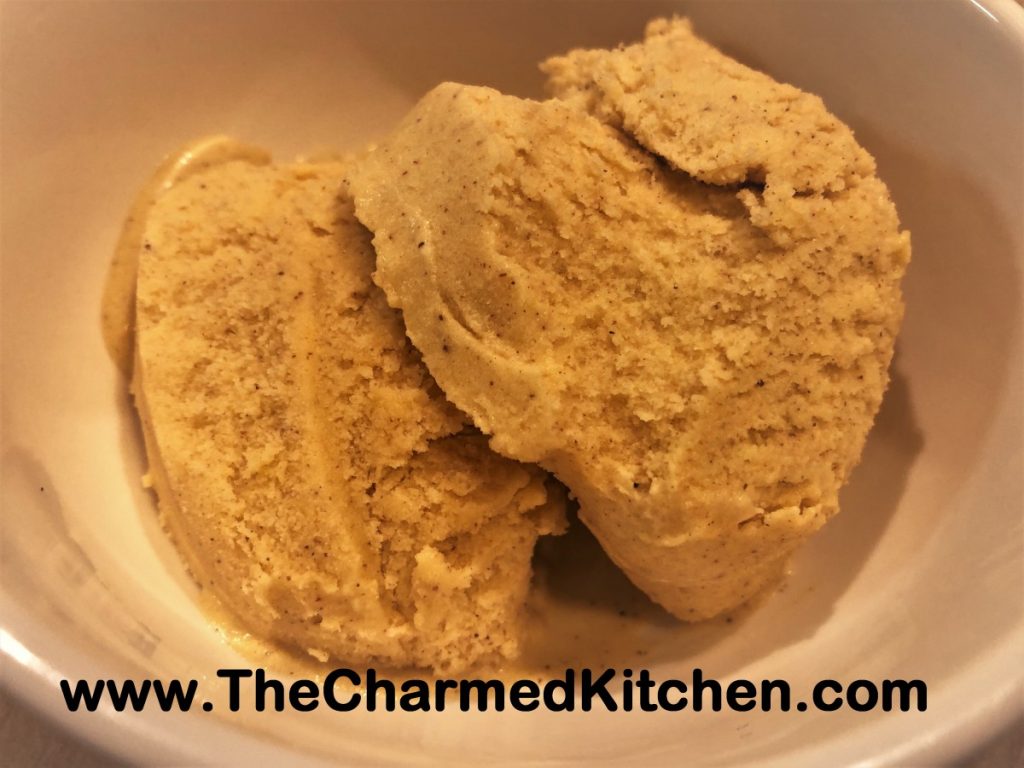
Pumpkin ice cream is such a nice addition to many fall desserts. It makes a nice topper for apple cake or pumpkin roll. Its also pretty good all on its own. I added some cinnamon and vanilla to mine, but you can certainly add more spices. Colder Fall weather might make us think less about ice cream desserts. I don’t think it is ever too cold for ice cream.
This is a nice, simple recipe. I did not use eggs/custard as the base. You just mix the ingredients and freeze. Easier if you have an ice cream maker, but doable without.
Pumpkin Ice Cream
2 c. whipping cream
2 c. pumpkin puree or winter squash
1 c. sugar, or to taste
1 T. molasses
2 t. cinnamon
1 t. vanilla
1/4 t. salt
Combine all ingredients and stir until well mixed and sugar is dissolved. Place in an ice cream maker following the manufacturer’s directions. My machine can’t take the whole recipe at once so I froze it in 2 batches and kept the rest of the pumpkin mixture chilled until ready to use. Place finished ice cream in the freezer until ready to serve.
Note: If you don’t have an ice cream maker you can place the mixture in a shallow pan and freeze until solid. remove from freezer and allow to thaw a little- about 10 minutes then break up and place in a mixing bowl. Whip with a mixer until smooth and return to the freezer. Repeat process once more to end up with creamy ice cream. You can also use a food processor for this step.
Apple Fritters

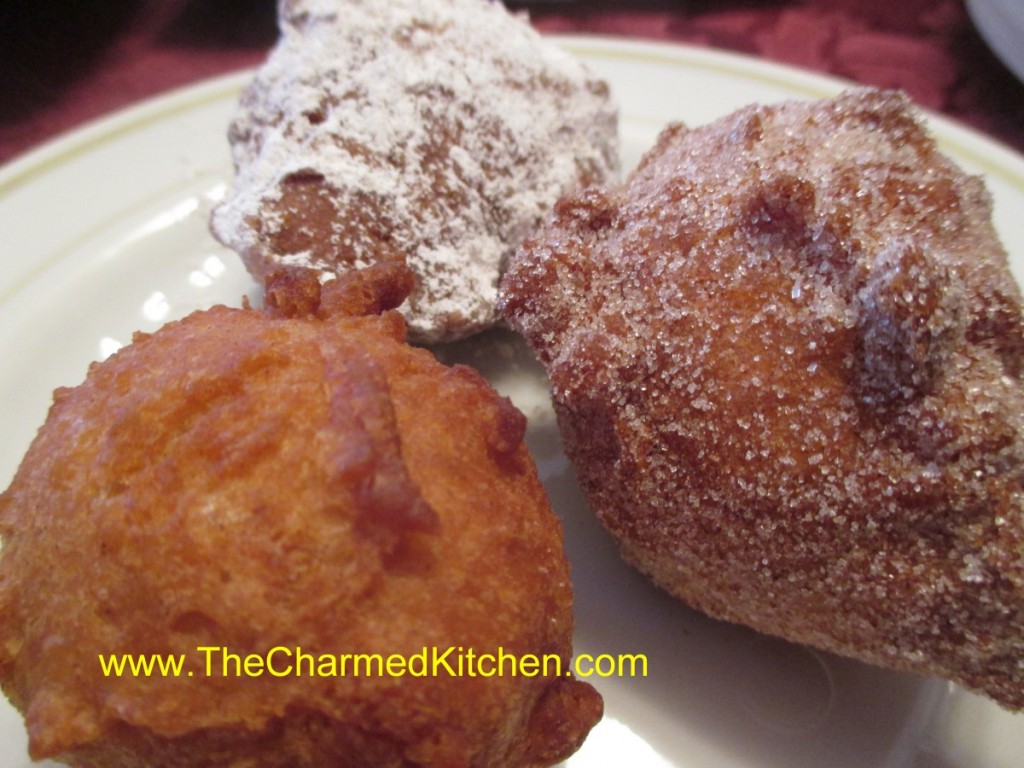
I love apple season. Besides eating them fresh, I enjoy cooking with apples. One of my favorite apple dishes is apple fritters.
Fritters are similar to doughnuts. Rather than being made from a dough that is rolled and cut, like doughnuts, fritters are made from a batter. The fritter batter is spooned into oil for frying. They are actually very easy to make.
Good fritters are light and airy inside, with a crisp outside. These are very good fritters. These fritters have diced apples and cinnamon in the batter and cook up tender and light. Fritters are good plain, but can be rolled in powdered sugar, cinnamon sugar or drizzled with a powdered sugar glaze. Unlike a lot of the giant-sized fritters I see at local orchards and farm markets this time of year, these fritters are smaller. Only a few bites each. I actually prefer that.
For my gluten-free friends, I have made these fritters with gluten free flour. They tasted great. The gluten free version seemed to brown faster, so I turned down the temperature of the oil to 350 degrees.
So enjoy one of my favorite recipes of the season, and make yourself some fritters.
Apple Fritters
2 c. flour
2 T. sugar
2 T. baking powder
1 T. cinnamon
1/2 t. salt
1 c. milk
2 eggs, beaten
2 T. melted butter
1 c. diced apples
oil for frying
Combine dry ingredients and set aside. Mix together milk with the eggs and butter. Stir in dry ingredients until just moistened and add the apples. Heat oil to 375. If using gluten-free flour heat oil to 350. Drop dough by tablespoonfuls into the hot oil and fry until golden brown. Don’t do more than 4-5 at a time. It will take about 4 minutes in total but you need to turn them to brown evenly so 2 minutes per side. Drain on paper towels. While warm roll in powdered sugar, cinnamon sugar, or drizzle with a powdered sugar glaze. Makes about 32.


