10 Plants You Might Not Know are Edible


I have posted this information before. I think it is extra important now, when so many of us are staying home. You might have a fresh salad growing all around you, and not even know it.
A lot of people don’t realize how many common plants they can eat. I thought it might be fun to share a few of them with you. Some of these are plants we grow as landscape/ornamental plants. Others are more often thought of as “weeds”. All have one thing in common. They are edible.
Some you may already know. I hope I might show you a few edibles you didn’t know about before.
I tried to stick to plants that were easy to identify. If you are not sure what it is – don’t eat it. Don’t eat plants where pesticides have been sprayed, either.
With any luck, you have at least a few of these in your yard.

Violets: Violet flowers are edible and used to decorate pastries and to make jelly. Did you know you can also eat the leaves? They are mild flavored- especially when young- and are a great addition to salads. Violet leaves are also high in vitamin C.
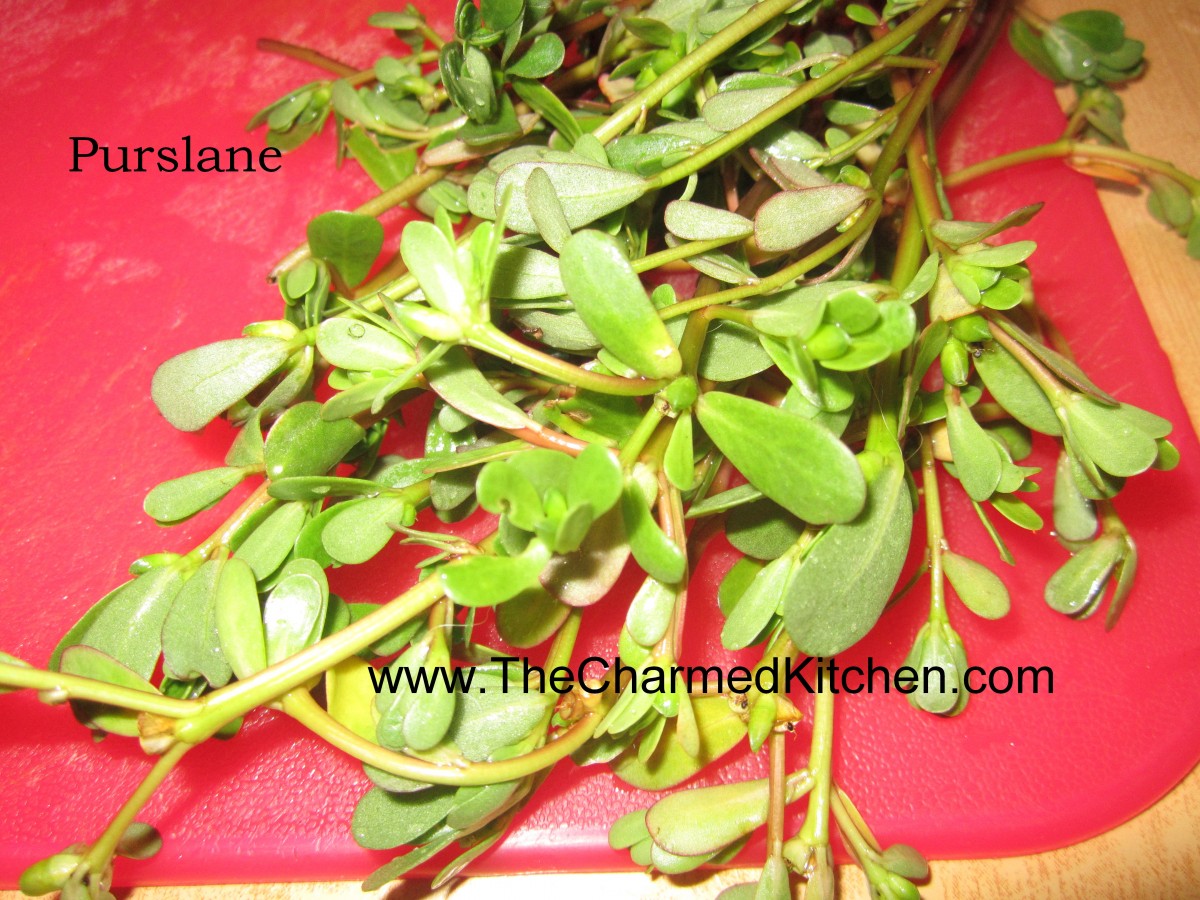
Purslane: The thick, fleshy leaves of purslane are easy to identify. Many vegetable gardeners make every effort to keep them out of their yards. Truth is, purslane is grown as a vegetable in many parts of the world. The leaves can be eaten raw in salads, can be cooked in a stir fry or just steamed as a fresh veggie. They can also be pickled. I make a salsa out of purslane leaves. They are crunchy with a slightly citrus flavor.

Lambsquarters: Lambsquarters are one of my favorites. They sprout all over my yard and in pots as soon as the weather warms up in the Spring. The leaves can be eaten raw when young or cooked as they mature. They taste just like spinach and are even better for you. Plants can get quite large and provide an easy harvest of nutritious greens.

Dandelions: We spend so much money trying to kill them. Sad because they are really a tasty green. Dandelions were brought to America by European immigrants as a vegetable. Their bitter greens can be an acquired taste. By combining the greens with certain foods you make them taste less bitter. Starchy foods like breads or potatoes, dairy products, tomatoes and vinegars all seem to tame the bitterness. Dandelion greens can be eaten cooked or raw. Flowers are used to make jelly and wine and can be added to baked goods.

Hosta: If you can get to them before the deer do, you will be pleasantly surprised. Hosta leaves are quite mild flavored, similar to Bibb lettuce. I add them to salads and even serve them with dips. The older leaves get tough so pick young leaves.

Sweet Potato Leaves: A friend from Hawaii first told me about eating sweet potato leaves. The leaves are pretty mild flavored. I normally eat them cooked although I have friends that eat them raw as well. You can eat the leaves of all sweet potatoes, including ornamental types.

Lilac: Lilac flowers are fragrant and edible. I use them every year to make lilac infused vinegar. They have a nice spicy taste that works well in the vinegar. Blossoms can be added to salads, too. This year I also made lilac jelly.

Redroot/Pigweed: This member of the amaranth family is distinguished by a reddish color to its roots. It has a spinach like flavor and can be cooked and used like spinach is any recipe. The plants can get several feet tall and often show up in places where the soil has been tilled.

Tulips: Tulips are more than pretty, they are also quite tasty. The petals taste like a mild flavored lettuce and can add a beautiful touch to salads. The bulbs are also edible but we rarely eat them because to do so would destroy the plant. The petals, however, can be harvested and eaten year after year without harming the plant.

Roses: Rose petals have been used to make fragrances for a very long time. The petals are also edible and can be added to salads and used to make jelly, syrup and of course, rose water. The hips are also quite edible. Rose hips are the round balls that are left after the bloom is spent. They are full of vitamin C and can be cooked and used to make tea and jelly.
This is far from a complete list. Just a few things from my yard that I thought you might have, too.
Lemon Drop Cheesecakes


Don’t let their small size fool you. These little cheesecakes pack a punch of lemon flavor. There is lemon zest in the batter and a topping full of lemony tartness. Not too sweet, either, which is a plus in my mind.
I wanted a dessert but didn’t want to make anything too big. With a limited pantry these days, my options were limited, too. These mini cheesecakes were the right solution. The recipe only uses one package of cream cheese and only makes 6. They can be frozen if needed.
For the crust you can use vanilla wafers, but since I didn’t have any, I just trimmed off the edges of some graham crackers, so they would fit in the muffin tins. You can even omit a crust and they are gluten free.
So here is the recipe. I hope you enjoy it.
Lemon Drop Cheesecakes
6 vanilla wafers or graham crackers
1 (8 oz.) cream cheese, softened
1/4 c. sugar
Zest of one lemon
1 t. vanilla
1 egg
Topping:
½ c. lemon juice or a combination of lemon juice and pieces of lemon*
½ c. sugar
2 t. cornstarch
Zest of a lemon
Line 6 muffin tins with paper liners. Place 1 wafer in each. If using graham crackers, trim them to fit the muffin tins. Beat together remaining ingredients for 1 minute with electric mixer. Divide this mixture in the muffin tins, filling each almost full. Bake 25 minutes at 325 degrees. Cheesecakes will puff up, then deflate as they cool. While cheesecakes are baking, make the lemon topping. Combine all topping ingredients in a small saucepan. Cook over medium heat, stirring, until mixture thickens and gets bubbly. Set aside. Once the cheesecakes have cooled down, spoon over the lemon topping. Chill before serving. Store leftovers in fridge. Makes 6. These can be frozen. Serves 2-3.
* I only had 2 lemons, so to get the most from them, I removed the peel and white membrane and used the lemon segments in the topping. I was still a little short, so I added some extra lemon juice to get to ½ cup. You could just use all juice.

Pumpernickel Bread


I bake a lot of bread. Homemade pumpernickel is one of my favorites. Plus, there is that wonderful aroma as it bakes.
The dark color comes from a mixture of rye flour, strong coffee, cocoa powder and molasses. These ingredients give this bread a flavor and texture I adore.
It’s hard for me to find a store-bought Pumpernickel bread that comes close to this one. Some store bakeries rely on caramel coloring for the color in the bread. For real flavor you need the real ingredients. It is worth the time to make your own.
Pumpernickel Bread
2 Packages active dry yeast
½ c. warm water
2 c. lukewarm strong coffee
¼ c. each molasses and unsweetened cocoa
2 T. Caraway seeds
2 t. salt
5-6 c. flour- I use bread flour
2 c. rye flour
Cornmeal
1 egg white, slightly beaten
In large bowl dissolve yeast in warm water. Stir in coffee, molasses, cocoa, seeds, salt and 3 cups of flour. Beat with wooden spoon about 2 minutes. Stir in rye flour and enough of the remaining regular flour to make soft dough. Turn onto floured surface and knead until dough is smooth, about 10 minutes. Place in greased bowl, turning to grease top, cover and let rest until doubled, about 1 hour. Grease large baking sheet and sprinkle with cornmeal. Set aside.
Punch down dough, divide in 2, and form into balls. Place on baking sheet and cover. Let rise until double, brush with egg whites, slash tops and bake at 375 for 35-40 minutes. Makes 2 loaves.
Growing Fresh Sprouts

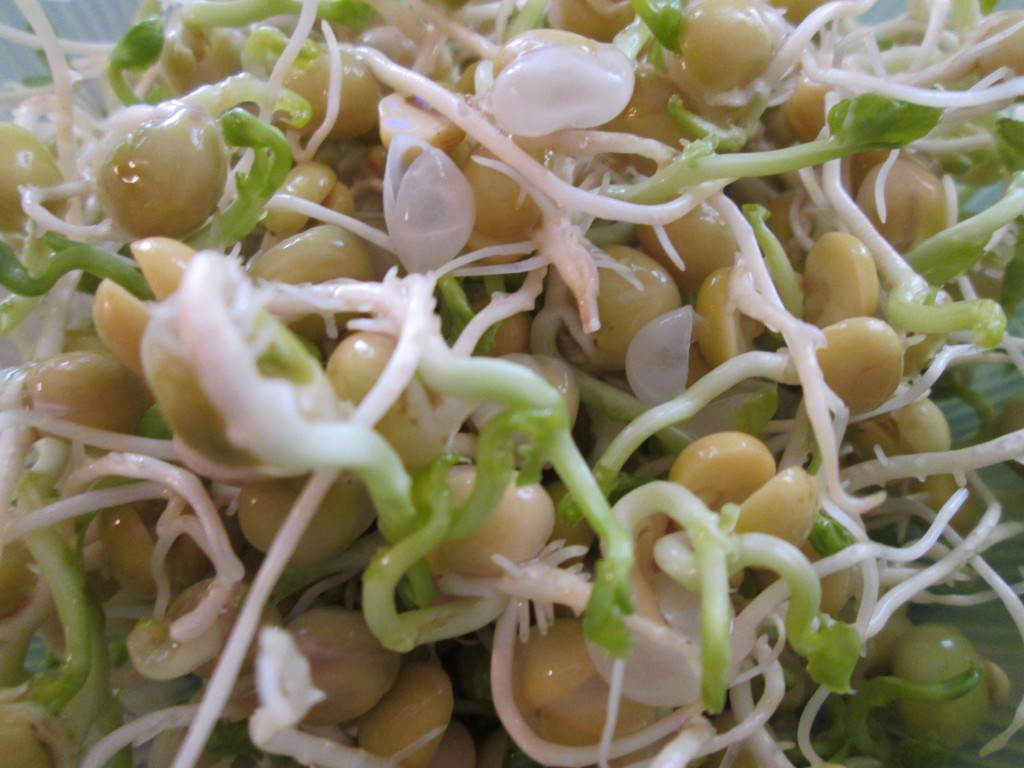
To satisfy my urge for fresh produce I have taken to sprouting. I have a nice assortment of seeds for this purpose, and I can start more anytime I like. Because of the variety of seeds that I have, I can have sprouts, like pea, garbanzo beans and mung beans that can be eaten cooked. I also have more delicate seeds, like alfalfa and radish sprouts, that are great as a salad ingredient or on sandwiches. With staying home so much, it is more satisfying than ever. This can also be a fun project for kids to work on.
The upside is the seeds last for ages so they will be available for sprouting when I need them. The downside is that it takes a week or more to get sprouts, so some planning is required. Still, sprouting is faster than the seeds I planted for my garden.
Sprouting is pretty simple- although it is a little like having a pet. There is some care than needs to happen. First, start with a clean, wide mouth jar. I have these handy lids with holes in them that are made just for sprouting. Place the seeds in the jars and cover with water. Allow them to be covered in the water for at least several hours. Drain and rinse the seeds. After the first soaking only keep what ever water stays on them after a rinse and drain. That’s pretty much the whole process. Twice a day, maybe three times if the weather is really warm, rinse the seeds and drain off any extra water. Depending on the seeds you can expect your first crop in 7-10 days. You can place the jars in a sunny window for greener sprouts. If you don’t have the lids with holes in them you can cover the jar with some cheesecloth. Hold in place with a rubber band. That will allow the sprouts to get air and make it easy to rinse and drain them.

Sprouts in the jars
Sprouts are full of nutrients and can be eaten cooked or raw. In some cases, like with mung beans, the skin of the seed will come off after a few days. They tend to float so if you just place the sprouts in a big bowl of fresh water and agitate them. The skins will come to the top and can easily be discarded.
Also, quantity can be tricky. Very few seeds can produce a heck of a lot of sprouts so go easy. A few tablespoons of tiny seeds like radish, alfalfa or broccoli should be plenty. Perhaps a 1/4 cup of larger seeds like the beans and other legumes is also going to give you a bountiful supply.
They do take time so if you want a steady supply start a new batch every few days. Once sprouts are the size you want them to be, give them a final rinse and drain well. Store in the fridge until you are ready to use them. Do use them soon. Often they are quite perishable. Besides, if you were sprouting for fresh food- enjoy it while it is fresh.
If you get any mold on the sprouts, you will have to toss them, so be sure to rinse them often and sprout them in a jar large enough to allow for some air circulation.
I bought my seeds online. The variety to pick from was amazing.
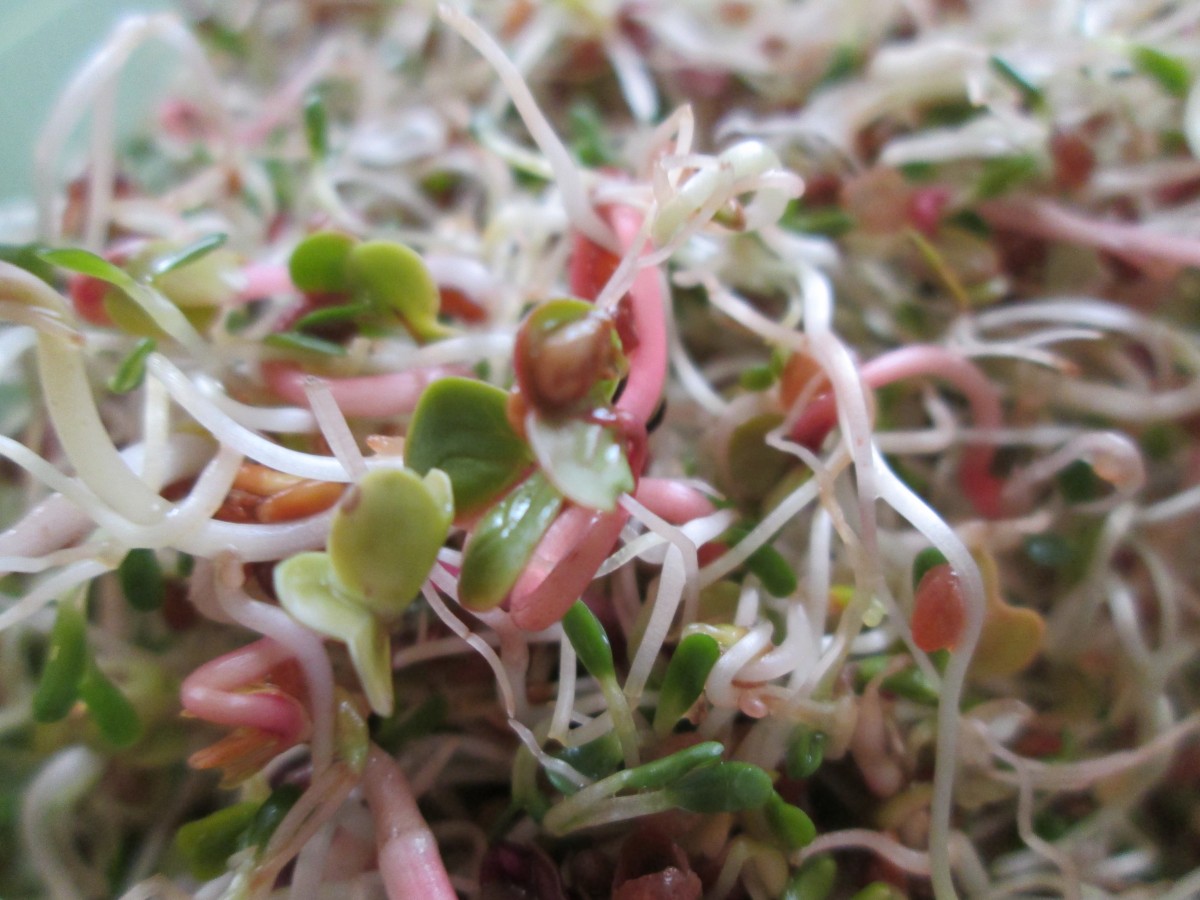
Alfalfa and radish sprouts
16 Wonderful Salad Recipes


I wanted to share some of my favorite salad recipes, in keeping with my earlier post. Something for every taste.
The dressing for this salad is one of my favorites, Its a creamy French dressing that just hits all the right notes.
Blueberry Chef Salad
Dressing:
1/3 c. honey
1/4 c. white wine vinegar or cider vinegar
1 t. paprika
1 t. dry mustard
1/4 t. salt
1/2 c. olive oil
3 cups blueberries
Salad:
6 c. torn salad greens
12 oz. cooked chicken, turkey, ham etc, cut into strips
1 c. cubed cheese
1/2 c. cashews
In blender, combine first five ingredients and start running machine on high. Add oil in a slow stream until mixture becomes thickened. Pour into bowl and stir in berries and chill, several hours if you can. When ready to serve arrange greens on one large platter or on smaller salad plates. Arrange meat and cheese on platter or plates. Spoon over the dressing and cashews then serve. Serves 4-6.
Shrimp and Bacon Spinach Salad
3-4 slices bacon, cut into 1-inch pieces
2 shallots- or 1 small onion- chopped fine
2 cloves minced garlic
8 oz. fresh spinach
8 oz. raw shrimp, shelled and deveined
¼ c. sherry
¼ c. chopped parsley
½ t. grated ginger
½ t. red pepper flakes
Salt and pepper to taste
2 cups cooked pasta
Cook bacon in skillet until almost cooked. Add the shallots and cook
until shallots are just turning brown. Add garlic and cook 1 minute
longer. Add spinach and cook, stirring often, until spinach is wilted
down. Add shrimp and continue cooking until shrimp are just barely
cooked. Add sherry and seasonings and cook 2 minutes more. Toss with hot
pasta and serve. Serves 2.
Note: You can add some fresh Parmesan cheese when serving, if you like.
Corn and Black Bean Salad
4 c. cooked corn
1 can black beans, rinsed and drained
1 sweet pepper, seeded and chopped
¼ c. olive oil
3 T. red wine vinegar
1 T. Balsamic vinegar
2 t. Italian seasoning- I used my Tuscan blend
Salt and pepper to taste
Hot sauce to taste, optional
Combine all ingredients in medium bowl. Stir to combine well. Chill before serving. Serves 6-8.
Mom’s Macaroni Salad
1 lb. uncooked pasta, shells are preferred
Salt and pepper
Mayonnaise, about 1 cup
Salad dressing, like Miracle Whip, about ½ cup or more mayo
3-4 ribs celery, sliced thin
4-5 green onions, trimmed and sliced thin
8-12 hard-cooked eggs, cooled and peeled
Cook pasta according to package directions, but do not overcook. Rinse with cold water and drain well. Place drained pasta in a large bowl and sprinkle with salt and pepper to taste. Add dressings and vegetables and stir until well mixed. You may want to add more dressing to suit your taste. Chop eggs and stir into salad. Adjust seasonings if needed and chill before serving. Serves 8-10.
Mom’s Mustard Potato Salad
When I was a kid I did not like the taste of mustard- except in this recipe. It adds such a wonderful flavor.
4 lbs. potatoes- I used Klondike Rose and I did not peel them
4 hard cooked eggs, peeled and chopped
1 sweet pepper, seeded and chopped, optional
1 c. mayo- maybe a little less
1/4 c. prepared mustard- I like a grainy brown mustard
salt and pepper to taste
dash of hot sauce
Bake whole potatoes until tender and allow to cool. Cube potatoes into large bowl and combine with remaining ingredients. Chill until ready to serve. Serves 8.
Succotash Salad
1 lb. lima beans, cooked and cooled
4 ears of corn, cooked, and kernels cut off the cobs
1 sweet pepper, seeded and diced
1 small sweet onion, diced
3-4 T. chopped fresh parsley
Dressing:
2/3 c. apple cider vinegar
1/3 c. oil
1/4 c. honey
1 t. cumin
dash of hot sauce
salt and pepper to taste
Combine veggies and parsley in a medium bowl. In small bowl whisk together dressing ingredients. Adjust seasonings and pour over the Lima bean mixture. Cover and chill for at least several hours before serving. Serves 6-8.
Corn and Barley Salad with Basil
½ c. pearl barley
salt
3 T. cider or white wine vinegar
1 t. Dijon mustard
fresh ground pepper
3 T. olive oil
3 T. fresh basil, cut into thin strips
3 c. cooked corn, from about six ears
1 c. diced sweet onion
1 c. diced sweet pepper, any color
¼ c. sliced green onions
Combine barley, 2 cups water and ½ t. salt in saucepan and simmer, covered until barley is tender, about 50 minutes. Drain and rinse under cold water. Combine remaining ingredients and toss with barley in large bowl. Makes 6 servings.
Curry Cauliflower Salad
1 head cauliflower, cooked
½ c. chopped green onions
¾ c. mayo – or less or more depending in the size of the head of cauliflower
1 T. curry powder- or to taste
1 t. hot sauce, or to taste
Salt and pepper to taste
1 c. peanuts
First break the cauliflower into florets. Cook the cauliflower any way you like. I steamed mine for about 5 minutes. You could roast it, or sauté it in a little oil. You want it tender, but still a little crisp. Don’t cook it to mush. I would also advise against boiling it, as it gets too wet. Once the cauliflower is cooked, let it cool down before proceeding. Combine the cauliflower with the green onions, the mayo and seasonings. It was hard to be exact because your head of cauliflower might be bigger or smaller than mine. I could have said 5 cups of cooked cauliflower- but would that really help? Then you’d have leftover cooked cauliflower. Or perhaps not enough. So add a little more mayo, if needed, and adjust the seasonings to suit your taste and the amount of cauliflower you have. Chill and toss the peanuts in closer to serving time. If you add the peanuts at the end, they stay crunchier.
Curry Powder
2 t. ground cumin
2 t. ground coriander
2 t. ground turmeric
1 t. nutmeg
1 t. salt
½ t. cinnamon
¼ t. cayenne pepper
¼ t. ground black pepper
Combine all ingredients and store in a cool, dry place.
Black-eyed Pea Salad
1 lb. dried black-eyed peas
1 large sweet onion, chopped fine
1 sweet pepper, seeded and chopped
1/4 c. olive oil
1/4 c. red wine vinegar
1/4 c. chopped fresh parsley
1/2 t. dried thyme
salt and pepper to taste
Cover beans with cold water in saucepan and bring to a boil. Boil 5 minutes. Turn off heat and allow to stand 1 hour. Drain and rinse beans. Return to saucepan and cover with cold water. Simmer beans until tender, about 1 1/2 hours. Drain. Place cooked beans in a bowl and cover with remaining ingredients. Toss to coat, cover and chill. Serve as a main dish or on the side. Also tasty served over salad greens or stuffed in a hollowed out tomato. Serves 6-8.
Broccoli and Cauliflower Salad
1 small head cauliflower, trimmed and broken into bite- sized pieces
2 broccoli crowns, cut into bite- sized pieces
1 sweet pepper, seeded and chopped
1 c. shredded cheese- I used a sharp cheddar
8- 10 slices of bacon, cooked and chopped
1/2 cup of mayo – or more according to your taste
salt and pepper to taste
Steam the cauliflower and broccoli until just tender/crisp. About 5 minutes in a microwave steamer, 6 minutes in a conventional steamer. Place in a bowl to cool down then combine with remaining ingredients and stir to combine well. Adjust seasonings, if needed. Serves 6-8.
Coleslaw Chef’s Salad
5-6 c. shredded cabbage- cole slaw mix is fine
2 c. cubed cooked meat- I used chicken but use what you like- or use a combination
2 c. fresh fruit- I used blueberries and fresh pineapple but use what you like
1 c. cubed cheese., optional
Dressing:
2/3 c. mayo
3 T. cider vinegar
1 T. sugar
1 t. fresh grated ginger
salt and fresh ground pepper to taste
Topping:
1/2 c. cashews, optional
Combine cabbage with fruits, meats and cheeses (if using) in a mixing bowl. In smaller bowl combine the dressing and stir until smooth. Pour dressing over the cabbage mixture and toss to coat. Chill at least 30 minutes before serving. Sprinkle cashews on top just before serving. Serves 4.
Roasted Beet Salad
1 small head Bibb lettuce, washed and sliced into thin slices
2 c. spinach, torn into bite sized pieces
1/4 c. olive oil
3 T. red wine vinegar
2 t. sugar, optional
3 small roasted beets, peeled
1/2 c. crumbled feta cheese
1/4 c. hulled pumpkin seeds, toasted
1/4 c. dried cherries
coarse sea salt- I used pink salt
Place lettuce in a mixing bowl. Combine olive oil with vinegar and sugar, if using. Add salt and pepper to taste and toss over the greens. Slice beets. Divide greens on 2 salad plates. Arrange half of the beets on each salad and top with the rest of the ingredients. Sprinkle with a few grains of the sea salt and serve. Makes 2 luncheon salads.
Beet, Carrot and Red Onion Salad
1½ lbs. beets
1 lb. carrots
2 red onions
Dressing:
1½ c. apple cider vinegar
½ c. oil- I used olive oil
½ c. sugar
¼ c. lime juice
2-3 T. chopped parsley
1 T. mustard seed
1 T. salt, or to taste
2 t. dill weed
1 t. celery seed
½ t. ginger
Hot sauce to taste
You’ll have to cook the beets. You can roast them or boil or even steam them. To roast the beets- Place beets in a roasting pan and drizzle with a little oil. Cover pan and place in a 350 degree oven for about 45 minutes. Smaller beets will be cooked in less time- about 35 minutes. Really large beets could take up to an hour. I always check by poking one of the beets with a fork. If boiling, just place beets in a pot with enough water to cover them and bring to a boil. Reduce to a simmer and cook, covered, until the beets are tender, about 30-45 minutes, depending on the size of the beets. When beets are cool enough to handle, removed the skins and cut into bite sizes cubes. Place in mixing bowl. To cook the carrots, just peel, slice and steam or boil until just tender. Combine with beets in mixing bowl. Peel and slice the red onions. Place in a saucepan with the dressing ingredients and bring to a boil. Simmer, covered, for about 10 minutes, or until onions are wilted and tender. Pour onion and dressing mixture over beets and carrots and stir to combine. Chill overnight. Serves 6-8.
Wilted Kale Salad With Bacon and Eggs
2-3 slices thick sliced bacon, chopped
1 onion, sliced
4-5 cups kale, washed and torn into pieces
2 T. cider vinegar
1 T. maple syrup
dash of hot sauce
2 hard- cooked eggs, peeled and cubed
In skillet cook bacon until crispy. Remove bacon from pan and set aside. Remove some of the fat from the pan- leaving about 2 tablespoonfuls. Add onion and cook until golden. Return bacon to pan and add the kale. Cook over medium-high heat, stirring often, until kale in wilted. I don’t mind my kale on the firm side-cook it longer if you like it more tender. Drizzle in the vinegar, maple syrup and hot sauce and stir to coat evenly. Place on a serving dish and top with the eggs. Enjoy!!
Cornbread Salad
A little different- people always seem to like this salad. A nice way to use up stale cornbread, too. ?
4 c. crumbled cornbread or corn muffins
1 c. shredded mild cheese
1 sweet red pepper seeded and diced
1 c. diced celery
½ c. diced green onion
4 hard-cooked eggs, peeled and chopped
¼ c. chopped parsley
1-1 ½ c. mayonnaise or salad dressing, sometimes I use potato salad dressing or even slaw dressing
2 c. diced fresh tomatoes
1 c. toasted pecans
paprika for sprinkling on the top, optional
Place cornbread and next 6 ingredients in a medium bowl. Stir in dressing until desired moistness is achieved. Chill and stir in tomato and nut just before serving. Sprinkle with paprika if you like. Serves 6.
Note: You can add whole kernel corn also if you like.
Sweet Potato Salad
A nice twist on potato salad.
3 large sweet potatoes
2 c. corn kernels, fresh off the cob preferred but frozen is O.K.
2 ribs celery, sliced
1 sweet onion, diced
1 c. sweet pepper, seeded and chopped
2-3 T. fresh parsley
1/3 c. oil
1 t. Dijon mustard
3 T. apple cider vinegar
1 T. lemon juice
1 clove garlic, minced
Salt and pepper to taste
½ c. cashews
In medium saucepan boil or steam potatoes until tender, about 20-25 minutes. Remove with slotted spoon and place in a large bowl of ice water. Add corn to saucepan and cook until just tender about 2-3 minutes. Drain corn and add to ice water with the potatoes. Once the vegetables have cooled down drain them and peel and cut the potatoes into bite-sized pieces. Place potatoes and corn in a mixing bowl with remaining vegetables. Combine remaining ingredients, except cashews, in a jar with a tight-fitting lid and shake well before pouring over the sweet potato mixture. Toss to blend and chill until ready to serve. Add cashews just before serving. Serves 6.

Black-eyed Pea Salad 
Cole Slaw Chef Salad 
Succotash Salad 
Roasted Beet Salad 
Broccoli and Cauliflower Salad 
Shrimp and Bacon Spinach Salad 
Corn and Black Bean Salad 
Curry Cauliflower Salad 
Cornbread Salad
Pantry Cooking – Salads

When it comes to versatile meals, it is hard to beat a salad. Pretty much anything can go into a salad. When your choices might be limited, you can almost always still make a great salad.
When we think of salad, I suspect most of us see of a bowl of lettuce, with a few other veggies and a drizzle of dressing. A side dish, and not an exciting side dish at that.
Salads can be so much more. Salads can easily be a meal all on their own. We just have to use our imaginations a little.
So where do we start? Start by looking at what ingredients you already have. Veggies, fruits, meats, grains, pasta, bread, nuts, eggs, dry beans, lentils, herbs, seafood and cheeses. Did I leave anybody out? Pretty much everything you have can be a salad. How you use them will determine just how wonderful your salad will be.
The Veggies
We’ll start with veggies, because they are the obvious place to start. If you don’t have lettuce, don’t worry. You can make great salads with shredded cabbage, sliced cucumbers, sliced peppers, tomatoes, broccoli, cauliflower, beets, fennel, carrots, celery, mushrooms, green beans, bean sprouts, alfalfa sprouts, corn, asparagus, sweet onions, green onions, spinach, kale, Brussels sprouts, endive, dandelion. You get the idea. There are a lot of options. Let’s not forget potatoes and sweet potatoes.
I figured people might still have potatoes and cabbage around. I thought you might like this recipe.
Potato Slaw
1 large potato, peeled and cubed
1 clove garlic
1 t. salt
3 -4 T. vinegar
1/3 c. oil
1 ½ -2 lbs. Cabbage, shredded
Freshly ground black pepper
Cook potato until tender. Meanwhile, combine next 4 ingredients in a blender until smooth. Set aside. Drain cooked potato and mash into the cabbage. Cabbage will wilt a little. Toss in dressing and serve immediately. Serves 4-6.
Many veggies can be used raw in salads, but you’ll want to cook potatoes, sweet potatoes. I love a broccoli and cauliflower in salads, but I prefer to cook them a little. Just steamed a few minutes.
Here is a salad using eggplant!
Greek Eggplant Salad
1 medium eggplant
1 large tomato, seeded and chopped
1 sweet pepper, seeded and chopped
1 small onion, minced
1/3 c. olive oil
¼ c. red wine vinegar
1 clove garlic
Salt and pepper to taste
Sliced ripe olives and chopped fresh parsley
Broil eggplant until skin has blackened. Cool. Rub skin off the eggplant with a damp paper towel and chop the pulp. Combine eggplant with remaining vegetables in bowl. Combine dressing ingredients in blender until smooth and toss over eggplant mixture. Chill and garnish with olives and parsley. Serves 3-4.
Fruits
Fruits can be used in salads, too. I am not talking about a fruit salad, although they are great. I am talking about adding fruit to your veggie salads. Oranges, apples, berries, pineapples, dried fruits all add a pop of sweetness. Even canned fruits can be used, although they wouldn’t be my first choice. Still, if you have a can of pears you are looking to use, it could work. It might be a way of using up those raisins your kids won’t eat.
Proteins
Proteins can take your salads from side dish to main dish. Canned beans are a great addition- like kidney beans or black beans, not canned green beans. Don’t overlook other legumes. Lentils and split peas can be cooked until just tender and then added to a salad. They add protein, texture and even a pop of color. Other great protein options- nuts, seeds, eggs, meats, fish, cheese.
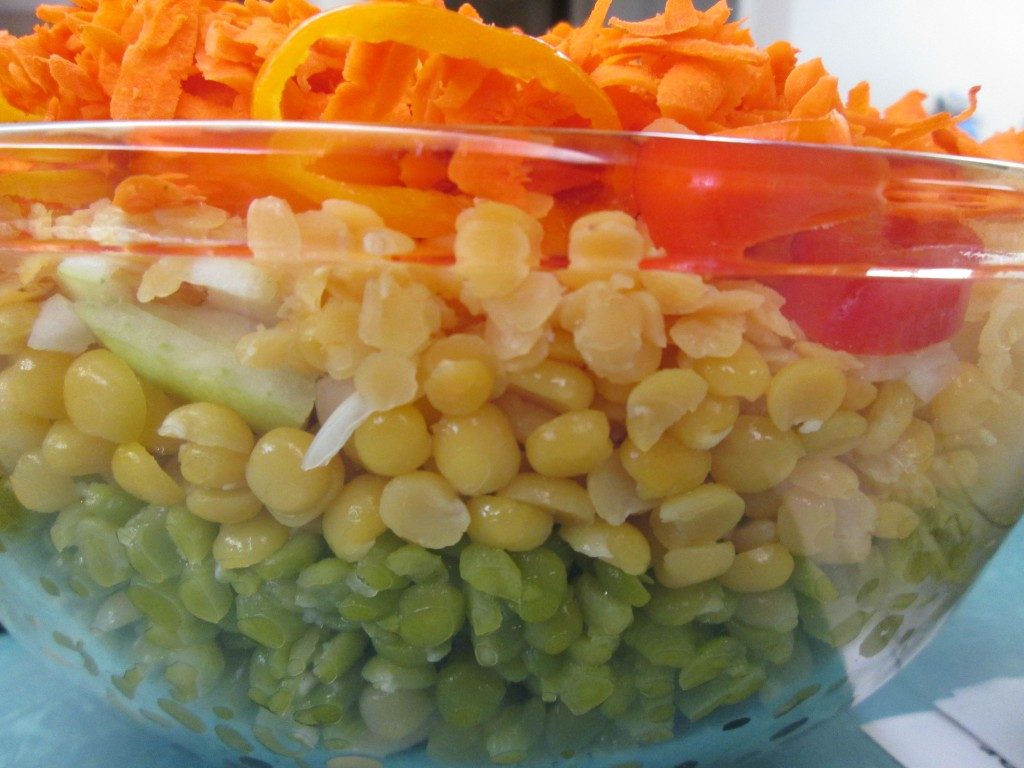
Here is a colorful salad using yellow and green split peas and red lentils. It makes a lot of salad, but you can cut it down to a smaller size. The cooked peas and lentils freeze well, too.
Rainbow Salad
1 c. each green split peas, yellow split peas and red lentils
1 can black beans, rinsed and drained
1 can butter beans, rinsed and drained
1 c. diced sweet onion
1 c. diced sweet pepper
1 c. grated carrot
Cook split peas and lentils separately just until tender. Split peas, both green and yellow will take 20 minutes. Red lentils will take about 8-10 minutes. Drain and rinse each under cold water when done and set aside until ready to use, or you can cook them a day ahead and keep chilled. Each will yield about 2 1/2 c. cooked.
In large glass bowl, place the following ingredients in this order.
Black beans, butter beans, green split peas. yellow split peas. onion, red lentils. carrots and peppers. Pour over dressing and chill several hours or overnight. Serve on a bed of greens.
Dressing *
1/2 c. oil
1/2 c. vinegar
1 (14 oz.) can diced tomatoes, undrained
2-3 T. sugar
1/2 c. parsley or cilantro
1 t. each chili powder, cumin and salt
dash hot sauce
Combine in a blender or food processor until smooth.
*Note: Any bottled dressing you like can be used. Italian works very well.
Additional Salad Ingredients
There are more potential ingredients- cooked pasta is always a good choice, but you can also used cooked rice, barley, quinoa, cracked wheat or other grains.
Salads can be a great way to use up stuff from the fridge, too. Waste not, want not these days. Go through all those jars of pickled goodies you have lurking in there. Sliced hot peppers, dill slices, pickled beets, olives can all add flavor to your salad.
The Dressing
After you’ve got all your ingredients together we need to talk dressing. You can start by using prepared dressings, if you have them. Mayonnaise would be an option, too.
My mom loved to make her own dressings. For leafy green salads, she would often dress it with vinegar and oil. She would drizzle oil first, and toss the salad until the oil was distributed on the greens. Then she would drizzle in vinegar, tossing again. She would also toss in salt and pepper. She taught me to use a light hand with dressings. There was never a big puddle of dressing at the bottom of the bowl. It is a great lesson to learn. You will need less dressing than you might think. She made great salads.
If you don’t have bottled dressing you might have to make your own. It is actually pretty easy. In most dressing you’ll combine a fat with acid, salt, and sweetener. There are endless variations and plenty of options. I love to make salad dressings.
Oils and Fats
Most dressings start with oil or some fat. Any oil you like works here. If you store your extra dressing in the fridge, olive oil and avocado oil will harden up. Don’t worry. You can just take them out of the fridge for a few minutes before using. Sesame oil has a strong flavor, so don’t use too much of it. It can be added to other oils to soften it’s flavor. For wilted salads, bacon fat is warmed and poured over greens to wilt them down a bit
The classic ratio is 3 or 4 parts oil/fat to one part vinegar/acid. I often make dressing closer to equal parts oil and acid, but it depends on my mood and what my acid source is.
Acid Ingredients
Acids are usually vinegar, but shouldn’t be limited to them. Citrus juices are a great acid base in a dressing. Not just lemon or lime juice, either. Orange and grapefruit juices are wonderful in salad dressing. Other juices, too. Pineapple, tomato and pomegranate juice are nice options.
Pickle Juice
I would be remiss if I didn’t talk about pickle juice. Most of us have jars of something pickled in the fridge. The liquid in the jars, the brine, can be a great addition to any salad dressing. Most are vinegar based with salt, spices and sometimes sugar. Don’t throw it away. Use it in salad dressings and marinades.
Salt, Herbs and Spices
Salt- don’t forget to add some to you dressing, unless you are on a sodium restricted diet. Salt makes the dressing better. Add some pepper, too. Don’t forget herbs and spices, too. If you only have dried herbs, add them ahead of time and let your dressing chill in the fridge for an hour or longer. It gives the herbs time to get soft, but also for their flavors to infuse in the dressing.
Sweeteners
Sweetening is optional, depending on your personal tastes. The more acid ingredients you use, the more likely you will want to sweeten your dressing a little. It can be as simple as a bit of sugar, but don’t overlook honey, maple syrup, fruit juice concentrates, fruit, dried or fresh as other sweetening options.
Additional Dressing Ingredients
Other possible dressing ingredients include garlic, tahini, peanut butter, almond butter, sour cream, Parmesan cheese, milk, tomatoes. All sorts of things can be added. Start simple and build in more flavors gradually.
Making the Dressing
You can mix your dressing by just putting all the ingredients in a jar with a tight fitting lid and shaking them up. Of course, if you are adding things like garlic cloves or dried fruits, you’ll need a blender.
You can also make a creamy/emulsified dressing. These are fun to make and kids might even like to watch the magic happen. You can actually get the oil and vinegar to mix together. To make your dressing creamy- start with the acid and other ingredients- but NOT the oil. Place them in a blender. I use an immersion blender, so I place my ingredients in a wide mouth jar. Blend until the ingredients ate well combined. Slowly- and I mean SLOWLY, start to drizzle in the oil. If it starts to puddle up on top, slow down until it mixes in, then add more oil. The dressing with start to thicken up. The more oil you use, the thicker it will become. Mayonnaise is, after all, just an emulsified dressing. Store extra dressing in the fridge.
Don’t forget salad toppers like croutons, seeds, nuts, dried fruit, bacon. Have fun.
Here are a few dressing recipes, to help you get started.
Lemon Dill Dressing
¾ c. olive oil
½ c. lemon juice
1 T. Dijon mustard
1 T. dill, minced
3 cloves garlic, minced
¼ t. each cumin and paprika
Salt and pepper to taste
Combine all ingredients in blender until smooth. Use on vegetable salads, especially tomato and cucumber salads or on tuna salads. Makes 1 ¼ c.
Raspberry Vinaigrette
½ c. raspberry vinegar
3 T. minced chives, optional
1 T. each lime juices and honey
Salt and pepper to taste
¼ c. each olive oil and walnut oil or ½ c. olive oil
Combine all but the oils in a blender and mix well. Add oils in a slow stream with machine running until dressing is blended. Makes 1 cup.
Tomato and Herb Dressing
1 c. tomatoes, peeled and seeded, fresh or canned
½ c. chopped parsley
2 green onions, chopped
2 T. fresh celery or lovage leaves
2 t. basil leaves. Dried
½ t. each salt and garlic powder
½ c. olive oil
Dash hot pepper sauce
Combine all ingredients in blender until smooth. Makes 1 ½ c.
Fresh Herb Vinaigrette
¼ c. red wine vinegar
¼-1/2 c. fresh herbs such as parsley, basil, thyme, chervil etc., or a combination
½ t. celery seed
Salt and pepper to taste
1/3 c. oil
Combine all ingredients in blender and blend for 15 seconds. Makes about 1 cup of dressing.
Greek Style Dressing
¾ c. olive oil
¼ c. vinegar
2 T. lemon juice
1 T. fresh oregano or 1 t. dried
2 cloves garlic
¼ c. black olives, pitted
Salt and pepper to taste
½ c. feta cheese
4-6 anchovies cut up, optional
Combine all ingredients in blender, except cheese and anchovies and process until smooth. Cheese and anchovies can be stirred in just before using. Makes 1 ½ c.
Final Thoughts
Don’t be afraid to play around with your salad and salad dressings. Taste as you go. We will get through this.
Homemade English Muffins


If you haven’t made them before, English muffins are pretty simple to make. They are not baked in the oven, like most other breads. Rather, they are “baked” in a skillet over medium heat. It is the same way crumpets are cooked. I really like the flavor of a freshly made English muffin.
I decided to make a multi-grain version this time. I used spelt flour, but you could use whole wheat flour instead. Here is the recipe. If you only have white flour, you could use it for all the flour in this recipe.
Multi-Grain English Muffins
2 packages yeast
2 ½ -3 cups bread flour
1 ½ c. spelt flour, or whole wheat flour
½ c. oat bran
¼ c. wheat germ
2 T. sugar
2 t. salt
2 c. milk
¼ c. oil
Cornmeal
In large bowl combine yeast, 1 cup of the bread flour and remaining dry ingredients. Warm milk and oil and add to flour mixture and beat 3-4 minutes. By hand, stir in enough flour to make a moderately stiff dough. Turn onto floured surface and knead until dough is smooth and elastic, about 8-10 minutes.
Place dough in greased bowl and turn to grease top. Cover and allow to rise until doubled, about 1 ¼ hour. Punch dough down and allow to rest 10 minutes. On lightly floured surface roll dough to just under ½ inch thick. With 4 inch biscuit cutter cut out rounds of dough, re-rolling and cutting scraps. Dip both sides in cornmeal and cover, allowing to rise about 30 minutes. In ungreased griddle pan or skillet cook muffins over medium heat, turning frequently, until they are golden on both sides and cooked through. This will take about 20-25 minutes. To serve, split and toast. Makes 12-15.
Note: I used a 3-inch biscuit cutter and ended up with over 20 muffins.

“Baking” the muffins
Pantry Cooking- Stir Fry


At a time when a lot of us are relying on our pantries for dinner, I thought I would share another favorite go-to for me. That is the stir fry. Whenever I have to make dinner last minute, stir fry is my meal of choice. I consider stir fry one of the three S’s of pantry cooking- soups and salads being the other two.
You can stir fry in a skillet, but I prefer to use a wok. Whatever vessel you use, the cooking method uses high heat and relatively short cooking times. The results are tender meats and crisp, colorful vegetables.
When trying to get that restaurant quality dish, keep in mind that in commercial Asian kitchens the fire is much hotter than you will get at home on the range. Do the best you can.
Stir fry might seem like an odd choice, if fresh veggies are getting low. Truth is, you can use all sorts of veggies in a stir fry, when you need to.
It is also a chance to use up some of those sauces you picked up at the Asian grocery store, always meaning to try.
Start with the veggies. I am trying to stick with fresh veggies you might still have around. Onions are a great choice, along with carrots, celery, cabbage, sweet peppers, broccoli and sweet potatoes. You can also use frozen veggies. Thaw them first, to drain off excess water. Save that liquid, you might want to use it in the sauce later. Don’t overlook canned veggies. Water chestnuts, bamboo shoots, baby corn and straw mushrooms are all fun to add to a stir fry. Almost any veggie can be added. Think outside the wok!!
Don’t limit yourself to traditional stir fry veggies. Spinach, Brussels sprouts, chard, kale, asparagus, cauliflower, tomatoes can all join the party.
To prep the veggies, get them sliced or chopped into bite sized pieces. The general rule in wok cooking is that the veggies that take the longest to cook, go in first. You keep adding more veggies, based on length of cooking time. By adding them gradually, the wok or skillet also keeps it’s high temp better. Throwing too many veggies in at once may result in a build up of water. Then you get more of a stir “simmer” than a stir fry. No one wants that. Heat oil in the wok first. Then start to add your veggies. Once the veggies are all cooked, remove them to a dish while you cook the protein.
I always get asked about which oil to use in a stir fry. Easier to tell you which oil not to use. The one you probably have, that isn’t best for stir fry is olive oil. I love olive oil, but it has a low smoke point. That means it smokes at a lower temperature than other oils. It can also catch fire at a lower temp. Sesame oil is a finishing oil. You drizzle it in at the end of cooking. Don’t fry in it, either. I love avocado oil for stir fry. High smoke point and neutral flavor. Don’t freak out if you don’t have it. Use the oil have, it will be fine.
You’ll need a protein. Get creative here, too. Chicken, beef, pork, shrimp, are all great. You can also use ham, fish, ground meat, (maybe in little meatballs), sausage, eggs, tofu, beans ( like kidney or chickpeas), canned clams or crab meat, canned salmon, venison, duck, lamb.
If your protein is already cooked, just toss it in at the last minute. to heat it through. No need to remove the veggies from the wok first. This a great way to use up leftovers. You can do combinations of proteins if you don’t have enough of one. Maybe a couple of chicken drumsticks, cut up, and a can of crab.
Odds are though, that your protein will need to be cooked. As with the veggies, make sure it is cut up into bite sized pieces. Once the veggies are out of the wok, add a little more oil and add you protein, tossing to cook quickly and evenly. If you have a lot to cook, you can cook the protein in batches, to prevent your pan from losing too much heat.
If it is a last minute dish, just go ahead and cook it up. If you have the time, marinading your protein can give you a very pleasant surprise. When I plan ahead, I like to marinade my chicken, pork beef or lamb in a combination of sherry, soy sauce and cornstarch. The meat is cut into slices or thin strips, placed in a bowl and the marinade ingredients are added. Cover and place in the fridge overnight. It really makes the meat tender. a quick note about sherry. Don’t use cooking sherry. Cooking sherry is laced with salt and is icky. Just use a plain old bottle of sherry- not cream sherry, either. You don’t need an awful lot of the marinade. Just enough to toss the meat in.
Once the protein is cooked, the creative part really starts. First, return the veggies to the wok. Then you need to season your dish. Traditional Asian sauces and condiments are the natural choice. Use them if you have them. Soy sauce, oyster sauce, fish sauce, gochujang, sriracha, sesame oil, hoisen are all popular choices. Some are very salty, so use with care. You can always add more.
As you season your stir fry, you might also want a sauce, rather than just seasonings. In a small bowl, mix about a tablespoon of cornstarch- or rice flour- with 1/2 cup of cool liquid. Could be water from drained veggies or a little chicken stock. Stir until cornstarch is dissolved. Once your stir fry is seasoned, add the cornstarch mixture. It will thicken up and make a nice sauce. You can add more liquid/ cornstarch depending on how much sauce you want and how much stir fry you are making.
What to do if you don’t have a lot of traditional Asian sauces? Well, you probably at least have soy sauce. Start there. Any hot sauce is a great addition along with garlic in some form. Ginger is also a good choice. Think of the sweet/sour profile in a lot of Asian foods. Vinegar, citrus juice or even pickle juice can add a nice dimension to your sauce. If you are going sweet and sour, balance the sour with sweet. You can use sugar, any type, or honey, fruit juices, jam or just fruit. Besides, you don’t have to stay Asian with your stir fry. Season it with what you like. Call it fusion cuisine and you’ll sound like a pro!!!
We aren’t done yet. There are other ingredients you might want to add. Peanut or almond butter, pickles, olives, capers, pickled peppers are likely hanging around your fridge or pantry. All of them can add some flavor to your dish. Green onions are nice finish. I chop green onions and freeze them. That way I always have them to top off a dish. Use them if you have them. My chives are up now, so I could use chives instead. Look outside. If you have an herb garden, your perennials are probably up by now. Mint is a nice addition. Nuts are a fun way to finish off your stir fry. Toss a handful of peanuts or cashews in as the last minute, right before serving.
Once it is all done, the protein cooked, the sauce made and the veggies returned to the wok, you are ready to eat. You can serve it as is, or you can serve the stir fry over cooked rice, which is traditional. Get the rice cooked ahead of time, then just reheat before serving. I use my microwave to cook the rice and to reheat it.
You can also serve your stir fry over cooked pasta. Angel hair or rice noodles are great. Use what you have. You could put some of your stir fry in a tortilla and roll up. An Asian inspired wrap. Why not?
Here are some not-so traditional wok recipes. Enjoy!!
Sesame Cauliflower Stir-fry
1/4 c. sesame seed
2 T. each oil and butter
1 small onion, chopped
1 medium cauliflower, broken into florets and sliced
1/4 c. water or broth
1/2 c. sliced green onions
1/4 c. chopped parsley
salt and pepper to taste
lemon wedges
Warm wok over medium heat and add sesame seeds, stirring until they are lightly toasted. Set seeds aside. Heat pan and add oil and butter. Add onion and cook over medium high heat until onion wilts. Stir in cauliflower and stir-fry 1 minute. Add water or broth and cover and cook about 2 minutes. Cauliflower should be tender-crisp. Add green onions, parsley and reserved seeds and season to taste. Cook 1 minute then serve with lemon wedges on the side. Serves 6-8.
Mexican Corn
2-3 c. fresh corn cut off the cob, or frozen
1 sweet red pepper, seeded and diced
1 t. each cumin, chili powder and dried oregano
1/2 t. ground coriander
salt to taste
1/4 t. red pepper flakes
1 T. fresh chopped cilantro
In small amount of water in wok, heat corn through. Add all ingredients but the cilantro and heat through and simmer until water is gone. Stir in the cilantro and cook until it is wilted, about 2 minutes. Serves 4.
Curried Mixed Vegetables
2 T. olive oil
1 large onion, cut in chunks
2 cloves garlic, minced
2 medium carrots, peeled and cut into chunks
2 ribs celery, trimmed and cut into chunks
2 c. chopped cabbage
2 small zucchini, trimmed and cut in chunks
1 sweet red pepper, seeded and cut into chunks
1 sweet yellow pepper, seeded and cut into chunks
salt to taste
2 t. curry powder
1/4 t. cloves
Heat oil in wok. Add onion and stir-fry until tender. Add the garlic, carrots, celery and cabbage and stir fry until vegetables are tender. Add remaining ingredients and cook, covered, over low heat until all vegetables are tender, about 10-15 minutes. Add more curry powder if you like. Serves 6-8.
Chicken Cordon Bleu Stir Fry
1 lb. boneless, skinless chicken breast
1 T. each cornstarch and sherry
3 T. oil
6 oz. cooked ham, julienned
¼ t. white pepper
2 T. dry bread crumbs
1 c. shredded Swiss cheese
Cut chicken into julienne strips and mix with cornstarch and sherry. Heat oil in wok: toss in chicken and stir-fry for 3-5 minutes. Add ham and stir-fry for about 30 seconds. Stir in white pepper and bread crumbs. Sprinkle with shredded cheese, cover, and let stand until cheese has melted. Serves 4.
Peanut Soup


This is one of the easiest soups I make. It is also one of my favorites. It’s a rich soup with a creamy texture and just a hint of heat. You could make it spicier, of course. The recipe is very versatile. As written, the soup is vegan, but you could make it with dairy or a meat based stock, if you prefer.
If your only experience with eating peanut butter is on a sandwich or in cookies, you might be surprised at just how good this soup tastes. I have made it with almond butter. If you don’t have peanut butter, the almond butter works fine. Other nut butters would also work. but I still prefer it made with peanut butter. It freezes well, too.
Peanut Soup
2 c. chopped onions
1 T. oil
cayenne pepper to taste
1 t. grated fresh ginger
1 c. chopped carrots
1 c. chopped sweet potatoes
1 c. chopped white potatoes
5 c. vegetable stock or water
1 c. tomato sauce
1 c. smooth peanut butter
1 T. sugar, optional
1 c. chopped green onions
Sauté onions in oil until tender. Add seasonings and carrots and sauté 3 minutes more. Add potatoes and stock and simmer until vegetables are tender. Puree soup in blender in batches until smooth. Return to pot and add tomato sauce and peanut butter. Add sugar if soup is not sweet enough. I never add the sugar, but some people do. Warm gently and serve with green onions on top. You could also top with chopped peanuts, for a little crunch. Serves 6-8.
Pantry Cooking – Soups


I want to do something to help people get though this. I thought about posting a recipe using my pantry items, but it occurred to me that unless you had the same stuff as what is in my pantry, it might not be that helpful. So I came up with a different idea. More general information to help you get the most out of what you have on hand.
The 3 S’s
When it comes to meal planning remember the three S’s- Soups, Stir Fries and Salads. All of these are dishes that give you room to get creative, use what is on hand, and use up almost any type of leftovers. We’ll start with Soups today.
Soups
By definition, you’ll need some sort of liquid to make broth for the base of the soup. I won’t assume you have piles of bones hanging around to make a stock. So what might you have? Roasting a chicken? Cut meat off the bones to serve, and save the carcass. People do that all the time with turkeys at Thanksgiving. Those bones will make a great soup. Same with bones from steak, roasts, anything really, even spare ribs. Ham bones are a classic to make stock.
No bones? Do you still have a corned beef to be cooked? The water the corned beef is cooked in can be used as a base for soup. If it it too salty, just dilute it with water. Other non- bone sources for stock might include tomato juice or the cooking water from vegetables.
Think about that last one. You might cook veggies by either boiling or steaming them. Before you toss the cooking liquid- that water has picked up flavor from the veggies. Save it to use for later. You can use it again, to cook more veggies, to give your water even more flavor. Now you can add your veggie water when making soup stock for more flavor.
Pan drippings are a great source of flavor for soups. When you finish cooking a roast, you will have those lovely brown bits in the bottom of the pan. They actually have a name. They are called the fond. Add water to the pan and heat up over a medium low flame. Scrape as much as you can off the bottom of the pan. You can de-glaze with wine or sherry, if you prefer. Pour through a strainer into a heat proof container and let cool down. You can remove the fat from the top later. Store in the fridge for a few days or freeze to use later. The drippings don’t have to just be from meat sources. If you roast veggies, you will have similar brown bits. Get those flavors out of the pan the same way.
Try to use as many of the aromatics as you can get your hands on. They will help to give you a richer stock for your soup. Aromatics would include onions, carrots, celery, garlic, sweet peppers and herbs. If you don’t have a lot of extra veggies to make your stock, use the parts you might normally toss. It’s going to be strained out anyway, so use everything that gives flavor. Use the carrot peels, celery tops, onion and garlic skins, herb stems, cabbage cores, you get the idea. If you are peeling onions or carrots or potatoes and can’t use the peels right away, start a “soup bag” for the freezer.
To actually make your stock, place all the ingredients in a pot and add water, if needed. Simmer together for at least a few hours. Crock pots can be a great place to let stocks cook away. If you are lucky enough to have raw bones, you can roast them first, before adding to the stock pot, or brown them right in the stock pot. I am assuming you don’t have access to lots of bones, so I am working on the idea of making soup stock without them.
Once you cooked all the flavor out of your ingredients, strain your stock and add salt and pepper to taste. Now you can use it to make any number of soups. If you want more “stock” you can add other liquids to your soup like tomato juice, milk, coconut milk, rice milk, oat milk…. you get the idea.
You’ll want some protein for your soup. Diced up meats are traditional, but you can use, sausage, mini meatballs, cooked bacon (save the grease), tofu, eggs (egg drop soup) , dry peas or beans, lentils, nut and nut butters. You want to think outside the box.
Add veggies you have around. This is great time to check out what is in the fridge, freezer and pantry. Soups are a great place to use up that bit of leftover green beans from dinner last night or the can of corn whose expiration date is coming up.
I like my veggies to still have some texture to them, even in soup. Some vegetable that hold up well are carrots, onions, cabbage, turnips, parsnips, beets. You might see a pattern. For the most part, root vegetables hold their shape and texture even in long cooking. Vegetables that require less cooking can be added later. Greens like spinach and escarole or kale, and veggies like broccoli, cauliflower and sweet potatoes all cook pretty quickly. Add later to keep them from falling apart.
I feel like tomatoes deserve special mention. Canned tomatoes, in so many forms, can really make your soup better. From juice, diced, whole, sauce and even tomato paste. In different amounts, tomato products can add a lot of flavor to most any soup. Same for fresh tomatoes. If you feel like your soup is in need of a punch, consider adding tomato in some form.
Don’t be afraid to add seasonings in the form of herbs and spices. Hot sauce is always a fun addition. Sometimes, you can add a little zip by adding less common ingredients- perhaps a splash of vinegar or some lemon juice. You might be surprised at how a little acid can brighten up your soup. Taste as you go, and adjust until your soup is just what you want it to be.
When it come time to add carbs like pasta, rice, barley it really will depend on what you have and what you like. With the exception of minestrone or Italian Wedding soup, I keep my noodles out of my soup, until ready to serve. I find for classic chicken noodle soup, the noodles get mushy if added to the whole pot of soup. Cook your noodles according to package directions, then let everyone add noodles to their own bowls and ladle in the hot soup. For rice that is being cooked in the soup, add less than you think. The rice is going to cook and swell and absorb liquid. You still want soup in the end, not a rice casserole. A rounded half cup of raw rice for every two quarts of soup should be about right. Same for barley. You can make spaetzle, if you don’t have other pasta around. Here is my recipe.
Spaetzle
3 eggs
1/2 c. half and half or evaporated milk
1/2 t. salt
1 1/2 c. flour
Combine all ingredients and let rest 30 minutes. Drop by small spoonfuls into boiling water. Cook until they float and puff up, about 5 minutes. I use a spaetzle maker, which produces smaller pieces. I only cook them a couple of minutes. Drain and serve with soups, stews, sauces or buttered. For the paprikash, I browned the spaetzle, after cooking, in a butter- oil mixture. I also tossed in some fresh parsley at the end.
Another option is to make a pureed soup. Toss all your veggies into a pot, let them cook until very tender, and then puree until smooth. I often make pureed soups using a ham bone or smoked turkey to flavor the soup. Once the soup is cooked, I remove the bone/meat, and puree the soup. Then I remove and cut up any meat from the bones, adding them to the soup.
Think about the color of your ingredients before you make a pureed soup. Once pureed, the colors mix. I try to pick a dominant color for a pureed soup. Over the years, I tend to make orange, green or pink soup. Orange soup would have carrots, winter squash and/or sweet potatoes as the main vegetables. Green soup relies on spinach, broccoli and green beans for it’s color. Pink soup is made with beets, but I think you already figured that out. Even if your soup color turns out kind of brown, it should taste good, but I like it to look good, too.
After all the talk about making a soup stock from scratch, you can make your own vegetable soup base. It keeps for ages and ages. You just add a spoonful or two to water to make vegetable broth.
You might not be able to find all of the ingredients, but even if you get most of them, you should be able to make a really good veggie stock.
I make a vegetable soup base that is a mixture of vegetables, both fresh and dried, herbs, mushrooms, nutritional yeast, spices and salt. There is pretty good amount of salt, but I wanted to be able to store it in the fridge and be safe.
It worked out that every teaspoonful of the finished base has less than 1/4 teaspoon of salt. Not great, but a lot less than bouillon cubes.
If you want to make yours with less salt or no salt- you’ll have to freeze the mixture in ice cube trays and take it out of the freezer as needed. Sort of like your own bouillon cubes.
The nice part is, I can now make a vegetable soup easily and I know exactly what is in it. It can also be added to chicken or other meat-based stocks, in place of the salt, to add extra flavor.
Homemade Vegetable Soup Base
4 carrots, peeled and cubed
3 celery ribs, washed and cubed
1 large sweet onion, peeled and cubed
3 green onions, washed and cut up
1 c. sun- dried tomatoes, soaked in water 30 minutes, and drained
1 c. dried mushrooms, soaked in water 10 minutes and drained
1 c. chopped cabbage
1 c. parsley, chopped
1/2 c. chopped sweet pepper
1/4 c. nutritional yeast, optional
2 T. turmeric
8 oz. salt- I used sea salt and used a scale to weigh it. It’s around a cup but will differ if you are using a coarse salt
Combine all ingredients, except the salt, in a food processor and blend until smooth. I have a decent size Cuisinart and still had to do this in batches. Combine in a bowl with the salt and stir well to blend. Store in a clean jar in the fridge until ready to use. I ended up with about 5 cups of soup base. To use, add about 1 teaspoonful to a cup of hot water for vegetable broth. Use less or more according to your taste. Use in place of salt in other soups, stews and sauces.
I hope this has been helpful. Don’t be afraid to just use what you have around when it comes to soup. Taste as you go, you can always add more, but it is hard to take out what you’ve added too much of. Check though your pantry, fridge and freezer for ingredients that might be a nice addition to your soup. Be creative and try to have fun. We could all use a little fun right now.
Stay strong- we will get through this.


